
I don’t know… Sadly it never made it. With this storm just about on top of us, I am not sure if it will get here today. And, if it does I doubt I will transport it to my house in this weather. The sump is a foot longer than the bed of my truck. I think it will be Friday before I get to it now. Sigh…Well, how did that heavy pallet look during offloading?

Navigation
Install the app
How to install the app on iOS
Follow along with the video below to see how to install our site as a web app on your home screen.
Note: This feature may not be available in some browsers.
More options
You are using an out of date browser. It may not display this or other websites correctly.
You should upgrade or use an alternative browser.
You should upgrade or use an alternative browser.
The Dry Reef - What's old is new! 96x36x25 Peninsula
- Monster Build
- Thread starter WhatCouldGoWrong71
- Start date
- Tagged users None


Have fun or go home…Just so you know, I think you're a bit insane haha.
How much water do you plan to cycle out as change per week? It seems like you're gearing up for "shxtloads".
50-60 gallons a week on AWC is the plan. I can store up to 500g mixed if I needed to. I am planing on 24/7 AWC with 2 Versa.
I finally received the XR30 brackets. I modeled one up last night, and these will work nicely. However, Uber disappointed in working with this person. That’s $250 worth of plastic brackets just tossed on the side of a box, plus my XR30 pressed up against the other side (I shipped this in a bigger well packed box…). While the actual work product appears to be good (if the other 10 are like the first 2 I tested). But, nothing else about this transaction would want me to promote him to anyone. He is a popular YouTuber. I do plan on doing actual review segments on many different products and or services I have used during this journey. I need to find out what the TOS are for leaving vendor feedback here in this thread. I’m doing this on my Insta, so for certain it will be there unedited. I just know this place can be goofy with paying vendors and feedback that applies to those vendors. Or so people complain about that scenario. I have actually had my hands slapped in the past, so I need see first.
Attachments
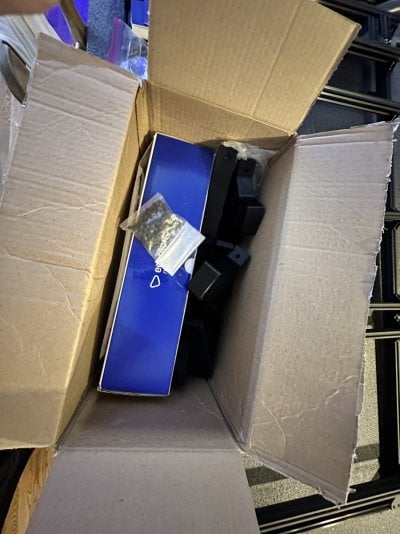

If you have feedback to share regarding a vendor that is facts and not driven by emotion I think it should be said for sure. If this forum is about silencing that, then there's problems for sure.
- Joined
- Dec 5, 2019
- Messages
- 32
- Reaction score
- 22
Following very very closely ... Look at what you have created, look back at my "plans on paper" - check, check, oh change that...I’ll be using these for the bottom closed loop. I’ll plumb 9 - 3/4” RFGs powered by an Abyzz A400. Man that 2” Hayward bulkhead is huge! I am want to minimize the height some, I purchased an extra 4 way just in case. I’m going to cut the attachment in half. I want to try and take as much height out of this as possible. The Haywards are large to begin with. Thanks Antonio for this great design!! @Vivid Creative Aquatics
I am jealous I am not in Chattanooga. But I will be traveling for work Monday and wanted to get some stuff done with this build.
I am taking the same CLS approach, recently changed to 2 holes on the bottom.
I am really wanting to see the details on the other Closed Loop you mention - placement of holes, use of RFGs, pump and size.
I'll keep reading before asking questions.
Again - thanks!
- Joined
- Dec 5, 2019
- Messages
- 32
- Reaction score
- 22
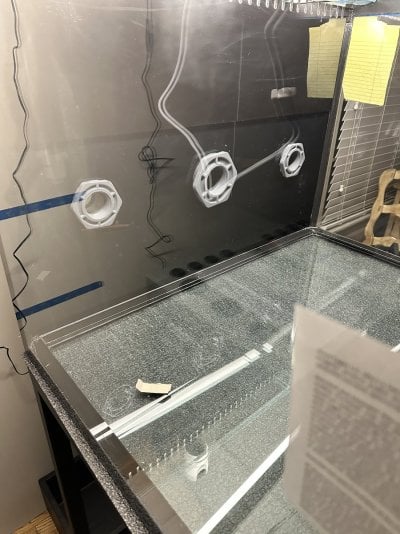
I am walking with you on this. This is exactly what I asked about on another thread today. Using that Waterway manifold and getting the profile as LOW as possible.Started plumbing in the lower closed loop. The 2” true union ball valve is huge, and heavy. I have about 7 inches between the overflow box and my wall. I have about 15 inches between the back of the tank and my wall. I think I am going to have to go straight from the 2” bulkhead directly to the wall with a 90. From there I need tie the pipe to the wall in order to remove the downward force that will be on the 2” bulkhead. The 3 bulkheads on the back wall need to be supported so that the bulkhead isn’t holding the pipe up.
For the loop underneath, I am going to run plexiglass from the white spill catch I made up to the bottom of the tank. I plan to also cut a drain hole in the white box and plumb it to the drain, along with a sensor in the box. Got a lot done, just can’t complete many things as I am missing many things that are delayed getting to me.
The photo below is my copy of what Than from Tidal Gardens created. Until I ran across the Waterway manifold.

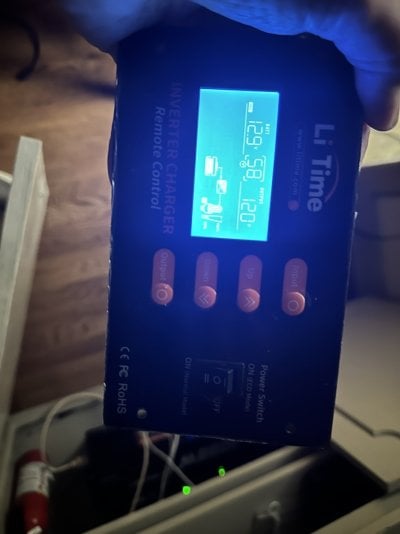
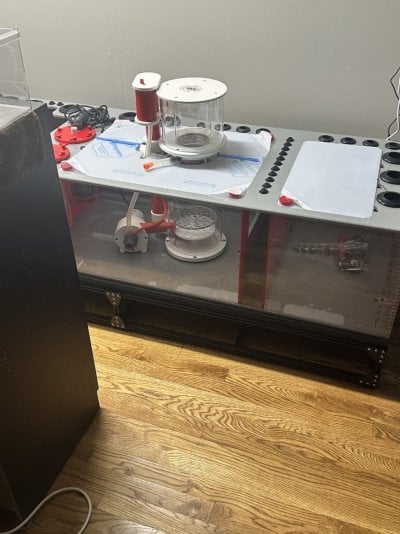
What a couple days. Been without power for the better part of 30 hours. I’ve lost most of this week to either lack of parts or simply no power, lol. However, the tanks did great on the LiFePO4 batteries. Really impressed with this setup. This was after about 24 hours:
Attachments
So, this showed up yesterday but I couldn’t pick it up until today. Man, Geo is first class all around. I’ve got a bunch of his equipment that I have been running and plan to review everything here and on my IG. The guy is not only a class act, a true craftsman at his trade but he likely has a PhD in packing. I think he should give classes on the proper packing techniques. Now, take a look at this sexy beast. Good lord am I happy with this. So, if you are wondering all the holes:
1) full siphon to roller 1
2) full siphon bypass via gate valve
3) Frag 1
4) Frag 2
1-4 1/4 inch for AWC (1-2 out, 3-4 in)
Notch between 1&2 frag 1 e drain (extra loud)
Notch between 3&4 frag 2 e drain (extra loud)
5) Secondary 1
6) secondary 2
7) e drain
The next 4 1/2” are reactor out
The next four 1/2” are reactor return
3 return pumps
I had the cryptic built after this was in production. I’ll need to figure that out. But, that will be a walk in the park.
Last edited:

Sadly when I built the stand, I forgot about the height of the frag tank plumbing. I was gauging the height by the plumbing from the display. So, there will be very limited storage now under the sump. I think the sump will be about 8-10” off the ground. It’s 19” now.
What size inlet does that have? Is your A1200 going to power the two bottom holes only? Are those 1” lock line?I am walking with you on this. This is exactly what I asked about on another thread today. Using that Waterway manifold and getting the profile as LOW as possible.
The photo below is my copy of what Than from Tidal Gardens created. Until I ran across the Waterway manifold.

These are my CLS intakes. The center is 2” and feeds the A400. From there it is 1.5” to both holes, which are both 1.5”. The 5 hole waterway is 2”, and I reduced it down. The 4 hole is 1.5”. The 5 hole I am going to be able to take about 5/8-3/4” off the top height to lower it some. I’m playing with those to get the height lower. The Hayward Bulkheads I am using are pretty stout and lift it about 3/8 of an inch too.
The holes on the left and right are 1.5”. Each one of those will feed a L2. Each L2 will feed 1.25” pipe that will go to 2 sea swirls each. So each L2 will ultimately feed two 1” RFGs at the end of 2 Sea Swirls. I’m not crazy about how far into the tank the swirls go, but I am working with Ed on some ideas there. I am also trying to figure out how I want to plumb my UV. I really only use it 1) when I introduce new fish and 2) if I get free floating Dino’s. The problem is, for Dino’s, I should plumb them into my closed loop. But for parasite control, the low speed of my return L2 (that’s the 3rd L2) is ideal. So, I am really not sure yet what to do with that.
Attachments
Yeah, I am not sure if they will be fully covered or not. We are not negative scape people. We like mountain ridges with caves. We have always felt that having lots of caves for fish to hide removes a ton of stress for them. We also know that if an outbreak happened, that we would never get anything out and we’ll, ultimately this is a coral tank with worker bees along for the ride.Anxious to see how you cover with rockwork these loc line risers from your CLS outputs.
I am using TBS sand and additional TBS rock. I do think that I am going to glue sand to the waterways though. To give them texture and such. Glueing sand and maybe some rock bits to them should help them blend in better. I know they will turn purple pretty quick, but, I may be able to hide those man made curves by rolling them in aquarium silicon and then sand and rock.
Very cool update thanks.
When I look at that, admittedly awesome looking sump, all I can think of is how hard it'll be to clean all those hard to get to corners etc under the lid I assume you can't take off. :x
I wonder if you could place an entire rock plateau directly on top of at least 1 of those 4-port exhausts, and turn it into a rock pillar to hold it up.
- Joined
- Dec 5, 2019
- Messages
- 32
- Reaction score
- 22
Wow! Work of Art!So, this showed up yesterday but I couldn’t pick it up until today. Man, Geo is first class all around. I’ve got a bunch of his equipment that I have been running and plan to review everything here and on my IG. The guy is not only a class act, a true craftsman at his trade but he likely has a PhD in packing. I think he should give classes on the proper packing techniques. Now, take a look at this sexy beast. Good lord am I happy with this. So, if you are wondering all the holes:
1) full siphon to roller 1
2) full siphon bypass via gate valve
3) Frag 1
4) Frag 2
1-4 1/4 inch for AWC (1-2 out, 3-4 in)
Notch between 1&2 frag 1 e drain (extra loud)
Notch between 3&4 frag 2 e drain (extra loud)
5) Secondary 1
6) secondary 2
7) e drain
The next 4 1/2” are reactor out
The next four 1/2” are reactor return
3 return pumps
I had the cryptic built after this was in production. I’ll need to figure that out. But, that will be a walk in the park.
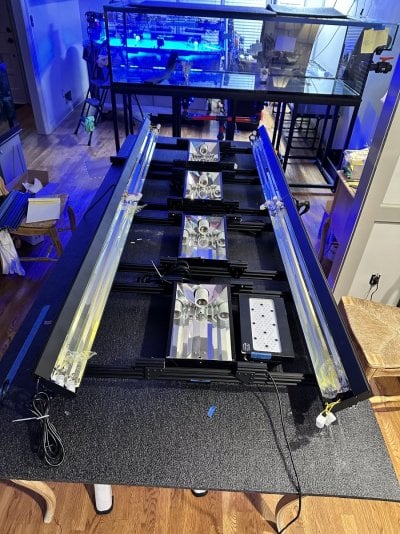
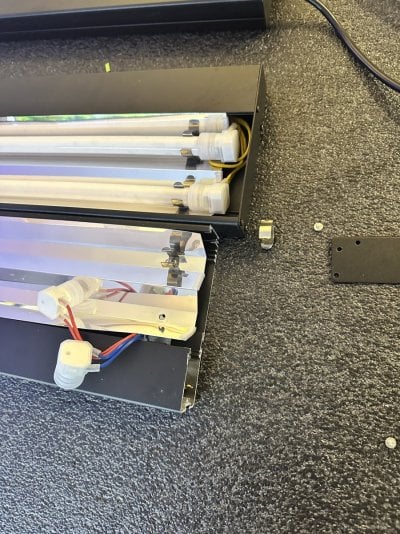
I’m almost embarrassed to say how many hours I have in the entire lighting assembly, lol. It’s amazing how custom almost every single detail is. I even cut the fluorescent fixtures down to give more clearance to the over head plumbing for 2 of the closed loops.
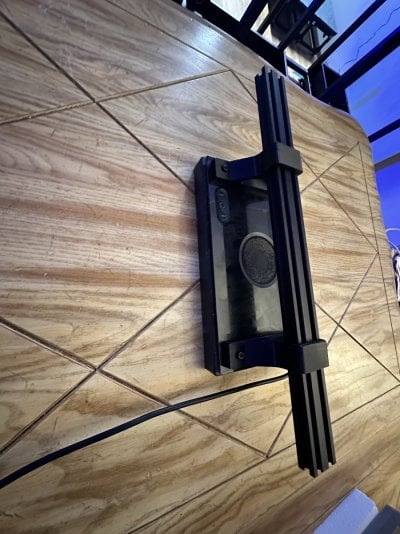
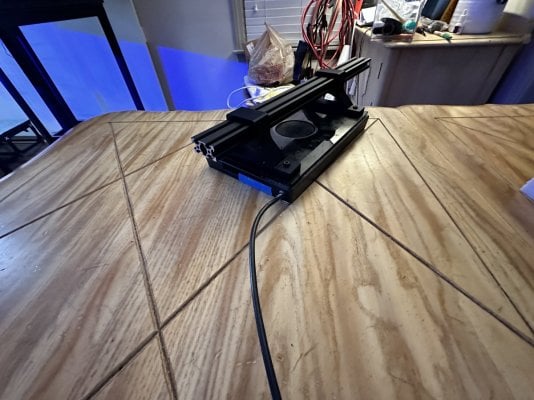
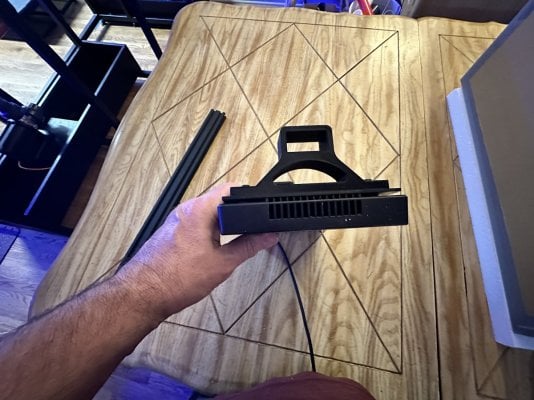
I need to add the 8 XR30s. I’m going to put these up when the rack is suspend from the rails this week. They are going to fit nicely. They are nearly flush with the MHs. What really worked out well was I had to remove ReefBrite XHOs, but the bracket that held them worked perfectly as it attached right to the Tslot.
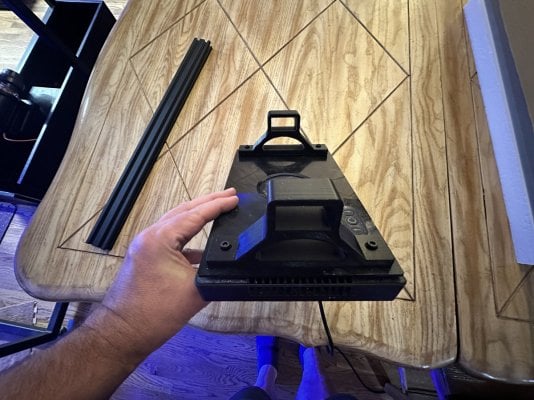
Here are some pics of the brackets I had made for the XR30s. They are made to use 2040 Tslot. I’ll also be changing the lenses on these XR30s to the high intensity ones as my lights will be 14”-15” above the water.
I need to add the 8 XR30s. I’m going to put these up when the rack is suspend from the rails this week. They are going to fit nicely. They are nearly flush with the MHs. What really worked out well was I had to remove ReefBrite XHOs, but the bracket that held them worked perfectly as it attached right to the Tslot.
Here are some pics of the brackets I had made for the XR30s. They are made to use 2040 Tslot. I’ll also be changing the lenses on these XR30s to the high intensity ones as my lights will be 14”-15” above the water.
Attachments
- Joined
- Dec 5, 2019
- Messages
- 32
- Reaction score
- 22
Suction/inlet side of the pump - 3.5" through the back wall. 2 outlets through the bottom of the tank which are: 3" pipe (Hayward bulkhead), gets reduced to 2" (Bushing) in order to accommodate the 1.5" waterway, and into the 1.5" waterway is 4 or 5 Loc lines that are 3/4". Just 1 of the Loc line sets sitting in the waterway is 23-24" in diameter. Pretty big. Hayward bulkheads, definitely. If I could get/find a 2" waterway w/ 4 or 5 ports, I'd go that route and skip the 2" redux bushing.What size inlet does that have? Is your A1200 going to power the two bottom holes only? Are those 1” lock line?
These are my CLS intakes. The center is 2” and feeds the A400. From there it is 1.5” to both holes, which are both 1.5”. The 5 hole waterway is 2”, and I reduced it down. The 4 hole is 1.5”. The 5 hole I am going to be able to take about 5/8-3/4” off the top height to lower it some. I’m playing with those to get the height lower. The Hayward Bulkheads I am using are pretty stout and lift it about 3/8 of an inch too.
The holes on the left and right are 1.5”. Each one of those will feed a L2. Each L2 will feed 1.25” pipe that will go to 2 sea swirls each. So each L2 will ultimately feed two 1” RFGs at the end of 2 Sea Swirls. I’m not crazy about how far into the tank the swirls go, but I am working with Ed on some ideas there. I am also trying to figure out how I want to plumb my UV. I really only use it 1) when I introduce new fish and 2) if I get free floating Dino’s. The problem is, for Dino’s, I should plumb them into my closed loop. But for parasite control, the low speed of my return L2 (that’s the 3rd L2) is ideal. So, I am really not sure yet what to do with that.
After seeing how much room they take up, I decided to scrub an earlier design where I laid out (4) 3" outlets plumbed to tank bottom. The plumbing got complicated and the sheer size and number of these Loc line sets was too much.
Reading through your write up I thought you have a good idea of a 'helper' closed loop. I modified my design. Since I dropped to (2) 3" outlets on the main Closed Loop, I added them back as (2) 1.5" outlets in bottom, staggered, with rockwork running between them, to create a random cross-surge. A "helper" closed loop sub-system.
They will fed by smaller pumps (Vectra or Abyzz), which ever can push water from basement to tank.
My goal is to keep all the mechanics out of the tank and moved to the basement if at all possible.
That 5 port I am using on the short side of my tank is a 2”, FYI. The 4 port (and 2 port, which I have but will not be using ) are 1.5”.
Yeah, at the bottom of the 9th inning, I discovered that I could use the lower two holes to move water in the bottom half of my tank. I will use a L2 for two return lines with a reverse check valve dumping through RFGs about 8 inches off the bottom on the overflow side. Then the “helper” loops will have 2 L2s controlling the top half of the tank.
If I wasn’t 3 feet wide, I would be way more concerned than I am with covering these bottom waterways. Since I am consolidating 2 tanks and adding TBS rock, I am not going to be able to build a scape without water in the display. I also think 7 of my 8 feet or so will not go higher than 1/2 way with rock. I have what I think must be a couple thousand Zoas, lol. I am debating building a rock structure that comes with in 3-4 inches of the water line at the leak and turn this into a Zoa mountain. Will also break up my back wall as I think it may be “mechanically busy”.


Similar threads
- Replies
- 8
- Views
- 156

- Replies
- 14
- Views
- 868
- Replies
- 2
- Views
- 227
- Replies
- 4
- Views
- 88
- Replies
- 1
- Views
- 49


