SweetAlso forgot to mention....depending on the version of OS on the Raspberry Pi if someone is looking to run the "sudo i2cdetect -y 1" (or "sudo i2cdetect -y 0" for original Pi's) they may not have the tools pre-installed to run the command. To get the i2c tools in the Raspberry Pi just type...
sudo apt-get install i2c-tools
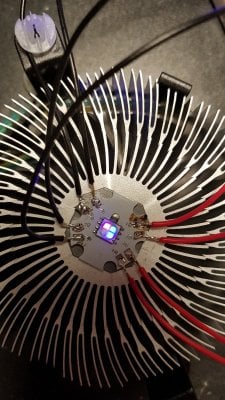
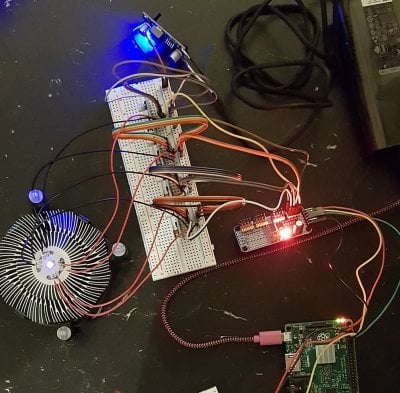
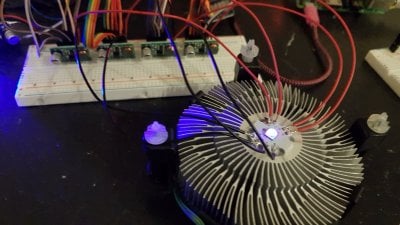
Now to finish building 300 watts of LED's fixture over 10 channels (parts all in were like $170 CDN; then on to stepper controlled dosing pumps and pH. I'll put up a build thread soon.
Navigation
Install the app
How to install the app on iOS
Follow along with the video below to see how to install our site as a web app on your home screen.
Note: This feature may not be available in some browsers.
More options
You are using an out of date browser. It may not display this or other websites correctly.
You should upgrade or use an alternative browser.
You should upgrade or use an alternative browser.
reef-pi :: An opensource reef tank controller based on Raspberry Pi.
- Thread starter Ranjib
- Start date
-
- Tags
- controller raspberry-pi
- Tagged users Ranjib
Hi where did you order the parts?Ledsupply or Rapidled?
Now to finish building 300 watts of LED's fixture over 10 channels (parts all in were like $170 CDN; then on to stepper controlled dosing pumps and pH. I'll put up a build thread soon.
Hi all. I'm new to all of this and I'm stuck on getting the temperature sensor to work. I never took any EE classes, so I'm fumbling my way through.
I have a rasp pi 3 with a ML hat v3, running reef-pi V 2.5
1-wire is enabled
temperature, equipment, and PCA9685 are all checked.
I can create equipment and lights with no problems, the leds on the hat will turn on and off.
When I go to create the probe on the temperature tab, the drop down for the sensor is blank.
I get one error in the logs:
Only other thing I don't know if it's normal or not: the leds on the hat labeled D40 and D39 are lit, just a tiny bit, all of the time.
Any ideas what I'm doing wrong?
Thanks!
Mike


I have a rasp pi 3 with a ML hat v3, running reef-pi V 2.5
1-wire is enabled
temperature, equipment, and PCA9685 are all checked.
I can create equipment and lights with no problems, the leds on the hat will turn on and off.
When I go to create the probe on the temperature tab, the drop down for the sensor is blank.
I get one error in the logs:
{"error":"Item 'usage' does not exist in bucket 'temperature'"} | HTTP 404 |
Only other thing I don't know if it's normal or not: the leds on the hat labeled D40 and D39 are lit, just a tiny bit, all of the time.
Any ideas what I'm doing wrong?
Thanks!
Mike
Hi Mikie25 ML board is perfect working for me but the wiring on the Temp sensor no good by factory.You connected as the color code by ML board is not working.Change the color at connection,
ML board Black=sensor yellow
ML board Yellow=sensor red
ML board red=sensor black
ML board Black=sensor yellow
ML board Yellow=sensor red
ML board red=sensor black
- Joined
- Apr 11, 2019
- Messages
- 32
- Reaction score
- 66
I've gotten most of my parts from aliexpress.com and buyapi.ca (I'm Canadian in the middle of no where so choices are few). I've gotten a few things from Home Depot, auto parts store, and local electronics store too...like the heat sinks, wires, solder, etc.Hi where did you order the parts?Ledsupply or Rapidled?
These are coverage LED's. I'll also be doing some spot lighting with something yet to be determined.
The specific LED stuff I've gotten are...
LEDs - https://www.aliexpress.com/item/32859370682.html?spm=a2g0s.9042311.0.0.27424c4dLqfF0u
Power Supplies - https://www.aliexpress.com/item/32948831075.html?spm=a2g0s.9042311.0.0.27424c4dLqfF0u
Drivers (just bought) - https://www.aliexpress.com/item/32828673347.html?spm=a2g0s.9042311.0.0.27424c4dLqfF0u
PCA9685 - https://www.aliexpress.com/item/32718274859.html?spm=a2g0s.9042311.0.0.27424c4dLqfF0u
the 404 usage error is benign. dont worry about it, it will go away once you have the sensor detected, after few minutes.Hi all. I'm new to all of this and I'm stuck on getting the temperature sensor to work. I never took any EE classes, so I'm fumbling my way through.
I have a rasp pi 3 with a ML hat v3, running reef-pi V 2.5
1-wire is enabled
temperature, equipment, and PCA9685 are all checked.
I can create equipment and lights with no problems, the leds on the hat will turn on and off.
When I go to create the probe on the temperature tab, the drop down for the sensor is blank.
I get one error in the logs:
{"error":"Item 'usage' does not exist in bucket 'temperature'"} | HTTP 404
Only other thing I don't know if it's normal or not: the leds on the hat labeled D40 and D39 are lit, just a tiny bit, all of the time.
Any ideas what I'm doing wrong?
Thanks!
Mike


Your sensor is not being detected. Check the ds18b20 circuit, if done right you should see the sensor appears as a device named 28-******* inside /sys/bus/w1/devices directory.
Given you are using the hat, this is likely wiring issue or worst case bad sensor
Hi Mikie25 ML board is perfect working for me but the wiring on the Temp sensor no good by factory.You connected as the color code by ML board is not working.Change the color at connection,
ML board Black=sensor yellow
ML board Yellow=sensor red
ML board red=sensor black
AWESOME!!! That fixed it. Thank you so much Janos!
- Joined
- Jun 11, 2019
- Messages
- 112
- Reaction score
- 155
Yes, it will work. I tested it before. now problem u can use this.
and u can also try this also http://www.veltisti.com/dcdc-led-la...rt-circuit-protection-module-12v28v-p-56.html
this is much cheaper than yours ...
I have tried these just at the weekend and it is working great!! Using a RGBW LED. On the picture I have PWM setting 1. Only the white will light up at PWM setting 5 (that is why it is off). I am still using Reef-Pi 2.4. I used these drivers:
https://www.aliexpress.com/item/-/32851499113.html?spm=a2g0s.8937460.0.0.50782e0eVkCksZ
Thanks Ranjib for the great work!!


What slicing software are you using ?Just finished a pi3 all in one build with 3d printed enclosure .

This one can do one temp sensor, one float switch , one kessil and one ph probe .

Similar to the last all in one build (I’m upgrading my builds to use 3d printed enclosures) this one has space for accessing pi 3 usb and hdmi ports


The electronics is very similar to other all in one build except it does not have the adj powerstrip control circuit involving 12v and uln2893a.

Overall pretty happy with the result . I used 3mm walls for this build , which made it pretty sturdy .
Here are both of my 3dprinted builds

Now back to 3.0 feature development ..
Anyone have suggestion for a more "elegant" approach to doing cutouts for Db9 connectors? I kinda went Freddy Krueger on my enclosure.....
Cura for slicing , blender for modeling , ended 3 stock setup for printing . I have octopi hooked into it for remote managementWhat slicing software are you using ?
FYI, it looks like in the photo you are over extruding and the temp is a little on the hot side. not sure if you knew this just my 2 cents..
I suspect some of those issue. Thank you for calling those out, I'm still learning. Currently spending most of my time in modeling. I went through some initial calibration, but I know they are far from tuned. They are just good enough to get the shape correct, I am sanding down things as and when needed.FYI, it looks like in the photo you are over extruding and the temp is a little on the hot side. not sure if you knew this just my 2 cents..
My intent is to learn it over the course of the next couple of years. Do PLA only for the first 5 filament rolls, and dial down flow rate, extrusion multiplier for my goto filaments by then.
Time is what limiting my efforts, and I am distributing my time across designing, tuning, plus all things software related. I'll keep posting the prototypes, and I would absolutely love if you keep on giving such awesome feedback
thank you again, folks like you make this place awesome
So, I think I've figured out what's keeping my dosing pump from running... To simplify things, I took one pump out of the equation, so I'm only using GPIO 18 for PWM & GPIO 15 & 17 for direction. I'm not getting any voltage output from my GPIO 18 pin no matter what I try.
Whenever I go to calibrate the dosing pump, I should be seeing *something* from that pin, right? Is there anything I have to enable in the settings to correct this?
Here's what I've got for Jacks:

That's all I should have to setup to control GPIO 18 & 19, correct? The direction "equipment" seems to be working just fine thankfully.
Whenever I go to calibrate the dosing pump, I should be seeing *something* from that pin, right? Is there anything I have to enable in the settings to correct this?
Here's what I've got for Jacks:
That's all I should have to setup to control GPIO 18 & 19, correct? The direction "equipment" seems to be working just fine thankfully.
Cura for slicing , blender for modeling , ended 3 stock setup for printing . I have octopi hooked into it for remote management
I'm curious, why are you using Blender, as opposed to something like Sketchup? Usually a CAD program like Sketchup or SolidWorks is better suited for this sort of modeling. Especially once you start getting into modeling things like holes for outlets.
Ranjib, just one thing if your going to have it near saltwater switch to PETG it has a little better resistance than PLA, it will string alot more than PLA but you can get it dialed in and It should come out Perfect. use a 20mm x 20 mm test cube for testing . Its cheaper and saves filament . If you have any questions on 3d printing or even design feel free to contact me any time.I suspect some of those issue. Thank you for calling those out, I'm still learning. Currently spending most of my time in modeling. I went through some initial calibration, but I know they are far from tuned. They are just good enough to get the shape correct, I am sanding down things as and when needed.
My intent is to learn it over the course of the next couple of years. Do PLA only for the first 5 filament rolls, and dial down flow rate, extrusion multiplier for my goto filaments by then.
Time is what limiting my efforts, and I am distributing my time across designing, tuning, plus all things software related. I'll keep posting the prototypes, and I would absolutely love if you keep on giving such awesome feedback(be my eyes)
thank you again, folks like you make this place awesome
When everything is set just right you should get this type of print.
Wow,.. thats awesome result.Ranjib, just one thing if your going to have it near saltwater switch to PETG it has a little better resistance than PLA, it will string alot more than PLA but you can get it dialed in and It should come out Perfect. use a 20mm x 20 mm test cube for testing . Its cheaper and saves filament . If you have any questions on 3d printing or even design feel free to contact me any time.
When everything is set just right you should get this type of print.

Yes, I intend to do exactly what you mentioned. My current thought process is to finish first 5 rolls of PLA over the course of next two months and learn more about the parts (hotend, heatbed) and operations and then switch to PETG. I already got an amazon basics petg spool, but I have to upgrade the bowden tubing to capricorn and may be swap the borosilicate glass heatbed with the original one before moving to petg. I am using ender 3.
On the design side, I am publishing the designs in thingiverse https://www.thingiverse.com/ranjib/designs . Currently they are very squary (using blender and applying my newly learned boolean modifier skills
Again, thank you for all your advice , I am enjoying 3d printing a lot. But Im stretched thin across software development, 3d printing, testing and actual circuit works... so just making little progress along different streams with a goal of 3.0 release in mind.
Blender is opensource, which is philosophically more aligned with reef-pi. It also has probably the largest community, so easier to find tutorial/resources. Last but not least, it's like reefing, very involved, complex and can grow with you. My hope is if I learn it right it will be useful and I can be hooked into it for years to come. As a side benefit, I can not only do the 3d printing, i can also render stunning images with material and light properties completely in my control. That will enable me to generate photorealistic images of builds, parts etc. Blender can do full-on animation also, I don't know how I may use it, but remember with the PWM control and arbitrary PWM profile, we can translate these profiles in kinetic models, in which case blender can actually simulate these using animation feature. I don't expect to learn any of that this year or anytime soon.. but just in case i venture.. theres that opportunity. Blender forces you to think the core 3d concepts and then its applications (3d printing, animations, rendering etc etc). I used to teach very basic blender in Pune university during my computer graphics course.. so there a bit of history/nostalgia as well.I'm curious, why are you using Blender, as opposed to something like Sketchup? Usually a CAD program like Sketchup or SolidWorks is better suited for this sort of modeling. Especially once you start getting into modeling things like holes for outlets.
Pin 18 not working? Thats pwm pin 0 right? check your dtoverlay configuration (/boot/config.txt) and then check the content of /sys/class/pwm/pwmchip0/pwm0/duty_cycle and /sys/class/pwm/pwmchip0/pwm0/period . Report back those details,So, I think I've figured out what's keeping my dosing pump from running... To simplify things, I took one pump out of the equation, so I'm only using GPIO 18 for PWM & GPIO 15 & 17 for direction. I'm not getting any voltage output from my GPIO 18 pin no matter what I try.
Whenever I go to calibrate the dosing pump, I should be seeing *something* from that pin, right? Is there anything I have to enable in the settings to correct this?
Here's what I've got for Jacks:

That's all I should have to setup to control GPIO 18 & 19, correct? The direction "equipment" seems to be working just fine thankfully.
stay with glass or just get a piece of mirror ( mirror Is the best), if you have a adhesion issue go to the dollar store and get some aqua net you will never have a problem. i have never used amazon filament the best PETG i have found over the years is made by Inland . the temp is around 240c so you would not need to change the tubing. I have built over 50 3d printers and have not had a problem with high temps as far as friction in the tubing print a filament dust and lube https://www.thingiverse.com/thing:3221154, you can use this one or search for more models. keep it simple....good luckWow,.. thats awesome result.
Yes, I intend to do exactly what you mentioned. My current thought process is to finish first 5 rolls of PLA over the course of next two months and learn more about the parts (hotend, heatbed) and operations and then switch to PETG. I already got an amazon basics petg spool, but I have to upgrade the bowden tubing to capricorn and may be swap the borosilicate glass heatbed with the original one before moving to petg. I am using ender 3.
On the design side, I am publishing the designs in thingiverse https://www.thingiverse.com/ranjib/designs . Currently they are very squary (using blender and applying my newly learned boolean modifier skills) , but functional. I want to make them smooth edgy (like apple products) eventually
. Let me know your thoughts., if this is a good plan.
Again, thank you for all your advice , I am enjoying 3d printing a lot. But Im stretched thin across software development, 3d printing, testing and actual circuit works... so just making little progress along different streams with a goal of 3.0 release in mind.
Similar threads
- Replies
- 2
- Views
- 241
- Shipping Available
- Replies
- 2
- Views
- 215


