I'm a buy once cry once guy, you've nudged me to my senses and the 300g2 it is. Now comes a few overtime shifts@WonkyWapiti I agree with Jenyphur. I currently run a 170 and a 300g2 and unless you just don't have the room I would go 300 all day long. The 170 is nice but it has no room in the cabinet and a 3ft tank vs 2ft just gives you so much more room in the display.
Navigation
Install the app
How to install the app on iOS
Follow along with the video below to see how to install our site as a web app on your home screen.
Note: This feature may not be available in some browsers.
More options
You are using an out of date browser. It may not display this or other websites correctly.
You should upgrade or use an alternative browser.
You should upgrade or use an alternative browser.
Jenyphur's Red Sea REEFER MAX 300 G2+ Build
- Thread starter Jenyphur
- Start date
- Tagged users None
Perfect! We can go through the ups and downs together.I'm a buy once cry once guy, you've nudged me to my senses and the 300g2 it is. Now comes a few overtime shifts
You can use simple switches like magnetic switches to turn on lights and other things with your Apex. Just like ATO switches etc ( open then on: closed then off)
I actually use a Ikea little light that is usb powered for my under cabinet lights
I actually use a Ikea little light that is usb powered for my under cabinet lights
Nothing too exciting to report on...got my Red Sea Doser 4 pump today and the Helio heaters. Wow...is that packaging ever nice!!! I think I will ditch the InkBird as I do get notifications from the Red Sea app if my temp goes out of range (which is essentially what I was using the inkbird for).
I thought my cycle was complete but apparently, it has other things in mind. I checked my numbers today and ammonia was at .28, Nitrite at 0 and Nitrate at about 5ppm.. So something is going on. Apparently 1/2 of my bacteria is on their game and the other half is slacking off a bit. No worries, I have lots of time before I want to add some clowns. Heading out of town next week for a few days. Will get my first inhabitants when I get back.
Speaking of clowns...I really want a bonded pair. I'm thinking Wide Bar Gladiator clowns. Does anyone have any advice or more info on them?
Shout out to Red Sea for getting me the larger pull-out panel VERY FAST! I can't believe it's here already. Now I have to figure out how to lay out all my 'stuff' on the board and get my hubby to drill some channels in it for the cables. Or maybe I just do the raceways so no need to drill. The one thing I am going to do is put some 2x 4 blocks behind the panel cleats to bring the panel out another 1 3/4". That way I have more room back there for the miles and miles of cords that come with all this equipment. I might even be able so put some of the power bricks back there now that I will have the extra room. Definitely not the LED ones...those things are massive.
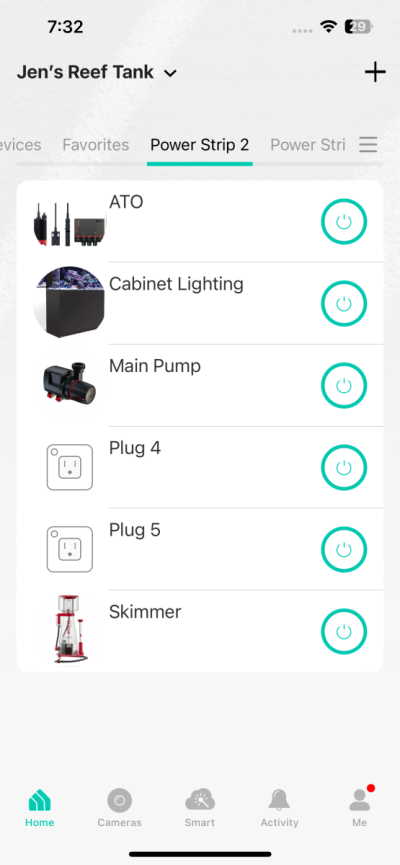
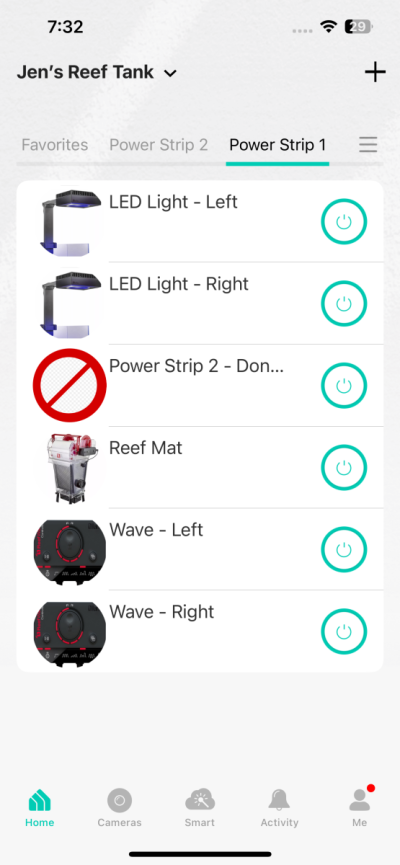
I did organize and get my 2 Kasa Power strips all programmed and labeled. At least now I can tell 'Google' it's feeding time and it will shut off my pump, ATO and wave makers for me. These things are pretty cool. I will be mounting these on the outside of the cabinet on the right side where no one will see but I can still easily get to them to turn on /off individually (that's why I have the little arrows pointing to the on/off).

Oh tomorrow I'm going to attempt to hook up the 6 stage RO/DI filter in one of my guest bathrooms. I have watched a bunch of videos and I *think* I can do it myself but of course I have asked my husband to help me out with it. Our house is brand new and I just don't want to mess anything up lol. I plan on leaving it under the sink until I want to make water then putting the container in the shower while I fill it up and then pumping it to my beautiful new slim ATO.
I think that's about it.
Just when I think I'm starting to understand some things....I watch another video and I'm more confused lol. What I'm realizing is that there is more than 1 right way to do something/anything in reefing.
I thought my cycle was complete but apparently, it has other things in mind. I checked my numbers today and ammonia was at .28, Nitrite at 0 and Nitrate at about 5ppm.. So something is going on. Apparently 1/2 of my bacteria is on their game and the other half is slacking off a bit. No worries, I have lots of time before I want to add some clowns. Heading out of town next week for a few days. Will get my first inhabitants when I get back.
Speaking of clowns...I really want a bonded pair. I'm thinking Wide Bar Gladiator clowns. Does anyone have any advice or more info on them?
Shout out to Red Sea for getting me the larger pull-out panel VERY FAST! I can't believe it's here already. Now I have to figure out how to lay out all my 'stuff' on the board and get my hubby to drill some channels in it for the cables. Or maybe I just do the raceways so no need to drill. The one thing I am going to do is put some 2x 4 blocks behind the panel cleats to bring the panel out another 1 3/4". That way I have more room back there for the miles and miles of cords that come with all this equipment. I might even be able so put some of the power bricks back there now that I will have the extra room. Definitely not the LED ones...those things are massive.
I did organize and get my 2 Kasa Power strips all programmed and labeled. At least now I can tell 'Google' it's feeding time and it will shut off my pump, ATO and wave makers for me. These things are pretty cool. I will be mounting these on the outside of the cabinet on the right side where no one will see but I can still easily get to them to turn on /off individually (that's why I have the little arrows pointing to the on/off).
Oh tomorrow I'm going to attempt to hook up the 6 stage RO/DI filter in one of my guest bathrooms. I have watched a bunch of videos and I *think* I can do it myself but of course I have asked my husband to help me out with it. Our house is brand new and I just don't want to mess anything up lol. I plan on leaving it under the sink until I want to make water then putting the container in the shower while I fill it up and then pumping it to my beautiful new slim ATO.
I think that's about it.
Just when I think I'm starting to understand some things....I watch another video and I'm more confused lol. What I'm realizing is that there is more than 1 right way to do something/anything in reefing.
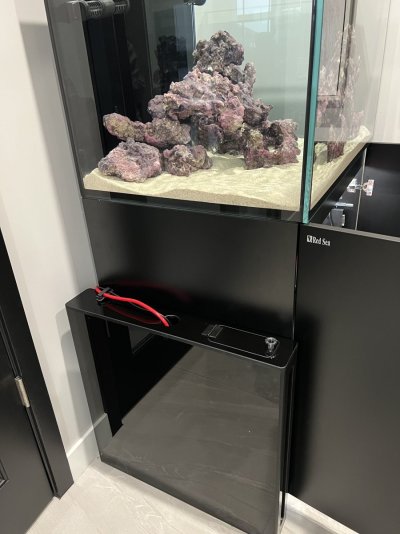
Oh...not sure if I ever posted my new ATO from Advanced Acrylics...here it is. I love it. It's slim and sleek and lets me keep all the room in my cabinet for other stuff. I have ordered new black tubing as the red draws too much attention to the unit. I'll be changing that out tomorrow hopefully. 
Attachments
Also, wanted to post some photos of the Kasa power strip app....you can even customize it to show pictures of the plugs/equipment. I thought this will be helpful for my husband and anyone minding my tanks since they might not know what each piece of equipment is. 
Attachments
I would be cautious about putting the PSU's behind the pullout. Poor air circulation can overheat them and shorten their life. Also you can purchase shorter cords for your PSU's to help with cord management. Black line can be purchased at depot or lowes in their automatic sprinkler area.
Good point about the bricks...I don't think there's any space behind the board anyway with all the cords. I'll definitely check out the shorter cords as well. Thanks for the pointers!
Well I did it. It took all day. And technically I"m not done but I just can't do any more tonight.
So what did I do exactly? Well, I got the larger pull out panel delivered from Red Sea (they sent the smaller one originally).
I mounted it and REALLY didn't want to drill any holes in board for two main reasons:
1. I'm sure my equipment is going to change and don't want to be stuck in any way.
2. I didn't want to bother my husband as this is my hobby and I told him I wouldn't put my 'stuff' on him . .
.
So no drilling! Just industrial strength velcro to hold the gear. Then I used these handy dandy cable rails (thanks to whoever told me about these). It hides all the cables inside and is flexible and I can add the cables wherever. They are AWESOME!
The main issue was going to be the mess of cables at the end that I need for the extension to properly work. I had these cool cable coozies (not sure that's their real name is) and they worked perfectly and made everything look super neat.
I went back and forth with all the power bricks. I decided to put them on the cabinet on the right side where no one can see them. This is the part I haven't completed yet as I'm waiting for short power extension cords so I don't have to try and organize the massive feet of cord by the power brick.
The last piece are the 2 Kasa Power Strips that I have mounted on the side (velcro again) to keep it easy to turn things on/off. I have hooked them up to Google Assistant so that I can do things like "Google...it's feeding time" and it will turn off pump, skimmer, waves, etc/. Then it will turn them back on after 10 min/.
The best part is nothing is hard wired or permanent as I'm sure there are going to be changes/additions, etc.
So that's it. Longggggg day. I did have a few 'moments' I won't lie..
Here are some photos. Thanks to all for the advice and suggestions!


So what did I do exactly? Well, I got the larger pull out panel delivered from Red Sea (they sent the smaller one originally).
I mounted it and REALLY didn't want to drill any holes in board for two main reasons:
1. I'm sure my equipment is going to change and don't want to be stuck in any way.
2. I didn't want to bother my husband as this is my hobby and I told him I wouldn't put my 'stuff' on him .
So no drilling! Just industrial strength velcro to hold the gear. Then I used these handy dandy cable rails (thanks to whoever told me about these). It hides all the cables inside and is flexible and I can add the cables wherever. They are AWESOME!
The main issue was going to be the mess of cables at the end that I need for the extension to properly work. I had these cool cable coozies (not sure that's their real name is) and they worked perfectly and made everything look super neat.
I went back and forth with all the power bricks. I decided to put them on the cabinet on the right side where no one can see them. This is the part I haven't completed yet as I'm waiting for short power extension cords so I don't have to try and organize the massive feet of cord by the power brick.
The last piece are the 2 Kasa Power Strips that I have mounted on the side (velcro again) to keep it easy to turn things on/off. I have hooked them up to Google Assistant so that I can do things like "Google...it's feeding time" and it will turn off pump, skimmer, waves, etc/. Then it will turn them back on after 10 min/.
The best part is nothing is hard wired or permanent as I'm sure there are going to be changes/additions, etc.
So that's it. Longggggg day. I did have a few 'moments' I won't lie..
Here are some photos. Thanks to all for the advice and suggestions!


I like it! Also FYI that industrial velcro goes a long ways. I've used it for a number of projects at work for tidying up electronics and on one project I used a bit too much and it held on REALLY good in a tight spot that was a bear to get the item out of.
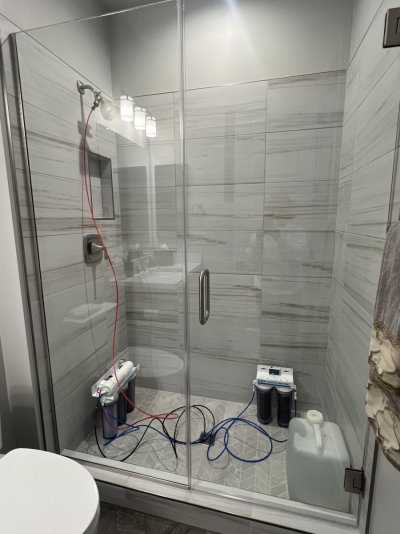
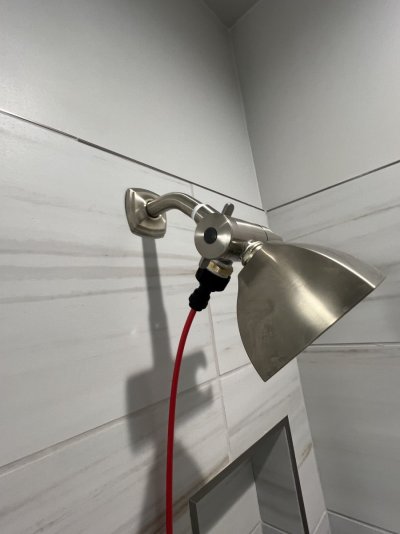
Ok...next project done. Wanted an RODI unit as we live a bit out of the city and I work from home (mostly) so I don't really leave the house much. We have a new build home and wasn't sure where to locate it and didn't want it out permanently.
So after some research I decided the spare bedroom shower was just the place. I don't have to make much at all maybe a few times a month and I can easily put it away under the sink when company comes over.
I originally wanted it in the laundry room but found out our new fancy washer has a Y connector already on it for the 'steam' part and I had a hard time finding a 3 way splitter for the water source. Not to mention I would have to drill through our brand new cabinets for the water lines and just wasn't keen on that (or have it out which also wasn't into). So the shower it is.
It's working great...and the bonus is if I ever do forget to turn off the water it's no biggie (expect the water bill).
Went to Home Depot grabbed the only shower diverter set they had and an adapter and a plug and my husband set it up for me in about 3 minutes. I'm getting about 60 PSI so for now, that's fine. It's making about 5 gallons of RODI water in about an hour.
When company comes over, it's easy to disconnect and 'hide' it under the sink. Everyone is happy.
Attachments
Shower/tub is key! So is a kitchen timer. It takes me 24 minutes to do 5 gallons. Setting the timer works well. What always gets me is the Kalk container or I have 2 liter jugs for daily stuff. Too slow to watch them fill too fast to remember you’re filling them. So the over spill just goes down the drain instead on the floor.Ok...next project done. Wanted an RODI unit as we live a bit out of the city and I work from home (mostly) so I don't really leave the house much. We have a new build home and wasn't sure where to locate it and didn't want it out permanently.
So after some research I decided the spare bedroom shower was just the place. I don't have to make much at all maybe a few times a month and I can easily put it away under the sink when company comes over.
I originally wanted it in the laundry room but found out our new fancy washer has a Y connector already on it for the 'steam' part and I had a hard time finding a 3 way splitter for the water source. Not to mention I would have to drill through our brand new cabinets for the water lines and just wasn't keen on that (or have it out which also wasn't into). So the shower it is.
It's working great...and the bonus is if I ever do forget to turn off the water it's no biggie (expect the water bill).
Went to Home Depot grabbed the only shower diverter set they had and an adapter and a plug and my husband set it up for me in about 3 minutes. I'm getting about 60 PSI so for now, that's fine. It's making about 5 gallons of RODI water in about an hour.
When company comes over, it's easy to disconnect and 'hide' it under the sink. Everyone is happy.
Definitely a great idea, looking at my guest shower for where I want to place my RODI system now.
I would really love to know how often you find yourself refilling that ATO tank. I have my own Reefer build (200 G2+) going and have been topping off manually while I consider my external reservoir options.
I have to refill it about 9 days or so. I think when I get the lid it will be even better. 
Last edited:
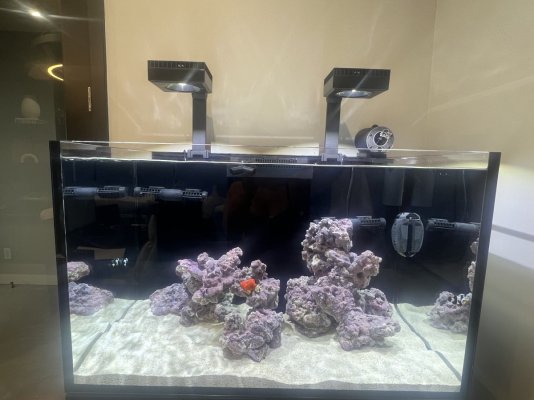
Well today I did my first real water change...15 gallons. I don't have all the right equipment (waiting on my python) and to be honest, it was a disaster lol. I did take all my equipment out and have to rinse everything because of all the substrate 'dust' all over everything. It was an all day adventure.
But here's the good news.....
I'm ready for the clowns!!!! Tank is cycled and ready to go. Everything is dialed in and I'm ready to welcome my first 2 cuties.
Tomorrow after I'm done working, I'm heading down to the lfs....I hope I find just the right pair. <3
But here's the good news.....
I'm ready for the clowns!!!! Tank is cycled and ready to go. Everything is dialed in and I'm ready to welcome my first 2 cuties.
Tomorrow after I'm done working, I'm heading down to the lfs....I hope I find just the right pair. <3
I would imagine using a Python would be rather expensive on your water bill.
I use a small brute trash can on wheels. Mixes 15g really well. I have my tanks on a rotation and I do 5g water changes in each. I also use a Sicce style sump pump to pump water back into the tank. But the secret is this remote I picked up at Depot for $10. you can turn the pump on and of with a push of a button.
amazon link sump pump

Commercial Electric Wireless Indoor/Outdoor Remote Control YLT-42B - The Home Depot
Plug in holiday decorations and landscape Lighting to the Indoor/Outdoor Remote Plug and use the included keychain transmitter to easily activate Lights from a remote location. This remote plug offers
www.homedepot.com
What’s funny is I used the brute trash can on wheels. Getting the new fresh sw back into the tank was easy it was getting it out of the sump that was the hard part.
Because I made the mistake of not researching beforehand the guy from the lfs (super nice guy) didn’t rinse the substrate.
For the past 2 weeks I have been dealing with a very fine chalky film over everything. I have been turkey basting the sand every day to create a huge dust cloud and let my Reefmat do its thing.
I finally got it to be almost clear and so I decided to take all my equipment out and do a nice rinse and wipe down to start fresh. To be honest the film was driving me nuts. Here I have this brand new system and it was covered in the while film. Much of it landing in the sump.
So I bought a power controlled vacuum and tried to suck as much as I could out with that. It kind of worked. Until it literally came apart on me and stated shooting water everywhere. Luckily it had a little remote in it and I was able to turn it off quickly. It seemed like a lot of water. .
So it was all a learning lesson.
at least my sump is looking much better!!
Well I did it. I finally got all the bricks off the ground and hung nicely in a little 3d printed rack I got on Etsy. It's hard to get any good pics of it as it's so tight on that side (mistake on my part). Oh the things we learn. I wish I would have moved my tank further to the left and kept that more open. Oh well. I can still do things back there, it's just a bit tight. Thank goodness I'm small.

Well I have my first livestock!
I thought this would be an easy pick at my lfs...they have tons of clowns. It took me a LONG time to decide which pair I wanted.
There were 2 pairs that originally caught my eye which surprised me. The first was a long fin pair and they were GORGEOUS. I typically don't care for the long fin variety but this pair was beautiful. They were 239 each so I thought that would be a silly move for my first fish. lol.
The next pair was a pair that had been traded in from an established tank. They were much larger than the rest but you could tell they were very happy with each other. I honestly don't remember what variety they were.
I'm drawn to all different types but seem to really like the Davinci and anything with bullets. They didn't really have any pairs of those to choose from.
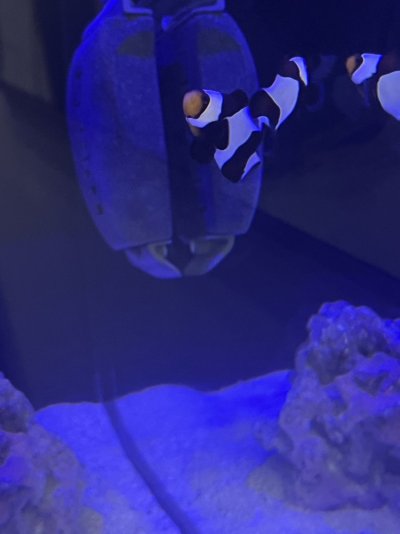
Then I saw them..in the corner tank. Two cute little mocha wide bar gladiators. They were small and active and seemed to really like each other. They aren't your 'normal' orange and black...they are mostly black/dark with an orange face. It makes their little faces stand out imho. They were perfect and at a price point that was much more reasonable.
I also picked up my first coral ...a beautiful pink/red mushroom. It was gorgeous and since I had such good luck with my mushrooms in my last tank I thought it would be a great starting coral.
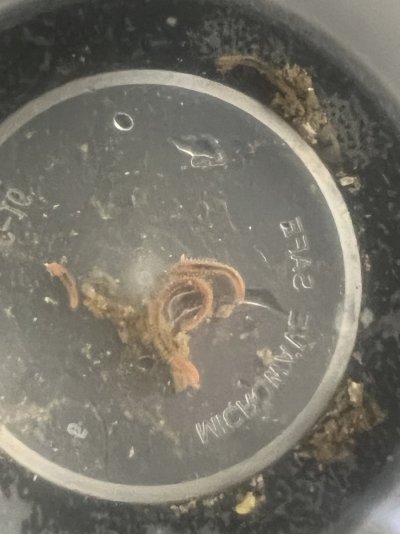
I did a coral dip on it and was shocked at the critters that came off...so many. I counted 6 brittle stars (I think that's what they were). I know they are not considered bad but I don't really like them. I'll post a pic of the gunk that came off. The mushroom is looking amazing...and already bigger than it was in the store. That makes me happy.
The clowns are eating well and just perfect. They aren't hanging in any corner...they are all over the tank in different areas and even venture out without each other. I am feeding them 3 small meals a day. They seem to prefer the reef jerkey and the frozen mysis shrimp. I need them to get used to the jerky as that's what the Plank uses.
I also made a DIY lid from a kit from Red Sea. I didn't bother making it perfect or cutting around the leds or the overflow...it's very temporary. I ordered my Kraken lid 2 days ago as well...so just waiting for that.
I'll try and take some better pics of the mushroom and clowns. Their names are Bo and Mona named after my late Mom and Dad. . He's the one that got me interested in saltwater tanks many years ago. They sadly both passed away recently. They were quite the 'pair'. My mom being the original cougar and Bo being 25 years younger than her.
I thought this would be an easy pick at my lfs...they have tons of clowns. It took me a LONG time to decide which pair I wanted.
There were 2 pairs that originally caught my eye which surprised me. The first was a long fin pair and they were GORGEOUS. I typically don't care for the long fin variety but this pair was beautiful. They were 239 each so I thought that would be a silly move for my first fish. lol.
The next pair was a pair that had been traded in from an established tank. They were much larger than the rest but you could tell they were very happy with each other. I honestly don't remember what variety they were.
I'm drawn to all different types but seem to really like the Davinci and anything with bullets. They didn't really have any pairs of those to choose from.
Then I saw them..in the corner tank. Two cute little mocha wide bar gladiators. They were small and active and seemed to really like each other. They aren't your 'normal' orange and black...they are mostly black/dark with an orange face. It makes their little faces stand out imho. They were perfect and at a price point that was much more reasonable.
I also picked up my first coral ...a beautiful pink/red mushroom. It was gorgeous and since I had such good luck with my mushrooms in my last tank I thought it would be a great starting coral.
I did a coral dip on it and was shocked at the critters that came off...so many. I counted 6 brittle stars (I think that's what they were). I know they are not considered bad but I don't really like them. I'll post a pic of the gunk that came off. The mushroom is looking amazing...and already bigger than it was in the store. That makes me happy.
The clowns are eating well and just perfect. They aren't hanging in any corner...they are all over the tank in different areas and even venture out without each other. I am feeding them 3 small meals a day. They seem to prefer the reef jerkey and the frozen mysis shrimp. I need them to get used to the jerky as that's what the Plank uses.
I also made a DIY lid from a kit from Red Sea. I didn't bother making it perfect or cutting around the leds or the overflow...it's very temporary. I ordered my Kraken lid 2 days ago as well...so just waiting for that.
I'll try and take some better pics of the mushroom and clowns. Their names are Bo and Mona named after my late Mom and Dad.
Attachments
Similar threads
- Replies
- 44
- Views
- 1,183
- Replies
- 23
- Views
- 576
- Replies
- 1
- Views
- 58


