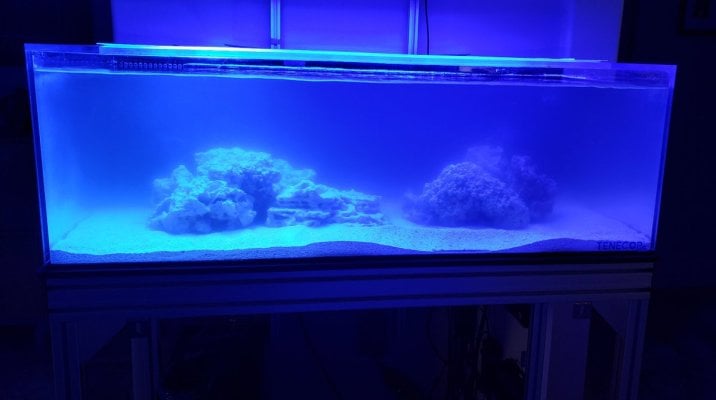
Tenecor 100 Gallon Lagoon-style acrylic AIO

tharbin

5000 Club Member
View Badges
Joined
Oct 22, 2021
Messages
5,199
Reaction score
35,209
Location
Arizona
Rating - 0%
0   0   0
This is my build thread for a Lagoon-style 100-gallon AIO acrylic tank. Its external dimensions are 48" x 30" x 16" and the AIO section is full length and height with an 8" depth. Basically, an in-tank sump. It sits on a Tenecor Magnum stand that has had light bars and a control-mounting board added. It also has a Tenecor 10-gallon ATO reservoir.

Here is what the tank looks like today.
Overview_20240129.jpg


The tank has been 'live' since late August 2023. I acquired the tank from Tenecor Aquariums in mid-January 2023. It is a pre-production or maybe proof-of-concept aquarium. I want to be clear that this is not a production or custom aquarium from Tenecor. As such, I expected a few challenges along the way. Tenecor does currently produce a 100-gallon lagoon-style AIO tank with the same external dimensions as my tank. I do not know how much their current tanks resemble my tank.

Since it has been live for five months, I will not spend a lot of time covering history, but I will detail the build as best I can from ‘vintage’ photographs. Here are two more-or-less FTS shots from today. Due to the tank's location, I cannot take straight on FTSs.

FTS_L_20240129.jpg


FTS_R_20240129.jpg


This tank was set up to replace the Waterbox 15 Peninsula from my previous thread. Here is the link to the old build thread:

To keep this post from being too long I will do one post for each major ‘event’ since the build began. To save you some time deciding which posts to bother reading, here is the timeline of major events for the build:

-Initial set up of tank, stand, first Nero 3 and first Prime 16HD: January 2023
-Leak/function checks, added Inkbird controller and BRS 300 watt heater, Sicce SDC 6.0 return pump: March 2023
-3d printed and added media basket solution: May 2023
-3d printed and added return section plug and dams: June 2023
-Added AI Blade Grow 39”, 3d printed cutout plugs, and initial addition of salt (Red Sea Blue Bucket): July 2023
-Took tank live, shutdown Waterbox, added the second Nero 3 and second Prime 16HD from Waterbox: August 2023
-Added Hector’s Goby, One-Spot Foxface, Yellow Coris Wrasse, Gold Hammer, Kryptonite and Purple Rim Trumpets, Green Fiji Bird Nest, Purple Stylo, Tubbs Stellata, and Acan : September, 2023
-Added UV (Green Killing Machine – 24 watt), Pink Fiji Birds Nest: October 2023
-Added Black Ray Goby and Peach Hammer: November 2023
-Added third Nero 3 and second AI Blade Grow 39”: January 2024

Current Equipment List:

-Tank
: 100-gallon Tenecor Pre-production acrylic AIO - 48"x30"x16"
-Stand: Tenecor Magnum stand w/starboard tank shelf, PVC equipment shelf, PVC mounting board and 30x30 light-mount bars
-Return: Sicce SDC 6.0, Loc-line 3/4", Ball shut-off and VGA RFG
-Flow: 2x Nero 3 on 180 degree pulse sync and 1x Nero 3 on random 2x Maxpect Gyre XF-350 CE (10%-30% 1 sec pulse anti-sync)
-Mechanical Filtration: 3d-printed media baskets w/inTank Filter Pads and SERA filter floss, occasionally Red Sea Reef-Spec carbon, Tunze 9004 DC Protein Skimmer
-Chemical Filtration: none at the moment
-Biological Filtration: other than rock/sand AIO chamber refugium
-Other Filtration: Green Killing Machine 24 Watt UV Sterilizer
-Lighting: 2x AI Prime 16HDs and 2x AI Blade Grow 39" for display, Tunze eco chic Refugium for fuge
-Heating: Inkbird controller and 1x 300 Watt BRS Titanium Heating Element
-Salinity Control: JBJ Nano ATO and 10-gallon Tenecor ATO reservoir
-Controller: none
-Miscellaneous: ADJ PC100a power strip, IKEA LED closet strip light, 3d-printed feed cup, digital timer for fuge light

And that will bring it current.
 
Last edited:
OP
OP
tharbin

tharbin

5000 Club Member
View Badges
Joined
Oct 22, 2021
Messages
5,199
Reaction score
35,209
Location
Arizona
Rating - 0%
0   0   0
January 2023 - Initial set up of tank, stand, Nero 3 and Prime 16HD

On January 17th 2023 I received a long-awaited shipment from Tenecor Aquariums.

100L-Crates.jpg


My new 100 gallon lagoon-style AIO tank. To say it was well packaged is an understatement. I still have the crates in our garage and use them for storage. The top crate was the acrylic tank, plastic and blanket-wrapped. The bottom crate was the Magnum stand and accessories, also plastic and blanket-wrapped.

We immediately started to assemble the stand and tank. The stand is one of Tenecor's standard 48" Magnum stands but 30" deep to accommodate the tank dimensions and with a controller-mounting board (PVC) and an extra crossbar on the back as part of the light-mount solution.

100L-Install3.jpg


The extra L-Brackets on the top and bottom crossbars were for an experimental skins idea. I have removed most of them as we actually like the aquarium with the open look of the base. This is the nicest, and highest-quality, aquarium stand I have ever seen. The top bars are 45x90 T-Slot, and the rest of the stand is 45x45 T-slot. The top plate is Starboard and the shelf is PVC board. The stand is rock-solid, easy to adjust/modify and totally water resistant. I cannot recommend their stands enough.

I also got a light-mount solution. I do not think Tenecor currently offers these as options but mine were part of the proof-of-concept. They are 30x30 T-slot so very beefy. I already had a Nero 3 and Prime 16HD from another build so once I knew the tank was coming, I found a STL file at Thingiverse for Prime 16HD mounts and printed two of them (one for the other Prime 16HD that would come over from the Waterbox once it was decommissioned). I added them during the initial build.

100L-Install12.jpg


The tank is 48" x 30" x 16" with an AIO section. The AIO is more like an in-tank sump as it is a full 8" deep and comes with a 7" filter-media cup. It is sized to allow for short 7" filter socks. It has five chambers, two of which have adjustable-height baffles.

100L-Tank11.jpg


It also came with a polycarbonate lid with feed hole and acrylic covers for the sump chambers.

100L-Tank4.jpg


All set up. That's the Tenecor 10-gallon reservoir sitting on the shelf.

100L-Tank13.jpg


And here it is at the end of the day of delivery with a Tenecor frag rack in it, the experimental skins in place and the Prime 16HD fired up.

100L-Build13.jpg
 
Last edited:
OP
OP
tharbin

tharbin

5000 Club Member
View Badges
Joined
Oct 22, 2021
Messages
5,199
Reaction score
35,209
Location
Arizona
Rating - 0%
0   0   0
March 2023 - Leak/function checks, added Inkbird controller and BRS 300 watt heater, Sicce SDC 6.0 return pump

Once the tank was set up it pretty much just sat there waiting for more parts before I could leak check it and check the operation of the AIO sections, overflow and return plumbing. I received a Sicce SDC 6.0 shortly after I set up the tank. I also ran into my first challenge. The return plumbing is 3/4" Loc-line (including a ball valve shut-off--very nice). The SDC 6.0 comes with your choice of 1" or 1-1/4" barb fittings. No 3/4" fitting that I can find fits the SDC 6.0 as the SDC 3.0 uses a different connection style. I settled on replacing the supplied 3/4" FPT/ Slip bulkhead with a Lifegard 3/4" FPT/FPT fitting and replacing the 3/4" 90 degree elbow with a threaded 1" to 3/4" reducing 90 degree elbow.

return2.jpg


It makes cleaning the return pump take a little longer but at least I know I'll never blow the slip fitting. I also bought, but did not yet add, a VCA 3/4" Flexible (TPU) Random Flow Generator in place of the suppled Loc-line flair nozzle. The SDC 6.0 is also a tight fit with the screen in place. It's a nice big chamber but not quite as wide as the SDC 6.0. Truthfully the tank would probably be fine with the SDC 3.0 and it has 3/4" fittings and a smaller footprint. Oh well.

pump2.jpg


I also added an Inkbird heater controller and a 300 Watt BRS Titanium heater. I really should have used two 200 Watt heaters instead. Now the tank was ready for some basic testing. I filled it with tap water so that I could watch the sump sections, test the overflow and return and set the heater up.

Full-tank.jpg


I also added an American DJ PC100a power center I had from an old build to provide easy on/off of the various equipment. Then I threw some cleaned base rock in to start to play around with ideas.

FTS_1_2023_03_07.jpg


The tank held water fine and the sump worked well but not quite to my liking so; time for a little reflection and designing.
 
Last edited:
OP
OP
tharbin

tharbin

5000 Club Member
View Badges
Joined
Oct 22, 2021
Messages
5,199
Reaction score
35,209
Location
Arizona
Rating - 0%
0   0   0
May 2023 - 3d printed and added media basket solution

The tank came with a 7" filter cup installed in a removable filter sock plate. It also came with some interesting filter media. It is white fiber balls that remind me of the SERA Crystal Clear filter balls I used in the Waterbox. They are a good filter media but I knew from the beginning I would not be using socks and a 7" cup full of media is a big media filter. I felt it was larger than what I would need at my desired turn over of 4-6 times per hour. I also felt the sock plate was a little lower than I would like which contributed to noise from the overflow.

I had played around with the idea of using a Klir 7" fleece roller at first but decided the price was too high (I was building this on a budget) and I wanted to try to use the sump covers as long as practical. I decided on media trays instead.

The first change to make to the tank as delivered was to make a media tray solution for the first chamber that allowed for filter media sheets. I really like the sheets of media from inTank so I started my design around the idea of using their sheets as the first layer of mechanical filtration. Their sheets come in 20" x 10" sheets that are about 1" thick. It was apparent that it would be a little wasteful trying to cut it into 8" squares as I would only get two squares per sheet. That would be a little cost prohibitive. I also knew I wanted to have a tray for secondary mechanical filtration or chemical filtration.

It took me a long time to come up with an 'okay' solution that I felt confident I could build.

I finally decided on using sheets cut to 8"x 5". By cutting this way I could get 4 pads and then by cutting the leftover 4"x10" piece in half, get a fifth pad. Not bad. That gave me dimensions for a 'media basket' that would be large enough to handle the turnover and still economical.

Seemingly the next part, other than not being very proficient with CAD software, should have gone quickly but I kept running up against one of my least favorite parts of the tank. There is a lip around the sump area of about 1/4". It gets in the way, a lot. I decided to make a media tray that was about 1.5" thick to hold the extra media and a grid over that for the inTank filter pad material. That would put the top of the pad about 1/4" below the overflow slots which proved to be nice and quiet.

This was my design; in the tank as far as it would go. Blasted lip...

Tray-fitting.jpg


I figured out, after a few days of pondering, that I could see-saw a tray in if it had cutouts in the sides. I finally came up with this, and it fit.

Media_Tray.jpg


The rest of the design was straight forward. I designed a baffle for the rear to act as an emergency overflow, access slot for probes or heaters and a backstop for the tray and a flat grid to sit on top of the tray for the filter pad. Here is the finished assembly.

Media_Assembly.jpg


And installed in the tank.

Assembly_Installed.jpg


Here it is in the tank with the filter media upside down during testing.

Overflow.jpg


This also highlights the one challenge with the tank I don't think I can change. It is really a bother and not an actual issue, unless I wanted to run higher turnover rates. Notice that the pad is drier at the right hand side. The overflow should have had one or two more slots cut to match the chamber width. Now that I had filtration I could fill the tank with RODI and start working on the next challenge.

FTS_1_2023_03_07.jpg


But I had a couple of things I wanted to get done before switching from tap water to RODI.
 
Last edited:
OP
OP
tharbin

tharbin

5000 Club Member
View Badges
Joined
Oct 22, 2021
Messages
5,199
Reaction score
35,209
Location
Arizona
Rating - 0%
0   0   0
I really like your tank's dimensions! Their tanks are quite pricey though. Looks really good!
I think the dimensions are great. I always liked 40 Breeders, except their depth, and this is like a deeper version of the 60 Breeder, with a built in sump. I like the look of the tank overall. Their tanks are a little on the high side but their stands are worth every penny and since this was not a custom-built or even production tank, I got a deal on it. Plus I only live about 70 miles from Tenecor.
 
OP
OP
tharbin

tharbin

5000 Club Member
View Badges
Joined
Oct 22, 2021
Messages
5,199
Reaction score
35,209
Location
Arizona
Rating - 0%
0   0   0
June 2023 - 3d printed and added return section plug and dams

The sump has two adjustable baffles. The first one is between chambers 2 and 3 and it determines the water level for chambers 1 and 2. It has a guillotine-style adjustment plate and it works fine. It is set for a depth of 10.25" currently but I am probably going to adjust it up to 11" in the near future.

Baffle_2-3_1.jpg


The second adjustable baffle is between chambers 4 and 5. It is meant to adjust the height of chamber 3 and 4 but it is a simple adjustable-plate design. If this was somewhere else in the tank it would work fine but since it feeds the return chamber (chamber 5) it proved to be an issue for using an ATO. The loose-fitting sides and large slot in the center both allowed the return chamber to level with chambers 3 and 4, which effectively meant that half the sump determined the return chamber height so the ATO, if fitted at that time, would have had massive swings from off to on. In the neighborhood of two or three gallons. It also meant that the water pouring through the center slot made a nice roaring waterfall into the return chamber.

Baffle_4-5_2.jpg


I fairly quickly figured out that the answer was to plug the slot and sides of the adjustment plate. I had a hard time getting measurements down in there and I needed to determine the working height for the plate before I could design something. It also meant I needed to print in TPU which was not something I had done before.

I designed a simple U-channel to fit around the edges of the plate and installed them. That helped some but the center slot was the much bigger issue.

Baffle-Dam.jpg


I designed and installed a plug for the slot.

Baffle-Plug-2.jpg


That fixed the issue with the return section and made the sump usable with an ATO.

4-5-Plug-Dams.jpg


The tank was now ready for salt, decor and a few smaller changes.
 
Last edited:

TheWB

2500 Club Member
View Badges
Joined
Sep 22, 2017
Messages
2,529
Reaction score
3,997
Location
Puyallup,WA
Rating - 0%
0   0   0
June 2023 - 3d printed and added return section plug and dams

The sump has two adjustable baffles. The first one is between chambers 2 and 3 and it determines the water level for chambers 1 and 2. It has a guillotine-style adjustment plate and it works fine. It is set for a depth of 10.25" currently but I am probably going to adjust it up to 11" in the near future.

Baffle_2-3_1.jpg


The second adjustable baffle is between chambers 4 and 5. It is meant to adjust the height of chamber 3 and 4 but it is a simple adjustable-plate design. If this was somewhere else in the tank it would work fine but since it feeds the return chamber (chamber 5) it provided to be an issue for using an ATO. The loose-fitting sides and large slot in the center both allowed the return chamber to level with chambers 3 and 4, which effectively meant that half the sump determined the return chamber height so the ATO, if fitted at that time, would have had massive swings from off to on. In the neighborhood of two or three gallons. It also meant that the water pouring through the center slot made a nice roaring waterfall into the return chamber.

Baffle_4-5_2.jpg


I fairly quickly figured out that the answer was to plug the slot and sides of the adjustment plate. I had a hard time getting measurements down in there and I needed to determine the working height for the plate before I could design something. It also meant I needed to print in TPU which was not something I had done before.

I designed a simple U-channel to fit around the edges of the plate and installed them. That helped some but the center slot was the much bigger issue.

Baffle-Dam.jpg


I designed and installed a plug for the slot.

Baffle-Plug-2.jpg


That fixed the issue with the return section and made the sump usable.

4-5-Plug-Dams.jpg


The tank was now ready for salt, decor and a few smaller changes.
I'm really impressed with your problem solving skills to make this tank usable. Especially considering it was not built to the specs that were requested. That lip never needed to be there and the design of the 2nd adjustable baffle is just dumb. Your solution for the mechanical filtration baskets and the emergency overflow is very nicely done.
 
OP
OP
tharbin

tharbin

5000 Club Member
View Badges
Joined
Oct 22, 2021
Messages
5,199
Reaction score
35,209
Location
Arizona
Rating - 0%
0   0   0
July 2023 - Added AI Blade Grow 39”, 3d printed cutout plugs, and initial addition of salt

Since I felt that the sump was now working more-or-less the way I wanted it, I went ahead and finished emptying the tank of water and rock. My initial idea for the tank was to slowly add to it to get what I was after. I had already installed my extra Nero 3, Prime 16HD and ADJ PC100a on the tank and added a Sicce SDC 6.0, an Inkbird controller, a 300 Watt BRS heating element and inTank filter media so the basics were in place. The plan was to add the other Nero 3 and Prime 16HD from the Waterbox when I broke it down and then go from there, very slowly.

Of course that 'plan' was garbage. Who wants to wait years to have a tank that actually supports life? With a few quick checks I determined that the 2 Prime 16HDs would not be sufficient for even keeping what was in the Waterbox thriving. I printed a 3rd Prime 16HD mount and put it on the tank with the idea of buying a 3rd Prime 16HD. No mater how I played around with it though it was obvious I would need at least two additional Prime 16HDs (for a total of 5) or some kind of fill light. I decided to try one of the fairly-new AI Blade Grows as a fill light. I ordered a 39" strip along with the mounting clips.

I tried the Blade when it came in by just laying it on the top with its included slide brackets and I was impressed with how will it filled the nocks and crannies with useable light. The question was how to mount it to the light bracket? In studying the mounting clips, I came up with a design for a simple bar that would attach to the T-slot on one end and the mounting clip on the other.

Blade-Bar-Profile.jpg


Blade-Bracket.jpg


I designed the arm to clear the Primes by a couple inches and sit at the same approximate height. I installed the Blade and was happy with the results. I also installed the VCA RFG in place of the Loc-line flair nozzle so that I could start to tune the return set up.

FTS-Lights.jpg


With the lighting done--for now, I went ahead and filled the tank with RODI. I always knew that having the RODI unit near the tank would be a time saver...

Filling.jpg


Full-of-RODI.jpg


Once the tank was full I rechecked all of the plumping and flow. Everything was okay so it was time to break out the 3d printer again. If you look back at the first photo in Post #9, you will see a cutout in the sump wall. That was put in to allow the pass-through of plugs and small attached controllers (like the Neros have). There are two of those pass-throughs, one in chamber 2 and one in chamber 5. I originally planned to use pieces of black sponge to fill them but in practice that did not work so well. I kept knocking the sponges out without noticing it. So I designed plugs for the cutouts and printed them in TPU.

Jump Plugs-Printer.jpg


They work very well and pop out easily when needed.


Jump-Plug-Front.jpg


I now felt the tank was ready for the addition of salt. I added Red Sea Blue Bucket to the tank over a couple of days until it was at 35ppt. Then I started to add back in the re-rinsed and cleaned rock and let it stabilize for a week or so.

FTS-SW.jpg

Almost time to turn it from a box of water into an aquarium.
 
OP
OP
tharbin

tharbin

5000 Club Member
View Badges
Joined
Oct 22, 2021
Messages
5,199
Reaction score
35,209
Location
Arizona
Rating - 0%
0   0   0
August 2023 - Took tank live, shutdown Waterbox, added the second Nero 3 and second Prime 16HD from Waterbox

I was taking my time getting the tank ready for the transfer. Instead of the old methods for cycling or using bottled bacteria, like I did for the Waterbox, I decided to use 'Live Sand'. After I added the base rock I was going to use, I added a ten-pound bag of Caribsea Arag-Alive Special Grade that I had left over from the Waterbox build. It contains bacteria spores that help but I didn't think it would actually cycle a tank very quickly but I went ahead and added some Dr. Tim's Ammonium Chloride to kick off the cycle anyway. I then ordered another twenty-pound bag of the Arag-Alive and a twenty-pound bag of CaribSea's Ocean Direct Original. The Ocean Direct was supposed to jump start the cycle, and it did, but not without its own set of issues. The Ocean Direct was mostly very fine-grained. There were a few small shells and a little 'chunkier-but-still-small' grains but most of the bag reminded me of plaster dust. I lightly rinsed it but I did not go crazy as the whole idea of the sand is that it is direct from the ocean, and heavily rinsed the Arag-Alive then added them both to the tank very slowly cup-by-cup. It still kicked up a nice cloudy mess. I knew it would and I was fine with that but I did not like how fine-grained the Ocean Direct was.

front-sand-jpg.3504049


What I didn't plan on was how long the tank would remain cloudy. While it basically cleared in about four days, the tank actually remained cloudy for over a month and gets cloudy again whenever I accidently disturb the Ocean Direct pockets. The sand is so fine that it goes into suspension and passes right through the mechanical filtration.

My plan was to set up a small quarantine tank for the corals from the Waterbox and then move the two Firefish, the Nero 3 and the Prime 16HD from the Waterbox into the lagoon in early/mid September. I wanted to isolate the corals and CUC for a while to more easily fight the bubble algae outbreak from the Waterbox. The bubble algae seemed to have originated on the shells of a couple of the Trochus Snails I had purchased from one particular LFS.

Plans are meant to change, right? The Firefish had been living peacefully together since October or November of 2021. No problems at all. On August 27, 2023 that all changed, no idea why except that they may have been transitioning from juveniles. Anyway in the afternoon I noticed the larger of the two Firefish chasing the other one relentlessly. The smaller one was evading fairly-well due to the aquascape design but still, it wasn't good. I quickly set up a 4-gallon tank as an isolation tank and grabbed some rubble from the Waterbox to throw in the isolation tank. It was ready to go the next morning. The idea was to net the bigger Firefish out and put it in isolation allowing the smaller one to remain in the tank so as to stress it as little as possible. I knew it would not be possible to net either one without dismantling the aquascape completely. I started by getting as much as possible of the coral and CUC from the Waterbox and putting them in the 4-gallon.

Frag-2023-08-28.jpg


By the time I did that, the Waterbox was so messed up that any thought of leaving either Firefish in the quagmire that was left in the Waterbox was out of the question. I didn't have any netting to throw over the 4-gallon and, as much as I was ticked at the larger Firefish for messing up my plans and nearly killing its bud, I still didn't want it on my floor. Besides they don't give away Firefish at any of my LFSs so practicality said to try to keep it alive. It went into the lagoon.

FTS-L-2023-08-28.jpg


That's it in the lower right corner of the tank.

FTS-R-2023-08-28.jpg


I went ahead and pulled the Nero 3 and Prime 16HD off of the Waterbox and mounted them on the lagoon. Then I pulled the smaller Firefish. I realized it was in much worse shape than I had thought and gave it practically no chance of survival. I was going to put it in the 4-gallon but I didn't want to foul that tiny tank if it died during the night and the fool thing still might try to jump anyway. I ended up putting it in a cave on the other side of the lagoon from where the other Firefish was hanging out and hoped for the best. I then broke down the Waterbox for storage.

It didn't end well for the smaller Firefish...

But the tank was now an aquarium, just a little sooner than planned.

Front-Sand.jpg

I have no idea why this last photo keeps showing up. I didn't put it there (its the same one as the top of the post) and I've deleted it a half-dozen times. It won't go away. Sorry.
 
Last edited:
OP
OP
tharbin

tharbin

5000 Club Member
View Badges
Joined
Oct 22, 2021
Messages
5,199
Reaction score
35,209
Location
Arizona
Rating - 0%
0   0   0
September 2023 - Added Hector’s Goby, One-Spot Foxface, Yellow Coris Wrasse, Gold Hammer, Kryptonite and Purple Rim Trumpets, Green Fiji Bird Nest, Purple Stylo, Tubbs Stellata and Acan

Once the Firefish was in the lagoon and the rest of the Waterbox inhabitants were in the 4-gallon isolation tank, I began to sort through the CUC and corals for things that could be added to the lagoon display. I deemed the Cerith and Nassarius Snails as relatively safe so every day or two I would pick a couple of them from the 4-gallon, look then over carefully under a lamp with magnifier glasses for any signs of bubble algae. Then they would get dropped into the display. None of them showed any signs of bubble algae.

After about a week I pulled the Trochus from the 4-gallon and cleaned the shells of the four from that one LFS again as they kept growing bubble algae on their shells. They stayed in isolation for over a month with weekly cleanings of their shells. I also left two Ceriths in isolation to help keep the corals clean.

After two weeks I decided that the Mystic Sunset Monti that I had added to the Waterbox just before its shutdown was okay to move so in the lagoon it went.

All that was in the tank currently was one Firefish, a Mystic Sunset Monti and about two dozen snails.

Mystic_Sunset.jpg


I also made several trips to my favorite LFS to see what they had. On the first trip I picked up a Hector's Goby (one of my favorite fish), a One-Spot Foxface for algae control (and because my wife really liked it) and a Yellow Coris (I know...) Wrasse just in case.

3of4-1.jpg


See the mound of sand in front of the rock? I fixed that by ordering a 5-pound mix of Stax and put one of the larger slabs where the sand blowing was worst and while I was at it I used most of the rest to make a center island behind the two larger islands.

I also picked up a Kryptonite Trumpet and a Gold Hammer a Green Fiji Birds Nest and an Acan. At the same time I really did not like how my green hammer was looking in the 4-gallon so I cleaned it again of bubble algae and moved it to the lagoon. Notice how nice and murky the tank looks? That was a recurring problem.

FTS-2023-09-20.jpg


The Ocean Direct sand would constantly go into suspension in the tank for a few days and then kind-of clear up. I finally added a Marineland in tank micron filter for a while. It helped but didn't really clear it up. Adding the Stax, which also made a nice home for the acan helped some as well.

I made a couple more trips to the LFS and added;

a Purple Rim Trumpet,

Purple_Rim_Trumpet.jpg


a Purple Stylo,

Purple_Stylo.jpg


and a Tubbs Stellata.

Tubbs_Stellata.jpg


I also added the orange monti cap (partially visible to the right of the Tubbs) and Pinhead from the Waterbox. Pinhead was a coral I found in the sand in the Waterbox, It was almost exactly the same size as the head of a common straight pin, very dark but bright green and did not have a discernable top or bottom. I actually found two other identical ones to Pinhead at different times but I couldn't corral them someplace relatively safe. I just left it in the sand in an area where I could keep an eye on it and rescue it when it blew into bad neighborhoods. It grew and when it was about 1/4" in diameter and had about a dozen polyps on it, I glued it to a Real Reef frag plug. It just kept growing and it became obvious that it was from the green monti cap I have that is supposed to be a WWC Grafted monti.

Pinhead:

Pinhead.jpg


I also moved over the two Beach Bum monti frags from the 4-gallon. This was the tank at the end of September.

FTS-2023-09-29.jpg


Still murky, but a little different.

--edit, fixed typo
 
Last edited:

BubblesandSqueak

Valuable Member
View Badges
Joined
May 8, 2023
Messages
1,739
Reaction score
3,120
Location
Maine
Rating - 0%
0   0   0
May 2023 - 3d printed and added media basket solution


Tray-fitting.jpg


I figured out, after a few days of pondering, that I could see-saw a tray in if it had cutouts in the sides. I finally came up with this, and it fit.
So I guess I need to add a 3D printer to my acquisitions. Did you print the 3 leg frag tables?
 
OP
OP
tharbin

tharbin

5000 Club Member
View Badges
Joined
Oct 22, 2021
Messages
5,199
Reaction score
35,209
Location
Arizona
Rating - 0%
0   0   0
So I guess I need to add a 3D printer to my acquisitions. Did you print the 3 leg frag tables?
It sure has come in handy...

Yes, but they are not my design. I found the STL files at Printables.com (Prusa's model repository). They were designed by Carlos Aceves and I think the search string is: 'Coral Frag Plug Stand'. All of my current reefing prints are done using PETG filament.
 

BubblesandSqueak

Valuable Member
View Badges
Joined
May 8, 2023
Messages
1,739
Reaction score
3,120
Location
Maine
Rating - 0%
0   0   0
It sure has come in handy...

Yes, but they are not my design. I found the STL files at Printables.com (Prusa's model repository). They were designed by Carlos Aceves and I think the search string is: 'Coral Frag Plug Stand'. All of my current reefing prints are done using PETG filament.
all we have is one of those 3D pens I gave the kids last year.
 
OP
OP
tharbin

tharbin

5000 Club Member
View Badges
Joined
Oct 22, 2021
Messages
5,199
Reaction score
35,209
Location
Arizona
Rating - 0%
0   0   0
October 2023 - Added UV (Green Killing Machine – 24 watt), Pink Fiji Birds Nest

I finally added the last inhabitants from the 4-gallon and broke it down for storage, the WWC Grafted Monti, that has always been all green with a few orange polyps here and there, and the bubble-algae-carrier Trochus snails after I cleaned their shells again for the fourth or fifth time.

While I was adding all of the new inhabitants to the tank I was also adding locally-sourced phyto/pod/brine mixes to get things rolling. The tank was still a little murky, and from time to time a lot murky, from the sand but I started to notice a subtle change in the murk. It was taking on a greenish tint, not real green but if you caught the light just right it was definitely greenish--a phyto bloom,

I started looking into UV Sterilizers for the tank as I always liked to have one around for emergencies anyway, that or Ozone but I haven't had an ozone generator since the late 1980s and didn't really have the support equipment for it anyway (I used to run it through a counter-current in tank skimmer). The tank is an AIO and I have a few design goals, which will probably not last much longer, for being able to leave the covers on the sump and to not have any external plumbing except for the ATO. That precluded the use of most UV Sterilizers. I also firmly believe that a UV Sterilizer works better connected in some fashion directly to the display instead of after the primary filtration. I also didn't want to spend more on it than on the tank's inhabitants. Long story short, I ended up buying a 24 Watt version of the Green Killing Machine at a local PETCO. I initially installed it on an angle (because it is taller than the tank) on one of the ends just to see if it really worked. It seemed too cost effective to not be more hype than substance. Anyway, it worked, pretty well in fact. It took about two weeks but it cleared up the bloom and also just improved the overall clarity of the tank, but it looked really ugly on the end panel. It didn't really fit in any of the sump compartments without modification and I prefer UV directly to the display anyway. I settled on mounting it sideways high on the sump panel. I barely notice it, most of the time.

PTS-2023-10-19.jpg


I was so happy with the results that the next time I went to the LFS I wasn't coming home without something to celebrate. As it happens, the LFS had just recently fragged their Pink Fiji Bird Nest so...

FTS_20231029.jpg


That's it between the Purple Stylo and the Purple Rim Trumpet. Also by this time the Kryptonite Trumpet had split from two to four heads and I had mounted the Green Fiji Birds Nest to a rock. Also around this time I added an ATO. I had a JBJ Nano ATO on the Waterbox that worked flawlessly for over a year, until I let the reservoir run dry and burn out the pump. I ordered a replacement JBJ Nano ATO but it would never dial in correctly so I disconnected it and did hand top offs the last few months of the Waterbox. I set about fixing that as I was already tired of remembering to top off the lagoon, and I had a nice new 10 gallon reservoir sitting under the tank just waiting to be hooked up. By using the controller/sensor from the original JBJ Nano with the pump from the replacement JBJ Nano, and resetting it several times, I finally got it to dial in and it has been working fine since. I'll probably replace it with something like the new Tunze ATO someday but for now it works.
 
Last edited:
OP
OP
tharbin

tharbin

5000 Club Member
View Badges
Joined
Oct 22, 2021
Messages
5,199
Reaction score
35,209
Location
Arizona
Rating - 0%
0   0   0
November 2023 - Added Black Ray Goby and Peach Hammer

During November I added the last two current inhabitants to the tank:

a Black Ray Goby, they also had a Randall's Pistol Shrimp but their price was insane so I passed on it.

Black-Ray-1.jpg


and, as an early Christmas present from my wife, a Peach Hammer

PeachHammer.jpg


When I added the goby and hammer I went ahead and mounted the Pink Fiji Bird Nest to a rock. I then left well enough alone to see how things were settling in.

Immediately after adding the Black Ray Goby and Peach Hammer

FTS_20231105.jpg


The end of November; I used a very old DSLR camera for these shots to see if I could get the in tank colors to be more natural but it really messes up the color of the lights. The tank is bluesish-white most of the day.

FTS-20231129.jpg


FTS-R-20231129.jpg


Nothing else changed until after the first of the year but I started to notice that the Green Fiji was not extending its polyps as much on the front (away from the lights) side. I determined to let my Christmas wish list help the tank to thrive, or at least survive better.
 
OP
OP
tharbin

tharbin

5000 Club Member
View Badges
Joined
Oct 22, 2021
Messages
5,199
Reaction score
35,209
Location
Arizona
Rating - 0%
0   0   0
January 2024 - Added third Nero 3 and second AI Blade Grow 39”

It was obvious that I needed better lighting, not necessarily more but better distributed. I decided that rather than add a third Prime 16HD, it would be better, probably, to add a second Blade Grow. By putting it in front of the Primes it should even out the light and help the Green Fiji. I also thought the flow in the center of the tank could use a boost so after a lot of back and forth decided on another Nero 3 for now. I'm not sure that is really the best choice but at least it gives me some placement flexibility plus it would just be another device in MyAI so no new apps.

I made another set of Blade brackets for the light mount bar and put it on the same schedule with the Primes and other Blade (Dave Saxby's Hydra 26 schedule). I also added the new Nero 3 near the center of the tank. The two outside Nero 3s are running a 180 degree sync pulse-mode at 75 percent and 25 second on/off and I set the new one to random-mode at 50/20 percent with medium variance. All three pumps go to 30 percent constant when the lights are off. I used the old DSLR for this shot as well so pretend it is blueish-white instead of purple.

FTS-L-20240104.jpg


That takes care of bringing the tank more or less current.
 

HAVE YOU EVER KEPT A RARE/UNCOMMON FISH, CORAL, OR INVERT? SHOW IT OFF IN THE THREAD!

  • Yes!

    Votes: 32 45.7%
  • Not yet, but I have one that I want to buy in mind!

    Votes: 9 12.9%
  • No.

    Votes: 26 37.1%
  • Other (please explain).

    Votes: 3 4.3%
Back
Top