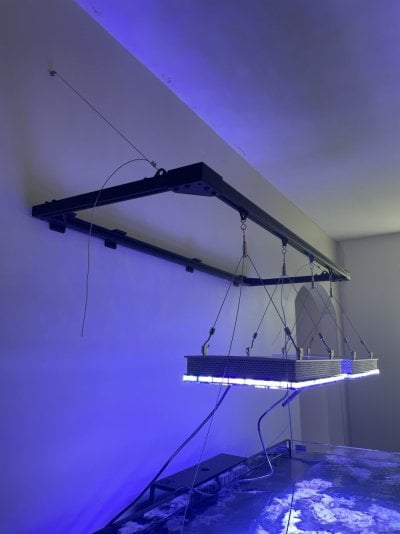
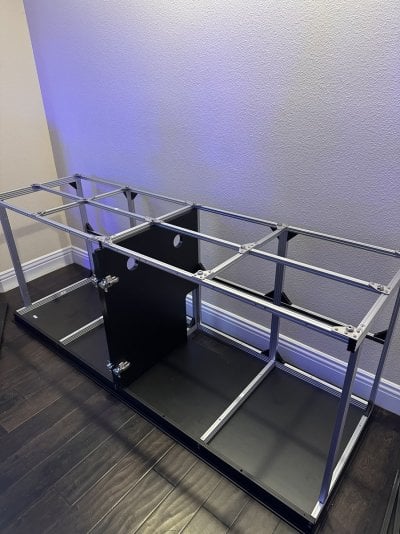
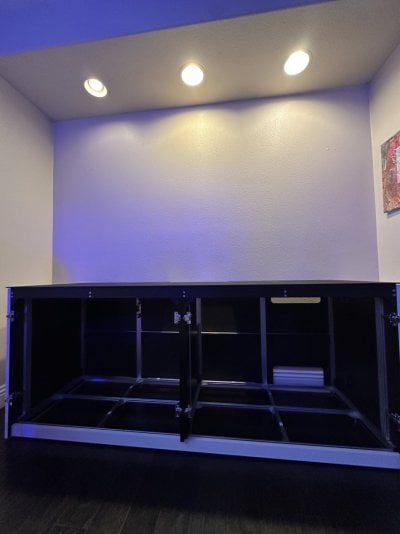
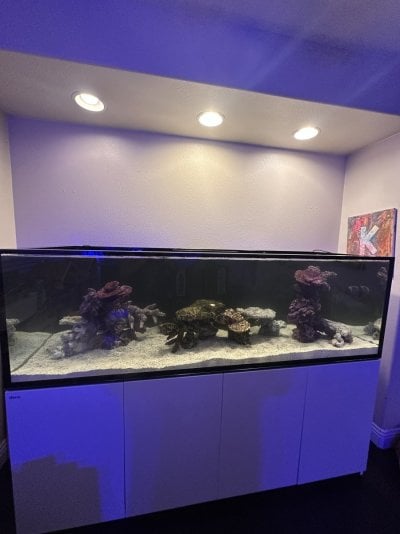
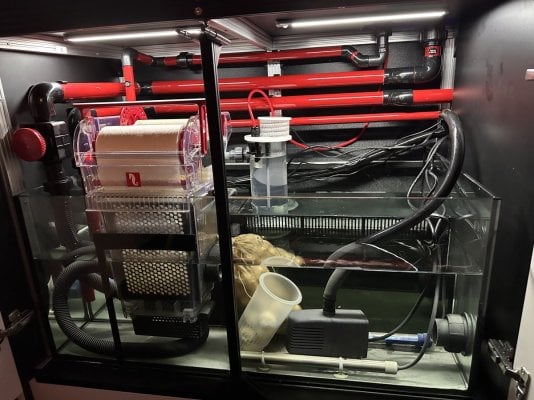
Do they have the light bars on their site?I just finished installing my light bars yesterday.
Navigation
Install the app
How to install the app on iOS
Follow along with the video below to see how to install our site as a web app on your home screen.
Note: This feature may not be available in some browsers.
More options
You are using an out of date browser. It may not display this or other websites correctly.
You should upgrade or use an alternative browser.
You should upgrade or use an alternative browser.
Show Us Your T-Slot Aluminum Stands !
- Thread starter Finatik
- Start date
-
- Tags
- t-slot aluminum
- Tagged users None
The panel has two metal sides, with the middle being corrugated plastic. It is very sturdy and fully rigid. The panels attach with magnets. To remove them you just pull the panel off the magnet latch and then lift them right off. The panels sit inside these grooved panel holders that you hammer into the T slot of the bottom bar.
Alufab has been awesome, cannot recommend them enough. Stand is definitely sturdy even on the casters. I prefer overkill though so even after getting things situated I did end up ordering some additional supports and such off tnutz, which is a lot cheaper than true 80/20 (and what Alufab uses) because its a softer alloy of aluminum.

Alufab has been awesome, cannot recommend them enough. Stand is definitely sturdy even on the casters. I prefer overkill though so even after getting things situated I did end up ordering some additional supports and such off tnutz, which is a lot cheaper than true 80/20 (and what Alufab uses) because its a softer alloy of aluminum.
- Joined
- Jan 4, 2019
- Messages
- 542
- Reaction score
- 816
Awesome. Thank you! When the time comes, I may just reach out and see if they'll make just panels for me. May even do both tanks hahaThe panel has two metal sides, with the middle being corrugated plastic. It is very sturdy and fully rigid.
Alufab has been awesome, cannot recommend them enough. Stand is definitely sturdy even on the casters. I prefer overkill though so even after getting things situated I did end up ordering some additional supports and such off tnutz, which is a lot cheaper than true 80/20 (and what Alufab uses) because its a softer alloy of aluminum.

They have photos of them. I'll get some photos to post here when mine arrive. My understanding is its just two very long bars attached vertically to the back of the stand, at the top and bottom horizontal extrusions of the stand. From there the horizontal hanger bars are just attached to the vertical ones and include gussets so they don't sag or anything. Heres the gallery photo of them:Do they have the light bars on their site?

My old tank had something similar DIY'd with 10-series 80/20 onto the Innovative Marine extrusion stand to hang an Aquatic Life hybrid fixture. I also ordered some additional pieces from Tnutz to mount my hybrid fixture to the bars when they arrive, as the few examples online didnt seem to attach it quite how I'd like.
If anyone sees this and wants to try the same, you can contact Aquatic Life directly and they'll send you these M5 screws that fit in the grooves of the fixture to try.
I don't believe they do but you can see them in some of the pictures in the tank stand galley. Just tell them what you want and they can make it.Do they have the light bars on their site?
Mine looks like this.
I don't believe they do but you can see them in some of the pictures in the tank stand galley. Just tell them what you want and they can make it.
Mine looks like this.

I'm liking this black aluminum look more and more. I was trying figure out how I would hang my six Noopsyche K7 on a braced tank. This might might be the ticket. Thanks.
I'm going to have two Neptune Sky's on mine. With the right t-nuts and maybe a washer they will slide right in to the channels.I'm liking this black aluminum look more and more. I was trying figure out how I would hang my six Noopsyche K7 on a braced tank. This might might be the ticket. Thanks.
I wanted a way to keep the HDPE sheets secured and in place on the stand but still be removable and adjustable. VHB tape seemed annoying and I didn't want to add any fasteners into the sheets.
Placing the panels on top of these inserted gaskets added more than enough friction that the panels no longer slide once laid on top of the stand. Once the tank or sump is full the sheet wouldn't move anyways, but this was a nice find in the meanwhile.

 www.tnutz.com

I'm also going to try these rubber strips on the light bars so there isn't any chance of the bars deflecting and hitting the back of the tank over and over for whatever reason over time.

 www.tnutz.com

Placing the panels on top of these inserted gaskets added more than enough friction that the panels no longer slide once laid on top of the stand. Once the tank or sump is full the sheet wouldn't move anyways, but this was a nice find in the meanwhile.

(GAS-015-B) 15 / 40 Series Black Rubber T-Slot cover – per foot | TNUTZ
The gasket is 100% equivalent to the following manufacturers: 80/20 - #2876
 www.tnutz.com
I'm also going to try these rubber strips on the light bars so there isn't any chance of the bars deflecting and hitting the back of the tank over and over for whatever reason over time.

(BUM-015-TS) 15 / 40 Series Rubber Tread Strip – per foot | TNUTZ
The tread strip is 100% equivalent to the following manufacturers: 80/20 - #12006
 www.tnutz.com
I traded some frags for some 8020 that was a light rack for a large display. I bought some double anchors and had a good friend @neonreef3d mill out the counterbores on his cnc machine. Now my son will start his first reef tank in style, lucky kid.
This thread came in very handy- I just found a bunch of 25x50 black anodized extrusion and hardware slated for the metal recycler at work- a couple dozen 36" lengths, corner braces, and some ~16" sections as well. Some trimming on a chop saw and I should have quite a nice stand for ~zero cost in materials. Just need to tap the legs for some leveling feet.
Last edited:
Ah, on closer look its 1020 (1x2" fractional) profile.
Man, I'm gonna be a little too fancy on a budget here- this stuff adds up quick 
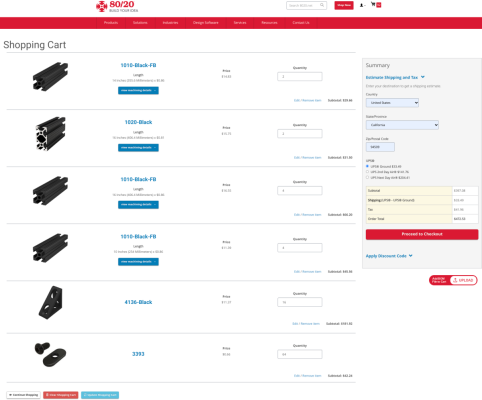
All this stuff is set aside for me, I will just need to chop some of the shorter pieces to size. Looking at pricing on the 8020 website shows this- I just need to source the endcaps and some feet. I will have a few spare sections too, so will probably make a light bar too.

Since I have the stuff anyway I figure I will just build it a little bigger than i need, and add some more pieces for support for smaller tanks. Think I will build it to accept a 40 breeder, and run a 20 long on it in the meantime, with a cross brace under then narrow ends of the 20 long for support, and a layer of plywood painted over the top so there arent any gaps.
All this stuff is set aside for me, I will just need to chop some of the shorter pieces to size. Looking at pricing on the 8020 website shows this- I just need to source the endcaps and some feet. I will have a few spare sections too, so will probably make a light bar too.
Since I have the stuff anyway I figure I will just build it a little bigger than i need, and add some more pieces for support for smaller tanks. Think I will build it to accept a 40 breeder, and run a 20 long on it in the meantime, with a cross brace under then narrow ends of the 20 long for support, and a layer of plywood painted over the top so there arent any gaps.
Well, got a little stand together for my 5.5 gallon with some of the smaller bits I was able to scrounge. This stuff is fun! It cut perfectly with the cheap blade that came with my ten year old Harbor Freight contractor type miter saw.
I'm fairly certain this is the smallest stand anyone has made out of this stuff- the uprights and longer horizontal bits are only 16" long to fit the space this is in, and because that dimension required less cuts from longer pieces I have reserved for other projects.
No leveling feet, as it's on carpet. Gonna add some plywood on the lower shelf later.
Yeah, there's no way I would be paying full price if buying this all outright!
I do say though, it was pretty fun to work with, feels very mad scientist compared to working with wood. I'm really looking forward to doing the bigger one next.
I do say though, it was pretty fun to work with, feels very mad scientist compared to working with wood. I'm really looking forward to doing the bigger one next.
Significantly cheaper at t-nutz!
But, of course, this is looking at the exact options I have available to me from what I was able to scrounge. Costs could be reduced a bit by choosing more basic corner gussets/supports.
Also- this is cost for the small stand I built- half as a joke, half because I needed something functional, and also as a skill building exercise to become familiar with the stuff in prep for building bigger later. Cost will scale Another ~100-140$ or so higher to build a 36" tall, 36" long, 16" wide stand for a 40 breeder. This compares to the maybe ~100$ or so in materials I paid to build my wood stand for my existing 40 breeder, but there was significantly more labor and time involved, and it is nowhere near as easy to expand, and it is much more bulky. Not a bad trade-off.
This was a really great thread to read. I was wondering if anyone could provide input on adding a horizontal beam down the middle of my Waterbox ALU4820 stand. Was wondering if it would be frowned upon or if it could possibly provide some additional structural integrity. Have a few extra pieces of T slot so just was curious.
I highlighted the additional beams I was considering adding. Appreciate your time and input.


I highlighted the additional beams I was considering adding. Appreciate your time and input.
Similar threads
- Replies
- 4
- Views
- 100
- Replies
- 26
- Views
- 442
- Replies
- 4
- Views
- 323
- Replies
- 11
- Views
- 294


