Navigation
Install the app
How to install the app on iOS
Follow along with the video below to see how to install our site as a web app on your home screen.

Note: This feature currently requires accessing the site using the built-in Safari browser.
More options
You are using an out of date browser. It may not display this or other websites correctly.
You should upgrade or use an alternative browser.
You should upgrade or use an alternative browser.
Salty stage: Have you ever built a DIY aquarium stand?
- QUESTION OF THE DAY
- Thread starter Peace River
- Start date

Have built many, going back 40 years or so. Basic skinned dimensional lumber, reinforced plywood cabinetry, built into walls, free-standing 360 degree viewable, big stands, small stands... yeah.
With my current tank, a 140g peninsula, intended to be up against a wall on one end, with the sump and other equipment in a closet behind that wall, I designed a wood stand, furniture grade 3/4" plywood. I wanted a bar top all the way around 3 sides of the tank. Since there was no equipment under the tank, I was looking at a bookshelf sort of arrangement.
When it came time to build, I stopped, and thought about it. Hm. Anything else I should look at, before spending several hundred bucks on plywood? I did a quick cad drawing of a steel frame. 1.5" square tube, 12 gauge. Sent that cad drawing to a local fab shop for a quote. Materials and labor for cutting it out, welding it all up came to less than what I was going to pay for the plywood. Called a local powder coating company, they said they'd sand blast the mill scale off and powder coat with gloss black, $100.
So... DO IT!
A bit of ply for the bar top, let my daughter paint the top, cover the artwork with some bartop poly, a pair of custom bookshelves (they're not bearing any weight)... bit of oak trim. Stand's been there for several years now, no issues. Strong enough to park a car on it, if I wanted to.
Point is, don't discard ideas in order to go traditional.

ca1ore
10K Club member
- Review score
- +0 /0 /-0
R2R Supporter
R2R Excellence Award
Reef Tank 365
CTARS Member
Article Contributor
R2R TV Featured
Build Thread Contributor
- Joined
- Oct 28, 2014
- Messages
- 13,617
- Reaction score
- 19,312
- Review score
- +0 /0 /-0
- Location
- Stamford, CT
Not a reef tank (obviously), but 1992 was the last time i used a commercial stand. DiY only since then.

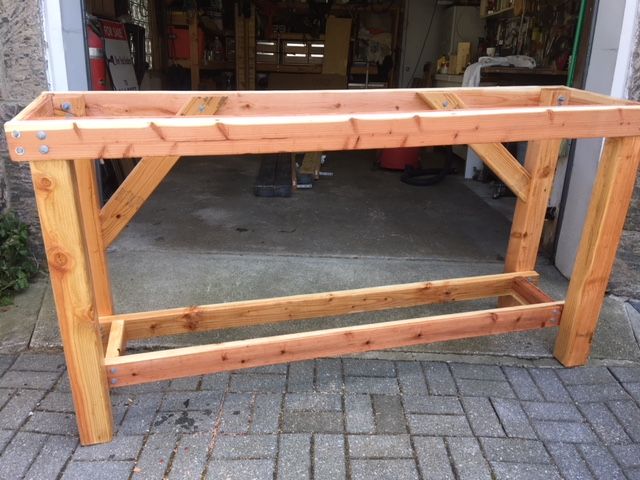
Great jobPlan and measure then measure again. glue and screw all joints. I've had premade stand in the past, and wanted the 400 to be a complete DIY by my wife and me, Building the stand for the 400 was a lot of fun, I think we did ok!
View attachment 3115657View attachment 3115658View attachment 3115659View attachment 3115660View attachment 3115661View attachment 3115662View attachment 3115663View attachment 3115664View attachment 3115665View attachment 3115666View attachment 3115667
I built mine mostly due to cost. I could build one for a 1/3 of the cost of buying one. Also i noticed most people way over build their DIY stands. Doing that makes them very bulky and doesn't leave much room for a sump/equipment. I designed mine using a safety factor of 2 and its very solid.


My brother and I build and sell log furniture and reclaimed barnwood furniture, so I went the route of barnwood on my stand. The four corners are supported by massive barnwood beams and the sides/trim are barnwood siding. The inside is overbuilt with 2x6 framing and joists under the aquarium plywood pad.


When I made the decision to downsize I pictured a big empty wall where the tank used to sit. First I was getting completely OUT! Then I decided to keep my side stand which fit an IM Nuvo 40AIO. Well she missed the side stand as she always sat stuff on it before we left the house. Well ended up building another "side stand" which still houses the 10G ATO container in a pull out drawer) and space for water tests, laptop and what nots. Then she decided to expand her Click N Gro so now we are back to 3 semi matching stands. I do believe the C02 exchange is helping boost up pH...Thanks, it helps having a table saw and router table. I used the Kreg pocket hole fixture for most of the screws. I used plugs and sanded them flush so the screws are no longer visible except for the the one I need to remove occasionally for maintenance.It took a while to build also. My wife wants me to build her kitchen cabinets next. I built one for the garage as a test run. It has drawers and doors on both front and back and one side will be against the wall.
View attachment 3115963
Last edited:
Fungusamongus
Community Member
- Review score
- +0 /0 /-0
Pacific Northwest Reefers
Build Thread Contributor
Planning my 75g build now. Have many ideas. My biggest issue is having a 2 year old and making sure he cannot get into the sump compartment where the chemicals are. Planning on using magnets to hold on the side panels. The panels material themselves is what i havemt decided on yet, but i have some time. Trying to be cost effiective but make it look good.
tbrown3589
It's just me
- Review score
- +0 /0 /-0
Hospitality Award
Build Thread Contributor
- Joined
- Nov 22, 2019
- Messages
- 33,924
- Reaction score
- 53,931
- Review score
- +0 /0 /-0
- Location
- Peoria, AZ
My 125, 110, and 75 are all on DIY welded square stock and angle iron stands. They're severely overbuilt but they were cool projects.
About ten years ago I was setting up my first marine tank since the 80's - a 55 gallon. My wife and I wanted something attractive for the living room. Before starting the construction in my basement workshop, I measured the space from the basement stairs to the ceiling to know how tall I could go.
I spent two weeks building it with a frame of two by fours covered by particle board and finished with knotty pine carsiding, trimmed with rope for a nautical look and brass drawer pulls and cabinet handles shaped like seahorses and shells.
When I was ready to move it upstairs I realized that the stairway ceiling curved downward at the bottom and the cabinet was about three inches too tall to fit up the stairs! I spent the next week wracking my brain trying to figure out how to get the stand upstairs before finally admitting defeat and setting the tank up in the basement.
Paul B
10K Club member
- Review score
- +0 /0 /-0
R2R Supporter
R2R Excellence Award
Reef Tank 365
Reef Of The Month
Article Contributor
Build Thread Contributor
- Joined
- Nov 3, 2010
- Messages
- 16,771
- Reaction score
- 55,844
- Review score
- +0 /0 /-0
- Location
- Long Island NY
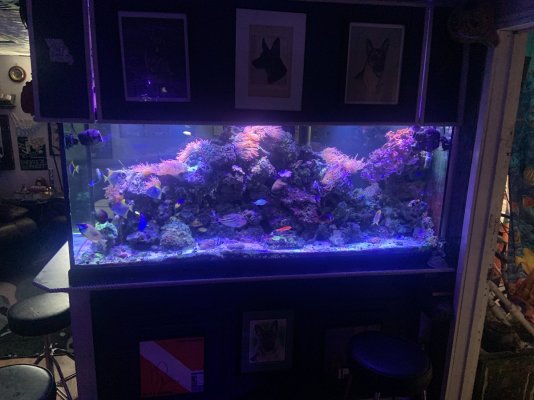
I built this out of redwood because it doesn't warp as much as pine. All the hardware is hot dipper galvanized bolts.
No screws. I designed it to have as little wood to wood contact as I can.

No screws. I designed it to have as little wood to wood contact as I can.
Paul B
10K Club member
- Review score
- +0 /0 /-0
R2R Supporter
R2R Excellence Award
Reef Tank 365
Reef Of The Month
Article Contributor
Build Thread Contributor
- Joined
- Nov 3, 2010
- Messages
- 16,771
- Reaction score
- 55,844
- Review score
- +0 /0 /-0
- Location
- Long Island NY
Double post
Last edited:
Great idea pit to action... Is it finished?Plan and measure then measure again. glue and screw all joints. I've had premade stand in the past, and wanted the 400 to be a complete DIY by my wife and me, Building the stand for the 400 was a lot of fun, I think we did ok!
View attachment 3115657View attachment 3115658View attachment 3115659View attachment 3115660View attachment 3115661View attachment 3115662View attachment 3115663View attachment 3115664View attachment 3115665View attachment 3115666View attachment 3115667
Yes, here is the write up from my build thread. Still going strong over 10 years later.
The Stand:
The stand was made and designed by myself. There were a few requirements for the stand.
It was to be made of cherry. I wanted drawers like my kitchen cabinets.
The inside height of the drawers is 5 inches, exactly the height of a Salifert test kit.
The front and back needed to be as open as possible, the front to allow for sump removal if needed and the back for ventilation and the ability to utilize the wall for electronics mounting. The inside compartment had to accommodate the skimmer and calcium reactor I was planning on using.
The height of the stand is 40 inches to the tank platform, 41 to the top of the trim. Inside height from the melamine platform to the bottom of the drawers is 27 inches. The stand is 30 inches front to back in order to accommodate the vortechs and return plumbing and still place the stand only a couple inches from the wall. A 3 inch plank fills the gap to make up the 3inch difference between the canopy and stand and the aquarium.
The stand at 30 inches deep matches the distance from the wall of the front of the couch nearby. I utilized plywood to create glue-lam type supports rather than dimensional lumber. Even the frame has support features. The doors and trim were fabricated at a local cabinet shop to my specifications.
The stand literally started from the drawing board.
.jpg")
.jpg")
.JPG")
.JPG")
.JPG")
.JPG")
.JPG")
.JPG")
.JPG")
The Stand:
The stand was made and designed by myself. There were a few requirements for the stand.
It was to be made of cherry. I wanted drawers like my kitchen cabinets.
The inside height of the drawers is 5 inches, exactly the height of a Salifert test kit.
The front and back needed to be as open as possible, the front to allow for sump removal if needed and the back for ventilation and the ability to utilize the wall for electronics mounting. The inside compartment had to accommodate the skimmer and calcium reactor I was planning on using.
The height of the stand is 40 inches to the tank platform, 41 to the top of the trim. Inside height from the melamine platform to the bottom of the drawers is 27 inches. The stand is 30 inches front to back in order to accommodate the vortechs and return plumbing and still place the stand only a couple inches from the wall. A 3 inch plank fills the gap to make up the 3inch difference between the canopy and stand and the aquarium.
The stand at 30 inches deep matches the distance from the wall of the front of the couch nearby. I utilized plywood to create glue-lam type supports rather than dimensional lumber. Even the frame has support features. The doors and trim were fabricated at a local cabinet shop to my specifications.
The stand literally started from the drawing board.
I got a tank from a buddy that was one of those standard black rimmed tanks. But I hated the black rim so I designed a stand to cover it.


Similar threads
- Replies
- 33
- Views
- 812
- Poll
- Replies
- 1
- Views
- 336

- Replies
- 49
- Views
- 686
-
- Poll
- Replies
- 22
- Views
- 1,058