Replacing Glass Panel

CodyRVA

2500 Club Member
View Badges
Joined
Nov 12, 2015
Messages
2,539
Reaction score
1,584
Location
Wilmington, NC
Rating - 0%
0   0   0
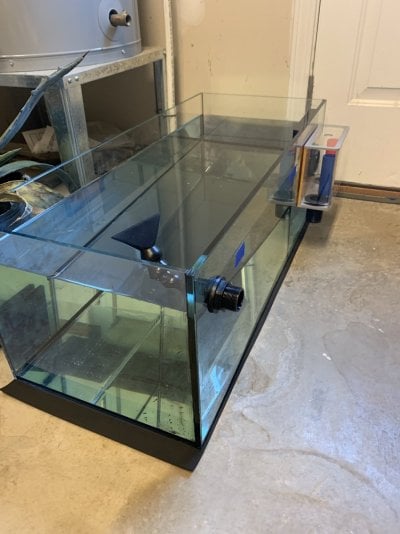
Question regarding replacing broken glass panels. I recently dug out an old IM 30GL, still in the box after 5 years, and the back panel had a full crack in it, top to bottom. I have since removed the back panel, sourced a new piece of glass, drilled it and I'm ready to install... or so I thought. I kept the seam of silicone between the good, existing, panels in tact. I only removed the silicone along the interior edge. My thought is/was I can keep the majority of the tank in tact, remove the interior silicone, preserve the small bead between the panels then apply a new seam between the new back panel and the rest of the tank. Then, once it cures, I can apply a new seam to the entire interior of the tank. I've seen many instances of exclusively removing the interior seams, leaving the tank in tact and applying a new interior seam of silicone with no issue.

Will this work?

Here's an image of my build thread of the broken panel.

Here's an image of my build thread of the tank prepped for silicone.
 

Ron Reefman

Lets Go Snorkeling!
View Badges
Joined
Aug 12, 2012
Messages
9,366
Reaction score
21,076
Location
SW Florida
Rating - 0%
0   0   0
IMHO, I think you are on the right track. Just be very, VERY sure you have all of the old silicone removed... especially along the ends of the glass where the new panel will attach.

New silicone does not adhere very well at all to old silicone. The glass ends are far more important than the inside joints. In fact, the last few tanks I built; I didn't even do an inside the tank coat of silicone. I tend to tear it up cleaning the glass over time, so why even bother putting it in. The tanks have all held up flawlessly. But then I was very sure of how well I had done the silicone that joined the panels together. I think the inside coat is more an 'insurance' seal.

You're doing a 30g tank and that really doesn't put a lot of pressure against the glass. The most recent tanks I've done have been 90g and 40g. And I was extra careful with the 90g tank.
 

vetteguy53081

Well known Member and monster tank lover
View Badges
Joined
Aug 11, 2013
Messages
96,707
Reaction score
215,505
Location
Wisconsin -
Rating - 100%
15   0   0
I thought I replied to this but apparently did not hit send. The tank glass appears to be clean and if not, MUST be free of silicone. It appears to be. You appear to have everything well prepped and have the correct tape. Using a clean cloth, clean area well with rubbing alohol.
Using AQUARIUM SEALANT (either aqueon or Marineland brand)- apply a generous bead into corner. Wet your finger and smooth it out uniformly starting from bottom and and run wet finger to the top. *you can also use a small popsicle stick)
Once done, allow to dry for at least 24 (i like 36 hours) hours then cold water test for a full 24 hours. If no leak- get ready to restart tank. Ive repaired at least 75 tanks at my LFS and for some friends. Prepping is key

1683042480903.png
 
OP
OP
CodyRVA

CodyRVA

2500 Club Member
View Badges
Joined
Nov 12, 2015
Messages
2,539
Reaction score
1,584
Location
Wilmington, NC
Rating - 0%
0   0   0
Thanks guys @Ron Reefman & @vetteguy53081. I'm a fairly meticulous person, I've spent a lot of time prepping the glass, but will certainly check again and ensure it's clean and good to go.

I did some more research last night on tank building and this IM 30 was definitely built via the silicone injection method. Before understanding this concept, I was very perplexed as how how I was going to align and fit this tank back together. I'm going to source some 90 degree corner clamps and get the ball rolling.

This is the silicone I'm planning to use, black to match the existing seams.
 

vetteguy53081

Well known Member and monster tank lover
View Badges
Joined
Aug 11, 2013
Messages
96,707
Reaction score
215,505
Location
Wisconsin -
Rating - 100%
15   0   0
Thanks guys @Ron Reefman & @vetteguy53081. I'm a fairly meticulous person, I've spent a lot of time prepping the glass, but will certainly check again and ensure it's clean and good to go.

I did some more research last night on tank building and this IM 30 was definitely built via the silicone injection method. Before understanding this concept, I was very perplexed as how how I was going to align and fit this tank back together. I'm going to source some 90 degree corner clamps and get the ball rolling.

This is the silicone I'm planning to use, black to match the existing seams.
Yes, im familiar with this silicone and regard it as reliable
 
OP
OP
CodyRVA

CodyRVA

2500 Club Member
View Badges
Joined
Nov 12, 2015
Messages
2,539
Reaction score
1,584
Location
Wilmington, NC
Rating - 0%
0   0   0
Water test is underway. I did an initial 3-4 inch test. Currently at max water height. So far so good, no leaks. This is edge seams only, no interior seams. Confident once I add interior seams I'll be in good shape.
 

Attachments

  • Tank.jpg
    Tank.jpg
    144.3 KB · Views: 55

vetteguy53081

Well known Member and monster tank lover
View Badges
Joined
Aug 11, 2013
Messages
96,707
Reaction score
215,505
Location
Wisconsin -
Rating - 100%
15   0   0
Water test is underway. I did an initial 3-4 inch test. Currently at max water height. So far so good, no leaks. This is edge seams only, no interior seams. Confident once I add interior seams I'll be in good shape.
Very positive outcome thus far
 

Ron Reefman

Lets Go Snorkeling!
View Badges
Joined
Aug 12, 2012
Messages
9,366
Reaction score
21,076
Location
SW Florida
Rating - 0%
0   0   0
IMHO the inside seal only does 20% of the work... if even that much. And it's easily damaged when cleaning the inside glass, especially with a scrapper blade.
 

HAVE YOU EVER KEPT A RARE/UNCOMMON FISH, CORAL, OR INVERT? SHOW IT OFF IN THE THREAD!

  • Yes!

    Votes: 32 45.7%
  • Not yet, but I have one that I want to buy in mind!

    Votes: 9 12.9%
  • No.

    Votes: 26 37.1%
  • Other (please explain).

    Votes: 3 4.3%
Back
Top