DIY Robotic Tester - BoraTronic

jgirardnrg

Valuable Member
View Badges
Joined
Oct 9, 2019
Messages
1,590
Reaction score
2,413
Location
Berlin, CT
Rating - 0%
0   0   0
Following...
Deer Popcorn GIF
 

thatmanMIKEson

Reefing ain't easy$
View Badges
Joined
Jan 10, 2021
Messages
5,104
Reaction score
5,133
Location
florida
Rating - 0%
0   0   0
The vials I bought (from China) are most likely exacly the same as in MasterTronic:

20220106_102436.jpg
Why would the vial need to be so similar? Does it effect anything, or just similar is the best way to go for testing procedures?
Sorry I'm not a smart man, most of this is way over my head, but I was wondering why you try to make it so similar to an already existing product?

Anyway good information and one of a kind threads, thanks!
 
OP
OP
Borat

Borat

Valuable Member
View Badges
Joined
Apr 4, 2021
Messages
1,569
Reaction score
1,878
Location
United Kingdom
Rating - 0%
0   0   0
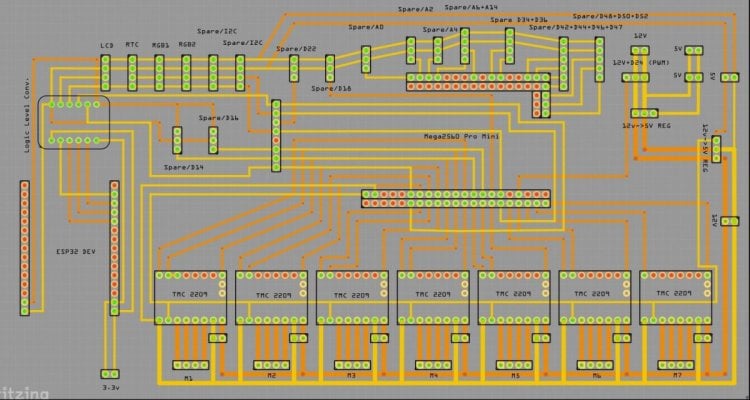
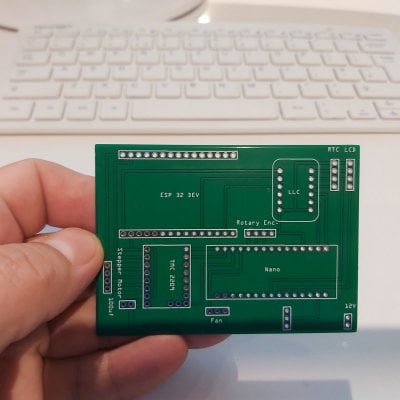
I have never designed a PCB - this was my first experience with Fritzing software..

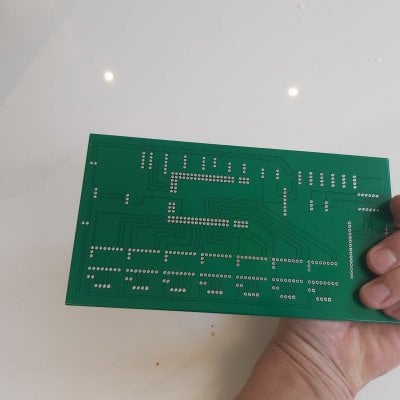
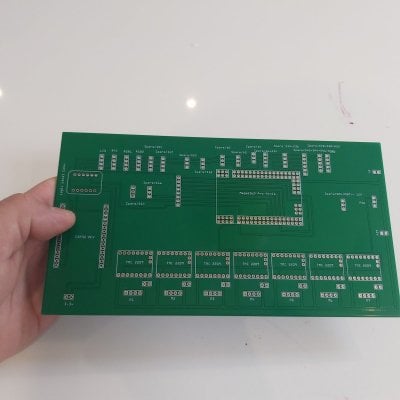
I already ordered PCBs from China a week ago but I made one mistake in assuming that Mega 2560 R3 Pro Mini is the same as Mega 2560 Pro Mini.. So I wasted a bit of money as those PCBs are not useful.. One the more positive side - I also ordered some PCBs for my peristaltic pump and those worked as designed. So I am confident that the newly ordered PCBs will be as desired - should arrive next week.

Here's the Friting sketch:

Capture9.JPG

These are PCBs I received last week:

Incorrectly designed BoraTronic PCB
20220103_110413.jpg

20220103_110405.jpg

Good PCB - for my peristaltic pump upgrade:
20220104_161102.jpg

20220104_231319.jpg
 
OP
OP
Borat

Borat

Valuable Member
View Badges
Joined
Apr 4, 2021
Messages
1,569
Reaction score
1,878
Location
United Kingdom
Rating - 0%
0   0   0
Why would the vial need to be so similar? Does it effect anything, or just similar is the best way to go for testing procedures?
Sorry I'm not a smart man, most of this is way over my head, but I was wondering why you try to make it so similar to an already existing product?

Anyway good information and one of a kind threads, thanks!
Some of the devices I build surpass in quality/complexity similar commerical products (I think).

I spent quite some time learning how MasterTronic was designed (based on some limited information, videos, online specs etc), of couse - I don't know what's inside but I can infer with 95% confidence all component parts. My conclusion was that MasterTronic is really smartly built - it really is a work of genious.. well even genious make mistakes - and the example with syringe needle blunder is one of them (this will obviously be not an issue in my device!). I don't see a point in re-inventing the wheel if the wheel is already perfect.

Now - to your question why do I build this:
- try it yourself and you will understand how complex this device is (especially how difficult to make it really small). Even if someone will show you every little part of it - does not mean that you may ever be able to build it even with best efforts. So it's a self-challenge to build something like this - sort of mini hobby project.
- secondly - I just like DIY and I enjoy thinking about it, overcoming difficulties and designing ways to deal with problems. Remember, there are no threads such as this to lean/follow from (for me) - it's all a complete new learning curve. You are priviledged to learn all this knowledge from my cultural Kazakistan learnings - and I am glad to share them with you.
- finally, MasterTronic will cost you twelve hundred bucks ($1200). I will be building mine for about $250 - $300.
 
Last edited:
OP
OP
Borat

Borat

Valuable Member
View Badges
Joined
Apr 4, 2021
Messages
1,569
Reaction score
1,878
Location
United Kingdom
Rating - 0%
0   0   0
Why would the vial need to be so similar? Does it effect anything, or just similar is the best way to go for testing procedures?
Sorry I'm not a smart man, most of this is way over my head, but I was wondering why you try to make it so similar to an already existing product?

Anyway good information and one of a kind threads, thanks!
Vials don't need to be similar.. But I assessed that 20ml vials are about the right size for the reagents. I also noted that mastertronic vials are brown. I did buy brown vials before (e.g. to store lugoil solution) and I already knew why they are brown - to limit the impact of light on some chemicals that require dark storage.

So I started searching for brown 20ml vials - and then found some on Amazon - delivery from China (not easy to find!). It took me 3 weeks before these were delivered (versus normal 1 day delivery for anything ordered on Amazon here in UK). After I have recieved those vials I realised they are exactly the same as in MasterTronic (at least visually) - except I didn't get proper septa caps (caps are exactly the same from first look - except they don' have the 10mm hole for membrane access).. So in some way they are similar to MasterTronic - by pure accident.

MasterTronic uses 12 reagent vials - this requires slightly larger footprint from the rotating vial rack. I don't need 12 reagent vials - I decided to have only 9.

9 Vials will allow me to test Nitrate, Phosphate and I will still have 4 spare vials for some other test (I have my AlkX monitor - similar to Alkatronic and I am not interested in additional Alk testing, also my magnesium level does not change much - so I end up only testing magnesium once every 3-4 months).. I can also utilise some spare vials by using hydrochloric acid to clean syringe/test vial or use spare vials as spare reagent supplies for N03 and PO4, similar to how MasterTronic is setup.
 
Last edited:
OP
OP
Borat

Borat

Valuable Member
View Badges
Joined
Apr 4, 2021
Messages
1,569
Reaction score
1,878
Location
United Kingdom
Rating - 0%
0   0   0
Adafruit RGB sensor- I will use 2 of those, one to check the colour of testing vial and another to position reagent rack.

20211207_182150 (1).jpg
 

thatmanMIKEson

Reefing ain't easy$
View Badges
Joined
Jan 10, 2021
Messages
5,104
Reaction score
5,133
Location
florida
Rating - 0%
0   0   0
Some of the devices I build surpass in quality/complexity similar commerical products (I think).

I spent quite some time learning how MasterTronic was designed (based on some limited information, videos, online specs etc), of couse - I don't know what's inside but I can infer with 95% confidence all component parts. My conclusion was that MasterTronic is really smartly built - it really is a work of genious.. well even genious make mistakes - and the example with syringe needle blunder is one of them (this will obviously be not an issue in my device!). I don't see a point in re-inventing the wheel if the wheel is already perfect.

Now - to your question why do I build this:
- try it yourself and you will understand how complex this device is (especially how difficult to make it really small). Even if someone will show you every little part of it - does not mean that you may ever be able to build it even with best efforts. So it's a self-challenge to build something like this - sort of mini hobby project.
- secondly - I just like DIY and I enjoy thinking about it, overcoming difficulties and designing ways to deal with problems. Remember, there are no threads such as this to lean/follow from (for me) - it's all a complete new learning curve. You are priviledged to learn all this knowledge from my cultural Kazakistan learnings - and I am glad to share them with you.
- finally, MasterTronic will cost you twelve hundred bucks ($1200). I will be building mine for about $250 - $300.
Thats amazing, and your right nothing for you to get ideas from but yourself and your skills, good job, im sure others like you will be inspired!

Very cool stuff!
 

Biff0rz

Valuable Member
View Badges
Joined
Jul 9, 2020
Messages
1,773
Reaction score
966
Location
USA
Rating - 100%
2   0   0
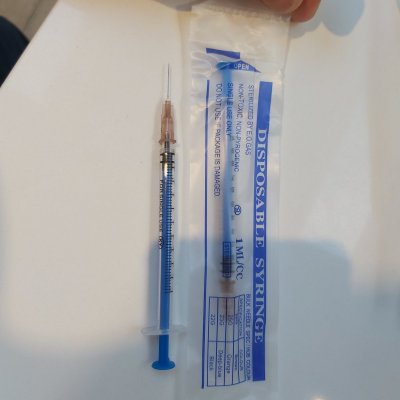
Some syringes:

I bought a wrong set of syringes - as I knew nothing about them. Firstly, the needle needs to be at least 80mm. MasterTronic erroneously (probably by design fault) uses 60mm needes and for that reason it's unable to draw the majority of reagent from vials as the vials themselves are 60mm tall (it can draw a maximum of 12ml out of 20ml available, i.e. only 60% of reagent!).

Secondly - there are different ways in which the needle is connected to the syringe: one is called Luer Slip and another is called Luer Lock.

Luer Slip is what you encounter most - by just pushing the needle into syringe until it's firmly in it. Luer Lock is where the needle screws into syringe.

Disclaimer: I don't have a MasterTronic - but I inferred it from reading the MasterTronic manual and studying the technicalities of syringes.

So after getting wrong type of needles (too short), I re-ordered 100x of 80mm needles but these came with with Luer Lock connector. I then had to order new 20x syringes with Luer Lock Connector. Waiting for delivery...


20220106_101823.jpg
Pro tip (since I know WAY too much about needles now).

Go with luer slip
use 1ml syringes
the 60mm was done on purpose, so they can charge $2.50/needle.
explore different gauge options for the needles - a design flaw of the MT is the use of 21g needles. They clog constantly and need to be changed. For example, there's no reason why the vent needle cannot be 18g or 16g. If you can use a 18g for the primary needle, you'll have less clogging imo.
 
OP
OP
Borat

Borat

Valuable Member
View Badges
Joined
Apr 4, 2021
Messages
1,569
Reaction score
1,878
Location
United Kingdom
Rating - 0%
0   0   0
Pro tip (since I know WAY too much about needles now).

Go with luer slip
use 1ml syringes
the 60mm was done on purpose, so they can charge $2.50/needle.
explore different gauge options for the needles - a design flaw of the MT is the use of 21g needles. They clog constantly and need to be changed. For example, there's no reason why the vent needle cannot be 18g or 16g. If you can use a 18g for the primary needle, you'll have less clogging imo.
Thank you - this is really great advice!

For now I oredered 23G needles, but a bulk of 100 needles only cost £13, so really cheap per needle. I will start with Luer Lock and change to Luer Slip later if necessary.

The actuator will have generic clips for both Luer Lock and Luer Clip syringes and it's max positioning from point zero will be about 120mm (verus only 60mm clearance needed to reach the vial bottom), so I will be able to replace both the syringes and the needles later.

This is one other beauty of DIY devices - you are not tied to standard components and you can adjust the code or hardware to whatever you want!
 

ineption

Active Member
View Badges
Joined
Mar 19, 2019
Messages
156
Reaction score
130
Rating - 0%
0   0   0
Watching with interest.
What's very impressive for me is how you going to code the software. Although Hardware is nothing to sneeze at, but software boards ect that's what makes the machine.
Will the machine be able to send notifications?
Where did you learn to code? Is it only forums ect or you do this kind of thing for a living?
 
OP
OP
Borat

Borat

Valuable Member
View Badges
Joined
Apr 4, 2021
Messages
1,569
Reaction score
1,878
Location
United Kingdom
Rating - 0%
0   0   0
Watching with interest.
What's very impressive for me is how you going to code the software. Although Hardware is nothing to sneeze at, but software boards ect that's what makes the machine.
Will the machine be able to send notifications?
Where did you learn to code? Is it only forums ect or you do this kind of thing for a living?
Software is not going to be that difficult (at least for me) - the whole testing process is effectively a script, a bit more complex than PH test but still it's a bit like telling the rig to follow testing manual
PCB will have wifi-connected chip through which one should be able to operate the device and yes - all of my DIY devices nowdays send email notifications

I did know how to code from an early age (the dark ages of computer sciences) but learning how to code in Arduino is easy even if you are a complete novice. You can just google your component and there will be a mini-project explaining how to connect electronic components and what the code is to run it. And finally, no - I don't do anything remotely close to this project for living..
Capture10.JPG
 
OP
OP
Borat

Borat

Valuable Member
View Badges
Joined
Apr 4, 2021
Messages
1,569
Reaction score
1,878
Location
United Kingdom
Rating - 0%
0   0   0
Additional set of parts arrived this morning:

3 Way Corner Joint Bracket Connector
20220108_084447.jpg

Set of plastic motor gears
20220108_084457.jpg

Rotary encoder I2C expansion board
20220108_084513.jpg

Acrylic tube (will be used to construct reagent rack)
20220108_084523.jpg
 
OP
OP
Borat

Borat

Valuable Member
View Badges
Joined
Apr 4, 2021
Messages
1,569
Reaction score
1,878
Location
United Kingdom
Rating - 0%
0   0   0
..another thing that came to my mind is that whilst MasterTronic was being designed is that he (aka Kit Yan Eric Tang) realised that a lot of components naturally fit into the back of the box and some of these are very heavy: 12V PSU, a bunch of stepper motors, moving rig etc. I think he then started to think about how to spread the weight a bit - it's difficult to make the box well-balanced (unless you make it into a black box) but it's possible to distribute some of the weight away from the back of the unit into the middle of the unit: this is one of the reasons he may have placed dosing pumps and motors above the reagent rack.. and the heavy PSU is probably located at the front on the left hand side..
 
Last edited:
OP
OP
Borat

Borat

Valuable Member
View Badges
Joined
Apr 4, 2021
Messages
1,569
Reaction score
1,878
Location
United Kingdom
Rating - 0%
0   0   0
As I was waiting for parts to be delivered, I already pre-built this mini mitre box - allowing me to make straight cuts to the 2020 aluminium extrusion profiles:

20220108_132352 (1).jpg
 
OP
OP
Borat

Borat

Valuable Member
View Badges
Joined
Apr 4, 2021
Messages
1,569
Reaction score
1,878
Location
United Kingdom
Rating - 0%
0   0   0
This mitre box saved me a lot of time!


Align!
20220108_125338.jpg

Visual check!
20220108_125355.jpg

Cut!
20220108_125615.jpg
Done!
20220108_131638.jpg
 
Last edited:

Chrisv.

2500 Club Member
View Badges
Joined
Mar 17, 2012
Messages
3,379
Reaction score
3,998
Location
United States
Rating - 0%
0   0   0
When you're ball done, will you be sharing a parts list and links to where they can be purchased?
 
OP
OP
Borat

Borat

Valuable Member
View Badges
Joined
Apr 4, 2021
Messages
1,569
Reaction score
1,878
Location
United Kingdom
Rating - 0%
0   0   0
When you're ball done, will you be sharing a parts list and links to where they can be purchased?
Parts list will be there towards the end.. Whilst I am sure of the 90% of parts purchased will be used, I am about 50% sure about the remaining 10% parts...

But if you want to start early and move along- just ask!
 
Back
Top