Cryptic problem: RO membranes clog up. Please help

A_Blind_Reefer

Valuable Member
View Badges
Joined
Aug 13, 2019
Messages
2,088
Reaction score
2,772
Rating - 0%
0   0   0
Good morning all! I got a bunch of stuff done yesterday night.
Time for updates:

Check your water flow (in addition to the pressure)!
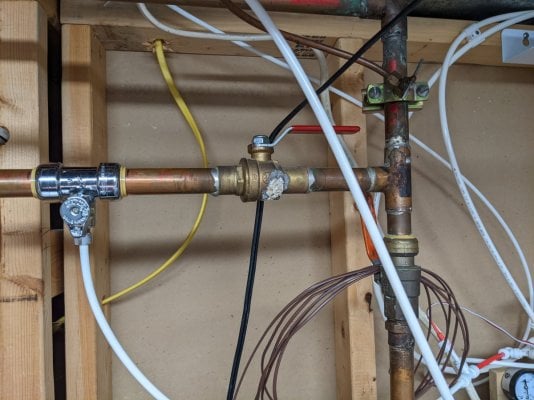
So I installed the sharkbite tee and shut-off valve combo. Here is what it looks like:
PXL_20220712_211301368.jpg

I compared the water flow between the saddle valve and this new tee based shut-off valve. WOW
The difference is night and day!

Just like I posted earlier, the measured pressure is exactly the same...around 70 PSI. However the flow of water shooting out is much, much faster from the shut-off valve. Why? Clearly it is the orifice size difference.

Why does it matter to us?
Well, when we flush the membrane, it is the flow of water which will flush away the sediments and impurities from the RO membrane. In my case, the flow was too low. So even if I flushed, the membrane was probably not getting cleaned/flushed.

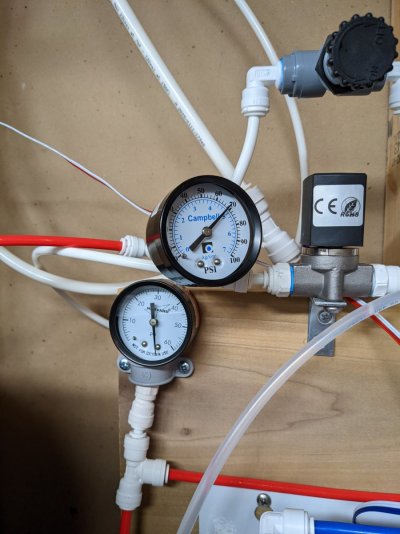
Showing pressure when the outlet is shut off. Notice both gauges show almost the same 70 psi:
PXL_20220712_211232155.jpg

Another thing I observed:
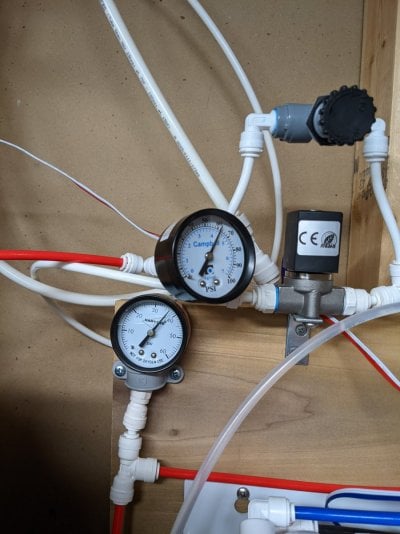
Check out the water pressure difference while flushing:

Water intake from piercing saddle valve:
Input gauge: 26 PSI
post-filters gauge: 13 PSI

Water intake from piercing saddle valve:
Input gauge: 62 PSI
post-filters gauge: 37 PSI

Which one will do a better job flushing the membrane?

Showing pressures while flushing:

PXL_20220712_211326597.jpg

But wait there is more!

So I have changed the membrane to the new one. The needle valve was useful while dialing down the target 4:1 waste:product water ratio Russ recommended for my hard water. It took a few back-and-forth adjustments but I was able to dial it to
  • 250 ml/min product
  • 1000 ml/min waste

PS: Talked to Russ about the precision on the flow adjustment valve being not so "precise". I observe that a tiny rotation makes a huge difference in water flow. I was expecting more precision. He said it is what it is and could be user error also. Well, it works for now. I guess I will try to find another flow adjustment valve which could do better.

Hey I just remembered this: I have a very precise flow adjustment valve for my CO2 injection system. I think I will look into getting one of those valves.


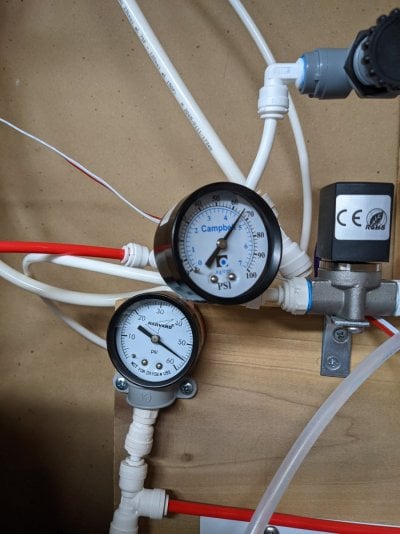
Anyway, I noticed that a tiny adjustment in the waste water flow adjustment also affects the product flow. Kinda makes sense, but also points out to the fact that input pressure matters a lot for reverse osmosis product. Here are the pressures while producing at the rate shown above:

Notice the 10 PSI drop over the filter blocks. Is that normal? Or does that mean my pre-filters are clogged?
Note that once the output solenoid closes, both pressure gauges show 70 PSI ...guessing that does not matter, but sill worth mentioning.

PXL_20220712_215723063.jpg

If anyone have two gauges like me, can you post a reading while producing RO water please?


Auto flush

Now I have an auto flush cycle programmed every hour for 2 minutes.
Is that good or I need to change this schedule?


Well, that is all for now!

Again, I will urge anyone with a RO system to check your water flow, just looking at your pressure gauge is NOT enough :cool:
I’m not understanding how when you previously took the unit outside and connected it to a garden hose, eliminating the piercing valve, there was no improvement in flow. Yet when you replaced the piercing valve with a tee the flow is astronomically better? Something doesn’t make sense
 
OP
OP
R

rajdude

Active Member
View Badges
Joined
Jun 17, 2021
Messages
108
Reaction score
54
Location
USA
Rating - 0%
0   0   0
I’m not understanding how when you previously took the unit outside and connected it to a garden hose, eliminating the piercing valve, there was no improvement in flow. Yet when you replaced the piercing valve with a tee the flow is astronomically better? Something doesn’t make sense
so yeah, that....let me explain :)

When I said there was no improvement in flow when the RODI unit was taken out on the deck, I meant no difference in the output of the membrane (RO water).

That is probably because the membrane had already fouled with hardness in my water.

In the post you quoted, I am talking about flow of water straight out of the tap/connection in the house's main copper line line... saddle valve vs Tee+1/4" shutoff valve (nothing to do with the membrane)
 

A_Blind_Reefer

Valuable Member
View Badges
Joined
Aug 13, 2019
Messages
2,088
Reaction score
2,772
Rating - 0%
0   0   0
so yeah, that....let me explain :)

When I said there was no improvement in flow when the RODI unit was taken out on the deck, I meant no difference in the output of the membrane (RO water).

That is probably because the membrane had already fouled with hardness in my water.

In the post you quoted, I am talking about flow of water straight out of the tap/connection in the house's main copper line line... saddle valve vs Tee+1/4" shutoff valve (nothing to do with the membrane)
Gotcha, that makes sense to me now.
 
OP
OP
R

rajdude

Active Member
View Badges
Joined
Jun 17, 2021
Messages
108
Reaction score
54
Location
USA
Rating - 0%
0   0   0
ok folks, I have an update. A bad one at that :-(

Replaced the membrane, upped the ratio. Added auto flush for 2 minutes every hour............still the membrane has fouled up in just one week! what the heck?


I think I may need to call Russ tomorrow morning to get some further advice.

Stats:


2022-07-24 23_08_29-Window.png
 
OP
OP
R

rajdude

Active Member
View Badges
Joined
Jun 17, 2021
Messages
108
Reaction score
54
Location
USA
Rating - 0%
0   0   0
tiny update:

Talked to Russ. He recommended I call our water company to find out if they are adding Alum to our water.

So I did, jumped through a bunch of people and eventually was led to this person's direct number, who may know about what is in our water. I left a message. Lets see.

BTW, if there is Alum in our water, we are not sure how to filter it out. A quick research on the internet show this:


Filmtech has a document also (attached)
 

Attachments

  • RO-NF-FilmTec-Prevention-Aluminum-Manual-Exc-45-D01576-en.pdf
    102.5 KB · Views: 273
OP
OP
R

rajdude

Active Member
View Badges
Joined
Jun 17, 2021
Messages
108
Reaction score
54
Location
USA
Rating - 0%
0   0   0
Update:


I got hold of a Laboratory Projects Technician in Fairfax Water. We had a long conversation about this problem. He gave me some pointers.

Yes they do add alum, but it is added to raw water. The finished water does not have any measurable alum in it. He told me that they have reports which show concentrations of many metals in our water. I have attached the report here. It says Aluminum in my water is below lowest level of measurement.

More reports are here, I live in the northern Fairfax county.
https://www.fairfaxwater.org/imar_fairfax-water-service-area

Then he mentioned Phosphate. They add it to the finished water as a corrosion inhibitor. It is listed in page #1 of the attachment as Phosphorus.
We are wondering if phosphates in our water will foul up RO membranes. Doing a quick internet search does bring up some research papers, talking about phosphate fouling in commercial scale RO filters and its solutions, which is mostly injecting anti-scalants.

I will talk to Russ again to hear his input.
 

Attachments

  • Corbalis Treatment Plant Finished Water.pdf
    43.3 KB · Views: 72
OP
OP
R

rajdude

Active Member
View Badges
Joined
Jun 17, 2021
Messages
108
Reaction score
54
Location
USA
Rating - 0%
0   0   0
It’s up to you, just make sure you are isolating the treated chambers to specifically what you want to clean! IE only sediment and membrane. Bypass everything else. Those little sureflo pumps will be affected by the treatment. Use city water pressure to flow. And bypass your tanks to dump permeate down the drain. Pulse water through, let it sit. Then flush! Then check your concentrate to permeate ratio. Guarantee to reduce build up. This will foul membranes prematurely, but the membrane would be toast other wise (10:1 ratio is garbage). You should be seeing 3:1 4:1 at worst. Any higher I’d consider acid flush. In some instances I’ll acid neutralize with potassium hydroxide for it’s added benefits.


Oh well, I guess it is time to throw in the towel and try out the acid cleaning procedure you suggested.

I have some questions please:
1. What acid:water ratio of Muriatic acid should I put into the filter chambers?
I have liquid Muriatic acid from Home Depot.

2. How long should I let it sit in the system?

3. For how long should I flush, afterwards?

4. What did you mean when you said "This will foul membranes prematurely, but the membrane would be toast other wise"?

Thanks for your input!

By the way, right now the waste:permeate ratio is around 10:1 :-(
 
OP
OP
R

rajdude

Active Member
View Badges
Joined
Jun 17, 2021
Messages
108
Reaction score
54
Location
USA
Rating - 0%
0   0   0
By the way, I did talk to Russ yesterday, but he seemed stumped also :-( He said that it should not be hard water scale which is fouling the membrane because he sees these membranes last over an year with harder water than mine.

He did say he will look at my water report and see if there is anything weird in the water. Also mentioned he may want me to run a couple of more tests on my fried membrane, but he was out and did not have that information on hand.

I guess it is time for experimentation, so thinking of going after what I think is the most probable culprit - scale caused by hard water.
 
OP
OP
R

rajdude

Active Member
View Badges
Joined
Jun 17, 2021
Messages
108
Reaction score
54
Location
USA
Rating - 0%
0   0   0
ok...while searching for answers to my questions (posted above)...I found a few articles. This one (right at the bottom of that page) talks about pH and not water: HCL ratio. I could do that

 
OP
OP
R

rajdude

Active Member
View Badges
Joined
Jun 17, 2021
Messages
108
Reaction score
54
Location
USA
Rating - 0%
0   0   0
ok folks here is what I just did:
Researched on the 'net about dilution ratios for scale removal using Muriatic acid (HCL). I got various ratios; anywhere between 1:16 to 1:1. Seemed to me that 1:4 is what most articles on the net are saying. So, I went with 1:4 ratio.

Observations:
  • Upon opening the three pre-filters, I noticed a lot of white scale in the sediment filter housing. Which is expected given my water is hard.
  • The second filter housing which has carbon block, also had some scale at the top where the circular rubber seal/washer is. I found that interesting.
  • The third filter housing which also has a carbon block is mostly clean, no scale. However, it had a little bit of slime and smell. I guess bio film.

Activity:
  1. Adjusted the connections so as to bypass all equipment after the membrane:
    1. Drain is going straight to drain
    2. Permeate is going straight to drain
  2. I cleaned all three housings, scrubbed them squeaky clean in the kitchen sink with dishwashing liquid.
  3. Then I measured the water capacity of an empty housing and also with the sediment filter.
  4. Diluted HCL to 1:4
  5. Filled one housing with HCL solution
  6. Put sediment filter in the second housing with HCL solution
  7. Installed them in this sequence:
  8. Inlet>empty housing> housing with HCL > housing with HCL & sediment filter
  9. Put a measuring cup in the drain line
  10. Let the system on-off for a few seconds until the measuring cup measured same volume as a housing.
  11. Now letting it sit 24 hrs.

My measurements and notes:
Volume of empty housing : 1100 ml
Volume of housing + sediment filter : 500 ml
Total HCL solution needed = 1600 ml
For approximately 1:4 ratio. Add 300 ml HCL to 1300 ml RO water.


That's it for today, folks!
Wish me luck :cool:
 
OP
OP
R

rajdude

Active Member
View Badges
Joined
Jun 17, 2021
Messages
108
Reaction score
54
Location
USA
Rating - 0%
0   0   0
ok folks, another update:

Rinsing / flushing is going on now. Permeate production is back! :)
Permeate production is 300 ml/min! which is actually higher than brand new membrane's production
TDS of permeate is 5 PPM!

WHAT? That is crazy cool! Well, flushing it for an hour now. Will check again after that.

PS: Does not look like the membrane got damaged by the acid. Otherwise its TDS would be much higher.

My notes:
  1. Before I started flushing I did this:
    1. Removed sediment filter to look into it. It was back to white color (it was muddy beige earlier).
    2. Removed second housing to dump acid; it did not have any acid left in it.
    3. The above two steps were taken to reduce dislodged/dissolved sediment on the sediment filter from going into RO membrane housing.
    4. Added carbon filter into second housing, hoping to reduce membrane's exposure to tap water chlorine
    5. Added sediment filter back into third housing
  2. Started flushing bypassing the drain flow restrictor. Did this for a few minutes
  3. Added flow restrictor (same old 1000 ml/min setting)
  4. Let it flush for 1 hour.
 
OP
OP
R

rajdude

Active Member
View Badges
Joined
Jun 17, 2021
Messages
108
Reaction score
54
Location
USA
Rating - 0%
0   0   0
It seems to me that this procedure proves that my RO membranes are getting fouled by scale formation. The only solution is to use a water softener. Now, I do not want to use a whole house water softener. It would be difficult to add it to my rental house, plus the cost is pretty expensive, around 1000 dollars.

I am thinking of adding a water softening cartridge to the system. Something like this:

Wait, I already have the DI housing with resin inside it. Sure, that resin is mixed bed version, meaning has Cation & Anion both. I have already used it quite a lot, meaning it is probably exhausted. I could regenerate it with acid or is it salt ? like this dude mentions the procedure....


As an experiment I am going to add that housing just before RO membrane. Lets see what happens!

But wait! Even better......lets make it more scientific rather than guessing.......hey ! I could easily measure hardness of water before and after that housing.
 
OP
OP
R

rajdude

Active Member
View Badges
Joined
Jun 17, 2021
Messages
108
Reaction score
54
Location
USA
Rating - 0%
0   0   0
ok here is yet another update:

So I added the unused DI stage canister/housing (which had been exhausted earlier) in between the carbon blocks and the RO membrane.

The measured the GH of water before and after that stage
  • Before 9
  • After 1
So the DI stage is softening the water pretty nicely! :)

Although I am sure the softening capacity will get exhausted pretty quickly... but lets see how long it lasts. I could monitor the GH and regenerate the resin, as needed.

Maybe this would be the final solution to my problem!

Comments?
Anyone?
 

sneekapeek

Active Member
View Badges
Joined
Sep 27, 2021
Messages
194
Reaction score
67
Location
San Diego
Rating - 0%
0   0   0
Oh well, I guess it is time to throw in the towel and try out the acid cleaning procedure you suggested.

I have some questions please:
1. What acid:water ratio of Muriatic acid should I put into the filter chambers?
I have liquid Muriatic acid from Home Depot.

2. How long should I let it sit in the system?

3. For how long should I flush, afterwards?

4. What did you mean when you said "This will foul membranes prematurely, but the membrane would be toast other wise"?

Thanks for your input!

By the way, right now the waste:permeate ratio is around 10:1 :-(
1) straight, it’ll dilute with water when you pulse the incoming water to fill membrane chamber. Keep waste water dialed to 4:1 or 3:1 ratio. You don’t want all your acid to go down the drain. You need the acid to penetrate membrane.
2) let it sit 3-5minutes. The longer you wait the better.
3)flush ten minutes afterwards making sure permeate and concentrate go down drain.
4) acid just like chlorine will prematurely foul membrane. But the membrane would be rendered useless without treatment so if you can extends its life why not?
IE- I don’t need to acid wash a membrane, but I do it anyways. Probably get 3 years out of the membrane without treatment and I just reduced it down to 2-1/2 years by doing treatment.

reduce the waste water to 4:1 before starting treatment. You need the acid to penetrate with pressure.
 

sneekapeek

Active Member
View Badges
Joined
Sep 27, 2021
Messages
194
Reaction score
67
Location
San Diego
Rating - 0%
0   0   0
Lol just read the rest of thread raj
Glad the resources helped and found a solution for you! Try researching anti-scalent injection to prolong membrane. I use this all the time to prolong membranes with well-water solutions. It works. Might be more cost efficient instead of whole house conditioner!
 
OP
OP
R

rajdude

Active Member
View Badges
Joined
Jun 17, 2021
Messages
108
Reaction score
54
Location
USA
Rating - 0%
0   0   0
oh boy! :-(

The membrane has fouled up again. Water production is down to 90 ml/min (from 300 ml/min after acid cleaning).
Checked GH of "softened" water, it is 9 grains. That means that DI cartridge is totally exhausted (this was expected)

As I see it now, I have two options:

1. Add a water softener
Two sub-options here:
1.1 I could go with a whole house style water softener (at least 500 bucks)
OR
1.2 I could install a large housing and regenerate resin once a week. (around 110 bucks)

4.5 x 20 Housing $50
Empty cartridge $25
0.25 cu. ft. Cation resin $35
(cheapest prices on amazon)

But wait......
2. Someone suggested I add a booster pump

Does a booster pump help with calcium fouling?
 
OP
OP
R

rajdude

Active Member
View Badges
Joined
Jun 17, 2021
Messages
108
Reaction score
54
Location
USA
Rating - 0%
0   0   0
I thought about my option 1 (above) a bit more.

How about I made my own water softener?

So I did some more research and seems to me that it will probably not be cost effective to DIY a water softener which auto regenerates. The main problem seems to be the multiple water solenoids, valves, tanks, etc, required for auto regen. It may be cheaper for me to buy a used or non functional water softener and repair/rebuild it. Commercially, all these valves , solenoids, etc have been shrunk down into one single contraption. However, I cannot find that valve head by itself. It always comes with a controller (adding cost). My plan was to use the raspberry pi as the controller, which probably could be made much more intelligent than the cheap timer based controller I am looking at here.

Here is one idea posted by a nice guy here:


Having said that the cheapest controller valve head I can find is $135. Add a resin tank $100 and a brine tank $150, I guess it will bring it up to $400. At that price, I could simply buy a new, complete water softener from Amazon.

A cheaper option for me would be to simply add a large housing with resin in it. Then regen it manually using a salt bath once a week. I guess this will get tiresome quickly.


PS: I was going with the water softening cartridge information posted here:
 
OP
OP
R

rajdude

Active Member
View Badges
Joined
Jun 17, 2021
Messages
108
Reaction score
54
Location
USA
Rating - 0%
0   0   0
Wait. what is this?


I do see many contraptions being sold on Amazon. I wonder if they would work. Sounds like snake oil to me! LoL


OP
OP
R

rajdude

Active Member
View Badges
Joined
Jun 17, 2021
Messages
108
Reaction score
54
Location
USA
Rating - 0%
0   0   0
Thanks for looking into my problem, Chad and your suggestions also :)
For reference they are here:


At this time, I think the simplest and cheapest option (around $120) for me would be to go with a big blue housing (4.5x20") and a cation resin filled cartridge inside it. Connect it after RO filter system's pre filters. Then monitor total water flow through the system (via your Pi project) and maybe test GH every week. Then regenerate resin using a salt bath manually, as needed.

The whole house softener is also do-able. I am very handy with plumbing, etc. But the cost of a good, reliable one is more like $800-1000. I do see some at $400 range, but the reviews of them are crappy. And frankly, our city water is not that hard here. Never noticed a major problem with hard water deposits on our faucets etc. Only this RO system fouls.

Actually, I am very worried about dropping big bucks on a water softener. I think there may be something else in the water which is causing fouling. I suspect that even a water softener will NOT solve my membrane fouling problem :-(
 
Back
Top