Acrylic Fabrication Q & A

Lowell Lemon

2500 Club Member
View Badges
Joined
May 23, 2015
Messages
4,179
Reaction score
18,145
Location
Washington State
Rating - 0%
0   0   0
Actually I was thinking of using the inside of the tank. I’ve drawn a sketch to show what I want. But still plan on flattening the top.

7F19C7BE-2C65-4CF9-83A3-53836C5A28FB.jpeg


CB3DE8F2-F13F-4ECD-8B86-6D9EBEB27FE2.jpeg

As I already mentioned the euro brace will meet the same fate as the braces you were able to knock off. Make sure you use something better than weld on 4. There is a mix that is listed in this thread that will give you much better bond strength. A full top will give you much better strength than a euro brace in my experience.
 

Jose Berry

Active Member
View Badges
Joined
Aug 6, 2018
Messages
186
Reaction score
298
Location
United States
Rating - 0%
0   0   0
As I already mentioned the euro brace will meet the same fate as the braces you were able to knock off. Make sure you use something better than weld on 4. There is a mix that is listed in this thread that will give you much better bond strength. A full top will give you much better strength than a euro brace in my experience.


Weld on #40 I think is preferred.
 

Scrubber_steve

2500 Club Member
View Badges
Joined
Feb 19, 2018
Messages
3,224
Reaction score
4,835
Location
down under
Rating - 0%
0   0   0
Hello @lapin & @Floyd R Turbo
Novus #1 plastic clean & shine seems to make a big difference when polishing black acrylic. It really removes the residual polish & leaves a very much improved result i can't get using, say, soapy water instead???
Reading the data sheet it seems to be mostly water with a few chemicals added.
Do either of you know of a cheaper alternative that is as effective?
Cheers
 

cromag27

CUSTOM ACRYLICS - octoaquatics.com - view my sig
View Badges
Joined
Sep 7, 2013
Messages
8,262
Reaction score
11,294
Location
arizona
Rating - 0%
0   0   0
Hello @lapin & @Floyd R Turbo
Novus #1 plastic clean & shine seems to make a big difference when polishing black acrylic. It really removes the residual polish & leaves a very much improved result i can't get using, say, soapy water instead???
Reading the data sheet it seems to be mostly water with a few chemicals added.
Do either of you know of a cheaper alternative that is as effective?
Cheers

i have tried other polishers but not necessarily cheaper, and you still need to thoroughly wash it off.
 
Last edited:

ArcKatana

Community Member
View Badges
Joined
Jun 27, 2015
Messages
99
Reaction score
32
Rating - 0%
0   0   0
Hey Folks,

I'm planning a 42"L x 18"W x 30" T rectangle aquarium with a Eurobrace of 3" around the edges, giving me 36" in the middle for a single fixture. I think 3/4" should be plenty for this. Yes?

Thanks!
 
OP
OP
Turbo's Aquatics

Turbo's Aquatics

Super Duper Member
View Badges
Joined
Jun 7, 2011
Messages
2,823
Reaction score
4,143
Location
West Des Moines, IA
Rating - 0%
0   0   0
I think 3/4" should be plenty for this.
Yes, that should be good

42"L x 18"W x 30" T
Eurobrace of 3" around the edges, giving me 36" in the middle for a single fixture
Generally you want a crossbrace for every 24" of tank width, but if you want to avoid that, I would beef up the euro width. In this case, you might bump those up to 4.5". Also make sure your radius corners are 1.5" radius (3' diameter) minimum
 

Neil poulton

New Member
View Badges
Joined
Jan 7, 2019
Messages
8
Reaction score
1
Rating - 0%
0   0   0
Alright folks

Learned so much off this thread already

Couple of questions how do you make the rounded edges on the cut outs on a tank with a full top

And also does cure time mean waiting for cure time before filling?
 

lapin

10K Club member
View Badges
Joined
Dec 16, 2017
Messages
10,876
Reaction score
18,041
Location
Austin
Rating - 0%
0   0   0
Alright folks
Couple of questions how do you make the rounded edges on the cut outs on a tank with a full top
Does cure time mean waiting for cure time before filling?
I think this is what you want..
You can make a template and router the opening.
You can use a drill bit and drill press to make the 4 radius holes in the corners of the cut out. You can then join them by cutting a straight line between holes with the router and guide. Both will work.

https://scigrip.com/assets/tds/4_TDS-0517.pdf

I always wait at least 2 weeks for a tank. But thats just me.
 

Neil poulton

New Member
View Badges
Joined
Jan 7, 2019
Messages
8
Reaction score
1
Rating - 0%
0   0   0
I think this is what you want..
You can make a template and router the opening.
You can use a drill bit and drill press to make the 4 radius holes in the corners of the cut out. You can then join them by cutting a straight line between holes with the router and guide. Both will work.

https://scigrip.com/assets/tds/4_TDS-0517.pdf

I always wait at least 2 weeks for a tank. But thats just me.


That’s what I was thinking use a hole saw at each corner of a sheet of ply then clamp it/tape it to the acrylic and go round it with a straight cut but and finish it with a flush trimmer
 
OP
OP
Turbo's Aquatics

Turbo's Aquatics

Super Duper Member
View Badges
Joined
Jun 7, 2011
Messages
2,823
Reaction score
4,143
Location
West Des Moines, IA
Rating - 0%
0   0   0
I always wait at least 2 weeks for a tank. But thats just me.
You can leak-test fill in about 72 hours. As far as filling for use, this is when you would want to wait 2 weeks; that's for 1/4" material. For every 1/8" thickness you add, add a week. So 3/8" = 3 weeks, 1/2" = 4 weeks, etc. I might be a week off there though, will have to check my notes.

The reason is that softened acrylic adsorbs water faster than the acrylic panels, and this can cause additional expansion of the joints and possibly also discoloration (whitening) but most importantly, it takes strength away from the joints.
 

Neil poulton

New Member
View Badges
Joined
Jan 7, 2019
Messages
8
Reaction score
1
Rating - 0%
0   0   0
You can leak-test fill in about 72 hours. As far as filling for use, this is when you would want to wait 2 weeks; that's for 1/4" material. For every 1/8" thickness you add, add a week. So 3/8" = 3 weeks, 1/2" = 4 weeks, etc. I might be a week off there though, will have to check my notes.

The reason is that softened acrylic adsorbs water faster than the acrylic panels, and this can cause additional expansion of the joints and possibly also discoloration (whitening) but most importantly, it takes strength away from the joints.


Thanks floyd and is that the way you would cut access holes in a fully top ie with plywood template an then take out rough cut with 2 flute straight bit then clean up with flush trimmer?
 

MSB123

Someone out there put something smart here.
View Badges
Joined
Aug 11, 2017
Messages
3,487
Reaction score
3,431
Location
Santa Barbara, CA
Rating - 0%
0   0   0
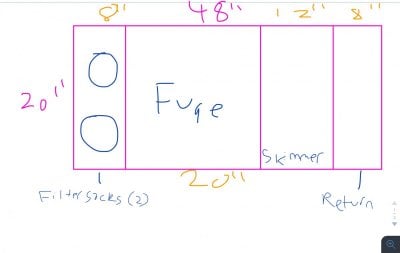
I am looking to build a new sump.
48”x20”x18”
Realistically, what size acrylic should I use?
Water level is 14” in the Fuge, 8” in the skimmer, 8” in the return
C5ABF999-C0E8-423C-A0F4-13515DA404FE.jpeg
 

lapin

10K Club member
View Badges
Joined
Dec 16, 2017
Messages
10,876
Reaction score
18,041
Location
Austin
Rating - 0%
0   0   0
If I built this I would use 3/8 . I would also run some bracing around the top where possible. Not only will it add strength but will help with splash/ salt creep.
 
OP
OP
Turbo's Aquatics

Turbo's Aquatics

Super Duper Member
View Badges
Joined
Jun 7, 2011
Messages
2,823
Reaction score
4,143
Location
West Des Moines, IA
Rating - 0%
0   0   0
Thanks floyd and is that the way you would cut access holes in a fully top ie with plywood template an then take out rough cut with 2 flute straight bit then clean up with flush trimmer?
When I first did this I made a template out of particle board or pressboard (not chipboard, might have been MDF - something cheap) and used a coffee cup to mark the corners I think, then used a jigsaw to make the cutout or something like that. I may have done the hole saw in the 4 corners then a circular saw for the straight cuts, etc...whatever works. Then lots of sanding to make it a nice shape, then double-stick-tape to your part, drill a pilot hole, and then route.

You need a flush cutter for this. The bearing rides on the template.

alternatively you can drill the holes directly on the acrylic with a hole saw, then route with a straightedge guide between them as you previously described, you'll likely have to spend a bit of time scraping and sanding to get rid of bumps and rough edges etc (those are focus points for stress) but that works too.
 
OP
OP
Turbo's Aquatics

Turbo's Aquatics

Super Duper Member
View Badges
Joined
Jun 7, 2011
Messages
2,823
Reaction score
4,143
Location
West Des Moines, IA
Rating - 0%
0   0   0
I am looking to build a new sump.
48”x20”x18”
Realistically, what size acrylic should I use?
Water level is 14” in the Fuge, 8” in the skimmer, 8” in the return
Remember to plan for the sump to be filled to the highest level (long term power outage draw down)

If I built this I would use 3/8 . I would also run some bracing around the top where possible. Not only will it add strength but will help with splash/ salt creep.
Agreed, I would use 3/8 also but you can use that for only the walls and the baffles that have a level difference from one side to the other, then 1/4" for other baffles and 1/4" for the bottom/top. But if you have to buy a full sheet because that's all you can get, 3/8" all around
 

Neil poulton

New Member
View Badges
Joined
Jan 7, 2019
Messages
8
Reaction score
1
Rating - 0%
0   0   0
When I first did this I made a template out of particle board or pressboard (not chipboard, might have been MDF - something cheap) and used a coffee cup to mark the corners I think, then used a jigsaw to make the cutout or something like that. I may have done the hole saw in the 4 corners then a circular saw for the straight cuts, etc...whatever works. Then lots of sanding to make it a nice shape, then double-stick-tape to your part, drill a pilot hole, and then route.

You need a flush cutter for this. The bearing rides on the template.

alternatively you can drill the holes directly on the acrylic with a hole saw, then route with a straightedge guide between them as you previously described, you'll likely have to spend a bit of time scraping and sanding to get rid of bumps and rough edges etc (those are focus points for stress) but that works too.


Cheers for the advice gonna ha e to start paying soon

One more would you have any advice for an internal overflow box with regards thickness was thinking 12”x4” box comb round all 3 edges

And best way to fix it in place

Thanks again
 

lapin

10K Club member
View Badges
Joined
Dec 16, 2017
Messages
10,876
Reaction score
18,041
Location
Austin
Rating - 0%
0   0   0
The internal box will be surrounded by water and have water inside. There will not be much pressure on it, unless it is full of water or void of water. Make it the same thickness as your sump for simplicty sake. I find it easier to cut teeth on thicker material. As far as attachment. Weld on 4. It wont have a back, will it? Your tank back panel where you will attach it is straight, yes?
 

Neil poulton

New Member
View Badges
Joined
Jan 7, 2019
Messages
8
Reaction score
1
Rating - 0%
0   0   0
Makes sense yeah 3 sided box then welded on back and bottom
Yeah back is straight
Would 6mm b ok?
 

Neil poulton

New Member
View Badges
Joined
Jan 7, 2019
Messages
8
Reaction score
1
Rating - 0%
0   0   0
Hello is there anybody out there lol

When you’re cuttin access holes in the top is this better done after all six pieces are stuck together?
 

HAVE YOU EVER KEPT A RARE/UNCOMMON FISH, CORAL, OR INVERT? SHOW IT OFF IN THE THREAD!

  • Yes!

    Votes: 32 45.7%
  • Not yet, but I have one that I want to buy in mind!

    Votes: 9 12.9%
  • No.

    Votes: 26 37.1%
  • Other (please explain).

    Votes: 3 4.3%
Back
Top