60 gallon cube build

jgirardnrg

Valuable Member
View Badges
Joined
Oct 9, 2019
Messages
1,590
Reaction score
2,413
Location
Berlin, CT
Rating - 0%
0   0   0
I picked up a used Deep Blue 60g cube from a local for my home office. I also have a 180g in wall for the man cave with fish room but we're going to save that for another thread. I have just about everything I need to get the tank wet, just need to find the time to do so.

The stand...
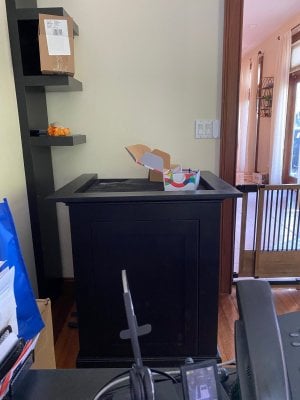
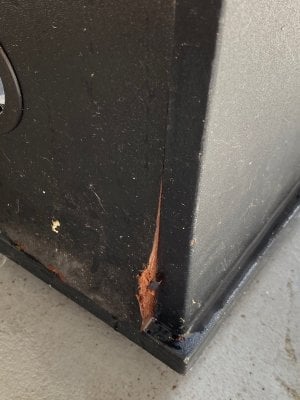
I got a stand with the tank but it's going in the fire pit one night soon. It's your typical particle board commercial stand but has water damage and I don't trust it with ~500-600 lbs sitting on it in my office:
IMG_1304.jpeg
IMG_1305.jpeg


The above is no good so I did what anyone with a ton of tools in quarantine would do... I built my own:

61326516318__E4362570-359E-4301-A0F9-DCE7853D6BAF.jpg
.
IMG_1295.jpeg


There's more pics of the process above I posted in another thread. Any questions, just ask.

The tank...
Just your typical 60g rimless cube with corner overflow. It's been through the first round of cleaning and leak tested. I need to pick up more vinegar as soon as the store down the street restocks. Still a ton of cleaning to do on the overflow. The calcium deposits were 1/4" thick in places. I may get impatient and not try to get every little bit off... we'll see how ambitious I get.
IMG_1301.jpeg


This will be the view from my desk... I'm excited:
IMG_1306.jpeg


The equipment (so far)...
Acrylic top for the tank with brand new screen I just put in it.
Fiji Cube 20g sump
2x Reef Breeders Reef Power RP-M wavemakers
Photon 16-V2+
Coralbox DCA4000 (for return pump)
Coralbox DCA2000 (for UV)
Hygger heater with controller
36w Jebao UV (had this already, might as well use it)
Cheapo Amazon fuge light
I also have 60lbs of sand plus around 250+ lbs of rock that's been sitting in 78 degree saltwater with powerheads for the past 6 months or so.

More to follow...
IMG_1305.jpeg IMG_1306.jpeg
 
Last edited:
OP
OP
jgirardnrg

jgirardnrg

Valuable Member
View Badges
Joined
Oct 9, 2019
Messages
1,590
Reaction score
2,413
Location
Berlin, CT
Rating - 0%
0   0   0
Just remembered something I left out of the equipment list... skimmer. I picked up a used eshopps s150 in a deal for an 80g lowboy from another local reefer. I replaced the impeller and it's in the basement right now purring like a kitten in a bucket of salt water.
 
OP
OP
jgirardnrg

jgirardnrg

Valuable Member
View Badges
Joined
Oct 9, 2019
Messages
1,590
Reaction score
2,413
Location
Berlin, CT
Rating - 0%
0   0   0
Found a few hours to get some more done on this project.

Tank in its final resting place:
IMG_1312.jpeg


Plumbing done and ready for leak test:
IMG_1316.jpeg


Also installed the wavemakers, screen top and light. I think I'm going to build a nicer mount for the light. First of all I don't like the look of the brackets. Second of all, I'll need to remove the light to remove the screen for tank maintenance. No bueno.

I setup the light schedule for a mixed reef. If anyone is on the fence about buying the Reef Breeders LED's I can tell you they're very nice lights. At 50% they're putting out 175-180 par at the bottom. I'll test and post numbers after filling the tank and putting the aquascape together.
 
OP
OP
jgirardnrg

jgirardnrg

Valuable Member
View Badges
Joined
Oct 9, 2019
Messages
1,590
Reaction score
2,413
Location
Berlin, CT
Rating - 0%
0   0   0
This is really looking good!

Thank you. I'm planning on getting more done today and tomorrow and should be wet this weekend. I'm waiting on a couple of shipments that are holding me up that contain the clamps for the plumbing and the epoxy for the aquascape. Tracking says they should be here tomorrow.

I used 2.5% limo tint on the back of the tank instead of painting it. Looks perfect and only took 10 minutes to do. I may tint the left side of the tank as well since it's only 18 inches from the wall and isn't going to be a viewing panel.

To do for today:
  • Finish cleaning the tank.
  • Cut PVC board for the bottom of the tank and silicone in place.
  • Final cleaning on skimmer.
  • Make a skimmer stand and install skimmer.
  • Plumb UV.
  • Make something to mount pump and equipment controllers under the shelf to the left of the tank.
  • Grab a 10g tank from storage and set something up for the ATO. I got a couple of ATO units when I bought the tank for $20-30 each. I've got 4 or 5 pumps I can utilize for these.
  • Decide on powerhead/wavemaker placements. I have the 2 Reef-Power RP-M's by the corner overflow perpendicular to each other. I also have a couple Jebao RW-4's and am thinking of mounting one low in the back to keep detritus stirred up behind the rock work (thoughts anyone?). Anyone have any input on how they handled flow in a cube aquarium?
 

SMSREEF

Valuable Member
View Badges
Joined
May 27, 2016
Messages
2,048
Reaction score
4,304
Location
Miami
Rating - 0%
0   0   0
Decide on powerhead/wavemaker placements. I have the 2 Reef-Power RP-M's by the corner overflow perpendicular to each other. I also have a couple Jebao RW-4's and am thinking of mounting one low in the back to keep detritus stirred up behind the rock work (thoughts anyone?). Anyone have any input on how they handled flow in a cube aquarium?
Your tank is looking awesome!

I have a 60 cube and what I did for flow is: one return with a random flow generator going diagonal and hitting opposite corner.
I have two jebao ow-25 each positioned next to overflow. These are really powerful and even on the low setting. It gives me a ton of room to increase as coral grows. You can also change the direction of very easily By turning magnet or turning the powerhead itself.
7E888A9A-D8D4-483C-9C23-23F5D86465C1.jpeg

I had to change my sand to caribsea special grade so it doesn’t blow around too much. The fine sand I started with was a nightmare blowing around.
 
OP
OP
jgirardnrg

jgirardnrg

Valuable Member
View Badges
Joined
Oct 9, 2019
Messages
1,590
Reaction score
2,413
Location
Berlin, CT
Rating - 0%
0   0   0
As an electrician i approve your use of electrical conduit ! That is so bad butt

Went and wandered around Home Depot and passed the conduit... was even available in precut 5 foot lengths. Grabbed fittings and came up that. Was really cheap and took like 10 minutes to make. I do think it needs to be painted black though.
 
OP
OP
jgirardnrg

jgirardnrg

Valuable Member
View Badges
Joined
Oct 9, 2019
Messages
1,590
Reaction score
2,413
Location
Berlin, CT
Rating - 0%
0   0   0
Your tank is looking awesome!

I have a 60 cube and what I did for flow is: one return with a random flow generator going diagonal and hitting opposite corner.
I have two jebao ow-25 each positioned next to overflow. These are really powerful and even on the low setting. It gives me a ton of room to increase as coral grows. You can also change the direction of very easily By turning magnet or turning the powerhead itself.
7E888A9A-D8D4-483C-9C23-23F5D86465C1.jpeg

I had to change my sand to caribsea special grade so it doesn’t blow around too much. The fine sand I started with was a nightmare blowing around.

My return splits into 2 loclines... maybe I should order the RFG's for those. They go off on different angles than where the powerheads are pointed to, hopefully, create more turbulence. I'm just worried about the dead spots everyone seems to have in the cubes. Maybe I'll end up using both of the RW-4's in there... I guess I won't really know until I get the rock and water in there and fire up the pumps. Like I said earlier, I can always black out the left side of the tank to help hide the equipment on that side.
 

Parent_usmc

Active Member
View Badges
Joined
Mar 23, 2020
Messages
155
Reaction score
123
Rating - 0%
0   0   0
Went and wandered around Home Depot and passed the conduit... was even available in precut 5 foot lengths. Grabbed fittings and came up that. Was really cheap and took like 10 minutes to make. I do think it needs to be painted black though.
I bet a black textured paint would look good
 
OP
OP
jgirardnrg

jgirardnrg

Valuable Member
View Badges
Joined
Oct 9, 2019
Messages
1,590
Reaction score
2,413
Location
Berlin, CT
Rating - 0%
0   0   0
That stand it beautiful

Thank you... I'm pleased with how it came out. I had most of the wood laying around from other projects so that's what I used. If I were to buy everything from the start with the stand in mind, I probably would have bought a hardwood so it's more durable. It'll be fine though. I'm the only one who will mess with the tank and stand. It's in my home office.
 
Back
Top