29G First Reef Tank Build!!

hollow6210

Community Member
View Badges
Joined
Nov 4, 2017
Messages
41
Reaction score
35
Location
Denver Metro
Rating - 0%
0   0   0
So, I’ll try and keep the backstory kind of short. I’ve wanted a reef tank for more than 20 years—life just never seemed to come together where it made sense to build one. Always moving every couple of years (military, then college, then military again) and as everyone knows it’s ridiculously expensive. Been lurking on the other forum since 2010 until I found Reef2Reef in 2017 and have been lurking here ever since. I’ve read a bunch of books, gone through more build threads than I can count and watched so much BRSTV it’s almost an addiction.

Finally talked wife into getting a tank in 2016, but she didn’t want to spend a ton of money on it, so we settled on a 75G African cichlid tank. At the time I was in Melbourne FL and had a friend nearby with multiple tanks and tons of experience including breeding them so I figured I couldn’t lose. I also thought some tank is better than no tank.

I knew that my next job was going to be tough and not allow much time to devote to a reef tank, so we went with African cichlids again but downsized to a 40B.

That tank didn’t last too long (less than 18 months) even though we were there for 3 years—just couldn’t get into the cichlids when I really wanted a reef. And that brings us to today; we moved to Denver area last year. I complained to wife that I was tired of waiting until we retire to get a reef tank. I’d plan and plan and plan for a future tank—seemingly no end in sight. Wife agreed that I could get one!!!

The plan is to keep it small to save on cost and because I’ll likely have to break it down for next move in about 18 months.

Before I get to the plan, I just want to say thanks to drummereef, @RocketEngineer, @SuncrestReef, @d2mini, @Humblefish, @Ditto, @dbl, @evolved, @Mike&Terry. I’m sure I’ve forgotten some, but they’ve given tons of inspiration and great information from their posts and builds.

So here’s the plan!
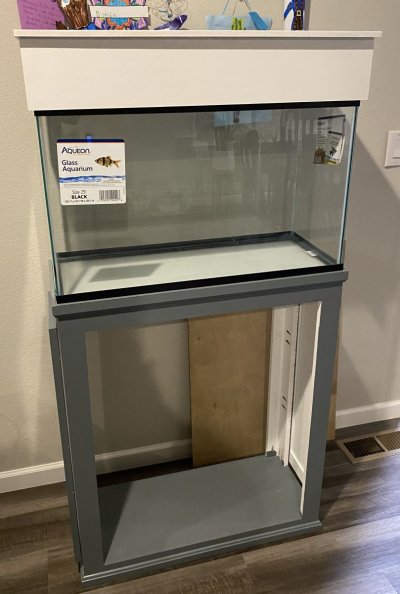
  • Display Tank: 29G Aqueon (30” x 12” x 18)
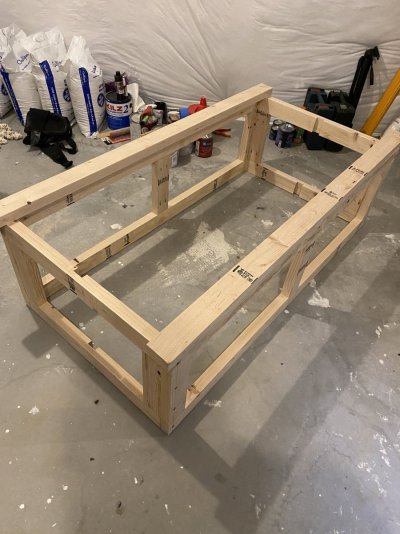
  • Stand and canopy: DIY stand and canopy; stand is based on @RocketEngineer plan. I altered to use ¾ lumber vice 2x4 since it’s only 29G, and no skin—just added doors
  • Rock: 40 lbs MarcoRock
  • Sand: Tropic Eden Tonga Miniflakes (leftover from cichlid tanks—rinsed extremely well)
  • Sump: No sump for you!
  • Mechanical Filtration: Tidal 55
  • Protein Skimmer: Not sure about this one, but if I do get one it’ll be an upgrade to replace Tidal 55 next year and it’ll be HOB skimmer
  • Return Pump: No sump, no return pump!
  • Chemical Filtration: None; but can run something small in Tidal 55
    • Refugium: (future add) CPR Aquatics Medium AquaFuge2 HOB Refugium for pod production and helping with pH.
    • Water Circulation: Tunze Turbelle Nanostream 6015; also have a Sicce Voyager Nano (270 gph) if I need more flow
    • Lighting: AI Pime16HD to start; thinking of adding 2 bulb T5 retrofit kit just before adding corals
    • Calcium/Alkalinity/Magnesium: Haven’t decided for sure and don’t need to now, but leaning towards manual 2-part dosing
    • AWC/ATO: (future add) manual for now
    • Heating: 100W Eheim Jager
    • System Control: (future add) Hydros
  • Fish Plan (in order)
    • Ocellaris Clownfish x2 (amphiprion ocellaris)
    • Yellow Clown Goby (Gobiodon okinawae)
    • Royal Gramma (Gramma loreto)
    • Orange Stripe Prawn Goby (Amblyeleotris randalli)
    • Tailspot Blenny (Ecsenius stigmatura)
    • Jester Goby (Koumansetta rainfordi)
As you can see from the pic, the cabinet doors aren't done--actually they need to be redone. I either screwed up the math or the measurement. I'm working on those tomorrow. Canopy needs the final coat of paint. And I don't have the display tank light yet, but I'm planning on leaving it dark for a few weeks or more while cycling and trying to avoid uglies. I'm off work for a couple weeks, so the plan is to finish the last bits, get wet and cycle tank, and get first fish into quarantine. Appreciate any feedback.

IMG_1626.JPG IMG_3569.JPG IMG_5278.jpg
 

N1tew0lf1212

...Cronies Secretary...
View Badges
Joined
Apr 9, 2022
Messages
4,520
Reaction score
23,614
Location
Loveland
Rating - 0%
0   0   0
Im a Colorado guy myself welcome to debt i mean hobby lol only kidding glad you got your wish though and look forward to see your progress. If you need anything let me know im not down the block but still not that far out.....Welcome to the thrill
 

pshootr

Well-Known Member
View Badges
Joined
Oct 12, 2018
Messages
900
Reaction score
2,117
Rating - 0%
0   0   0
So, I’ll try and keep the backstory kind of short. I’ve wanted a reef tank for more than 20 years—life just never seemed to come together where it made sense to build one. Always moving every couple of years (military, then college, then military again) and as everyone knows it’s ridiculously expensive. Been lurking on the other forum since 2010 until I found Reef2Reef in 2017 and have been lurking here ever since. I’ve read a bunch of books, gone through more build threads than I can count and watched so much BRSTV it’s almost an addiction.

Finally talked wife into getting a tank in 2016, but she didn’t want to spend a ton of money on it, so we settled on a 75G African cichlid tank. At the time I was in Melbourne FL and had a friend nearby with multiple tanks and tons of experience including breeding them so I figured I couldn’t lose. I also thought some tank is better than no tank.

I knew that my next job was going to be tough and not allow much time to devote to a reef tank, so we went with African cichlids again but downsized to a 40B.

That tank didn’t last too long (less than 18 months) even though we were there for 3 years—just couldn’t get into the cichlids when I really wanted a reef. And that brings us to today; we moved to Denver area last year. I complained to wife that I was tired of waiting until we retire to get a reef tank. I’d plan and plan and plan for a future tank—seemingly no end in sight. Wife agreed that I could get one!!!

The plan is to keep it small to save on cost and because I’ll likely have to break it down for next move in about 18 months.

Before I get to the plan, I just want to say thanks to drummereef, @RocketEngineer, @SuncrestReef, @d2mini, @Humblefish, @Ditto, @dbl, @evolved, @Mike&Terry. I’m sure I’ve forgotten some, but they’ve given tons of inspiration and great information from their posts and builds.

So here’s the plan!
  • Display Tank: 29G Aqueon (30” x 12” x 18)
  • Stand and canopy: DIY stand and canopy; stand is based on @RocketEngineer plan. I altered to use ¾ lumber vice 2x4 since it’s only 29G, and no skin—just added doors
  • Rock: 40 lbs MarcoRock
  • Sand: Tropic Eden Tonga Miniflakes (leftover from cichlid tanks—rinsed extremely well)
  • Sump: No sump for you!
  • Mechanical Filtration: Tidal 55
  • Protein Skimmer: Not sure about this one, but if I do get one it’ll be an upgrade to replace Tidal 55 next year and it’ll be HOB skimmer
  • Return Pump: No sump, no return pump!
  • Chemical Filtration: None; but can run something small in Tidal 55
    • Refugium: (future add) CPR Aquatics Medium AquaFuge2 HOB Refugium for pod production and helping with pH.
    • Water Circulation: Tunze Turbelle Nanostream 6015; also have a Sicce Voyager Nano (270 gph) if I need more flow
    • Lighting: AI Pime16HD to start; thinking of adding 2 bulb T5 retrofit kit just before adding corals
    • Calcium/Alkalinity/Magnesium: Haven’t decided for sure and don’t need to now, but leaning towards manual 2-part dosing
    • AWC/ATO: (future add) manual for now
    • Heating: 100W Eheim Jager
    • System Control: (future add) Hydros
  • Fish Plan (in order)
    • Ocellaris Clownfish x2 (amphiprion ocellaris)
    • Yellow Clown Goby (Gobiodon okinawae)
    • Royal Gramma (Gramma loreto)
    • Orange Stripe Prawn Goby (Amblyeleotris randalli)
    • Tailspot Blenny (Ecsenius stigmatura)
    • Jester Goby (Koumansetta rainfordi)
As you can see from the pic, the cabinet doors aren't done--actually they need to be redone. I either screwed up the math or the measurement. I'm working on those tomorrow. Canopy needs the final coat of paint. And I don't have the display tank light yet, but I'm planning on leaving it dark for a few weeks or more while cycling and trying to avoid uglies. I'm off work for a couple weeks, so the plan is to finish the last bits, get wet and cycle tank, and get first fish into quarantine. Appreciate any feedback.

IMG_1626.JPG IMG_3569.JPG IMG_5278.jpg
Glad you joined the forum! Stand and canopy look really good so far, I'll be watching this as I'm considering a 40 breeder in the near future with a DIY stand.
 
OP
OP
hollow6210

hollow6210

Community Member
View Badges
Joined
Nov 4, 2017
Messages
41
Reaction score
35
Location
Denver Metro
Rating - 0%
0   0   0
Im a Colorado guy myself welcome to debt i mean hobby lol only kidding glad you got your wish though and look forward to see your progress. If you need anything let me know im not down the block but still not that far out.....Welcome to the thrill
Thanks for the comment--what LFS do you go to? I had thought about getting the fish online, but with the weather I figured LFS would be better route. I've been to Neptune's Fish in Highlands Ranch and they seem pretty good.
 

N1tew0lf1212

...Cronies Secretary...
View Badges
Joined
Apr 9, 2022
Messages
4,520
Reaction score
23,614
Location
Loveland
Rating - 0%
0   0   0
Thanks for the comment--what LFS do you go to? I had thought about getting the fish online, but with the weather I figured LFS would be better route. I've been to Neptune's Fish in Highlands Ranch and they seem pretty good.
Havent been that far down that way for lfs that is. @polyppal any suggestions
 
OP
OP
hollow6210

hollow6210

Community Member
View Badges
Joined
Nov 4, 2017
Messages
41
Reaction score
35
Location
Denver Metro
Rating - 0%
0   0   0
So today was supposed to be completing/redoing the cabinet doors. I was able to get the rough lumber; using maple this time. My first attempt was with pine and one of the side doors warped such that it wouldn't lay flat against the stand. Got everything milled down--love using the USAF Academy wood workshop.

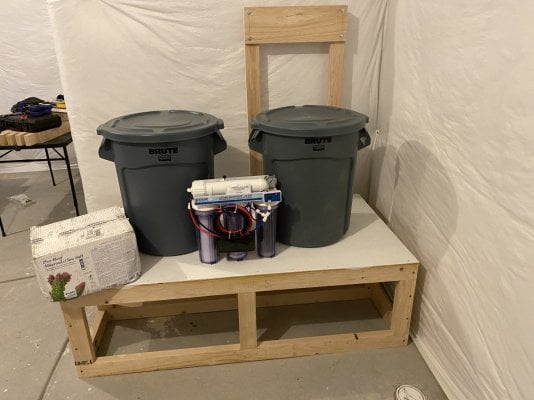
Got home and wife suggested that the only thing holding me up from getting fish into quarantine and cycling the tank was setting up the RODI. "Listen to the woman!" Shifted gears and wrapped up the platform for the RODI. I stopped short of making water. The surprising thing about the BRS RODI system (4-stage) was how hefty it is. So I'll get some beefy screws tomorrow, mount it on the board behind the platform and make water.

You can see from the photos that the platform is pretty large. The cans are 20g. I was going to go with the next size up but realized that with only a 29g tank I didn't need cans that large. The platform is also large because it allows for upgrades. As I said, been planning for a tank for more than 10 years and the retirement tank is going to be 250 gallons so I'll need more water and larger holding tanks then.

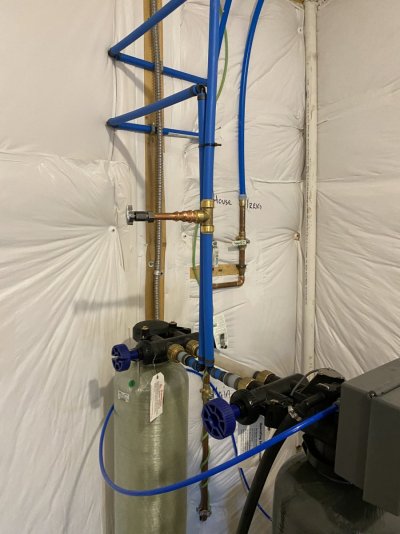
Had a plumber by earlier in the week and they installed the brass piping in the middle of the pic which reduces the PEX and adds a shutoff valve, so I can connect the 1/4 RODI tubing.
 

Attachments

  • IMG_5260.JPG
    IMG_5260.JPG
    195.7 KB · Views: 73
  • IMG_5288.JPG
    IMG_5288.JPG
    157.4 KB · Views: 71
  • IMG_5287.JPG
    IMG_5287.JPG
    161.1 KB · Views: 69

N1tew0lf1212

...Cronies Secretary...
View Badges
Joined
Apr 9, 2022
Messages
4,520
Reaction score
23,614
Location
Loveland
Rating - 0%
0   0   0
So today was supposed to be completing/redoing the cabinet doors. I was able to get the rough lumber; using maple this time. My first attempt was with pine and one of the side doors warped such that it wouldn't lay flat against the stand. Got everything milled down--love using the USAF Academy wood workshop.

Got home and wife suggested that the only thing holding me up from getting fish into quarantine and cycling the tank was setting up the RODI. "Listen to the woman!" Shifted gears and wrapped up the platform for the RODI. I stopped short of making water. The surprising thing about the BRS RODI system (4-stage) was how hefty it is. So I'll get some beefy screws tomorrow, mount it on the board behind the platform and make water.

You can see from the photos that the platform is pretty large. The cans are 20g. I was going to go with the next size up but realized that with only a 29g tank I didn't need cans that large. The platform is also large because it allows for upgrades. As I said, been planning for a tank for more than 10 years and the retirement tank is going to be 250 gallons so I'll need more water and larger holding tanks then.

Had a plumber by earlier in the week and they installed the brass piping in the middle of the pic which reduces the PEX and adds a shutoff valve, so I can connect the 1/4 RODI tubing.
Looks awesome cant wait to see more posts
 
OP
OP
hollow6210

hollow6210

Community Member
View Badges
Joined
Nov 4, 2017
Messages
41
Reaction score
35
Location
Denver Metro
Rating - 0%
0   0   0
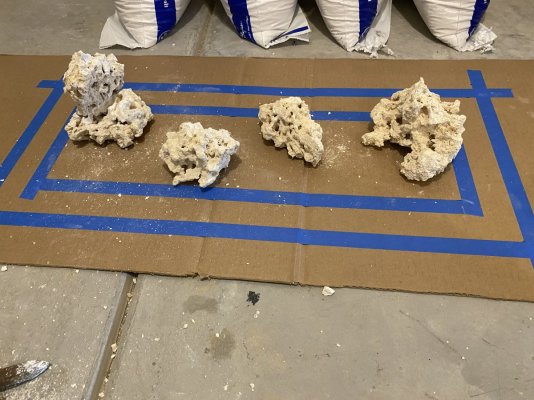
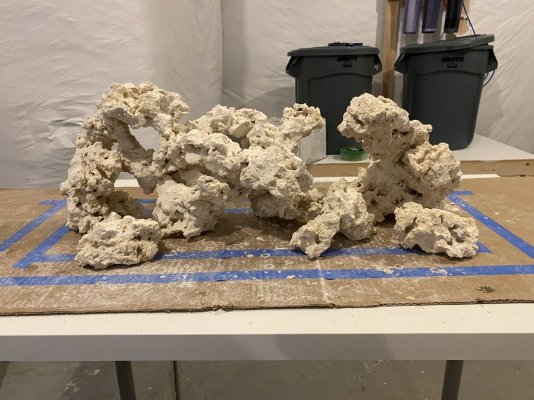
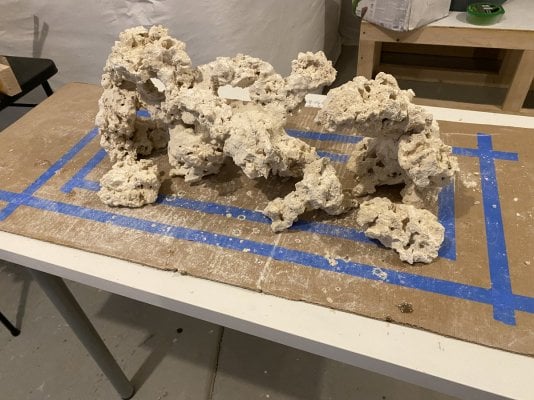
For the rock work, I bought 40 pounds of MarcoRocks. Since it’s a small tank, I didn’t want to have a pile of rocks. I also wanted to create as much habitat as possible so I followed the BRSTV #HNSA videos to create the rockwork. I used a flat blade chisel to break up most of the rock; it allowed me to choose the spot to try and break the rock up. My other chisel is kind of large—more like a blunt instrument. The issue I had frequently was trying to avoid a bunch of small boulders—Ryan talked about it in the BRS video, but the small round rocks just don’t lend well to creating interesting structures.

I started with a large tube of the super thick glue from BRS to join the rock together. I didn’t get very far. I either thought I could do without the super glue quickset, or I forgot to buy it. Either way, the thick gel doesn’t set for about 5 minutes and holding the rock in place without moving it while the glue sets just isn’t feasible. I didn’t want to stop aquascaping and wait to order the quickset via mail. Fortunately, I was able to find a bottle of quickset from a local Hobby Town. They also had a large bottle to refill the small 2 oz sprayer and the large refill bottle is much cheaper than buying multiple of the small spray bottles. After that, things went much quicker. I ended up doing one longer, larger structure, a medium one on the right, and then a small structure from some rubble that might serve as a good hiding place and a spot for a zoa garden. Also left a few individual rocks that could serve as a home for zoas or favites. My daughters like the medium structure on the right—they think it looks like a dragon.

Next, I started adding the Two Little Fishies aquastik epoxy around the joints. This part was a bit tougher. I took enough epoxy to shore up each of the joints, rolling it and mixing it up. The hard part came when the epoxy started getting sticky without seemingly being thoroughly mixed—I could still see the grey in the epoxy. The result was that over time, my fingers were lightly coated in leftover epoxy. It did wash off pretty easily with hot water. The other complication was that as I was using a small rock, as recommended, to break up the smoothness of the epoxy, some of the epoxy would pull away from the joints as I was pressing on it. Not a major hurdle but something to be aware of if you’re trying this approach. After 24 hours, the structures seemed like one solid piece of rock.

Bought a bottle of super thin CA from Hobby Town and covered the epoxy with the rock dust as Ryan did in the video. Gloves recommended; fingertips ended up with caked on rock dust.


Finally starting making RODI today after some technical difficulties. Was planning on getting water in tank tomorrow but realized that I haven't painted the back of the tank. So I'll trial the royal blue rustoleum on quarantine tanks and if if looks good, I'll paint the display as well. Shooting for fish in quarantine on Thursday.
 

Attachments

  • IMG_5252.JPG
    IMG_5252.JPG
    237.7 KB · Views: 75
  • IMG_5299.JPG
    IMG_5299.JPG
    222.2 KB · Views: 70
  • IMG_5300.JPG
    IMG_5300.JPG
    246.1 KB · Views: 78
OP
OP
hollow6210

hollow6210

Community Member
View Badges
Joined
Nov 4, 2017
Messages
41
Reaction score
35
Location
Denver Metro
Rating - 0%
0   0   0
Painted the back of the two 10 gallon quarantine tanks today. Used rustoleum royal blue enamel. Put the first coat on this morning and it's still not dry. Using the quarantine tanks as a trial run for display--so far not really feeling it. Might end up with the plain blue background from petco--didn't want to have the background black. Have 40 gallons of RODI ready--will make saltwater tomorrow. Meant to blow off rockwork with compressed air and get it and the sand into display today but was preoccupied with making daughter's christmas present. Also need to see how the enamel paint ends up. Checked with LFS about their water parameters--still planning for first fish on Thursday.
 
OP
OP
hollow6210

hollow6210

Community Member
View Badges
Joined
Nov 4, 2017
Messages
41
Reaction score
35
Location
Denver Metro
Rating - 0%
0   0   0
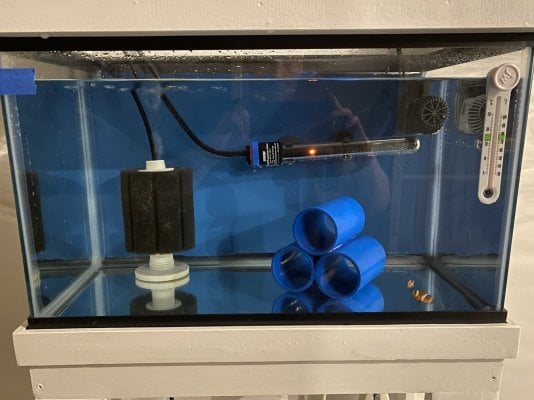
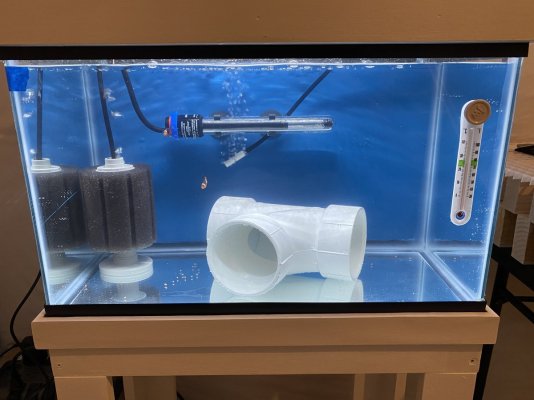
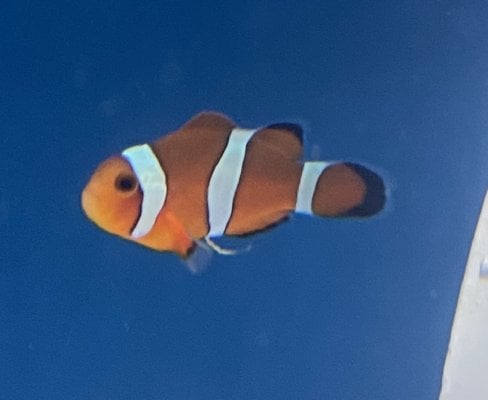
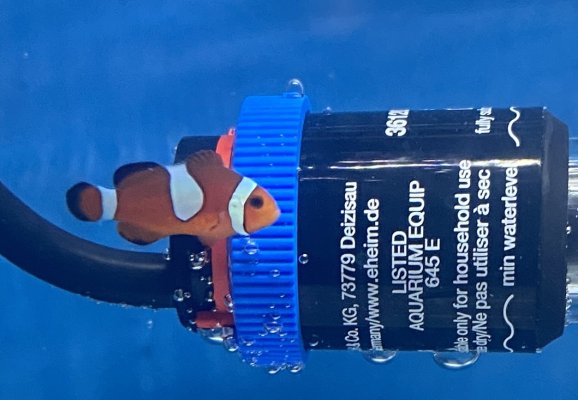
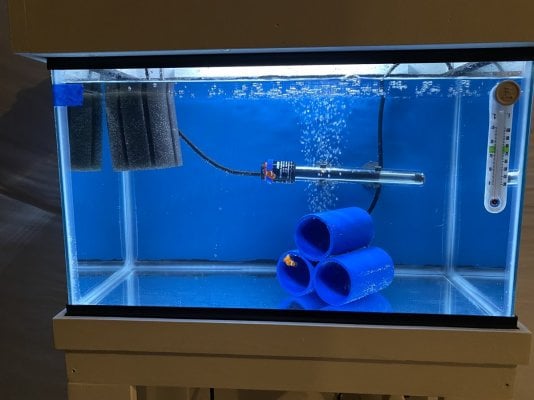
Got fish--one day delay. Two clownfish. The smaller of the two has a misbar. LFS was closed Thursday because of snow and brutal cold. For the identical quarantine systems I followed @Humblefish advice. Have 2 10 gallon tanks, sponge filter that's probably oversized (wasn't paying close attention to dimensions), PVC hiding spot, heater, a power head, and a Fluval Aquasky LED light. The light is probably more than I need for quarantine, but it wasn't too expensive, is bluetooth controlled and has ramp up and ramp down.

Floated the bag for 15 minutes and then a cup of tank water every 5 minutes, removing about a half cup before adding the next iteration. Did that 3 times and then poured the water and fish into silicone strainer and added to the tank. They were swimming really hard in the bottom left corner of the tank opposite the powerhead, but otherwise acting what I considered normally. After about 5 minutes I moved and redirected the powerhead. They eased up on swimming a bit but they still seemed to be swimming excessively hard. Unplugged the powerhead after another few minutes and let the sponge filter handle everything. After shutting the powerhead off, they began exploring the tank and swimming easier.

The powerhead I'm using is for quarantine is a Sicce Voyager Nano Stream Pump (270 GPH). Thinking that 270 gph for a 10 gallon tank is just too much for them. Makes me wonder if my display powerhead will be too much as well. I have the Tunze Turbelle Nanostream 6015 (475 GPH) for the 29G display. Guess I need to look through some 29G build threads and see what everyone else is using. Any thoughts are appreciated. First tank transfer is on Christmas Day.

Gotta give a shout to the LFS--Neptune's Tropical Fish in Highlands Ranch CO. Don't have tons of experience, but have visited many stores in various cities and most everyone is really nice. The lady that helped me, asked what size tank I had, whether I was using live rock and live sand, was the tank cycled. I got the impression that she wasn't about to sell me a fish without making sure I was ready. Caught me a little off guard mostly because of some of the things I've read on the forums about other LFS. Definitely going back for next fish purchase.
 

Attachments

  • IMG_5307.JPG
    IMG_5307.JPG
    162.3 KB · Views: 76
OP
OP
hollow6210

hollow6210

Community Member
View Badges
Joined
Nov 4, 2017
Messages
41
Reaction score
35
Location
Denver Metro
Rating - 0%
0   0   0
Fish made it through night. Using the light from 7 am to 830 pm with 90 minute ramp up and down. They didn't eat this morning. Tried flake and no interest--sucking that back out was fun. Tried a bit of mysis next and not interested either. Got the food from the LFS because I wanted to give them what they're used to eating. Have frozen PE mysis, frozen Hikari spirulina brine, PE pellets, and Cobalt marine omni flake. Hopefully they'll be hungrier this afternoon.
 
OP
OP
hollow6210

hollow6210

Community Member
View Badges
Joined
Nov 4, 2017
Messages
41
Reaction score
35
Location
Denver Metro
Rating - 0%
0   0   0
Success with PE pellets--still only ate 1-3 pellets each. The smaller clown ate more than the larger. Anything that hits the bottom though, they aren't interested in.
 
OP
OP
hollow6210

hollow6210

Community Member
View Badges
Joined
Nov 4, 2017
Messages
41
Reaction score
35
Location
Denver Metro
Rating - 0%
0   0   0
Fed PE mysis again tonight. Better luck this time. I think the issue is that a lot of the PE mysis is whole mysis shrimp which is too large for their small mouths--they did go after the smaller bits. Measured ammonia today and it was 0.2--did a water change (about 1-1/2 gallons) and added Prime. Added an airstone also. The sponge filter I have is oversized for the tank and I think the air pump isn't driving it enough. With the airstone, the air exchange looks better.
 
OP
OP
hollow6210

hollow6210

Community Member
View Badges
Joined
Nov 4, 2017
Messages
41
Reaction score
35
Location
Denver Metro
Rating - 0%
0   0   0
Did first transfer today--was planning to do a H2O2 bath, but got distracted making water to get display tank up for cycling and I forgot to do bath before transfer. Eating has been mixed--sometimes they go for it and other times they let it sink to bottom.
 

Attachments

  • IMG_5315.JPG
    IMG_5315.JPG
    146.5 KB · Views: 73
  • IMG_5313.jpg
    IMG_5313.jpg
    117.9 KB · Views: 69
  • IMG_5318.jpg
    IMG_5318.jpg
    231.4 KB · Views: 74
OP
OP
hollow6210

hollow6210

Community Member
View Badges
Joined
Nov 4, 2017
Messages
41
Reaction score
35
Location
Denver Metro
Rating - 0%
0   0   0
Thanks for the comment @Gumbies R Us --all due to great build threads on Reef2Reef!

So bit of a long day, but my basement is really clean. So I got that going for me. Which is nice. Why is it clean? RODI overflowed after I left it running and family went for a hike. About 5-6 gallons, so not horrible but not what you want to come home to find. Installed the BRS RODI float valve tonight, so that won't happen again.

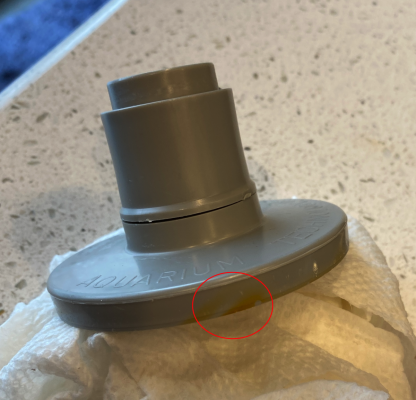
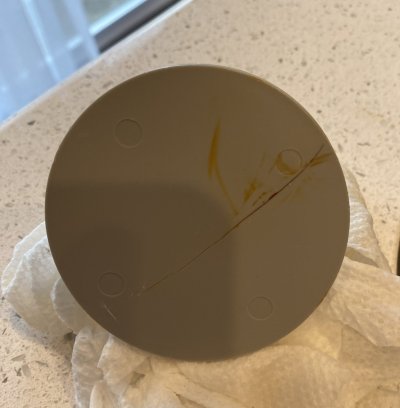
Tore down quarantine tank after running bleach overnight to sterilize everything. Found rust on the sponge filter. I saw a spot (red circle in pic) on the bottom after a day or two, but thought it was algae or something. Rinsed everything and then saw the bottom of the filter. I guess there's a crack in the rubber coating and the rust started coming through right away. Doubt I can return it since I used it. I think I'll buy another setup before I get any more fish.

I only have the two sponge filter setups, but I have extra sponges. Thinking that for the next transfer, I'll have to reuse the base and guts, then use one of the spare sponges.

Lastly, got the display tank up and running. I'm going to dose Dr Tim's tonight. The display tank is at lower salinity (1.017) and I'm going to run it warm to accelerate the cycle. He talks about best parameters to cycle quickly in his MACNA 2019 video.

( )

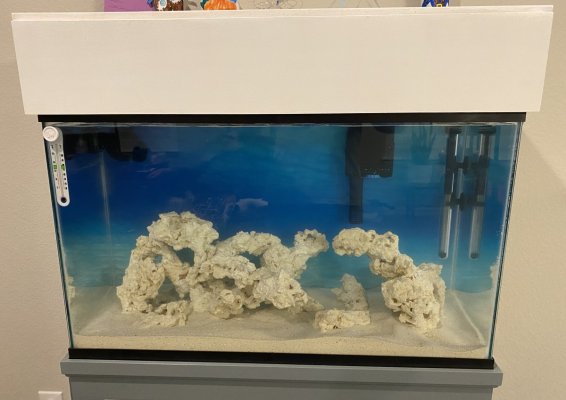
Display tank doesn't have a light yet (AI Prime 16HD to be ordered) or the HOB refugium. Happy with how the background turned out. Had to use tape to keep it in place, soap and water wasn't keeping the edges tight. The other odd thing I noticed is that the rock work has small bubbles all over--I assume those will fade. Other than the refugium, the first upgrade will be appropriately plumbing the RODI/Saltwater reservoirs--manually transferring water via buckets is no fun.

IMG_5320.png IMG_5321.jpg IMG_5323.jpg
 
Last edited:
OP
OP
hollow6210

hollow6210

Community Member
View Badges
Joined
Nov 4, 2017
Messages
41
Reaction score
35
Location
Denver Metro
Rating - 0%
0   0   0
Dosed Dr Tim's as directed along with 4 drops per gallon of the ammonia in the display tank. I've used his bacteria for both freshwater setups I had so I'm a fan, but I gotta say that dosing the ammonia sucks. I know a drop isn't an exact measurement, but they were coming out so fast and sometimes in squirts. I quit adding at 90 drops vice 100. Today, per the schedule, I'm supposed to add more drops but I tested and the ammonia is easily at 2 so I'm not dosing anything. Next time I do have to dose the drops though, I'm going to drop it into a cup and draw the amount needed in mL via a testing syringe. The upside is that I'm not transferring the fish to the display tank until they finish quarantine phase; almost 3 more weeks so there's plenty of time to cycle.

Gave the fish a 30-minute H2O2 bath and then transferred to new quarantine tank setup. Small fish didn't want to eat tonight. I guess I'm a little nervous because I've read clownfish eat pretty much anything anytime. Both of them are still active and look healthy (to my untrained eye).

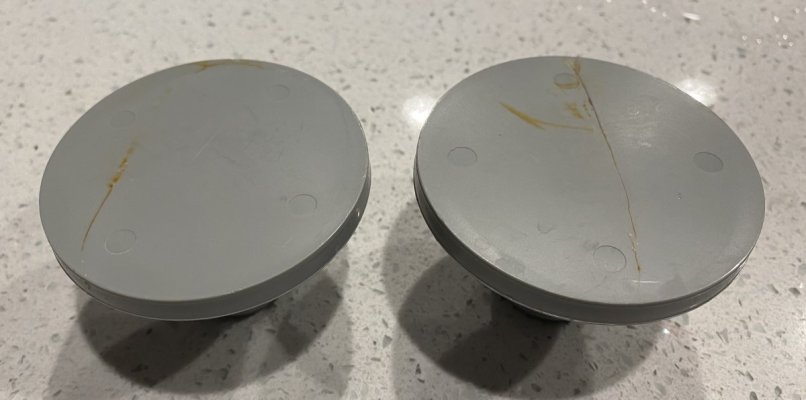
Took apart the sponge filter and the base for the second filter has a crack similar to the first. They only spent 3 days in the tank. I sent an email to AAP so we'll see. Since I don't have a usable base, I ran the air hose to the sponge filter and just left it floating. Other option is to run to petsmart and get a replacement sponge filter.
 

Attachments

  • IMG_5338.jpg
    IMG_5338.jpg
    80.6 KB · Views: 64
  • IMG_5337.JPG
    IMG_5337.JPG
    142.4 KB · Views: 75
OP
OP
hollow6210

hollow6210

Community Member
View Badges
Joined
Nov 4, 2017
Messages
41
Reaction score
35
Location
Denver Metro
Rating - 0%
0   0   0
Not much to tell tonight--fourth night of ammonia testing that the ammonia is at 2.0. Water is cloudy. Keeping salinity at 1.017 and water is at 80.
Next to last transfer for clownfish in quarantine is tomorrow. Smaller fish ate a lot this morning so that's positive. He looks a bit rough. There's been a little aggression, but it doesn't seem like anything more than dominance establishment. No nipping of fins or anything like that.
 

bradreef

Well-Known Member
View Badges
Joined
Aug 12, 2013
Messages
766
Reaction score
646
Rating - 0%
0   0   0
The cpr aquafuge looks nice but a ton of $$. I used a hang on the back breader box with a 50 gph powerhead . Then i added a cheap led light on the top. I have way more pods all through my tank than i expected. Everyone was converting filters, but, i wanted less flow.


this is what I used, but medium would be fine.

Amazon product
 
Back
Top