Navigation
Install the app
How to install the app on iOS
Follow along with the video below to see how to install our site as a web app on your home screen.
Note: This feature may not be available in some browsers.
More options
You are using an out of date browser. It may not display this or other websites correctly.
You should upgrade or use an alternative browser.
You should upgrade or use an alternative browser.
134-Gallon Cube Build - Random Flow Generator® Powered Mixed Reef - Lots of Pics!
- Cube Build
- Thread starter Vivid Creative Aquatics
- Start date
- Tagged users None
I have always been partial to sand. I tend to like the look of it and all the small and microscopic life it harbors.Don't put sandjust BB and tons of sps/flow

Plus the goal for of this tank will be a mixed reef (emphasis on the "mixed") and not so much an SPS dominant tank.
Of course I say that now, but we all know how this goes.... right after the first Frag swap when this tank is ready for some coral - LOL
Last edited:
revhtree
Owner Administrator
View Badges

Staff member
Super Moderator
Reef Squad
Partner Member 2024
Excellence Award
RGB
Photo of the Month
Article Contributor
R2R TV Featured
Hospitality Award
Article Administrator
Black Friday Sponsor
Industry Professional
My Tank Thread
My Aquarium Showcase
- Joined
- May 8, 2006
- Messages
- 49,226
- Reaction score
- 98,070
I was thinking about the closed loop plumbing inside the tank last night and it occurred to me that I may need to protect the outlets from sand and other debris, since the return and the drain are on the floor of the aquarium
If at some point I want to remove the stand pipes or the suction strainer for cleaning or for other purposes. I run the risk of letting sand drop down the pipes. On the return side it's not as big a an issue but on the drain side, that means it would have to pass through pumps to get expelled.
Plus - I have a rather active and large Tiger Pistol Shrimp/Goby pair coming over from another tank. I guarantee that shrimp will attempt bury this drain - that's just how he is - LOL
So - I have devised a plan to create a Sand Guard around the plumbing

I don't know if this will work, and it will likely take a few design iterations to get it right, but this is the basic concept.
This Sand Guard will sit over the bulkheads and on the glass, the sand will then be added to the tank. The lip around the base of the gaurd will than act as a means of keeping it in place with the weight of the sand sitting on top of it.
Rock work will then be placed around this structure to hide it.
When it's all setup, and if it works, i should be able to remove the Suction Strainer without also dumping a lot of sand down the pipe. Same goes for the stand points, should I need or want to remove them.
The first prototype of this is already on a printer
Thoughts?
Very cool!
Pulled the trigger on the final sump design. I settle on having a Titan Aquatic Exhibits do the sump, since they are local to me. They are generally known for their (very) much larger installations and projects, but they do smaller projects such as this as well.
I Worked closely with Titan Aquatic Exhibits to get the final design as close as possible to what I created. Since I don't design sumps for a living, I relied heavily on them to make sure this would work.
Should be a very interesting setup, once water is running through this. Color scheme will be simple - clear sides with an opaque white tops and bottom panels as well as some of the partitions.
UPDATE - the sump was cut yesterday, and will hopefully be all glued together and under the tank in as little as a few weeks.
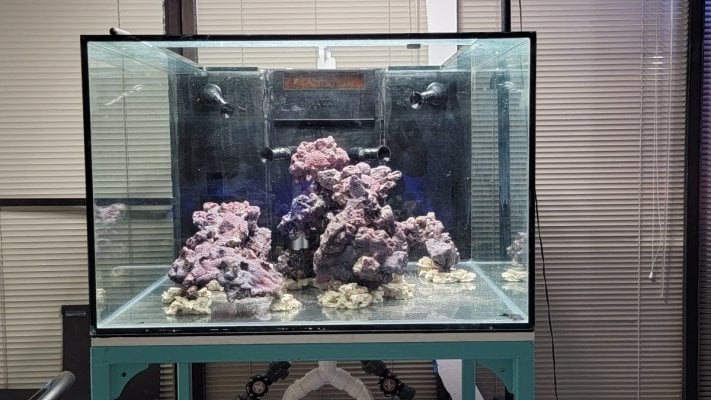
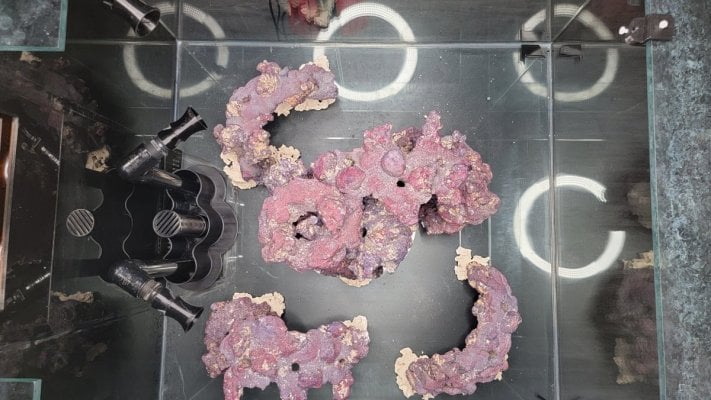
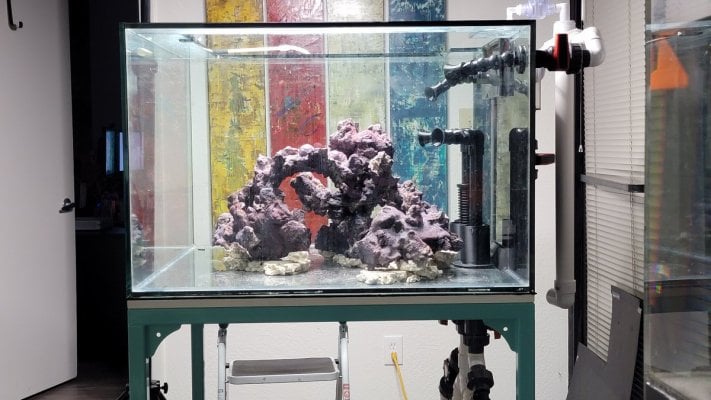
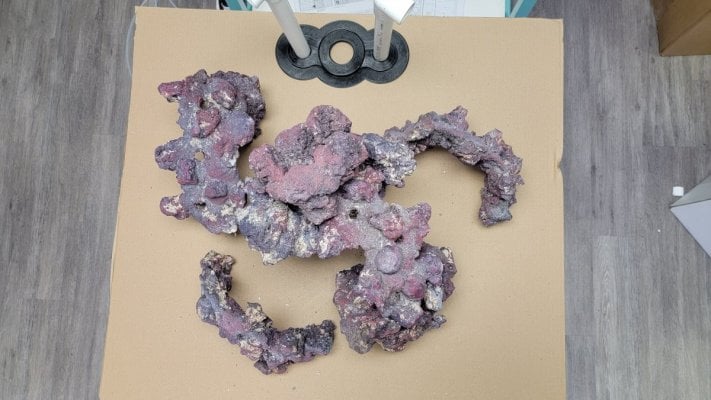
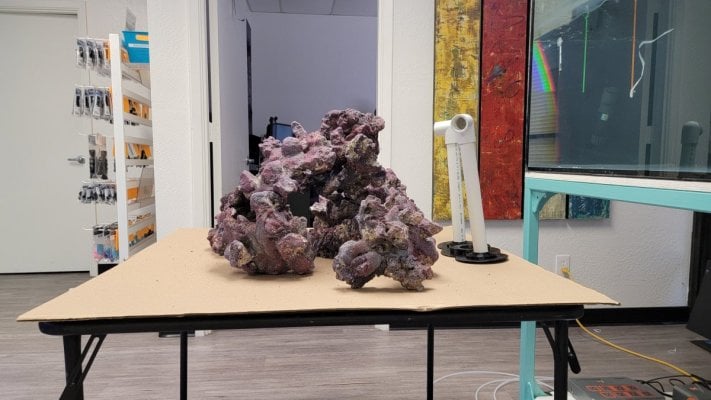
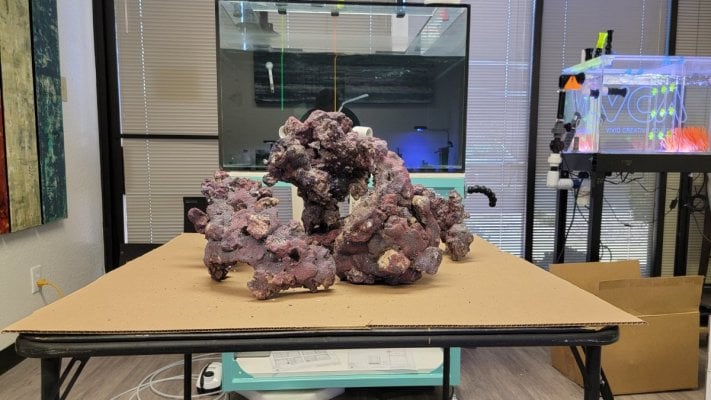
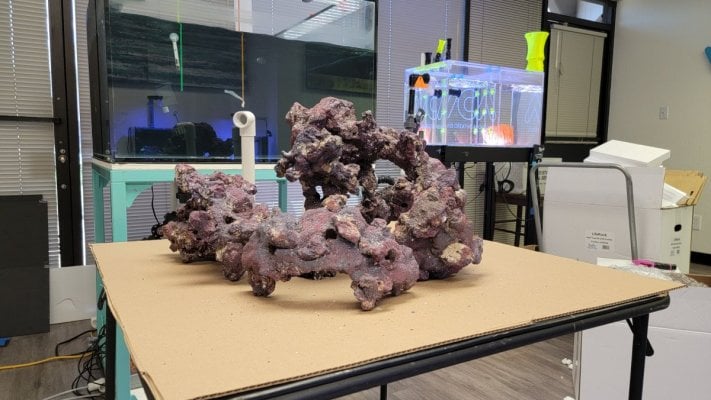
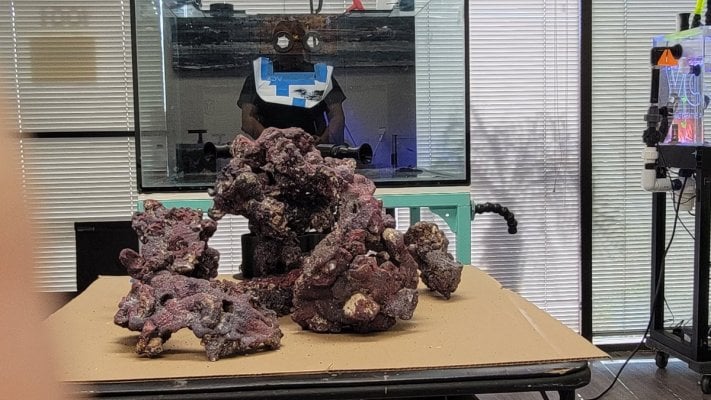
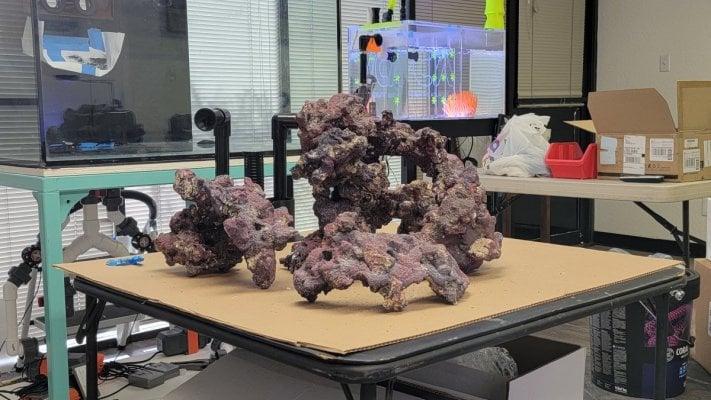
Next up is aquscapeing this cube. The goal here was to create volume while minimizing the height, but also have lots of surface area for coral. I also needed to maintain plenty of swim space for fish to swim around and through the structure.
I went with the CaribSea LifeRock. Really liked the shapes this rock line offers and it;s super easy to work with. Also, I used a few pieces of this rock in the 10-gallon Waterbox cube I setup here a the office about 6 month ago and really liked the results there too.
This aquascape consists of 1 LifeRock Tree Kit with Arches and one 40 lbs box of Liferock Shapes.
What do you think?


Finally completed the design and printing of my Closed Loop Guard for the bottom-drain dual closed loop.
It took some effort to the get the holes aligned, since existing bulkhead holes are not symmetrical place. Ultimately, I ended up draining the tank of the leak test water to get it right.
This should protect the drain from sand and small rocks and allow me to remove an the drain screen and/or stand pipes without the worry of sand dumping down the holes.

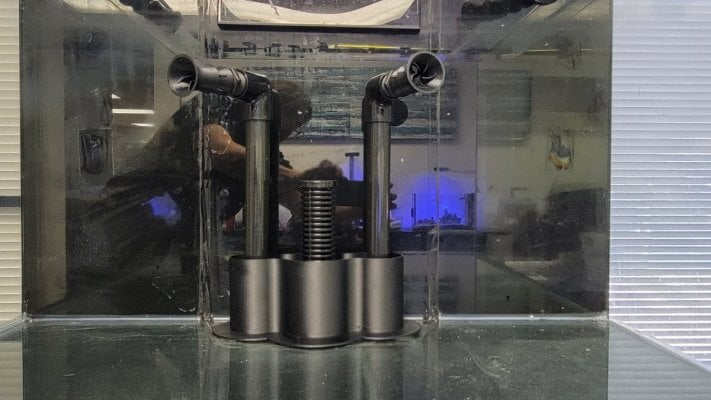
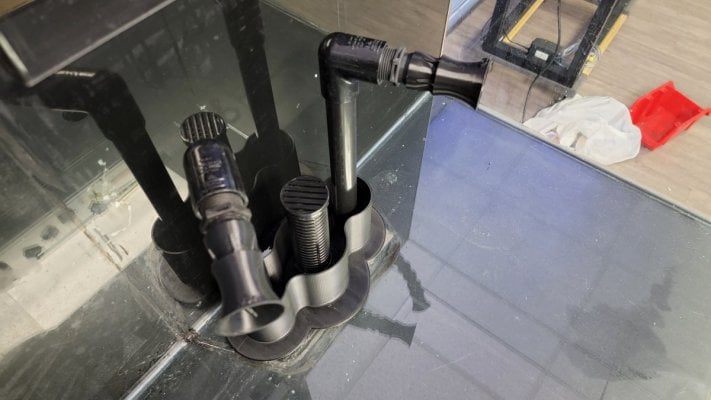
Since I'll be adding a sandbed to this tank and have a very active Pistol Shrimp, I needed a way to protect the drain from sand and rocks. The aquascape should also help to hid this a bit, other than from a direct side view but from the front and on an angle you wont even be abel to see it.
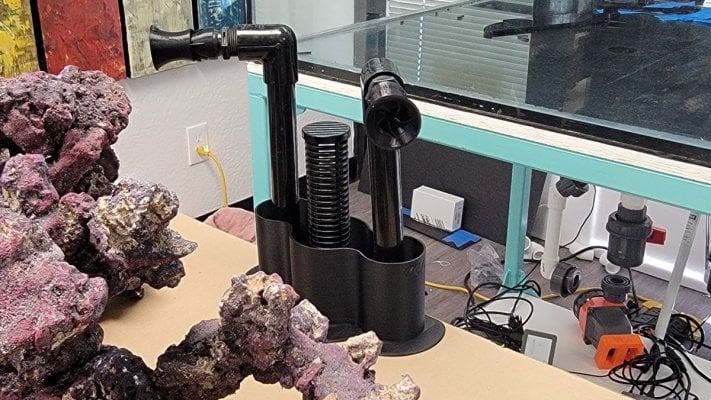
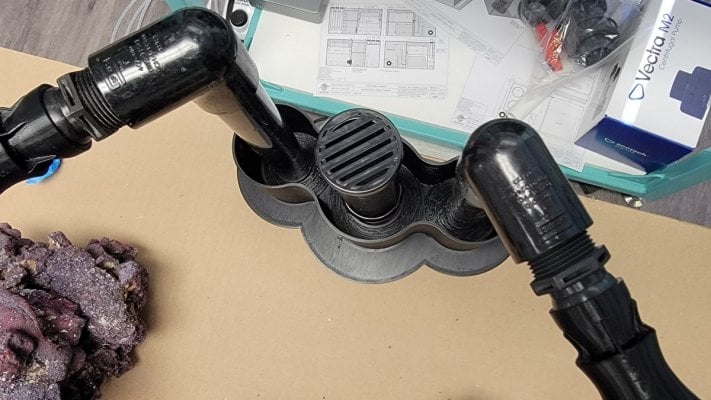
It took some effort to the get the holes aligned, since existing bulkhead holes are not symmetrical place. Ultimately, I ended up draining the tank of the leak test water to get it right.
This should protect the drain from sand and small rocks and allow me to remove an the drain screen and/or stand pipes without the worry of sand dumping down the holes.


Since I'll be adding a sandbed to this tank and have a very active Pistol Shrimp, I needed a way to protect the drain from sand and rocks. The aquascape should also help to hid this a bit, other than from a direct side view but from the front and on an angle you wont even be abel to see it.


revhtree
Owner Administrator
View Badges

Staff member
Super Moderator
Reef Squad
Partner Member 2024
Excellence Award
RGB
Photo of the Month
Article Contributor
R2R TV Featured
Hospitality Award
Article Administrator
Black Friday Sponsor
Industry Professional
My Tank Thread
My Aquarium Showcase
- Joined
- May 8, 2006
- Messages
- 49,226
- Reaction score
- 98,070
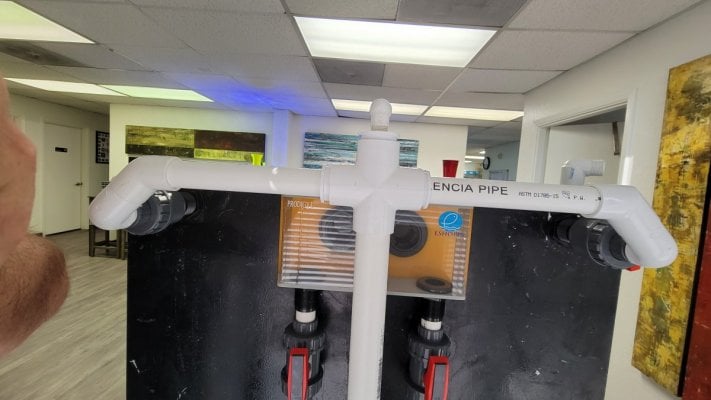
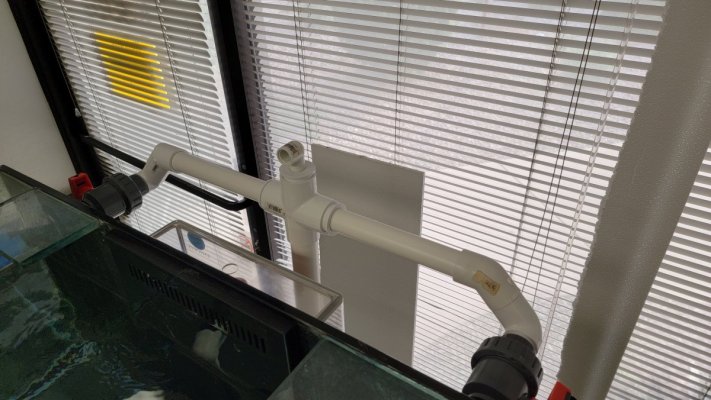
This check valve idea is genius. Id put one on both of my returns right now if I could. Have you thought about making a locline attachment that could be used in this configuration? Something less bulky and sleek? I'd buy 4 right now.Here is the dry-fit of the return line plumbing that has the Reverse Check Valve setup. Nothing is glued yet, but I wanted to get an idea of how this would look like in real life.
Sorry for the wonky photos - the tank is somewhat close to the wall, and it's hard to get nice straight shots.

I'm considering painting the upper part of the plumbing a flat black once it's all done to help make it less obviosue form the front. Standing a few feet form the tank, it;s hard to see the plumbing sticking up, but you can see the check vavle.


I have - I even build a prototype to test the theory. It consisted of a singe Loc-Line segments that had a sort of hose barb protruding from it that pointed in the same direction as the water flow. Then a small 1/4in hose was attached at the barb and then a check valve was placed at the end of that.This check valve idea is genius. Id put one on both of my returns right now if I could. Have you thought about making a locline attachment that could be used in this configuration? Something less bulky and sleek? I'd buy 4 right now.
It only sort of worked, and the valve just wasn't responsive enough be be trusted. I may revisit that idea at a later date, but for this built, i went with a methods that had been proven to work.
The Key to Reverse Check Valve Setup
The key to this design with the reversed check valve is that the Check Valve has to at the highest point in the plumbing. You also have to have a horizontal run that is higher than your inlets to the tank. The check valve can be installed at the same level as the Horizontal Run, or as I have done here, above the horizontal run.This will ensure that gravity pulls the water out of the pipe causing a slight vacuum that will then allow the check valve to open.
Once the valve opens, air rushes into the pipe and the internal vacuum equalizes inside the pipe and the Horizontal Run will empty and break the siphon. This should almost instantly stop water from draining back to the sump. The only water going back to the sump should be what's in the down pipe.
Of course this is all contingent on the valve opening. So it will still be a point of maintenance, as any Check Valve should be, but in this configuration, it is much less likely to fail.
Plumbing is in full swing - I'll post some Pics later this week, once I have more of it done.
But- I thought I should share this first .
I need some support for the plumbing and could not find an adjustable solution that also looked good. So, I designed some adjustable-length pipe hangers.
They give me a adjustable length range of 1in to almost 2 inches, which is plenty to get around the beams on the stand.


I showed these on FB as well, and a number of people expressed interest in these, and a few of the other pieces and parts I have been creating for this build. So, I have created a new section off our website called "Early Access and Product R&D". I'll add thing such as this item to the catalog. If you need a set of these in either 1in or 1.25in you'll find them, here:
 vividcreativeaquatics.com
But- I thought I should share this first .
I need some support for the plumbing and could not find an adjustable solution that also looked good. So, I designed some adjustable-length pipe hangers.
They give me a adjustable length range of 1in to almost 2 inches, which is plenty to get around the beams on the stand.
I showed these on FB as well, and a number of people expressed interest in these, and a few of the other pieces and parts I have been creating for this build. So, I have created a new section off our website called "Early Access and Product R&D". I'll add thing such as this item to the catalog. If you need a set of these in either 1in or 1.25in you'll find them, here:
Early Access Products and Accessories | Vivid Creative Aquatics
 vividcreativeaquatics.com
The Sump is here!
Picked it up yesterday

...and set it in place in the afternoon

Everything fits perfectly - Titan Aquatics Exhibits of Phoenix, Arizona do a fantastic job of taking my drawings and plans and creating exactly what I needed.
The Clear Water Scrubbers Algae scrubber also showed up and fits perfectly. I had a tray to hold the Scrubber created so that it sits over the sump.
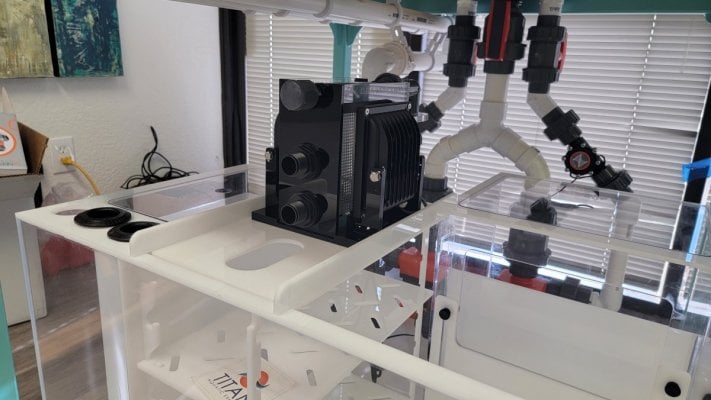
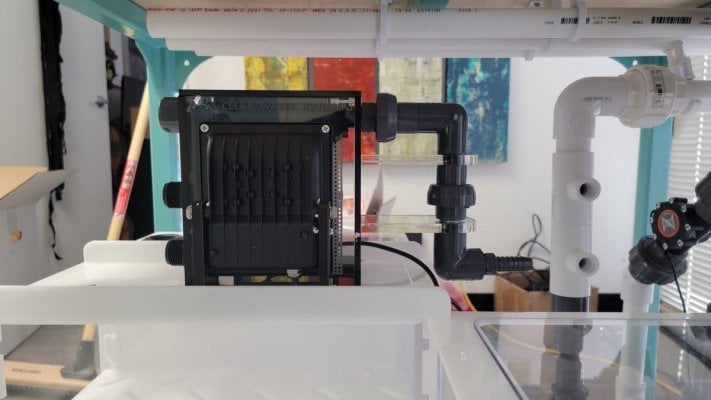
I went with the CW50 - the smallest scrubber thay make, both because of space constraints (I needed enough room to easily pull out the screen) and since I'll also be running a skimmer and the smaller Scrubber is all this tank would need.
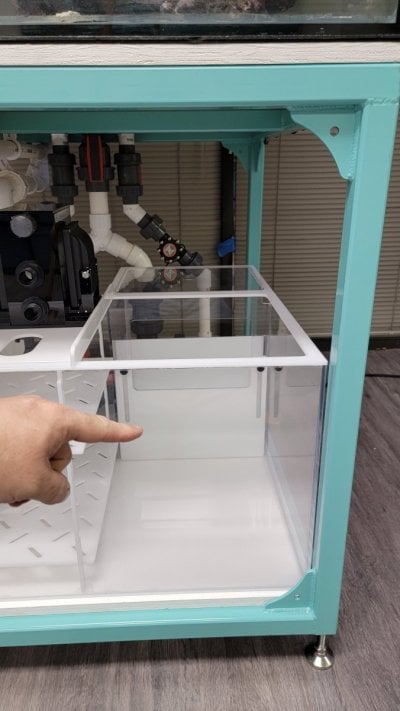
This the space I have for the skimmer
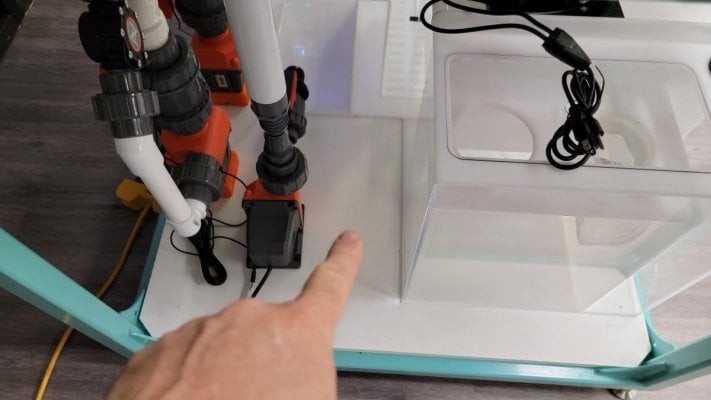
and this is where the ATO will sit, once that arrives from @melev
Next up, I'll be wrapping up the plumbing, so stay tuned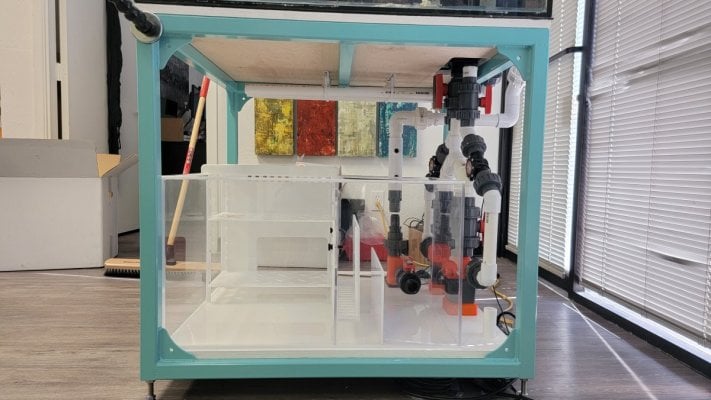
Picked it up yesterday

...and set it in place in the afternoon
Everything fits perfectly - Titan Aquatics Exhibits of Phoenix, Arizona do a fantastic job of taking my drawings and plans and creating exactly what I needed.
The Clear Water Scrubbers Algae scrubber also showed up and fits perfectly. I had a tray to hold the Scrubber created so that it sits over the sump.


I went with the CW50 - the smallest scrubber thay make, both because of space constraints (I needed enough room to easily pull out the screen) and since I'll also be running a skimmer and the smaller Scrubber is all this tank would need.
This the space I have for the skimmer

and this is where the ATO will sit, once that arrives from @melev

Next up, I'll be wrapping up the plumbing, so stay tuned

Last edited:
Making progress on the plumbing.
Return line

This is the main return line coming from the return pump. The holes are 1/2in ports for the manifold that I'll supply the algae Scrubber from and one extra for other reactors as needed.
Drain lines

Drain lines. Still need to get the drop-pipes inserted into the drain chamber.
You can see the pipes are fully supported with the new adjustable pipe mounts I created
Return line
This is the main return line coming from the return pump. The holes are 1/2in ports for the manifold that I'll supply the algae Scrubber from and one extra for other reactors as needed.
Drain lines
Drain lines. Still need to get the drop-pipes inserted into the drain chamber.
You can see the pipes are fully supported with the new adjustable pipe mounts I created
Following! Can’t wait to see some coral in this!!
The return pump is plumbed in.
This one was bit of a challenge. I went hard pipe for the entire run. I was going to do a few sections of soft plumbing but again, space restraints made that tough. So I went with ample amount of unions so that, should I choose to, I could easily re-configure this part of the plumbing without having to cut it all out
The entire run comes apart in about in 4 or 5 neat, and re-conigureable sections.

The Return pump is the same as the closed loop pumps. That way I always have 2 extras of these pumps on hand, in case the return pump poops out. I can always swipe one from the dual closed loop to hold me over until I can replace it.

This was a complex set of angles and turns to get right when gluing.

Lots of pipe support. Keeps everything secure.

The anti-back-siphon reverse Check Valve setup

The tank as it stands now

This one was bit of a challenge. I went hard pipe for the entire run. I was going to do a few sections of soft plumbing but again, space restraints made that tough. So I went with ample amount of unions so that, should I choose to, I could easily re-configure this part of the plumbing without having to cut it all out
The entire run comes apart in about in 4 or 5 neat, and re-conigureable sections.
The Return pump is the same as the closed loop pumps. That way I always have 2 extras of these pumps on hand, in case the return pump poops out. I can always swipe one from the dual closed loop to hold me over until I can replace it.
This was a complex set of angles and turns to get right when gluing.
Lots of pipe support. Keeps everything secure.
The anti-back-siphon reverse Check Valve setup
The tank as it stands now
Last edited:
Man I wish I could get my hands on a sleek 3/4" locline attachment to hook up a cpl check valves like this.
I am actually running my 80 gallon frag tank with 2 x vca rfg as only flow in tank atm. Would be awesome if I could drop one of them lower in the tank though.
Turf scrubber looks awesome
I am actually running my 80 gallon frag tank with 2 x vca rfg as only flow in tank atm. Would be awesome if I could drop one of them lower in the tank though.
Turf scrubber looks awesome
I plan on filling the tank tomorrow and giving this reverse Check Valve setup a propper test. Fingers crossed.Man I wish I could get my hands on a sleek 3/4" locline attachment to hook up a cpl check valves like this.
I am actually running my 80 gallon frag tank with 2 x vca rfg as only flow in tank atm. Would be awesome if I could drop one of them lower in the tank though.
Turf scrubber looks awesome
Shoot me a PM with your setup - maybe I can help you figure out how to get the RFGs a bit lower in your tank.
The cycle has begun!
I used the Brightwell Qucicucl. I've had good luck with it in the past so I figured ide use it on this one.
Dosed it mid-day yesterday so not seeing any Nitrite yet, but hope to in the next day or two. Have plenty of Ammonia though


I used the Brightwell Qucicucl. I've had good luck with it in the past so I figured ide use it on this one.
Dosed it mid-day yesterday so not seeing any Nitrite yet, but hope to in the next day or two. Have plenty of Ammonia though
Adding a little (functional) bling to the sump and drain area.
I wanted a way to easily remove the drain pipes form the sump for cleaning (should I ever want to, since they are kind of on display), and they found after I set it all up that installing into removing those pipes with the sump in place in the height of the stand was very difficult if not impossible. So I set out to create a better solution
I designed and pritned a drop-in manifold that would fit into the holes for the drain pipe.

I then sourced out some white silicone hose. It almost looks just like standard white PVC once it's installed which I kind of like

Then I installed hose barbs on the drain lines and the manifold.

It's all the pipes on the manifold and dropped it in place.

I then used the silicone hose to run between the pipes in the manifold for a nice clean look. I used a dab of silcone on the hose barbs and the manifold for a good seal.


Now, should ever need to remove those pipes it's just simple as pulling the silicone hose off lifting it out cleaning it and dropping it back in.
The other benefit was that is takes some stress off the plumbing, because no matter how careful i was, i could not get the center pipe to line up perfectly. As hard pipe ,it was putting some stress on that line to get it lined up. So the silicone hose can flex as needs to aldo that to line up better.

I wanted a way to easily remove the drain pipes form the sump for cleaning (should I ever want to, since they are kind of on display), and they found after I set it all up that installing into removing those pipes with the sump in place in the height of the stand was very difficult if not impossible. So I set out to create a better solution
I designed and pritned a drop-in manifold that would fit into the holes for the drain pipe.
I then sourced out some white silicone hose. It almost looks just like standard white PVC once it's installed which I kind of like
Then I installed hose barbs on the drain lines and the manifold.
It's all the pipes on the manifold and dropped it in place.
I then used the silicone hose to run between the pipes in the manifold for a nice clean look. I used a dab of silcone on the hose barbs and the manifold for a good seal.
Now, should ever need to remove those pipes it's just simple as pulling the silicone hose off lifting it out cleaning it and dropping it back in.
The other benefit was that is takes some stress off the plumbing, because no matter how careful i was, i could not get the center pipe to line up perfectly. As hard pipe ,it was putting some stress on that line to get it lined up. So the silicone hose can flex as needs to aldo that to line up better.
Similar threads
- Replies
- 2
- Views
- 145
- Replies
- 1
- Views
- 320
- Replies
- 4
- Views
- 123


