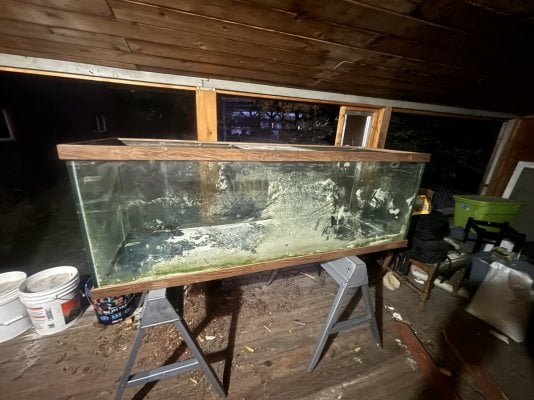
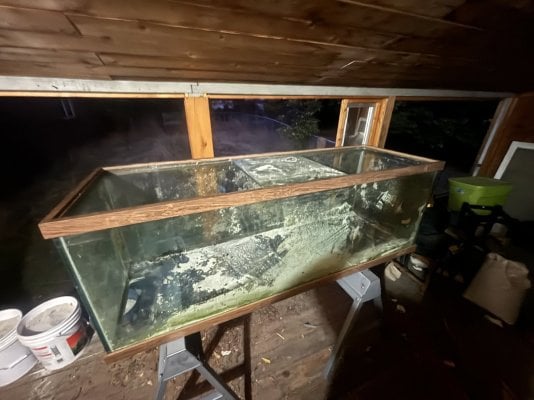
Used tank, full reseal. 180 gallon

bigbugoutfitters

Active Member
View Badges
Joined
Apr 20, 2022
Messages
389
Reaction score
408
Location
Troy
Rating - 0%
0   0   0
So I recently purchased a used 180 gallon drilled for a corner overflow. Due to the corner overflow being pretty poorly done and discovering some very worrying bubbles in the seams that i didnt notice upon first inspection i will be doing a full re-sealing of the tank.
Ive done a fair bit of research on what to do and what not to do and this is what i have come up with:
Make sure ALL silicone is removed using both razorblades and acetone.
Use this silicone https://www.gracoroberts.com/silicones/momentive-rtv108-clear-silicone-adhesive-sealant/
I think 3 10 ounce tubes should be enough. Maybe is should go with 4?
Everything has to be done in one go. Ive got three people that will be helping me, one of whom does custom bathrooms, so he will be laying the bead.
The tank has a rim and eurobrace so i an reattaching them the same way they were originally installed.
Once i get the rim off ill be building a couple jigs to ensure a perfect reconstruction.
To seal the two drilled holes on the bottom of the tank, should i silicone a plate of .5 inch glass over both holes or go with the bulkhead method?

If there is anything ive got wrong please let me know and if there is any advice you may have or perhaps a link to a valuable resource id love to see it.

And to answer the inevitable “just get a different tank” unfortunately it is really this tank or nothing. New is too expensive and we live in very, very rural montana. Ever watch the show mountain man? Tom Orr? Yea, we live there. The closest tank i saw of this size was toughly 5 hours away and i only have a 5’ bed on my truck. Logistically its unfortunately not realistic.
I believe this is very doable, especially as i am currently “laid off” for the winter and have plenty of free time.

Thank you for your time!

Tank specs 24-24-72 1/2” glass

Attached photo is my daughter helping me remove the eurobracing. Dont worry, i kept her away from all the razors!
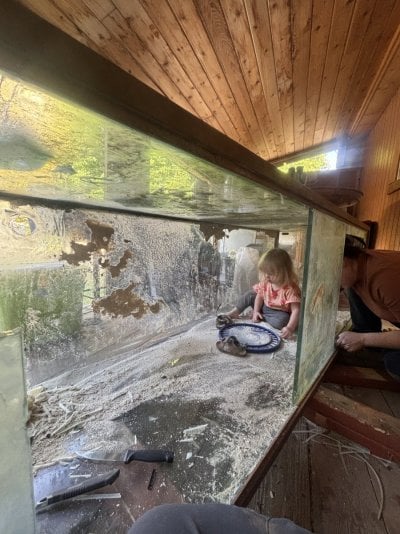
IMG_0517.jpeg
 

IceNein

Active Member
View Badges
Joined
Sep 1, 2017
Messages
124
Reaction score
252
Rating - 0%
0   0   0
I can't offer much help here, but please document as much as possible. Re-sealing a tank has always struck me as something much easier to accomplish in theory than in practice, so I'm interested in methodology and lessons learned after the fact.

I briefly toyed with the idea, but I read a lot of things about needing some stand offs, kinda like if you were laying tile, to provide an even gap into which you'd flow the silicone... and that seems tricky.
 
OP
OP
bigbugoutfitters

bigbugoutfitters

Active Member
View Badges
Joined
Apr 20, 2022
Messages
389
Reaction score
408
Location
Troy
Rating - 0%
0   0   0
I can't offer much help here, but please document as much as possible. Re-sealing a tank has always struck me as something much easier to accomplish in theory than in practice, so I'm interested in methodology and lessons learned after the fact.

I briefly toyed with the idea, but I read a lot of things about needing some stand offs, kinda like if you were laying tile, to provide an even gap into which you'd flow the silicone... and that seems tricky.
Exactly. That is the one thing i forgot to mention and it is honestly the one thing i am most unclear on. Ill be tiling a bathroom in two months so i sorta figure that will make for good practice. We are currently building a house. Tank will be in the basement. I figure itll be easier to build in the basement than to carry it down the stairs. Smarter not harder.
 
OP
OP
bigbugoutfitters

bigbugoutfitters

Active Member
View Badges
Joined
Apr 20, 2022
Messages
389
Reaction score
408
Location
Troy
Rating - 0%
0   0   0
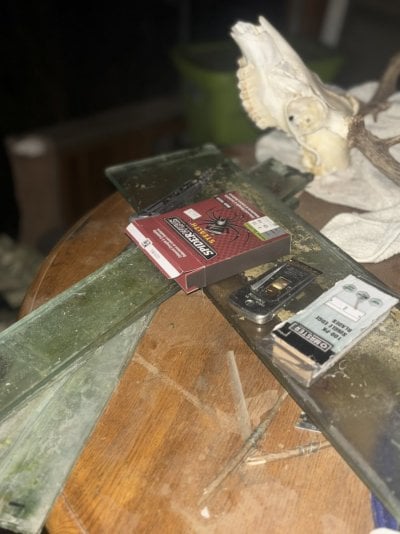
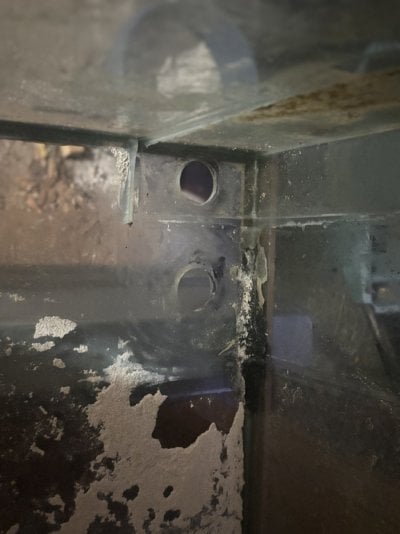
Sorry for the poor light but here are some photos. This is the beginning. Ive got most of the eurobracing off. Its a mix of 1/4 inch and 1/2 inch strips which i found odd. 1/4 for lengthwise and 1/2 inch along the depth side.
Pictured are what i am using to remove all the glass. Working pretty good. Whenever possible the fishing line works like a charm, otherwise a good ol razorblade is the go to.

Additionally, i dont like how close the holes were drilled to the side of the tank. I may need to close the holes up as i build the tank back together.
 

Attachments

  • IMG_0518.jpeg
    IMG_0518.jpeg
    196.4 KB · Views: 28
  • IMG_0519.jpeg
    IMG_0519.jpeg
    163 KB · Views: 29
  • IMG_0520.jpeg
    IMG_0520.jpeg
    150.4 KB · Views: 31
  • IMG_0521.jpeg
    IMG_0521.jpeg
    122.7 KB · Views: 34

PharmrJohn

The Dude Abides
View Badges
Joined
Mar 19, 2019
Messages
2,761
Reaction score
6,561
Location
Shelton, Washington
Rating - 0%
0   0   0
Mountain Man, huh? What's your town size? LOL, I think mine is small at 11K! I came from 100,000K. And lived for a time in 500,000K. I didn't like Seattle. It was too big. Beautiful city tho, as they go. At least 40 years ago it was!
 

IceNein

Active Member
View Badges
Joined
Sep 1, 2017
Messages
124
Reaction score
252
Rating - 0%
0   0   0
IF you check my build thread page 2 I had to reseal. Been 2 years and still holding water. Might find some tips
Very interesting. So you used cable ties as spacers. Did you simply pull them out one by one as your bead got to them? Were you worried about any pane slippage when you had removed them?
 

wrassie86

Active Member
View Badges
Joined
Apr 27, 2020
Messages
316
Reaction score
192
Location
Maine
Rating - 0%
0   0   0
Very interesting. So you used cable ties as spacers. Did you simply pull them out one by one as your bead got to them? Were you worried about any pane slippage when you had removed them?
Small 1 inch or so areas were injected with silicone near the zip ties the night before and full tank reseal that next day. so the zip ties were pulled as i got to them, the small areas held nicely
 
Last edited:

wrassie86

Active Member
View Badges
Joined
Apr 27, 2020
Messages
316
Reaction score
192
Location
Maine
Rating - 0%
0   0   0
Before I broke the tank down, I used the small orange razor knife to carve a hole in the inner seal to test thickness, those zip ties I listed just happened to be a perfect thickness for my 180g marineland tank. you will use a lot of razor blades, when you think your done.... put on a new blade chances are your not and the blade dulled.
 
OP
OP
bigbugoutfitters

bigbugoutfitters

Active Member
View Badges
Joined
Apr 20, 2022
Messages
389
Reaction score
408
Location
Troy
Rating - 0%
0   0   0
Before I broke the tank down, I used the small orange razor knife to carve a hole in the inner seal to test thickness, those zip ties I listed just happened to be a perfect thickness for my 180g marineland tank. you will use a lot of razor blades, when you think your done.... put on a new blade chances are your not and the blade dulled.
Perfect. Thank you so much!
 

HAVE YOU EVER KEPT A RARE/UNCOMMON FISH, CORAL, OR INVERT? SHOW IT OFF IN THE THREAD!

  • Yes!

    Votes: 32 45.7%
  • Not yet, but I have one that I want to buy in mind!

    Votes: 9 12.9%
  • No.

    Votes: 26 37.1%
  • Other (please explain).

    Votes: 3 4.3%
Back
Top