The Modified Black Box Thread

AbjectMaelstroM

Valuable Member
View Badges
Joined
Jul 21, 2019
Messages
1,530
Reaction score
1,811
Location
RVA
Rating - 100%
1   0   0
My par meter is coming today and I should have my RB LEDs as well so I will try get par readings from my current Viparspectra lights (they are already a little modified) and compare to the V2 of modifications. I'll also try$ take some pictures with both over the tank next to each other to see how they look.

I also want to compare par with and without lenses. With 90s there's a good bit of disco effect but from what I remember of the par measurements I took few months back, they're par cannons.
 

AbjectMaelstroM

Valuable Member
View Badges
Joined
Jul 21, 2019
Messages
1,530
Reaction score
1,811
Location
RVA
Rating - 100%
1   0   0
I agree the white is under used and slightly too yellow when it comes on, my leds arrived yesterday and the thermal paste should come today. I'm going to swap the yellower whites for 20000k then swap 4 x 470k for 450k on the blue channel and put them on the whites along with
6 x 450k, then add 2 x 420k to the blue as I already have 4 and add 4 x 420k on the white. I don't want to make too many changes on the blue channel as that seems to work, I really dont like the look of the white channel so want to make that more appealing. Any advice is welcome.

This isn't so much about the spectrum as that will depend on what you like. But, when it comes to swapping LEDs, depending on how your viparspectra was wired at the factory will make things a bit different.

My first two viparspectra lights came with what looks like LEDs assempled by a robot: super clean solder job and unfortunately, used thermal adhesive under the LEDs which makes it hard as all get out to get off cleanly. I originally plucked them off with pliars but that was a mess and on two occasions actually damaged the traces. Since then, I learned and started to use an xacto knife with 17 or 18 blade (chisel). First, use solder wick to desolder the - /+ legs, then carefully pop the blade between the board and led to separate them. It can take a surprising amount of force but Be CAREFUL. Once led is off, clean up the contacts, plop a bit of thermal compound on the large round pad (not much maybe like a 1-2mm bloop) and press down making sure polarity is correct. Get some flux on each of the legs and solder that puppy on.

My 2nd set I just got last week, the LEDs looked like they were soldered by hand, slightly messy solder job. But, instead of thermal adhesive, they used thermal compound. If you get one of these, once you wick away the solder from the led legs, they just come right off and cleanup is super easy.

Good luck and post pix.
 

oreo54

5000 Club Member
View Badges
Joined
Sep 18, 2017
Messages
5,970
Reaction score
3,673
Rating - 0%
0   0   0
Another thing I wonder is why did Vipar build a light where the white channel is so under utilized.....I am running mine at 1%...it just doesn't make much sense!!
My speculation is
1) Cultural differences
2) Makes them somewhat useable for freshwater tanks. (0 blue/100% white)
 

Nicholas Dushynsky

Valuable Member
View Badges
Joined
Jul 30, 2017
Messages
1,214
Reaction score
1,363
Location
Devon, England
Rating - 0%
0   0   0
This isn't so much about the spectrum as that will depend on what you like. But, when it comes to swapping LEDs, depending on how your viparspectra was wired at the factory will make things a bit different.

My first two viparspectra lights came with what looks like LEDs assempled by a robot: super clean solder job and unfortunately, used thermal adhesive under the LEDs which makes it hard as all get out to get off cleanly. I originally plucked them off with pliars but that was a mess and on two occasions actually damaged the traces. Since then, I learned and started to use an xacto knife with 17 or 18 blade (chisel). First, use solder wick to desolder the - /+ legs, then carefully pop the blade between the board and led to separate them. It can take a surprising amount of force but Be CAREFUL. Once led is off, clean up the contacts, plop a bit of thermal compound on the large round pad (not much maybe like a 1-2mm bloop) and press down making sure polarity is correct. Get some flux on each of the legs and solder that puppy on.

My 2nd set I just got last week, the LEDs looked like they were soldered by hand, slightly messy solder job. But, instead of thermal adhesive, they used thermal compound. If you get one of these, once you wick away the solder from the led legs, they just come right off and cleanup is super easy.

Good luck and post pix.
Thanks for the heads up, the light I have is over 3.5 years old now and is the one with the clock in the middle not off to one side. I'm not sure which thermal stuff I have on the leds yet I'm hoping paste not adhesive. I'll try the first led and I muck it up, the pic I post will be the light in the bin. I'll give it a go anyway and I'll report back good or bad.
 

Billsreef1

New Member
View Badges
Joined
Apr 26, 2020
Messages
13
Reaction score
6
Rating - 0%
0   0   0
Thanks for the heads up, the light I have is over 3.5 years old now and is the one with the clock in the middle not off to one side. I'm not sure which thermal stuff I have on the leds yet I'm hoping paste not adhesive. I'll try the first led and I muck it up, the pic I post will be the light in the bin. I'll give it a go anyway and I'll report back good or bad.
Yah good luck!!! Post some pics of the progress and the "operation"
 

Billsreef1

New Member
View Badges
Joined
Apr 26, 2020
Messages
13
Reaction score
6
Rating - 0%
0   0   0
My par meter is coming today and I should have my RB LEDs as well so I will try get par readings from my current Viparspectra lights (they are already a little modified) and compare to the V2 of modifications. I'll also try$ take some pictures with both over the tank next to each other to see how they look.

I also want to compare par with and without lenses. With 90s there's a good bit of disco effect but from what I remember of the par measurements I took few months back, they're par cannons.
They are par cannons!!! My 300w vipar are dialed back to 25% blue, 1% white and get 300 par at water level from 12" up!
 

Billsreef1

New Member
View Badges
Joined
Apr 26, 2020
Messages
13
Reaction score
6
Rating - 0%
0   0   0
My speculation is
1) Cultural differences
2) Makes them somewhat useable for freshwater tanks. (0 blue/100% white)
Thanks! I read the marketing blurb from vipar saying they designed the light based on feed back from customers! The layout, etc. I find that hard to believe based on my personal observations....lol
 

oreo54

5000 Club Member
View Badges
Joined
Sep 18, 2017
Messages
5,970
Reaction score
3,673
Rating - 0%
0   0   0
Thanks! I read the marketing blurb from vipar saying they designed the light based on feed back from customers! The layout, etc. I find that hard to believe based on my personal observations....lol
Asian/European customers maybe.. both "generally" are more blue/white centric.

First I think it is due to many hobbyists in the US using significantly more blue light than I saw on most European tanks. That is, unlike most US tanks where the switch to LEDs and specifically blue LEDs in one form or another, European tanks I saw were still using metal halides or even more were using t-5s. If they were running LEDs or “leads like the metal as they called them”, they ran them more towards the 12-14,000K temperature range rather the higher color temperatures like we do, and specialty blue LEDs like ReefBrites were unheard of.


Nicholas Dushynsky

Valuable Member
View Badges
Joined
Jul 30, 2017
Messages
1,214
Reaction score
1,363
Location
Devon, England
Rating - 0%
0   0   0
Yah good luck!!! Post some pics of the progress and the "operation"
I will do, I have 20 new leds and I want to swap 4 of the whites for 20000k so I'll start on the white channel and if I break the white channel trying to remove 1, I will just run blue channel only . I'm sure it will be fine but if it goes wrong, I work with an ex television engineer who is good with electronics. I've got solder wick and I'm going to desolder first then I have blades to cut the thermal glue if it is that so finger crossed.
 

JCOLE

Grower of the Small Polyps
View Badges
Joined
Mar 12, 2018
Messages
4,158
Reaction score
11,216
Location
Charlotte, NC
Rating - 0%
0   0   0
I am about to work on 4 more boxes that are above my DT. I converted 2 over my frag tank already. The first one I made a mess of and learned from. My second one turned out good. The newer Mars Aqua boxes have COBs and I have to pop them off and scratch the paint back to expose the copper. I mount them to heat sinks and use thermal paste on the diode and the bottom the heat sink.

The issue is the bottom of the heatsink is attaching to mostly paint on the board. How will this work on transferring heat if any? I don't want to start a fire from them overheating. The first box gets really hot when both channels are at 100% so just wondering.

20200516_111409.jpg

20200516_111929.jpg
 

Nicholas Dushynsky

Valuable Member
View Badges
Joined
Jul 30, 2017
Messages
1,214
Reaction score
1,363
Location
Devon, England
Rating - 0%
0   0   0
I am about to work on 4 more boxes that are above my DT. I converted 2 over my frag tank already. The first one I made a mess of and learned from. My second one turned out good. The newer Mars Aqua boxes have COBs and I have to pop them off and scratch the paint back to expose the copper. I mount them to heat sinks and use thermal paste on the diode and the bottom the heat sink.

The issue is the bottom of the heatsink is attaching to mostly paint on the board. How will this work on transferring heat if any? I don't want to start a fire from them overheating. The first box gets really hot when both channels are at 100% so just wondering.

20200516_111409.jpg

20200516_111929.jpg
I'd say u may have a heat issue if the new heat sink can't reach the main one,I assume the original trace is under the new heatsink. What about scraping the black off under the original cob led to expose the original heat sink and then use non conductive thermal paste,the one i bought was arctic mx-4.
 

AbjectMaelstroM

Valuable Member
View Badges
Joined
Jul 21, 2019
Messages
1,530
Reaction score
1,811
Location
RVA
Rating - 100%
1   0   0
Heat transfer will likely suffer as far as paint vs exposed copper/aluminum pad. I wouldn't think it would start a fire, but the lifespan of the diode will likely suffer.

Also, is the diode only being held to the board by the thermal compound? If so it may work for now but over time the led star may start pulling away from the board which will result in degradation of heat transfer and eventually kill the led. That bejbg said, led is light so it "may" hold up once it hardens a bit, but still less than optimal.

As for PAR, I played with apogee sq-420, not the full spectrum one (520), and at 75 blue and 5 white I was getting 300 at highest point. 100/15 I was getting about 430.

Thr spread is pretty bad though and PAR drops significantly from the center to the outer edges. Get about 100 (90-98) at the same height but at the perimeter of the tank. Going to pull lenses tomorrow see how it's looking.
 

Nicholas Dushynsky

Valuable Member
View Badges
Joined
Jul 30, 2017
Messages
1,214
Reaction score
1,363
Location
Devon, England
Rating - 0%
0   0   0
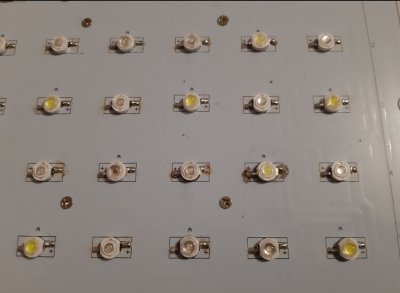
Well I went ahead and changed my led layout. It was alot easier than I thought as the leds only had paste not adhesive on the back so they came off fine, although it still took me around 3.5 hours from start to finish (including cups of tea and putting it all back together). It is very blue/violet only having left 8 white leds 4 original and 4 new 20000k instead of the 6500k, I will post pics over the tank later and draw up my layout. I moved a some of the original 450 and 470 blue leds to the white channel.
I have added:
4 x 20000k whites
6 x 420k
10 x 450k
I got the leds from a uk company 20 mix and match so not too bad and the price was good
Screenshot_20200525-041029_eBay.jpg
Screenshot_20200525-041202_eBay.jpg

I also cleaned the old paste off and added new arctic mx-4 thermal paste on the leds before soldering. My soldering got better towards the end so it isn't the best but it all works and I didn't burn any out trying to remove them so I could use them on the white channel. Here's a couple shots of the board.
I had the original layout printed out and I wrote what was going to go where, that used some of my 3.5 hours. I haven't got any shots over the tank yet as I I didn't start it until the light was off I'll post them later.
So before I started.
Screenshot_20200525-042832_Gallery.jpg

Screenshot_20200525-011559_Gallery.jpg

Then I had removed the 4 x 6500k to swap with the 20000k and 4 12000k that I swapped with the 470k from ch1
Screenshot_20200525-011630_Gallery.jpg

This is the finished board.
Screenshot_20200525-011414_Gallery.jpg
Screenshot_20200525-011353_Gallery.jpg

Powered up at 1% on both channels
Channel 1
Screenshot_20200525-011313_Gallery.jpg

Channel 2
Screenshot_20200525-011221_Gallery.jpg

Both
Screenshot_20200525-011338_Gallery.jpg

I'll see how I like it when over the tank and how the corals react, as now I have blue and violet on the white channel now I could run that higher than previous. But for now I have ch1 on 40% and ch2 on 5% for when it all turns on later, I'll adjust to suit. Also as its straight forward, if I don't like the look it's easy to change back or swap some out. Screenshot_20200525-011647_Gallery.jpg
 
Last edited:

Billsreef1

New Member
View Badges
Joined
Apr 26, 2020
Messages
13
Reaction score
6
Rating - 0%
0   0   0
Well I went ahead and changed my led layout. It was alot easier than I thought as the leds only had paste not adhesive on the back so they came off fine, although it still took me around 3.5 hours from start to finish (including cups of tea and putting it all back together). It is very blue/violet only having left 8 white leds 4 original and 4 new 20000k instead of the 6500k, I will post pics over the tank later and draw up my layout. I moved a some of the original 450 and 470 blue leds to the white channel.
I have added:
4 x 20000k whites
6 x 420k
10 x 450k
I got the leds from a uk company 20 mix and match so not too bad and the price was good
Screenshot_20200525-041029_eBay.jpg
Screenshot_20200525-041202_eBay.jpg

I also cleaned the old paste off and added new arctic mx-4 thermal paste on the leds before soldering. My soldering got better towards the end so it isn't the best but it all works and I didn't burn any out trying to remove them so I could use them on the white channel. Here's a couple shots of the board.
I had the original layout printed out and I wrote what was going to go where, that used some of my 3.5 hours. I haven't got any shots over the tank yet as I I didn't start it until the light was off I'll post them later.
So before I started.
Screenshot_20200525-042832_Gallery.jpg

Screenshot_20200525-011559_Gallery.jpg

Then I had removed the 4 x 6500k to swap with the 20000k and 4 12000k that I swapped with the 470k from ch1
Screenshot_20200525-011630_Gallery.jpg

This is the finished board.
Screenshot_20200525-011414_Gallery.jpg
Screenshot_20200525-011353_Gallery.jpg

Powered up at 1% on both channels
Channel 1
Screenshot_20200525-011313_Gallery.jpg

Channel 2
Screenshot_20200525-011221_Gallery.jpg

Both
Screenshot_20200525-011338_Gallery.jpg

I'll see how I like it when over the tank and how the corals react, as now I have blue and violet on the white channel now I could run that higher than previous. But for now I have ch1 on 40% and ch2 on 5% for when it all turns on later, I'll adjust to suit. Also as its straight forward, if I don't like the look it's easy to change back or swap some out. Screenshot_20200525-011647_Gallery.jpg
Wow!!! Thats awesome dude!!! Looks sweet!! Impressive!! Like you say once you see it over the tank you can tweak it again if need be! I think I could handle this if I tried!!
 

Nicholas Dushynsky

Valuable Member
View Badges
Joined
Jul 30, 2017
Messages
1,214
Reaction score
1,363
Location
Devon, England
Rating - 0%
0   0   0
Wow!!! Thats awesome dude!!! Looks sweet!! Impressive!! Like you say once you see it over the tank you can tweak it again if need be! I think I could handle this if I tried!!
Thanks, I now wish I had done this about a year and a half ago when I was thinking of doing it. I was scared of breaking the light.
I wasnt going to do it originally before that as the light had a 3 year warranty when i bought it so I was waiting for that but now it's done and how simple of a process it was on this light with it being a thermal paste not thermal glue I wish I had done it back then.
It did help alot reading though this thread though.
 

Billsreef1

New Member
View Badges
Joined
Apr 26, 2020
Messages
13
Reaction score
6
Rating - 0%
0   0   0
Thanks, I now wish I had done this about a year and a half ago when I was thinking of doing it. I was scared of breaking the light.
I wasnt going to do it originally before that as the light had a 3 year warranty when i bought it so I was waiting for that but now it's done and how simple of a process it was on this light with it being a thermal paste not thermal glue I wish I had done it back then.
It did help alot reading though this thread though.
Yah you made it look easy!! Yours had a 3 year warranty? I thought mine only had 1?..the thing thats aggravating is I paid $210 a piece, or $420 for 2 vipar 300w lights that I thought were engineered specifically with par and spectrum for reef tanks!!! Now to have to reconfigure them doesnt seem right! thats gonna be more cost! I might not have bought them had I known this...
 

Nicholas Dushynsky

Valuable Member
View Badges
Joined
Jul 30, 2017
Messages
1,214
Reaction score
1,363
Location
Devon, England
Rating - 0%
0   0   0
Yah you made it look easy!! Yours had a 3 year warranty? I thought mine only had 1?..the thing thats aggravating is I paid $210 a piece, or $420 for 2 vipar 300w lights that I thought were engineered specifically with par and spectrum for reef tanks!!! Now to have to reconfigure them doesnt seem right! thats gonna be more cost! I might not have bought them had I known this...
Don't get me wrong these lights are good at growing corals I had grown sps with them so you don't need to reconfigure them. It's just alot if people dont use much white, I have used them at 80 blue and 20 white growing sps fine. Someone on the thread I startedhttps://www.reef2reef.com/threads/viparspectra-165watt-anyone-using-these.317612/ uses them at 100% on both channels. This was my tank before I lost the sps due to zero phosphates and nitrates. This was it when I started
Screenshot_20200525-083121_Chrome.jpg

Screenshot_20190923-002133_YouTube.jpg

I'm looking at it thinking I've had the light since Jan 2017 its over 3 years old now and It looks too yellow for my liking and I want a different look and it can do with a freshen up, plus once I think about doing something I do as much research as I can and eventually do it.
I'm sure the leds over time must change/degrade.

I paid £89 delivered back then and the seller on amazon I bought it from gave a 3 yr warranty, but now to replace it the cheapest I can find it is £139 for a new one.
I like the look of the g5 blue but the price is stupid and alot more than what I'm willing to pay. So I went with just modding what I have to make a poor man's version of one (not really). Even if I broke this one beyond repair and bought a new one it is still cheaper than 1 radion so why not. I started a thread about the viparspectra on here asking if people use them and at what settings and most people who responded used them at 100 blue and 1 white or very little, then supplemented with extra blue led strips or t5. Please don't think you have to change your lights just because others have. They work fine out the box to grow corals, I feel you won't run very high white. I run just channel 1 for 4 hrs on it's own per day 2 at the beginning and 2 at the end.
 

AbjectMaelstroM

Valuable Member
View Badges
Joined
Jul 21, 2019
Messages
1,530
Reaction score
1,811
Location
RVA
Rating - 100%
1   0   0
Yah you made it look easy!! Yours had a 3 year warranty? I thought mine only had 1?..the thing thats aggravating is I paid $210 a piece, or $420 for 2 vipar 300w lights that I thought were engineered specifically with par and spectrum for reef tanks!!! Now to have to reconfigure them doesnt seem right! thats gonna be more cost! I might not have bought them had I known this...

To give them credit where it's due, they work just fine for reefs, both par and spectrum wise. Now, are you going to be maxing out both channels? Probably not. But even on radions, some channels are greatly underused such as the white, green, and red. Unfortunately, by spending only 200 per fixture vs 850, I think it's not realistic to expect the same features. One of the sacrifices is that there are only two channels and all the LEDs that are underused on most other lights happen to on the same channel.

You absolutely don't have to do anything to your lights. You probably just won't be using majority of the white channel depending on how blue you like it. Majority of users seem to run their white channels between 1 and 30%. The only reason to mod them, at least for me, was so that I could squeeze more juice out of the white channel.

Should hold me over until I'm ready to drop $$ on "premium" lights. Right now there's no need as I only have softies/Lps.
 

HAVE YOU EVER KEPT A RARE/UNCOMMON FISH, CORAL, OR INVERT? SHOW IT OFF IN THE THREAD!

  • Yes!

    Votes: 32 45.7%
  • Not yet, but I have one that I want to buy in mind!

    Votes: 9 12.9%
  • No.

    Votes: 26 37.1%
  • Other (please explain).

    Votes: 3 4.3%
Back
Top