TonysReef

Active Member
View Badges
Joined
May 3, 2019
Messages
487
Reaction score
780
Location
Warren, NJ
Rating - 0%
0   0   0
Looks great. Is that Alveopora? I have a green test frag that I picked up about a month ago. Started out ok but now barely opens. Had it mid level recently moved it to the bottom like you have. Pretty sure I upset it and it isn't happy or my tank is missing something it needs. I've heard that the red ones do so much better.

Tank looks great btw.

Cheers. Those are all goniopora in that pic. And yeah, they can be a fickle coral. Best of luck with yours.
 
OP
OP
SuncrestReef

SuncrestReef

That Apex guy
View Badges
Joined
Jan 18, 2018
Messages
4,214
Reaction score
9,251
Location
Oregon
Rating - 0%
0   0   0
I just swapped and cleaned my powerheads. I always like to check the flow patterns by looking at my various LPS corals to see if the movement is adequate. (please excuse the bubble algae...)

 
OP
OP
SuncrestReef

SuncrestReef

That Apex guy
View Badges
Joined
Jan 18, 2018
Messages
4,214
Reaction score
9,251
Location
Oregon
Rating - 0%
0   0   0
Several of my SPS colonies at the top of my rock work have been growing quite large, and they're starting to cast shadows on some of the corals lower in the tank. I don't really want to cut them back very much, so I decided to rotate my ReeFi LED lights 90 degrees and add a 3rd light in the middle to provide more coverage, in particular in the front and back of the tank.

Since I originally mounted my ReeFi's on the Ecotech RMS arms from my old Radions using custom adapters Daniel from ReeFi provided, I contacted him to see if he could design a new adapter for the rotated orientation. Here's what he came up with, and it works perfectly! The adapter slides right into the aluminum channel from the RMS, and is angled by 3.6 degrees to account for the sagging slope RMS mounts are notorious for.

IMG_8364.jpg


IMG_8372.jpg


After test fitting this prototype, now I'm just waiting on Daniel to print the additional adapters and for my 3rd RMS mount kit to arrive so I can rearrange my lights. For now, I have one rotated 90 degrees. Here are some before and after photos:

Before:
IMG_8371.jpg


IMG_8370.jpg


After:
IMG_8373.jpg


IMG_8377.jpg


IMG_8374.jpg


IMG_8375.jpg


I'll post an update once I have the new RMS arm and adapters for all 3 lights.

I want to give a big Thank You to Daniel @danlu_gt. Such awesome customer service!
 
OP
OP
SuncrestReef

SuncrestReef

That Apex guy
View Badges
Joined
Jan 18, 2018
Messages
4,214
Reaction score
9,251
Location
Oregon
Rating - 0%
0   0   0
A fellow reefer on my local club forum just asked me what the PAR readings are for ReeFi's on full power, so I pulled out my PAR meter and took these measurements just now. My ReeFi's are 8" above the water surface.

All channels at 100%
1/4" below water surface: 902
Top of rocks, 6" below surface: 604
Sand bottom, 18" below surface: 273

Normal daytime peak lighting:
1/4" below water surface: 632
Top of rocks, 6" below surface: 404
Sand bottom, 18" below surface: 165

Here's my normal ReeFi lighting schedule where those last numbers were measured:

Screen Shot 2020-04-13 at 4.12.36 PM.png
 

shadow1013

Well-Known Member
View Badges
Joined
May 8, 2015
Messages
847
Reaction score
340
Location
Orlando, FL
Rating - 0%
0   0   0
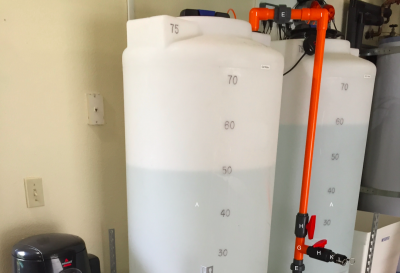
I'm looking on Norwesco's site and their technical drawings show markers already placed for every 10, depending on size of tank, gallons. Was this the case for yours? I see you used markers to make the numbers more visible, but were those already there? Thanks.

I get a lot of questions about my mixing station, so I'll provide some detail here and a parts list:

A. (qty 2) Norwesco 75 gallon storage tanks with 1.25" threaded bulkheads
Screen Shot 2019-06-15 at 10.16.53 PM.png
 

ReefRDude

Community Member
View Badges
Joined
Jun 20, 2011
Messages
62
Reaction score
12
Location
Maryville, Tn
Rating - 0%
0   0   0
Hello,

I need your advice on some things regarding my mixing station build. I'm picking up the same water tanks you have in a few days and will hopefully start my build. Please forgive me for all the questions but I'm new and don't wanna screw this up.

1. When you ran your plumbing to the top of the saltwater storage tank, I noticed you made a U shape and then back down into the top of storage tank. Was that due to space limitations? I am wondering why you didn't just place the bulkhead/Uniseal into the flat side of tank near top?

2. Do you think you could have gotten by with maybe a smaller 1/2" bulkhead or Uniseal instead of a 1" on top for all the tubing entering the saltwater storage tank/RODI storage tank? I was thinking the smaller the opening the better to cut back on possible contaminants.

3. What lines do you have run FROM the tank through the conduit to the mixing station? I know you have the blue RODI ATO tube, orange AWC tube for fresh salt water coming back to the tank, the black tube is for waste water leaving the tank and then you have a 30' ??? Neptune AquaBus cable? The AquaBus is to hardwire into apex EB4 in the garage but its not really needed because of WiFi....It basically just adds the peace of mind of knowing you have connection.

4. What lines are run into the bulkhead in the the top of saltwater storage? The orange is for fresh sw headed to the tank via AWC through your DOS. You have the heater cord, salinity probe and....??

5. What lines are run into the RODI Storage tank? I see a supply line attached into the side for RODI supply. You also have the blue tube for ATO via Neptune ATK run into the top. What are the other lines??

6.Can you list the equipment that you have mounted up in your mixing station other than the obvious (RODI, pump, storage tanks, etc.........) ??
I think you said you have a Neptune EB-4 and I'm assuming your pump, your heater and what else is plugged into it??? Also what are the two Neptune Modules? ATK? and ???

7. Looking back is there anything you would have done different besides your stand?


Once again please excuse all the questions........Thank You.
 

Daveobrien

Active Member
View Badges
Joined
Sep 9, 2011
Messages
175
Reaction score
272
Location
Portland, OR
Rating - 0%
0   0   0
I'm looking on Norwesco's site and their technical drawings show markers already placed for every 10, depending on size of tank, gallons. Was this the case for yours? I see you used markers to make the numbers more visible, but were those already there? Thanks.
I have the same Norwesco tanks. They come with raised plastic letters every 10. A black sharpie over them just makes them pop. Easier to Read.

Just finished my mixing station, yes, it's a copy of @SuncrestReef 's. I'm trying to calibrate my RO flow rate, so I setup my nestcam in front of the tank and taped a ruler to it. (green tape is holding the ruler in place - nothing fancy) Oh, and I backlit the tanks as well. Easier to read.
1586901079821.png
 

shadow1013

Well-Known Member
View Badges
Joined
May 8, 2015
Messages
847
Reaction score
340
Location
Orlando, FL
Rating - 0%
0   0   0
Thank you! Where did you get your tanks? I have a company that is semi local but doesn't have every size available. Also what I liked about Nerwesco was that they showed the distance between the marked numbers so you could draw your own lines depending on how many gallons you'd want to display.

I have the same Norwesco tanks. They come with raised plastic letters every 10. A black sharpie over them just makes them pop. Easier to Read.

Just finished my mixing station, yes, it's a copy of @SuncrestReef 's. I'm trying to calibrate my RO flow rate, so I setup my nestcam in front of the tank and taped a ruler to it. (green tape is holding the ruler in place - nothing fancy) Oh, and I backlit the tanks as well. Easier to read.
 
OP
OP
SuncrestReef

SuncrestReef

That Apex guy
View Badges
Joined
Jan 18, 2018
Messages
4,214
Reaction score
9,251
Location
Oregon
Rating - 0%
0   0   0
Hello,

I need your advice on some things regarding my mixing station build. I'm picking up the same water tanks you have in a few days and will hopefully start my build. Please forgive me for all the questions but I'm new and don't wanna screw this up.

1. When you ran your plumbing to the top of the saltwater storage tank, I noticed you made a U shape and then back down into the top of storage tank. Was that due to space limitations? I am wondering why you didn't just place the bulkhead/Uniseal into the flat side of tank near top?

I placed it at the top simply because that's also where I drilled the hole to run cables and tubing.

2. Do you think you could have gotten by with maybe a smaller 1/2" bulkhead or Uniseal instead of a 1" on top for all the tubing entering the saltwater storage tank/RODI storage tank? I was thinking the smaller the opening the better to cut back on possible contaminants.

I used 1" to be able to fit the heater plug through the bulkhead. You could easily stuff some foam or other barrier into the bulkhead to block contaminants.

3. What lines do you have run FROM the tank through the conduit to the mixing station? I know you have the blue RODI ATO tube, orange AWC tube for fresh salt water coming back to the tank, the black tube is for waste water leaving the tank and then you have a 30' ??? Neptune AquaBus cable? The AquaBus is to hardwire into apex EB4 in the garage but its not really needed because of WiFi....It basically just adds the peace of mind of knowing you have connection.

I have the three 1/4" tubes you listed (waste water, salt water, fresh water), an AquaBus cable (you cannot connect remote Apex modules like the PM4, DOS, FMM, PM2) wirelessly...all modules require an AquaBus connection), and I also ran a Cat5 Ethernet cable through the conduit and then through a different wall in the garage into my entertainment cabinet where I have a network switch, allowing me to have my Apex hard wired into my home network rather than using WiFi. I'm a network engineer by profession and will always opt for hard wired vs WiFi for anything that's critical.

4. What lines are run into the bulkhead in the the top of saltwater storage? The orange is for fresh sw headed to the tank via AWC through your DOS. You have the heater cord, salinity probe and....??

Heater, temperature probe, salinity probe, optical sensor, and a powerhead.

5. What lines are run into the RODI Storage tank? I see a supply line attached into the side for RODI supply. You also have the blue tube for ATO via Neptune ATK run into the top. What are the other lines??

Two optical sensors, and the power cord for the PMUP.

6.Can you list the equipment that you have mounted up in your mixing station other than the obvious (RODI, pump, storage tanks, etc.........) ??
I think you said you have a Neptune EB-4 and I'm assuming your pump, your heater and what else is plugged into it??? Also what are the two Neptune Modules? ATK? and ???

I posted the complete parts list on page 34 of this build thread: https://www.reef2reef.com/threads/suncrestreefs-red-sea-reefer-xl-425-build.358990/post-6173194

7. Looking back is there anything you would have done different besides your stand?

I really like @Daveobrien's backlit LED lights. Other than that everything works great so no complaints.

Once again please excuse all the questions........Thank You.
 
OP
OP
SuncrestReef

SuncrestReef

That Apex guy
View Badges
Joined
Jan 18, 2018
Messages
4,214
Reaction score
9,251
Location
Oregon
Rating - 0%
0   0   0
My 3rd RMS mount arm arrived today, so I finally have all 3 ReeFi’s mounted. Looks great!

31DD359F-B59E-4BEF-80A9-51DE598FB757.jpeg

B6A67B69-9050-4ADB-9F8F-0312C7A4CDD0.jpeg

505415DA-3B8C-415B-A294-1CCA230304C4.jpeg

F5116D9E-E625-4C0A-86B0-D80FA5D02495.jpeg
 

AustinReef

Community Member
View Badges
Joined
Apr 22, 2020
Messages
28
Reaction score
27
Rating - 0%
0   0   0
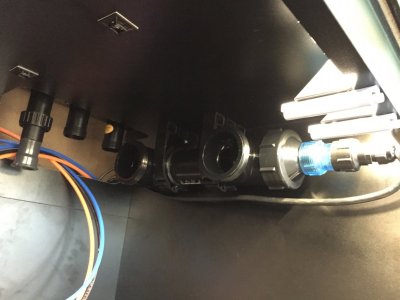
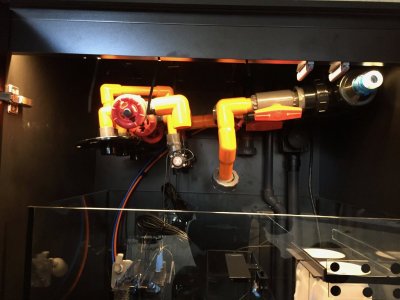
More good progress today. I glued up all the PVC and installed the sump plumbing. I purchased a set of mounting brackets for the Aqua UV sterilizer since it's a pretty heavy unit and will require periodic maintenance to replace the bulb and clean the glass tube. I wanted to make sure it was mounted firmly to make this easier when unscrewing the large PVC fittings.

IMG_2654.jpg

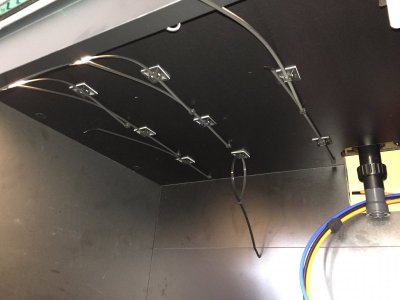
To support the rest of the plumbing, I used 1" x 1" zip-tie mounting plates screwed into the sump cabinet ceiling, then suspended the PVC pipe from the mounts with zip ties. This worked great because it allowed me to loosely suspend the pipes while I got everything lined up and connected, then just tightened the zip ties until everything was pulled up to the ceiling and level with the UV sterilizer that is mounted solidly.

IMG_2658.jpg

IMG_2659.jpg

IMG_2662.jpg

IMG_2661.jpg

IMG_2663.jpg

Now I just need to wait patiently for Neptune to get their manufacturing caught up and start shipping the next batch of COR-20 pumps so I can get water flowing.

I also added a few final touches to my saltwater mixing station. I glued up a small PVC structure to mount a heater, temperature probe, and salinity probe to sit in the bottom of the saltwater tank and connect into my Apex.

IMG_2646.jpg

IMG_2647.jpg

Tomorrow I plan to organize all the Apex cabling and power cords, and start the Apex configuration & programming.

Thanks for this chain. Also have done a full read through and am just starting on my build (you've also answered another question of my on one of the FB forums...so thanks for that as well). I'm about to pull the trigger on an Aqua UV as well. Curious from the pics...how is it plumbed? Are those two inch ball valves prior to it, and then what come after those going into the UV sterilizer, plumbing parts/size wise?
 
OP
OP
SuncrestReef

SuncrestReef

That Apex guy
View Badges
Joined
Jan 18, 2018
Messages
4,214
Reaction score
9,251
Location
Oregon
Rating - 0%
0   0   0
Thanks for this chain. Also have done a full read through and am just starting on my build (you've also answered another question of my on one of the FB forums...so thanks for that as well). I'm about to pull the trigger on an Aqua UV as well. Curious from the pics...how is it plumbed? Are those two inch ball valves prior to it, and then what come after those going into the UV sterilizer, plumbing parts/size wise?

The valves are 1" and then I have 1" to 2" adapters to fit the UV. I chose the 2" Aqua UV rather than the 3/4" version so it wouldn't restrict flow. You can see a better view of it when I was mocking up my manifold design:

1587666031867.png


More photos of it in this post: https://www.reef2reef.com/threads/suncrestreefs-red-sea-reefer-xl-425-build.358990/post-4487411
 

Sunny Goold

Active Member
View Badges
Joined
Feb 22, 2018
Messages
344
Reaction score
373
Location
Brno, Czech Republic
Rating - 0%
0   0   0
Hello! Would you mind sharing some information about your UV sterilizer? Are you still using it?

I am interested in adding the Aqua UV 25 watt to my system but there's a few quirks. It's 22 inches long, and has a wiper mechanism that extends 16". I'm not sure the best way to mount this model so I hope you don't mind sharing your advice?

One option is to mount the UV sterilizer to the side of the red sea cabinet, so that the wiper mechanism can be pulled outwards with the cabinet door opened. One challenge with this method is that the bulb goes in the other side, so to replace the bulb I would need to dismount the UV system. Is that how you perform this task? Is it cumbersome to do?

A second option is to mount it to the ceiling of the cabinet lengthwise, so that I have more room to fit everything. I don't think this will leave me enough room to operate the wiper mechanism though.

I am thinking of adding this to my system to assist with parasite control. Curious what your thoughts on that subject would be as well.

Thank you in advance! Hope you don't mind the questions & sharing your opinion.
I think I just heard on BRS (they reviewed the Aqua) that they don't sell the one with the wiper as it can't be used in saltwater. Maybe I am wrong but I thought I should let you know ;)
 

DS204

Active Member
View Badges
Joined
Apr 11, 2019
Messages
366
Reaction score
420
Location
Winnipeg, Canada
Rating - 0%
0   0   0
I think I just heard on BRS (they reviewed the Aqua) that they don't sell the one with the wiper as it can't be used in saltwater. Maybe I am wrong but I thought I should let you know ;)
Thank you for your message! I wound up getting the 25watt without the wiper after reading the same thing in the fine print somewhere. I appreciate you taking the time to remind me though, just in case!
 

Bob The Reefer

Community Member
View Badges
Joined
Sep 29, 2017
Messages
98
Reaction score
80
Location
Belgium
Rating - 0%
0   0   0
Great build thread with plenty of inspiration. Question for you ... when you set up your COR what procedure did you use to tune the Red Sea return valve to the COR or vice versa?
 
OP
OP
SuncrestReef

SuncrestReef

That Apex guy
View Badges
Joined
Jan 18, 2018
Messages
4,214
Reaction score
9,251
Location
Oregon
Rating - 0%
0   0   0
Great build thread with plenty of inspiration. Question for you ... when you set up your COR what procedure did you use to tune the Red Sea return valve to the COR or vice versa?

The Red Sea return valve is notoriously difficult to fine tune. I run my COR 20 at 100% at all times, other than during feed mode where I reduce it to 1%. Basically I just look at the water level in the return box, and if the water is high I turn the valve counter-clockwise to allow more water through. If it's low then turn it clockwise to restrict the flow and bring the water level back up. I never turn the valve more than about 1/4 turn before waiting to see how much effect it has. Ideally I try to get the water to be about 1/2" below the top of the drain pipes, but I find I need to adjust it every few days as it just never stays constant.
 
Back
Top