Jason's Reefer 250: Fish added! Sump Mod, Clarisea, custom plumbing, aquascape w/E-Marco, IKEA cabinet mod. (Pic heavy!)

canadianeh

Valuable Member
View Badges
Joined
Feb 28, 2017
Messages
1,611
Reaction score
1,044
Rating - 0%
0   0   0
It probably doesn't matter much either way. I left that little glass bridge in there for the minimal framing/added support it provides. (It does complete a support 'line' from the back to front of the sump.) If I run a refugium then it also serves to separate settled detritus from the return area and the refugium, although I suppose this makes cleaning ever so slightly harder as well.

As for the silicone gaps, I didn't worry about them. They are inevitable and haven't been a problem since my tank has been running.

If you run a refugium, aren’t you going to put a wall to separate the clarisea with the refugium?
 
OP
OP
Eight

Eight

Active Member
View Badges
Joined
Oct 15, 2009
Messages
277
Reaction score
622
Location
Pacific Palisades
Rating - 0%
0   0   0
If you run a refugium, aren’t you going to put a wall to separate the clarisea with the refugium?

Possibly, in which case it is much easier to just cut some eggcrate to fit and just use that small bottom glass piece to brace it from going into the fuge. Secure the eggcrate at the top with a clamp and you're done.

Without the glass, I'd have to find a way to secure bottom wall under water which would probably involve more silicone.
 

canadianeh

Valuable Member
View Badges
Joined
Feb 28, 2017
Messages
1,611
Reaction score
1,044
Rating - 0%
0   0   0
Possibly, in which case it is much easier to just cut some eggcrate to fit and just use that small bottom glass piece to brace it from going into the fuge. Secure the eggcrate at the top with a clamp and you're done.

Without the glass, I'd have to find a way to secure bottom wall under water which would probably involve more silicone.

I can see that. I still have the small piece. I will see if I can come up with something different. Otherwise, I am going to attach it back which is very easy to do.

are you planning to use marine pure block or balls? If you are, where you are going to put them? I am debating whether I should use the space for marine pure blocks or balls or miracle mud or chaeto.
 
Last edited:
OP
OP
Eight

Eight

Active Member
View Badges
Joined
Oct 15, 2009
Messages
277
Reaction score
622
Location
Pacific Palisades
Rating - 0%
0   0   0
I can see that. I still have the small piece. I will see if I can come up with something different. Otherwise, I am going to attach it back which is very easy to do.

are you planning to use marine pure block or balls? If you are, where you are going to put them? I am debating whether I should use the space for marine pure blocks or balls or miracle mud or chaeto.

I've never used marine block in the past. Since I set up my last tank, it seems to have become a 'thing' in the hobby. :) For now, I am going to plan to use the refugium for chaeto since that has worked well for me and go from there. I have a decent amount of live rock in my tank and adding marine block is easy. I could always add it below the Clarisea at a later time or throw balls into a bag and dump it pretty much anywhere in the sump.
 
OP
OP
Eight

Eight

Active Member
View Badges
Joined
Oct 15, 2009
Messages
277
Reaction score
622
Location
Pacific Palisades
Rating - 0%
0   0   0
Building out the dry side!

So on Friday I had a very successful Ikea run. I found three very inexpensive pieces to serve as the basis for my dry side frame, controller board(s) and a temporary top off container. Here's what I purchased:

EKET Cabinet with door and 2 shelves: $45
(The deeper 13.75" one, not the 9" one.)

SKADIS Pegboard (Small size): $9.99

HALLBAR 6 Gallon Bin (To use as a temporary ATO until I figure out a custom one): $9.99

Now, the slight shame is that the EKET cabinet is literally 1/2" too wide to fit in perfectly. I suppose if you were running your Reefer 250 without the doors and door hinges, you might be able to get the EKET cabinet to fit perfectly, but assuming you want the doors, the hinges are just too wide. (Trust me, I tried every which way to get this cabinet to fit, but it just doesn't.)

No matter as I was planning on modding whatever cabinet I built anyways. I ended up using a circular saw to cut off the top piece of the cabinet and effectively remove the whole right wall. I then used L brackets to turn the right side of the Reefer stand into the right side of the cabinet. I also omitted the base panel of the cabinet since I don't need the extra structural integrity and it just takes up more precious space. Here's the EKET cabinet and the top of the cabinet I cut off.

20200207_172103.jpg


It's all an extremely tight fit, even after modifying the top, so you actually need to assemble the cabinet inside the stand. You can't put the cabinet together and squeeze it in with the sump running. (I suppose if you plan all this ahead, you could do the dry side first and then slide the sump in, but I focused on plumbing and wasn't about to take out my sump.) Thankfully the cabinet is easy to assemble inside the stand since there are no screws. You just line up the pegs and use a lot of strength to snap them together.

20200207_172212.jpg


At standard height, the EKET cabinet (without the base comes just to the bottom lip of the Reefer 250 front. It's nice because you could add a hinged door if desired (I might do this using leftover wood from the cabinet) and it also leaves a little bit of space on top of the cabinet to tuck away power bricks. I also drilled tiny holes halfway into the Reefer cabinet (aligned to the ones on the left side) so I could use the existing shelf mounting pegs at the EKET cabinet stock height.

20200207_202739.jpg


The Hallbar 6 gallon waste bin fits PERFECTLY and even has a hinged front lid so you can fill it easily! Honestly, this is a pretty darn good solution for $10 that will hold me over until I'm ready to go for a nice custom acrylic ATO.

The last step for the dry side is to cut and add the SKADIS pegboard to which I will mount my electronics. I'll be doing this today and will hopefully post photos later tonight/tomorrow. Overall, since I'm not a super skilled wood worker, I was a little concerned about the dry side, but so far, finding this cabinet and making the modifications has been easy and I'm really happy with the results.

20200208_071822.jpg


A slight modification to my approach is to use the square Eket cabinet with door which is essentially the same thing I used but chopped in half. Then you could suspend this box from the top of the Reefer 250 stand top. This has the advantage of freeing up 1/2" more space next to the sump, but I liked the physical separation between the wet and dry sides.
 
Last edited:
OP
OP
Eight

Eight

Active Member
View Badges
Joined
Oct 15, 2009
Messages
277
Reaction score
622
Location
Pacific Palisades
Rating - 0%
0   0   0
Oh, forgot to mention...

You'll probably want to cut a hole in the cabinet to allow for wires to pass from the wet side to the dry. I made a pretty large 2" hole using a hole saw because I conveniently happened to have a couple of 2" rubber uniseals left over from my last tank build. Not completely necessary, but serves to add a professional look. Also, these cable clips from Ace hardware are fantastic because they hold three wires and have quick release clamps for convenient cable routing.

20200209_090102.jpg


IMG_20200209_095110.jpg
 
OP
OP
Eight

Eight

Active Member
View Badges
Joined
Oct 15, 2009
Messages
277
Reaction score
622
Location
Pacific Palisades
Rating - 0%
0   0   0
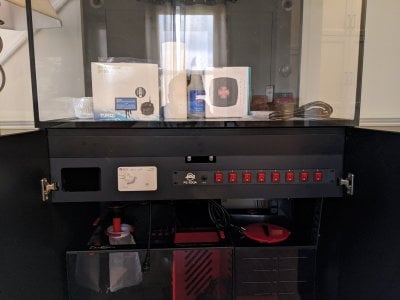
Apex Controller installed and stand is complete!

At long last, I've pretty much finished my build (for now). I mounted the DJ Power strip and Energy Bar to the back of the tank, hooked up my Apex, custom cut a bit of leftover Ikea material to create a hinged front panel and mounted the Amazon Fire tablet. Now I'm just waiting for my tank to cycle so I can move my very sad clownfish from his existing ten gallon swamp over to the new tank. (He's been waiting for a year and a half for his new home!) The Nyos skimmer has broken in and is no longer flooding the tank with microbubbles. I'm pleased to report that neither the Clarisea (which hangs on the side of the sump) nor the Nyos 120 require any sort of custom stand.

The front door panel turned out harder than planned. Getting everything to fit flush took a lot of finessing with the hinges and panel trim. Apparently, once you hack up an Ikea cabinet, right angles are no longer true right angles.

I have a few small remaining "todos"... route power to the tablet, mount the ATO (and eventually get a custom acrylic top off container) and connect a sump float switch and flood sensor to the Apex. I will also purchase a computer battery UPS to the Apex and Vortech for power outages. Hopefully my next update will be about putting some livestock in!

20200210_065154.jpg


20200210_064938.jpg


20200210_070101.jpg
 

canadianeh

Valuable Member
View Badges
Joined
Feb 28, 2017
Messages
1,611
Reaction score
1,044
Rating - 0%
0   0   0
Look very nice and clean! Can we see how you attach the door on the top shelf? :)

Also is your Clarisea running during the cycle?

Where are your dosing containers?
 
OP
OP
Eight

Eight

Active Member
View Badges
Joined
Oct 15, 2009
Messages
277
Reaction score
622
Location
Pacific Palisades
Rating - 0%
0   0   0
Look very nice and clean! Can we see how you attach the door on the top shelf? :)

Also is your Clarisea running during the cycle?

Where are your dosing containers?

Thanks! Not dosing any thing yet since I don't even have corraline seeded in the tank. Clarisea is not running at the moment. Want to give bacteria starters the best shot at seeding first. Please excuse the wiring mess, I have some shorter USB cables on order that I will use to neatly run everything.

Here are photos of the door panel. It's actually very simple. Just two small hinges. What makes the door panel difficult is you can't mount a door perfectly flush because it needs room to pivot open. On top of that, you have to avoid the main cabinet hinges on the Redsea reefer stand. I actually needed to use tiny O-rings between the stand and top hinge to space out the hinge and give it some clearance.

This is why cabinet door hinges have all those fancy screws to straighten and adjust them. (See my prior post on this.)

20200210_231218.jpg
 
Last edited:

3sgterror

Active Member
View Badges
Joined
Nov 24, 2019
Messages
262
Reaction score
186
Rating - 0%
0   0   0
How do you plan on mounting your dj powerstrip? I have the same one and 3d printed the control panel below to house the strip and my two varios controllers, but poor planning on my part and now I can't get the skimmer cup out without tilting it too far over.

I'm curious how you plan on mounting yours. I'm thinking I might now mount mine to the back of the stand, running up and down, with a small piece of wood. Then that would leave me all the space on the right side of my stand to do something similar to your setup.

IMG_20200208_102437.jpg
 
OP
OP
Eight

Eight

Active Member
View Badges
Joined
Oct 15, 2009
Messages
277
Reaction score
622
Location
Pacific Palisades
Rating - 0%
0   0   0
How do you plan on mounting your dj powerstrip? I have the same one and 3d printed the control panel below to house the strip and my two varios controllers, but poor planning on my part and now I can't get the skimmer cup out without tilting it too far over.

I'm curious how you plan on mounting yours. I'm thinking I might now mount mine to the back of the stand, running up and down, with a small piece of wood. Then that would leave me all the space on the right side of my stand to do something similar to your setup.

IMG_20200208_102437.jpg

I did exactly as you described and mounted the DJ strip vertically running up and down the left side of the stand. Here's a super ugly photo I took when I had the tank scooted away from the wall. (Yes you can carefully slide the Reefer 250 on the feet it comes on if you're really careful!)

You can see the DJ strip and the Apex Energy bar screwed into the tank stand directly. You don't need to use a strip of wood for the DJ strip. Just go to the hardware store and buy nuts, bolts and two medium size L brackets. Screw the brackets into your stand and then attach the DJ strip to the brackets using the nuts and bolts. It's super sturdy. I used marine grade stainless steel, but normal brackets are fine.

20200209_134532.jpg
 

canadianeh

Valuable Member
View Badges
Joined
Feb 28, 2017
Messages
1,611
Reaction score
1,044
Rating - 0%
0   0   0
Any new update on the progress? :)

When you cut the length of the pipe for emergency drain and reactors, do you cut them long enough just to hover right on top of the water level, or are they below water level in the sump?
 
OP
OP
Eight

Eight

Active Member
View Badges
Joined
Oct 15, 2009
Messages
277
Reaction score
622
Location
Pacific Palisades
Rating - 0%
0   0   0
Any new update on the progress? :)

When you cut the length of the pipe for emergency drain and reactors, do you cut them long enough just to hover right on top of the water level, or are they below water level in the sump?

I've found it best to cut them just below the water line. They are quieter this way.

For the down lines from the reactors, I actually didn't even bother cementing them in. I found that they dry fit very tightly and since they are not under pressure should be fine as is. Worst comes to worst, if the down pipes come off, the reactors just empty into the sump anyways. I might cement them in the future, but while I am still fiddling with things, I don't want to make anything permanent until I build a routine.
 
OP
OP
Eight

Eight

Active Member
View Badges
Joined
Oct 15, 2009
Messages
277
Reaction score
622
Location
Pacific Palisades
Rating - 0%
0   0   0
In the meantime I've been waiting for my tank to cycle. I'm starting the tank from a completely dead start which I haven't done since literally 20 years ago because I've always had a tank running continuously. This allowed me to use live rock from my old tank to seed the new one. In this case, i am only using dry sand, Marco Rock and my old live rock that had been completely dry and acid bathed.

So ten days ago, after getting my salinity and temp dialed in, I put one bottle each of Biospira and Microbacter XLM. I used Dr. Tim's Ammonium Chloride to get my ammonia up to about 4 ppm. (I was going for 2ppm but overshot by a little bit. )

I've been using API test kits for Ammonia and Nitrite to monitor things. Here's a photo a few days after I started. (I had just done a second dose of ammonium chloride.)

20200215_021116.jpg


Tonight my ammonia is zero, but nitrites are still >5 ppm. Not surprising, I just need to give it more time. I believe my tank can now zero out 2ppm of ammonia within 24 hours. I'll probably let it go another few more days to see if nitrites come down to zero.
 

canadianeh

Valuable Member
View Badges
Joined
Feb 28, 2017
Messages
1,611
Reaction score
1,044
Rating - 0%
0   0   0
In the meantime I've been waiting for my tank to cycle. I'm starting the tank from a completely dead start which I haven't done since literally 20 years ago because I've always had a tank running continuously. This allowed me to use live rock from my old tank to seed the new one. In this case, i am only using dry sand, Marco Rock and my old live rock that had been completely dry and acid bathed.

So ten days ago, after getting my salinity and temp dialed in, I put one bottle each of Biospira and Microbacter XLM. I used Dr. Tim's Ammonium Chloride to get my ammonia up to about 4 ppm. (I was going for 2ppm but overshot by a little bit. )

I've been using API test kits for Ammonia and Nitrite to monitor things. Here's a photo a few days after I started. (I had just done a second dose of ammonium chloride.)

20200215_021116.jpg


Tonight my ammonia is zero, but nitrites are still >5 ppm. Not surprising, I just need to give it more time. I believe my tank can now zero out 2ppm of ammonia within 24 hours. I'll probably let it go another few more days to see if nitrites come down to zero.

This is why I need digital test kits. When I look at those shades of colors, I can't match them with the result. When it is so obvious I can tell.

Any recommendation which digital test kits are accurate?
 
OP
OP
Eight

Eight

Active Member
View Badges
Joined
Oct 15, 2009
Messages
277
Reaction score
622
Location
Pacific Palisades
Rating - 0%
0   0   0
This is why I need digital test kits. When I look at those shades of colors, I can't match them with the result. When it is so obvious I can tell.

Any recommendation which digital test kits are accurate?

I've thought about picking up some digital test kits, but haven't researched them well. For now I will just finish up my Salifert (CA) and API (Ammonia, Nitrite, Alk) ones.

For the tests you will do regularly, namely Calcium and Alk, since they are titration kits, you don't need to match color shades and you will really only use Ammonia and Nitrite once, when you are cycling.
 
OP
OP
Eight

Eight

Active Member
View Badges
Joined
Oct 15, 2009
Messages
277
Reaction score
622
Location
Pacific Palisades
Rating - 0%
0   0   0
So while my tank cycles, I've been working on cleaning up the wiring and other usability improvements. Here's a nice "reefer hack" that I installed using an acrylic Ikea photo rail for $14.

20200216_220614.jpg


20200216_223810.jpg


20200217_051759.jpg


I drilled a couple small holes in the photo rail and just screwed it into the back of the stand. The rail is 4" wide, which is about as flush to a wall as you're likely to get a tank. (Vortech MP40 dry side is 3" deep and you'll need at least an inch to remove it for cleaning. Plus space for wiring, lighting mounts, electrical outlet, etc.)

It can hold standard fish food containers, test kits, turkey baster, etc. and can even shield electronics below from any stray water. Plus it's crystal clear so if you push anything you want to store towards the center, it's almost impossible to see.
 

HAVE YOU EVER KEPT A RARE/UNCOMMON FISH, CORAL, OR INVERT? SHOW IT OFF IN THE THREAD!

  • Yes!

    Votes: 32 45.7%
  • Not yet, but I have one that I want to buy in mind!

    Votes: 9 12.9%
  • No.

    Votes: 26 37.1%
  • Other (please explain).

    Votes: 3 4.3%
Back
Top