How many times do you forget to turn off your ATO when doing a water change? Here's a simple fix.

ThePlummer

Active Member
View Badges
Joined
Feb 6, 2020
Messages
292
Reaction score
160
Rating - 0%
0   0   0
First off, I just want to say that I despise doing water changes. I don't mind cleaning the gravel per se, but the whole hauling buckets of water, siphoning, pumping, spilling, and heaven forbid..... Forgetting to turn off the ATO while your doing the water change, so the ATO is dumping fresh water in your tank, diluting the salinity.

Well, I think I've got a simple and inexpensive solution for reducing to near elimination of all this being the 'Waterboy' for your precious pets. I'm all about 'Work smarter, not harder'.

I've been thinking about how to do a AWC without a Apex or controller, cause quite frankly, I just can't justify the cost of one. And since I was lucky enough to find what I consider my 'dream tank' on the used market, and am in the middle of the build right now, I decided to make a separate thread on this topic, rather than it getting lost in my build thread.

Ok, enough of the introduction, on with the theory.

Equipment needed:

Naturally you need a RO/DI unit.
1594823333455.png

A well pressure tank
1594823373847.png

A container for mixing fresh salt water. I'm using a 45 Gallon trash can... Don't judge me! I'm not cheap, I'm frugal....
1594823491335.png

2 RO/DI Floodguardian units. You won't be using one of the electric solenoids in this build, but it's nice to have a spare, for when one fails, and this is inexpensive insurance.
1594823672312.png

A Auto Aqua Smart AC Socket
1594823735181.png

A small DC pump like this:
1594823805607.png


You'll also need a cheap AC pump.... Just a simple pond pump with a 1/2" discharge will be more than adequate, unless you are pushing some crazy high head heights.
Ok, that takes care of supplying a never ending supply of RO water, so you never have to carry buckets of ATO water to your display, as well as a hands free(or bucket free) SW mixing station, I'm sure I've forgotten something....I haven't made a list of all the plumbing fittings, because every situation is different.

This is a long post, so I'll end it here and next post will describe how to hook these things up.
 

peteyspizza

Active Member
View Badges
Joined
Mar 10, 2017
Messages
142
Reaction score
230
Location
Redwood City, Ca. 94062 (San Francisco Bay Area)
Rating - 0%
0   0   0
Not sure if my idea would work, but you could also put a float switch in the tank lower than it would get when the ATO is hooked up. So a float switch that controlled a power strip that the ATO is plugged into, set lower than the water level when you siphon out water. For example if your ATO kicks on when the water level is half an inch lower than normal, you could put the other one that controls the outlet maybe an inch lower than the other float sensor. That way it would only pump in freshwater for a couple seconds before the level reaches lower than normal. That’s just my idea
 
OP
OP
ThePlummer

ThePlummer

Active Member
View Badges
Joined
Feb 6, 2020
Messages
292
Reaction score
160
Rating - 0%
0   0   0
Ok, first of all you might be saying something like, "Well that's all and good, but there's no way I can route a water line directly to my DT, so never mind."

Not so fast, pardner! Many times you CAN get a line to your DT, and fairly simple too. You just have to think outside the box, like I did.

Believe it or not, a 1/4" RO line can easily be pushed into the space between your carpet and baseboard. Maybe you've got an open basement and you can tack the line up under the floor joists. Get creative....

For example, my current home is a small 'man cave', not the greatest, but I'm single and don't have to spend a fortune on a big fancy house. (Been there done that)... And just don't care to have all the debt associated with making huge house payments for years on years. So, I'd rather live 'At or below my means, than what the bible describes as the borrower is slave to the lender'. Enough about my mindset, back on to the build...

I had a bit of a problem, when I moved in this house, the kitchen sink is on the back wall of the house, but the refrigerator spot is on the opposite side of the kitchen.... Darn, I thought, can't even use my automatic icemaker on my fridge... Well, thinking outside the box, I tapped into my Kitchen faucet supply with a 1/4" tubing... Turned out to be 50' worth.... and routed the line behind my diswasher, through the laundry room wall (hmm, I have a spare extra refrigerator, with icemaker, Might as well tee off and hook that up too, never know when I need lots of ice).

Once through the laundry room, I routed the line over the door, behind the furnace and through the wall into my master closet. Routed around the closet and down close to the floor and through the wall back into the kitchen, and used the back and bottom of the existing kitchen cabinets to hide the line as it passed through to my refrigerator.

So, don't think that it can't be done.... You just have to get creative....

All this describing may seem unimportant now, but is very relevant to this installation.... Stay tuned..
 
OP
OP
ThePlummer

ThePlummer

Active Member
View Badges
Joined
Feb 6, 2020
Messages
292
Reaction score
160
Rating - 0%
0   0   0
Not sure if my idea would work, but you could also put a float switch in the tank lower than it would get when the ATO is hooked up. So a float switch that controlled a power strip that the ATO is plugged into, set lower than the water level when you siphon out water. For example if your ATO kicks on when the water level is half an inch lower than normal, you could put the other one that controls the outlet maybe an inch lower than the other float sensor. That way it would only pump in freshwater for a couple seconds before the level reaches lower than normal. That’s just my idea
That would definitely work, IF you are still planning on doing manual water changes. I'm taking this to the next level, in an attempt to automate water changes too, or at least as much automation ideas to incorporate into your system.... I'm not going to be able to go full on automation, because I don't have a drain available, but I can run a hose across the floor, when it's water change time... And end the bucket brigade.
 
OP
OP
ThePlummer

ThePlummer

Active Member
View Badges
Joined
Feb 6, 2020
Messages
292
Reaction score
160
Rating - 0%
0   0   0
Ok, so you've got a 'possible' creative way to route your RODI... Now think if there's a way to mayabe steal a section of a closet (like I did) for a place to put a large well pressure tank. This operates on the same basic principle as the additional drinking water tank that RODI filter manufacturers sell as an add on.

This weekend, we are picking up the exact pressure tank for this build, and placing it in the master closet. Remember, where I described the routing of the RODI water line? This is going to be easy peasy, as I can simply cut into the RO line, and install a Tee, running the tee'd off line directly into the Well pressure tank.
More on this later this week...

Now, on to the rest of this build plan.

Once I've tee'd off the icemaker line behind the refrigerator (which happens to be right next to where the new display tank is setting, I drilled a small hole in the side of the stand and put a manual shutoff valve.... This isn't particularly for any safety redundancy, other than, IF the electric solenoid would fail, I could catch it quickly and won't be scrambling to get under the kitchen sink cabinet, only to find a mountain of cleaning supplies in my way to shut off the failed line. That and it will make it much easier to change out the electric solenoid when it does fail, and it will, eventually.

Remmeber, Everything mechanical will eventually fail. It's up to you to either maintain, inspect, or have a plan of what to do when it does fail. That's why I'm reluctant to use bulkheads and screw fittings on my plumbing plans. They are 'mechanical' fittings and are prone to eventual failure.

Ok, so we are to the point that we have water inside your display tank, and there's an appropriate way to mechanically shut it off, when need be. Right after that ball valve, it's time to install the electric solenoid which is going to be the workhorse of the system to keep your ATO chamber full of RO water.

Now here's something to consider.... Safety redundancy. There are several things you can do here, but neither are exactly foolproof. One is installing a mechanical float valve, like this one:
1594848667293.png

Or, this one:
1594848696115.png


I'm not a big fan of these for several reasons.

1. While they are supposed to be a mechanical 'stop' for the pressurized water coming into your ATO container, just like your toilet ball stops the flow of water into your toilet tank, I don't really trust the build quality, and have seen the float balls develop a pin hole leak, and then they sink so they don't work in an emergency (which is what this if for. I've seen them not sufficiently hold back the pressure and they tend to leak a bit, which could be catastrophic if you have a failure just after you leave home for the day.

2. I'm also not convinced that there is a way to securely mount them, if you happen to use a container made of tempered glass.... Apex offers one with a magnet mount.... Not so sure that's such a great idea, what if the ball does have to be used, and the magnets don't hold, and they creep upwards causing the ball to open the valve again.

3. Short of drilling your tank (and thus creating another potential leak point (remember the whole 'Everything mechanical will eventually fail' Thingy?).

So, bearing all this in mind, I'm going to opt to just disregard these things as a possible 'safety device'... I am going to opt for a simple/ cheap electronic timer switch. You can get these things at Harbor Freight for less than 10 bucks. They are infinitely adjustable down to the minute... You just have to pick a time that you are most likely to be home ( and AWAKE)... I choose 7pm... and I leave the switch on for 15 minutes. That means that the electric solenoid is only powered ONCE a day (saving the life of the switch), and that you'll be home, when it does fill.

1594849380713.png


So now you've totally eliminated having to haul RO water to your Display tank EVER AGAIN! The only consideration you need to think about, is that your ATO container is large enough to meet the demands of your aquarium evaporation rate for 24 hours.


Now on to the next phase. Which is fool proofing your ATO/ and combining your automatic water changes.... Stay tuned....
 
OP
OP
ThePlummer

ThePlummer

Active Member
View Badges
Joined
Feb 6, 2020
Messages
292
Reaction score
160
Rating - 0%
0   0   0
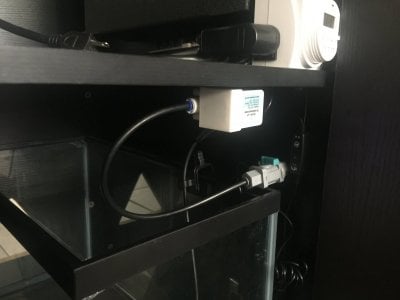
Here’s a picture of how I’ve set mine up forgive the dark picture.

Notice the Flood Guardian right next to the ball valve.... In a hurry, you need things easy... I like to call it the KISS method... (Keep it Simple, Stupid), especially when planning for a potential emergency situation.

image.jpg
 
OP
OP
ThePlummer

ThePlummer

Active Member
View Badges
Joined
Feb 6, 2020
Messages
292
Reaction score
160
Rating - 0%
0   0   0
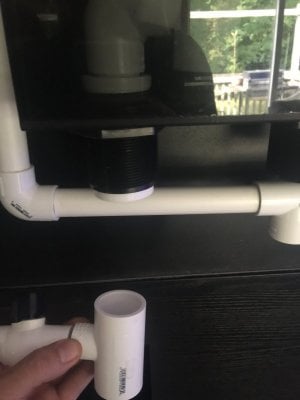
Here’s a pic of what’s going to happen on my system.

I need to run to the supply house and get the appropriate fittings for the Bean Animal, as we just got the tank on the stand two days ago. I'll post another pic soon.

Hmm, my last post describing what's going on didn't post... Wonder what happened.

It was a rather lengthy one, so i'm a bit frustrated and I'll have to re compose it to explain what the next plan is for Auto water changes....

image.jpg
 
OP
OP
ThePlummer

ThePlummer

Active Member
View Badges
Joined
Feb 6, 2020
Messages
292
Reaction score
160
Rating - 0%
0   0   0
Ok, before I explain the above photo, I need to recommend that what I'm about to describe doing for auto water changes, should only be attempted with a Bean Animal drain system.

Before I start, I'll give my 'theory' on Bean Animal's in general.

First, you should size your full siphon drain somewhere close to maximum volume size as to what your return pump can handle. In my situation, I'm using a 3100gph return pump, and a 1" full siphon. Actually, that drain is way oversized, in that a 1" drain can handle 120GPM.... Multiply that by 60 minutes, is 12,600 gph. However, you must take into account for all the fittings changing the direction of the drain water, which reduces the maximum flow potential. Now you also have to consider where that flow potential is with respect of the head pressure on the drain itself.

Without getting all technical, you just need to size your full siphon to move water fast enough to clear any air that would be in the system if/when it restarts. You can control the maximum flow rate with a gate valve... Which leads me to what I'm doing different, and you may think I'm crazy, but hold on.

I also need to recommend that on your bean animal, to upsize the partial drain as well as the emergency drain to make sure one drain can completely handle ALL the water your return pump can put out. In my case, I upsized them to 1 1/2" each.

Now on to what the above photo shows. I'm putting a 1" X 1/2" tee right off the full siphon drian, and I'm putting a 1/2" ball valve, as well as a 1" ball valve right under that tee....

You might think, Plummer That's crazy talk.... Hear me out... I'm putting the series of ball valves on the full siphon for three reasons.

1. I can easily fill a 5 gallon bucket of Display water, to do Tank Transfer Method of Quarantine for new arrivals, to eradicate parasites such as Ick and Velvet.

2. I can easily do a water change by simply running a hose to the kitchen drain, and because I have a auto water change (which I haven't explained how it works yet... be patient... I'll get there...) With the water change pump on, it will replace the water I'm draining off at nearly the same rate...

3. I can also vacuum the sand, without a bucket and the waste goes directly into the sump, and captured by the filter socks.... Yaay! Still no playing 'Waterboy'... I'll explain how this works later.

I'll post pics in the next day or so, as I'm off to the supply house for fittings.... Stay tuned!!!
 
OP
OP
ThePlummer

ThePlummer

Active Member
View Badges
Joined
Feb 6, 2020
Messages
292
Reaction score
160
Rating - 0%
0   0   0
Well, while we are both waiting for the fittings, I'll go ahead and describe point #3 from the above post about using the 1"x 1/2" tee as a source for the rock vacuum, without hauling buckets.

You see, IF you attach a rock vacuum and hose directly to the 1/2" tee, and don't close off the 1" ball valve, the water rushing past the 1/2" tee will create a vacuum. You simply connect your rock vacuum hose to the 1/2" and vacuum till your hearts content, and the filth will be trapped in your filter socks. I recommend changing your socks immediately after your done with this operation, as they may become clogged with detritus....

It may be a while, but I plan on doing a short video demonstrating this operation later... IF there is enough interest in me doing so....

Also, many of you may say that what I'm doing is all cool, but won't work in your situation because you can't access the back of your aquarium and the Bean Animal Drain.... But you can do this from under your cabinet also. I just chose to do it in a location that is more convenient for me. We all have to adapt to the circumstances we are given.
 
OP
OP
ThePlummer

ThePlummer

Active Member
View Badges
Joined
Feb 6, 2020
Messages
292
Reaction score
160
Rating - 0%
0   0   0
I'm a bit frustrated... I can't find a Auto Aqua Smart Socket anywhere. BRS says that due to Covid( or as I call it, the Plannedemic), they don't know when they will be restocked.... Can't really move forward till I get it, as I have to wire a switch in it... I guess, stay tuned....
 
OP
OP
ThePlummer

ThePlummer

Active Member
View Badges
Joined
Feb 6, 2020
Messages
292
Reaction score
160
Rating - 0%
0   0   0
Well, I'm back with a bit of an update.

Turns out the little smart AC socket is as rare as hens teeth. BRS has been out of them for quite a while now, and I've hunted for other sources, to no avail.

However, a couple of days ago, EUREKA! found one online. Immediately ordered it. It'll be here in a couple of days. Ironically, the next morning after I ordered it, BRS sent me a notification that they had them in stock again. Well, that lasted for less than a day, because they are now out again.....
1595437887672.png


Good thing I waited, because I've made a serious error in my pre-planning of this build. I wanted to use two of the Auto Aqua Smart ATO's and just replace the electric solenoid with a DC pump. But after evaluating the functionality of the Smart ATO, I discovered that it has a safety feature that makes this thing unusable as a ATO. Once the sensor eye is satisfied, the thing shuts completely off and will not start again unless you manually push the pause button, or cut the electric to the unit. It works great as the auto fill into the ATO tank, with a timer though. So, now only get ONE of these.
1595438123898.png


So, there are other options out there. I'm torn between two options that I've found. I like the idea of the Auto Aqua brand having a sensing eye, but they can be a bit pricey. The cheapest I've found that will work is the Auto Aqua Lite

1595438650893.png


But for 1/2 the price, if you don't mind an analogue switch, these little guys work great. I own two of them, and the only issue I have had, is that I'm using them on Innovative Marine 14 and 20 Peninsula all in one tanks, and the check valve is under water in the sump, when you use the proper mounting hardware... The check valve sticks closed, and the pump can't overcome the pressure... It's easy to fix, but a bit annoying.

These little guys have the same redundant safety features as the more expensive electric eyes. So, at this time, I'm opting for using one of these (because I have them 'in stock')... It's a good opportunity to upgrade one of the Smart ATO's on the smaller tanks, so I don't have to look at the annoying mounting hardware. And it doesn't matter inside my DT because it's got doors on it.

1595438872161.png


I'm using this switch, but you have to be careful what you buy (see caution note below)

1595438215561.png


There a bit hard to find, with a light at local hardware stores, but Amazon has everything, and these were cheap. 2 switches for $8.00 free shipping (they'll be here in a couple days too). Caution!!! Make sure if you plan on doing this with AC current, instead of DC current, you have to get a switch rated for 120V. This one is rated for AC. You can use a AC switch for DC, but not the other way around.


You'll also need a couple of check valves IF you plan on using the same feed line into your tank... I'll update this part, when my parts arrive from BRS, should be tomorrow.
 
Back
Top