First Build: IM EXT 112 "Noob Lagoon"

OP
OP
StickyThwomp

StickyThwomp

Community Member
View Badges
Joined
Oct 23, 2022
Messages
36
Reaction score
25
Location
Wisconsin
Rating - 0%
0   0   0
I knew I'd be going slow, but I never imagined this slow.

One might imagine by this point in time i'd have the tank set up, some inhabitants to care for, and I'd be overthinking whether or not I was feeding to much, providing enough light, etc...

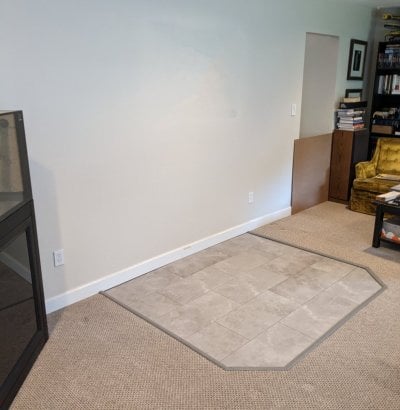
Well I'm not quite there yet. I did tear up some carpet and make some probably ill-advised home modifications though! Behold, the tank pad!
PXL_20230519_221704041~2.jpg

I didn't want to place the tank on the carpet, nor did I want to replace the carpet yet (even though it's in pretty bad shape), so I decided to make this little tiled pad to put the tank on, allowing me to further postpone the decision to replace the carpet.

Also, not pictured here, I've hung my lighting, and have got a PVC pipe sticking up through the floor (and routed 25' across the basement inside a support beam) as a conduit for my water change and ato supply tubing! Just trying to figure out and test if I can get the apex to dos comms running over a cat5 cable w/ USB on the ends before that piece of the system is more or less complete.

So, it's getting there, slowly and painfully, it's getting there. I think I'll be ready in oh, 3-4 years at this rate .

Thanks for reading!!
 

ScottD

Active Member
View Badges
Joined
Aug 16, 2022
Messages
362
Reaction score
289
Location
CT
Rating - 0%
0   0   0
Ya don’t feel bad. We started about the same time frame and my tank is still sitting in its box on the pallet and stand skeleton is built but the rest isn’t started yet. I probably won’t have a chance to get anything else done on it until next winter.
 

BubblesandSqueak

Valuable Member
View Badges
Joined
May 8, 2023
Messages
1,739
Reaction score
3,120
Location
Maine
Rating - 0%
0   0   0
I knew I'd be going slow, but I never imagined this slow.

One might imagine by this point in time i'd have the tank set up, some inhabitants to care for, and I'd be overthinking whether or not I was feeding to much, providing enough light, etc...

Well I'm not quite there yet. I did tear up some carpet and make some probably ill-advised home modifications though! Behold, the tank pad!
PXL_20230519_221704041~2.jpg

I didn't want to place the tank on the carpet, nor did I want to replace the carpet yet (even though it's in pretty bad shape), so I decided to make this little tiled pad to put the tank on, allowing me to further postpone the decision to replace the carpet.

Also, not pictured here, I've hung my lighting, and have got a PVC pipe sticking up through the floor (and routed 25' across the basement inside a support beam) as a conduit for my water change and ato supply tubing! Just trying to figure out and test if I can get the apex to dos comms running over a cat5 cable w/ USB on the ends before that piece of the system is more or less complete.

So, it's getting there, slowly and painfully, it's getting there. I think I'll be ready in oh, 3-4 years at this rate .

Thanks for reading!!
Any updates? I just ordered this tank. went with the complete (tank, stand, sump). Went with the 112 instead of the 150 mostly due to weight. estimating the 150 to be around an extra 700lbs. So when you're already at +2000lbs with the 112 I thought that was enough ;-) I still will brace the floor in a modern home. Thinking to use a 4x4 across the 3 main joists then a jack post under that which I rated for over 10k lbs. And place one on both sides. This is probably not needed but I'm placing this with stairs wrapping around it.

Things I'd like to know are why did you choose this specific skimmer from all this research on everything else?

How did your light work out? Do you have any pics with it mounted?

Screen guard for suicicidal fish? I see "something" that appears to be acrylic laying on the top of your tank?

How do you feel about the size now that you have it? I keep wondering if I should have just said screw it and went with the extra weight of the 150 but I really like the square look. though if the 150 had the end of a peninsula for 3x4 footprint that would be appealing.

I am digging in for my long wait so I have plenty of time to acquire stuff. Wondering if an Arctica chiller will fit in there too or if it's even needed. my house never goes over 74 degrees unless we lose power but my Biocube 32 is at 78 degrees because of the lights and has been to 80 a few times.

I may start a build thread when I finally get this. Before then I may order some Marco rock and follow along with BRS NSA as my guide.

I should ask, how far away from the wall did you ultimately place it for access? I'm placing this in a 3'x6' space that will have stairs wrap around it.
 
OP
OP
StickyThwomp

StickyThwomp

Community Member
View Badges
Joined
Oct 23, 2022
Messages
36
Reaction score
25
Location
Wisconsin
Rating - 0%
0   0   0
Any updates?
Not as many as I'd like . Made and sanity checked an aquabus cable that can run the length from the tank to the basement, but I'm falling down a rabbit hole determining how much automation I want in the water changing station. Definitely using that as an excuse to spin up some embedded programming infrastructure that I otherwise can't find the time/motivation to dive into.

Thinking to use a 4x4 across the 3 main joists then a jack post under that which I rated for over 10k lbs.
If my flooring was exposed from the basement, I think I'd probably also have attempted something as a feel-good measure at the very least. If you're on the fence, and don't want to hire a professional, you probably can't make the situation worse, right? People aren't always rational creatures, and peace of mind, however you achieve it, has value worth considering.

Things I'd like to know are why did you choose this specific skimmer from all this research on everything else?
I think this one generally had good reviews, I remember people complaining about the adjustment being finicky but figured I could handle that. Selling points I recall at the moment were that I could hook up a drain to it, the pump is quiet (or at least no complaints that it was too loud), and, it went on sale at brs :p . Remains to be seen is that was a good call or not. I tend to over-focus on any odd sound when I'm trying to fall sleep, and wanted to keep maintenance lower, so quiet gear and more effective volume on the skimmate before needing to interact with it I'm hoping will be worthwhile.

How did your light work out? Do you have any pics with it mounted?
Remains to be seen. This is a spot that I feel like I may have went with the shiny toy over function, as it seems at the edge of being enough spread to cover the reef, but I'm not up and running yet, so I don't know. The simplicity of a single light and a simple ceiling mount pushed me in this direction also. I don't really want a custom canopy, bulky lights, or arms getting in the way, do I'm hoping that trade-off is worthwhile.

Screen guard for suicicidal fish? I see "something" that appears to be acrylic laying on the top of your tank?
The tank came with a screen! I don't recall if that was advertised or not, but it was in the crate! Probably looks like acrylic cause it's still in the plastic bag.

How do you feel about the size now that you have it?
With how much room I'll have inside the tank? I feel great! I've got zero experience, so take it with a grain of salt, but it feels like it's not too big to be overwhelming on how to fill it, and not too small that id be feeling the need to go bigger. I'm happy with the size so far from that perspective.
With how it fits in the room? Slightly nervous. Adding that tile pad might have it claiming a bit more space than reasonable, so maybe a rectangular footprint may have been better. But I'm optimistic. I don't gaf about the old hand-me-down furniture I have in there at the moment, so rearranging around the tank isn't something I'm concerned with. If I gotta toss the bulky couch in exchange for some armchairs, oh well!

I may start a build thread when I finally get this.
Please do! There's nothing better than being able to copy and tweak the ideas of others, so it's always great to see how other people manage the same equipment. From a selfish perspective... watching others progress is also a good way to light a fire and spur some action on my part :).


Thanks for reading! I welcome your thoughts, and look forward to seeing your progress! Once I get further along, I'll try to revisit the questions I wasn't yet able to answer!
 
OP
OP
StickyThwomp

StickyThwomp

Community Member
View Badges
Joined
Oct 23, 2022
Messages
36
Reaction score
25
Location
Wisconsin
Rating - 0%
0   0   0
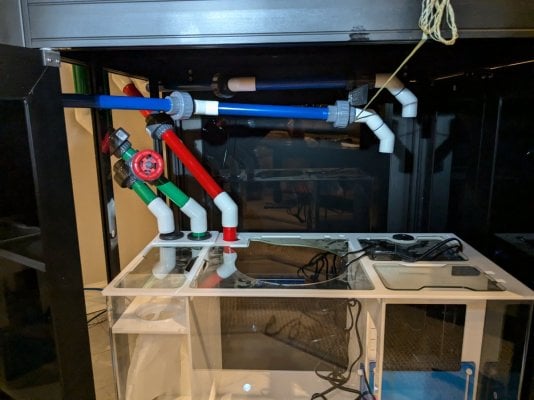
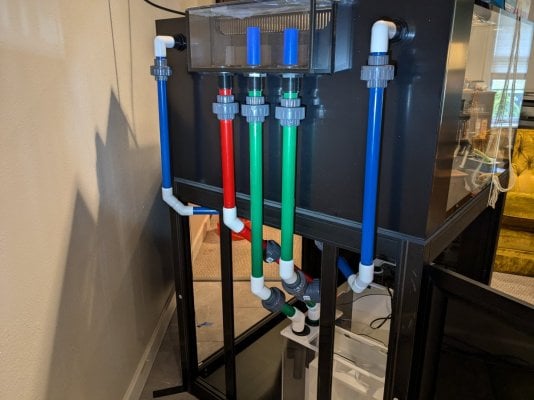
One year later and... The plumbing is nearly done!!!

Like the saltwater mixing station I choose to mock up my plumbing in SketchUp Make 2017. I cannot stress how wonderful that program is for someone like me who hates "winging it".

What I didn't realize until I started glueing it all together afterwards was that I modeled the unions entirely wrong. I somehow modeled them as adding an inch, when in reality it's closer to a half inch. So much for all that attention to detail... Thankfully, slop in cutting, measuring, and flexing meant it didn't seem to matter a bit! I don't know how that worked out in my favor, but it all miraculously fit more or less as planned.

Unions made managing the angles a breeze. One union before anything that needs a twist, and there's not a single fixed bend in the entire setup, they can all twist to make up for any slop

What remains to do how is:
  1. Find a way to support the plumbing, especially the blue returns. Not quite pictured well, but these should be parallel one atop the other, I need to find a way to mount them either with a column from the floor, or some suspension rigging, but there's nothing above but a pair of front-to-back t-slotted rails that I have no clue how to mount anything to. If I cannot find real hardware for it. I'm thinking I should be able to 3d print something out of ABS that might be able clamp onto the slotted rail and hold a little weight? Gotta think on this one...
  2. Mod the top of the return chamber to add another bulkhead, or just create an opening for the second return.
  3. Handle the returns (black flex or silicone, haven't figured that out yet.)
So, slow progress, but progress nonetheless! After I figure out the above I can cross my fingers and leak test my handiwork.

In retrospect, I wish I had selected grey fittings, and maybe gone unicolor instead of mixing it up. The look is a bit... "Lego-ish". Oh well, what's done is done.
PXL_20240922_195456462.MP.jpg
PXL_20240922_195253924.jpg

That's my 2024 update, tune in next fall for the next incremental slice! :loudly-crying-face:
 

ScottD

Active Member
View Badges
Joined
Aug 16, 2022
Messages
362
Reaction score
289
Location
CT
Rating - 0%
0   0   0
I know exactly how things take time and good things take even longer and of course perfect things take the perfect amount of time. I’m subscribing to the slow burn of building too. 2 years later finally starting to get some water in the tank to leak test and get some salt mixed into. Good to see you’re making progress on your build even if it seems like it’s taking forever.

I bought some of these for plumbing and have worked out pretty good so far, maybe an option for you or a starting point to print something. You put them in the track and twist 90 degrees to hold them in place.
 
OP
OP
StickyThwomp

StickyThwomp

Community Member
View Badges
Joined
Oct 23, 2022
Messages
36
Reaction score
25
Location
Wisconsin
Rating - 0%
0   0   0
I know exactly how things take time and good things take even longer and of course perfect things take the perfect amount of time. I’m subscribing to the slow burn of building too. 2 years later finally starting to get some water in the tank to leak test and get some salt mixed into. Good to see you’re making progress on your build even if it seems like it’s taking forever.

I bought some of these for plumbing and have worked out pretty good so far, maybe an option for you or a starting point to print something. You put them in the track and twist 90 degrees to hold them in place.
Aaaah, yeah I struggle with this for sure... lots of water in the house, plus life support for animals! It has to be perfect otherwise I'm being irresponsible! I'm hoping recent momentum will help me get some water in the tank before the year is up though. Gotta act while I'm motivated.

Also, I don't know why I didn't think of an "insert and twist" option, that seems like a no-brainer :upside-down-face: ... For some reason the tension clamps that come with the stand had me thinking that's the only way to do things, and those are expensive! Gotta think simple sometimes I guess, thanks for the link!
 

BubblesandSqueak

Valuable Member
View Badges
Joined
May 8, 2023
Messages
1,739
Reaction score
3,120
Location
Maine
Rating - 0%
0   0   0
Aaaah, yeah I struggle with this for sure... lots of water in the house, plus life support for animals! It has to be perfect otherwise I'm being irresponsible! I'm hoping recent momentum will help me get some water in the tank before the year is up though. Gotta act while I'm motivated.

Also, I don't know why I didn't think of an "insert and twist" option, that seems like a no-brainer :upside-down-face: ... For some reason the tension clamps that come with the stand had me thinking that's the only way to do things, and those are expensive! Gotta think simple sometimes I guess, thanks for the link!
you need a slow build award. When you're ready you're ready. I really like the depth of this tank. sometimes I wish it was a bit taller though. my grape caulerpa is finally regenerating.
 

ScottD

Active Member
View Badges
Joined
Aug 16, 2022
Messages
362
Reaction score
289
Location
CT
Rating - 0%
0   0   0
Aaaah, yeah I struggle with this for sure... lots of water in the house, plus life support for animals! It has to be perfect otherwise I'm being irresponsible! I'm hoping recent momentum will help me get some water in the tank before the year is up though. Gotta act while I'm motivated.

Also, I don't know why I didn't think of an "insert and twist" option, that seems like a no-brainer :upside-down-face: ... For some reason the tension clamps that come with the stand had me thinking that's the only way to do things, and those are expensive! Gotta think simple sometimes I guess, thanks for the link!
Just keep chugging along and making time for it and it will come together. That’s how I kept going with mine. It’s funny sometimes a solution is staring us in the face but we just can’t see it. You’re welcome for the suggestion, I think most of us benefit from a different set of eyes looking at things. That’s one of the reasons for doing the build threads, right?
 
OP
OP
StickyThwomp

StickyThwomp

Community Member
View Badges
Joined
Oct 23, 2022
Messages
36
Reaction score
25
Location
Wisconsin
Rating - 0%
0   0   0
I'm starting to doubt the wisdom of _not_ hard plumbing the returns all the way to the sump bulkheads (After I ordered the parts, naturally) Anyone think four Barbed connectors to black flex all above the sump is asking for trouble, or am I worrying too much? They'll be supported much better than using string as pictured, I promise I have some slight "water in the house PTSD" issues, so I'm going to ensure leak sensors up the wazoo in this thing, so I'm only really concerned of the tubes popping off entirely...
 

ScottD

Active Member
View Badges
Joined
Aug 16, 2022
Messages
362
Reaction score
289
Location
CT
Rating - 0%
0   0   0
I'm starting to doubt the wisdom of _not_ hard plumbing the returns all the way to the sump bulkheads (After I ordered the parts, naturally) Anyone think four Barbed connectors to black flex all above the sump is asking for trouble, or am I worrying too much? They'll be supported much better than using string as pictured, I promise I have some slight "water in the house PTSD" issues, so I'm going to ensure leak sensors up the wazoo in this thing, so I'm only really concerned of the tubes popping off entirely...
I don’t think it’s anything to worry about. Just check on it occasionally and see if it’s slipping off the barb. You could also put some hose clamps on it and that should make sure it doesn’t go anywhere. The trade off of hard piping it all the way is you run the risk of vibrations from the pump traveling through it and into the glass of the tank, amplifying the sound of it.
 
OP
OP
StickyThwomp

StickyThwomp

Community Member
View Badges
Joined
Oct 23, 2022
Messages
36
Reaction score
25
Location
Wisconsin
Rating - 0%
0   0   0
Two weekends of updates... The tank got wet!!!
1000033248.jpg


This was pretty nerve-racking for me (irrational fear of water leaks), but after running the garden hose through the front door and into the sump, I filled the entire tank for a weekend of zero leaks!!

Before this test, my plumbing got supported a bit better with well designed (by someone else) and poorly adapted (by me) 3D printed clamps. I still want to suspend the return pipes better, but one support each at the back edge of the tank (where the only slots I have correctly sized t-nuts for) worked surprisingly well! (I'll follow up with a shot of the supports and the openscad files for anyone who stumbles upon this and is interested.)

There other activity I undertook was setting up my RODI production. I'll leave the details of that to my other post, and just leave a picture of my less-that-orderly tubing here :upside-down-face:

1000033269.jpg


I'm so close I can almost smell the salt!! (if I can get through the nasty bag fart smell of the DI resin that's currently filling my basement)
 
Back
Top