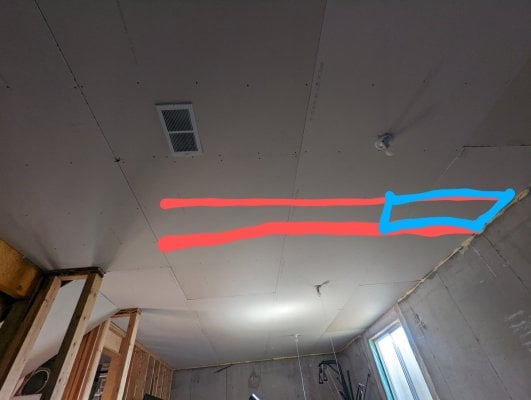
Do I Need Floor Supporting?!?

kalare

Active Member
View Badges
Joined
Aug 15, 2016
Messages
203
Reaction score
206
Rating - 0%
0   0   0
If you are set on that being the location of the tank
1) easiest: block the joists as far from the close wall out as you can tolerate
2) much harder but still ultimately not impacting the room below long term: sister in additional joists
3) much closer to ideal: evaluate if a post in the room below is in anyway aesthetically feasible

4) also an option: hire an engineer to evaluate the static load for you and suggest a course of action

really just comes down to your risk tolerance, personally, I would do 1 and 2 knowing I have to keep an eye on it as the years go by and be ready to take drastic action if I observe any floor sagging, increase in bounciness, tank level changing etc
Blocking alone is not sufficient and will not add any significant strength to the system. If it were my house, I would sister complete lengths of joists under the tank or I would reevaluate my location.
 

Charlie the Reefer

Well-Known Member
View Badges
Joined
Mar 29, 2022
Messages
709
Reaction score
856
Location
Chicago
Rating - 100%
1   0   0
Do you guys see any issues with this structure I built for a 130 gallon? It will be sitting perpendicular across all the joists above (which are 40 inches long, 4x4s and 2x6s). Sump will be plumbed down (not resting on top of floor/not with tank). Tank stand/footprint will be approx 64 inches x 27 inches.
joists1.jpg
joists2.jpg
 

kalare

Active Member
View Badges
Joined
Aug 15, 2016
Messages
203
Reaction score
206
Rating - 0%
0   0   0
A 130g spanning across multiple joists that are only 40" long will be fine. Those additional 2x6 that you added with huge notches in the middle are doing nothing. You cannot notch joists like that. In addition, whoever originally installed that conduit and notched the bottom of those existing joists seriously reduced the capacity of those joists and put the notch right in the middle of the span. You can only notch joists at their ends and conduit should have been run through a small hole drilled in the mid height of the joist.

All that being said, you should still be fine.
 

Charlie the Reefer

Well-Known Member
View Badges
Joined
Mar 29, 2022
Messages
709
Reaction score
856
Location
Chicago
Rating - 100%
1   0   0
A 130g spanning across multiple joists that are only 40" long will be fine. Those additional 2x6 that you added with huge notches in the middle are doing nothing. You cannot notch joists like that. In addition, whoever originally installed that conduit and notched the bottom of those existing joists seriously reduced the capacity of those joists and put the notch right in the middle of the span. You can only notch joists at their ends and conduit should have been run through a small hole drilled in the mid height of the joist.

All that being said, you should still be fine.
Good to know on all points - thank you! Didn't know that about notches... The more you know.

Also - house is 150+ years old so no clue when that occurred.
 

West1

Valuable Member
View Badges
Joined
Jul 26, 2016
Messages
2,005
Reaction score
654
Location
Idaho
Rating - 100%
1   0   0
@Charlie the Reefer I would be very hesitant to put a 130gl glass tank perpendicular (or parallel) under those notched joist.

I would add a couple pyramid cinder blocks under them. 4x4 across the 2 joist for support and 4x4 vertically to each cinder block (one set per side, half way between notch and end of tank). 4 sets would be overkill (2 at ends and 2 near notches) but would let me sleep well!

I agree, the added 2x6 does nothing but add unwanted weight to current weakened joists.
 

Charlie the Reefer

Well-Known Member
View Badges
Joined
Mar 29, 2022
Messages
709
Reaction score
856
Location
Chicago
Rating - 100%
1   0   0
@Charlie the Reefer I would be very hesitant to put a 130gl glass tank perpendicular (or parallel) under those notched joist.

I would add a couple pyramid cinder blocks under them. 4x4 across the 2 joist for support and 4x4 vertically to each cinder block (one set per side, half way between notch and end of tank). 4 sets would be overkill (2 at ends and 2 near notches) but would let me sleep well!

I agree, the added 2x6 does nothing but add unwanted weight to current weakened joists.
Hey thanks I really appreciate the info. Could you explain what you mean by the cinder blocks...? I tried googling but I don't understand what you mean - maybe an example of how this was done for someone else?

Thanks again...
 

West1

Valuable Member
View Badges
Joined
Jul 26, 2016
Messages
2,005
Reaction score
654
Location
Idaho
Rating - 100%
1   0   0
Hey thanks I really appreciate the info. Could you explain what you mean by the cinder blocks...? I tried googling but I don't understand what you mean - maybe an example of how this was done for someone else?

Thanks again...
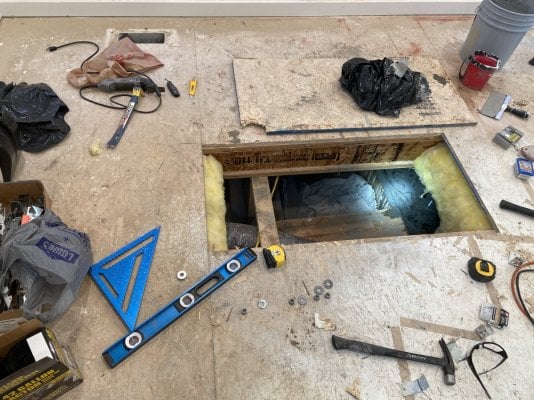
Here’s a birdseye picture of the floor joist that will run parallel to the tank.
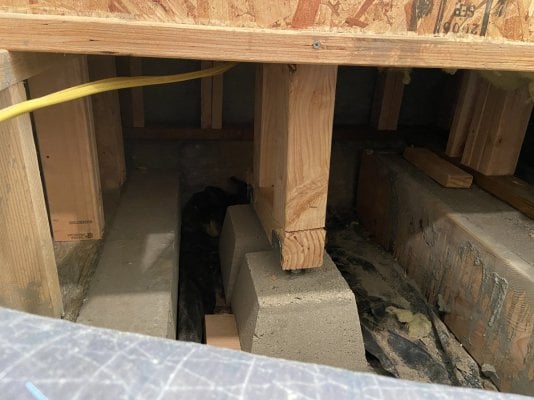
2nd pic is the dual perpendicular concrete with 4x4’s supporting each end of the tank. Also, there are pyramid cinder blocks in the middle. All this holds the load of one I-Beam. To spread the tank weight, I blocked 2x8’s across floor rafters so if the main I-Beam under the tank starts to bow/move/bend, the pressure is sustained by the following I-Beam. I went about 7 I-Beams worth of blocking. Then I blocked to the wall and added more structural 2x4’s so the center tank I-Beam has support from every direction.
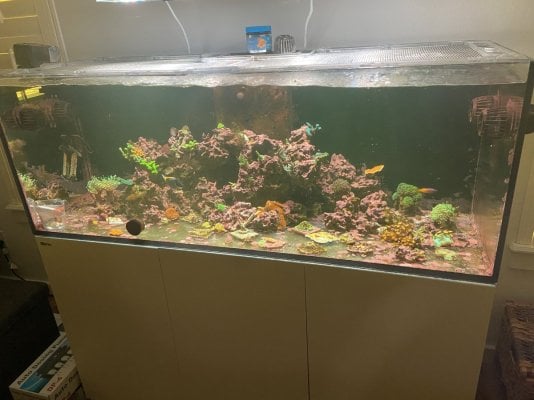
3rd pic is just showing the tank running parallel to the floor joist.
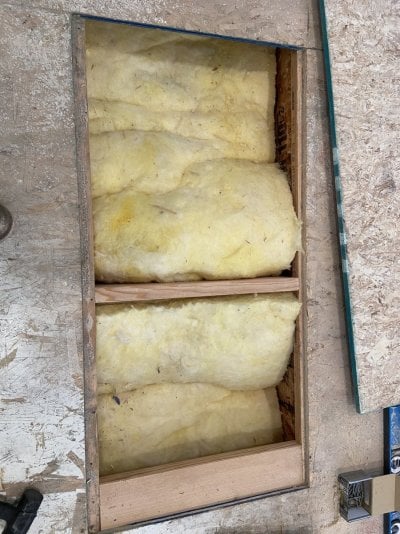
Last pic (couldn’t edit to have as 3rd pic) is how I blocked the I-Beams. By adding a thick (2x8) piece of wood, it is not holding all floor joist together, creating a more solid bond. Reducing the load of the tanks I-Beam.
Hope this helps visually.

080FD944-59E9-4A91-985A-563CCDF6FBEC.jpeg 23045459-8170-4854-898B-EF23878E58CF.jpeg 0D0398CB-3B47-4AC7-923C-31BE196A36B9.jpeg 168FD928-3BFE-446B-BF14-9CD1BDD440A9.jpeg
 
Last edited:

Chee-tomorpha

Active Member
View Badges
Joined
Oct 5, 2017
Messages
428
Reaction score
255
Location
Hugo, MN
Rating - 0%
0   0   0
I'm in the middle of a new build and came across this thread. I read through the entire thread and found a lot of good information. However, my home has open web truss joists and not the 2x10 or I-beams construction as covered in the thread

The open web truss joists are 18" tall and spaced about 19.5" OC. The span where the tank is placed spans about 15' to a huge wood beam in the downstairs. Exterior walls are formed and filled concrete.

The tank is a reefer peninsula 500. I'm over estimating total weight to be around 2000#. The tank runs parallel on two joist and butted to the exterior wall.

As my structure is not typical of what has been discussed so far in this thread and my tank size is in that threshold of caution. I am now worried about my build since it is in a peninsula layout running parallel with the joists. Can I get your honest evaluation? Let me know if there is any additional information you'd like to help with your evaluation.

This is what I can see in what is the unfinished mechanical room.
PXL_20220709_114440109.jpg


This is the span and placement of tank from the basement. I'm assuming the drywall screws follow the joist.
PXL_20220709_120255266~2.jpg


PXL_20220709_115302501~2.jpg


Placement of the tank on main floor. When I place the tank I used a stud finder to find the outer edges of the joists and was able to get the feet running parallel with two joists.

I have not filled the tank but have water in the weir and sump. Fortunately there would be no more live load placed directly on these two specific joists except traffic from walking by or viewing.
PXL_20220706_122425602.jpg
 

Attachments

  • PXL_20220709_120255266~2.jpg
    PXL_20220709_120255266~2.jpg
    98 KB · Views: 90

nkkm

Active Member
View Badges
Joined
Apr 13, 2013
Messages
131
Reaction score
78
Location
United States
Rating - 0%
0   0   0
Awesome diagram...really helps. Unfortunately I wouldn't do it. Under typical required loading, your floor joists are right at the limit of maximum stress. Adding the tank oriented as you show would plut two to three joists at almost 40% overstressed. Would probably be OK, considering a floor almost never sees code required loading, but I would not do it. Recommend changing orientation or finding a new location.
Having thought through it I think I will opt to change the orientation and go with a standard tank instead of peninsula.

Looking at the IN 170EXT with the sump in another room behind the wall. Would you feel comfortable in that position.

Tried to diagram it out here.

73DA343D-2BF8-493C-81B0-435ECC3A67D2.png
 

Sasquatchv

Community Member
View Badges
Joined
Oct 20, 2022
Messages
95
Reaction score
79
Location
Essex,UK
Rating - 0%
0   0   0
w
Do you guys see any issues with this structure I built for a 130 gallon? It will be sitting perpendicular across all the joists above (which are 40 inches long, 4x4s and 2x6s). Sump will be plumbed down (not resting on top of floor/not with tank). Tank stand/footprint will be approx 64 inches x 27 inches.
joists1.jpg
joists2.jpg
Whoever cut slots in the bottom of the joists needs serious talking too and perhaps trade change!!! You never cut outer(tob or bottom) of the joist, always drill in the middle. When you cut chunk of joist like that you may as well use thinner one - load bearing capacity is of the smallest section. Cutting middle out up to 30% of height(of top of my head) has no impact on load bearing capacity.
ie:
3" hole in the centre of 10" joist, at least 20" from supported end is ok,
3" notch anywhere on the top or bottom = strenght of 7" joist.
 

Sasquatchv

Community Member
View Badges
Joined
Oct 20, 2022
Messages
95
Reaction score
79
Location
Essex,UK
Rating - 0%
0   0   0
Having thought through it I think I will opt to change the orientation and go with a standard tank instead of peninsula.

Looking at the IN 170EXT with the sump in another room behind the wall. Would you feel comfortable in that position.

Tried to diagram it out here.

73DA343D-2BF8-493C-81B0-435ECC3A67D2.png
If the walls above ground level are conrete or brick/block I would opt for hanging stand.
Imagine 2-3 triangular steel frames bolted to conrete wall. Using through bolt and nut or resin anchors at the top.
Sump access might be a bit...unorthodox but i can't see why it wouldn't work even for original(futher into the room) orientation.

I hung a 500l 4ft tank once on a spruce 1"x2" on a brick wall, long tank edge followed the wall. Done it as floors were sagging under a normal wardrobe. it lasted 5- or years until I moved.
 
Last edited:

jassojasso

New Member
View Badges
Joined
Mar 18, 2024
Messages
7
Reaction score
8
Location
finland
Rating - 0%
0   0   0
Hi!
I have bit of an issue. I got myself a new reef tank, it is Waterbox 275.6 so all in all, I would say when filled it will be around 1300 kg = 2600ish pounds. I live in a house with a crawlspace and flooring is on joists.
Tank is going (unfortunately) on parallel joists so reinforcing flooring is a must.
reef2reef.png
Joists are 45 x 6000 mm so about 2 x 9 inches. They are spaced 60 cm apart ~ 23 inches. Red lines are outside walls, blue is the tank.
I was planning on building four support beams perpendicular to the tank so that it would distribute the weight of the tank more evenly on 3 joists that are underneath the tank. I am planning on using wood posts and use "raisable support" (4 on each support beam) on top of them to support and secure the beams to joists. (sorry, not native in english so my knowledege of terms is poor).
So I went under the crawlspace and there was a problem.
Since I live in cold country, there is a sheating board nailed on the joists. So I cant actually see joists from my crawl space, only the ~ 3/4 inch sheating board...
joists.jpg

orange lines are where the joists run, little boards are just supports which has been used to nail the board to joists.
So now I know where the joists run, but if I install support beams, they are technically not directly connected to the joists as there is 3/4 inch board between them,
ce2856a2-f3b4-4a43-8950-0114ecf86e9e.jpg

There actually is already a support beam on under other room (planning to use same construct) which is on direct contact on sheating board. Sheating board is completely intact and not depressed, altho as far as I can tell there is nothing exceedingly heavy right on top og this beam.

I do however worry, that given time the sheating board could "squash" and cause main joists to lag before the support beams really do anything to help. Sheating board is pretty solid but I am pondering should I remove it before attaching the beams to joists. This would be less than ideal because this might cause "cold bridges" from crawl space to house where cold air might enter the house.
What do you guys think? Cheers
 

KrisReef

10K Club member
View Badges
Joined
May 15, 2018
Messages
15,227
Reaction score
31,279
Location
ADX Florence
Rating - 0%
0   0   0
Hi!
I have bit of an issue. I got myself a new reef tank, it is Waterbox 275.6 so all in all, I would say when filled it will be around 1300 kg = 2600ish pounds. I live in a house with a crawlspace and flooring is on joists.
Tank is going (unfortunately) on parallel joists so reinforcing flooring is a must.
reef2reef.png
Joists are 45 x 6000 mm so about 2 x 9 inches. They are spaced 60 cm apart ~ 23 inches. Red lines are outside walls, blue is the tank.
I was planning on building four support beams perpendicular to the tank so that it would distribute the weight of the tank more evenly on 3 joists that are underneath the tank. I am planning on using wood posts and use "raisable support" (4 on each support beam) on top of them to support and secure the beams to joists. (sorry, not native in english so my knowledege of terms is poor).
So I went under the crawlspace and there was a problem.
Since I live in cold country, there is a sheating board nailed on the joists. So I cant actually see joists from my crawl space, only the ~ 3/4 inch sheating board...
joists.jpg

orange lines are where the joists run, little boards are just supports which has been used to nail the board to joists.
So now I know where the joists run, but if I install support beams, they are technically not directly connected to the joists as there is 3/4 inch board between them,
ce2856a2-f3b4-4a43-8950-0114ecf86e9e.jpg

There actually is already a support beam on under other room (planning to use same construct) which is on direct contact on sheating board. Sheating board is completely intact and not depressed, altho as far as I can tell there is nothing exceedingly heavy right on top og this beam.

I do however worry, that given time the sheating board could "squash" and cause main joists to lag before the support beams really do anything to help. Sheating board is pretty solid but I am pondering should I remove it before attaching the beams to joists. This would be less than ideal because this might cause "cold bridges" from crawl space to house where cold air might enter the house.
What do you guys think? Cheers
A piece of plywood between the floor and the stand (wide enough to span the floor joists underneath would distribute the weight more evenly and be much easier to install.
 

Devisissy

Kiss My Wrasse
View Badges
Joined
Nov 23, 2015
Messages
911
Reaction score
1,294
Location
Inland Northwest
Rating - 0%
0   0   0
Here’s a birdseye picture of the floor joist that will run parallel to the tank.
2nd pic is the dual perpendicular concrete with 4x4’s supporting each end of the tank. Also, there are pyramid cinder blocks in the middle. All this holds the load of one I-Beam. To spread the tank weight, I blocked 2x8’s across floor rafters so if the main I-Beam under the tank starts to bow/move/bend, the pressure is sustained by the following I-Beam. I went about 7 I-Beams worth of blocking. Then I blocked to the wall and added more structural 2x4’s so the center tank I-Beam has support from every direction.
3rd pic is just showing the tank running parallel to the floor joist.
Last pic (couldn’t edit to have as 3rd pic) is how I blocked the I-Beams. By adding a thick (2x8) piece of wood, it is not holding all floor joist together, creating a more solid bond. Reducing the load of the tanks I-Beam.
Hope this helps visually.

0D0398CB-3B47-4AC7-923C-31BE196A36B9.jpeg
Is this before or after the floor was braced?
 

West1

Valuable Member
View Badges
Joined
Jul 26, 2016
Messages
2,005
Reaction score
654
Location
Idaho
Rating - 100%
1   0   0
Is this before or after the floor was braced?
Pics are after it was braced. The far left was the original pour for the forms. The right form and center concrete blocks I added. It’s been solid. I even roll mixed brute bins near the tank and sometimes leave the weight in the tanks area for a few days. I’m extremely happy with my added support.
 

Devisissy

Kiss My Wrasse
View Badges
Joined
Nov 23, 2015
Messages
911
Reaction score
1,294
Location
Inland Northwest
Rating - 0%
0   0   0
Pics are after it was braced. The far left was the original pour for the forms. The right form and center concrete blocks I added. It’s been solid. I even roll mixed brute bins near the tank and sometimes leave the weight in the tanks area for a few days. I’m extremely happy with my added support.
That tank looks really really unlevel. Am I mistaken? I would be concerned if this was my tank. It seems it leans drastically to the left. The water level shows this. Could just be the wave makers. But being a red sea...
 

West1

Valuable Member
View Badges
Joined
Jul 26, 2016
Messages
2,005
Reaction score
654
Location
Idaho
Rating - 100%
1   0   0
That tank looks really really unlevel. Am I mistaken? I would be concerned if this was my tank. It seems it leans drastically to the left. The water level shows this. Could just be the wave makers. But being a red sea...
Thanks for the concern… four MP40’s on pulse can make an image look scary!
 

West1

Valuable Member
View Badges
Joined
Jul 26, 2016
Messages
2,005
Reaction score
654
Location
Idaho
Rating - 100%
1   0   0
Oh thank God. That's a serious wave. I'm such a dumb dumb I can't figure out a nice standing wave. I've monkey around with them to no avail. Four foot tank.
Haha.
I believe I had the settings at 65%, sync and 1.7 or .7 sec. It was a slow process to find the right numbers between speed, sec and pump placements.
 
Back
Top