Apex DOS DIY level switch?

nunoml

Community Member
View Badges
Joined
Nov 6, 2020
Messages
31
Reaction score
8
Location
Costa de Caparica
Rating - 0%
0   0   0
I have changed on my DDR the optical sensor for a Contactless Liquid Level Sensor.
It shows on the apex but stay always open. the light on the sensor change when in touch with the liquid but on the apex nothing change, stay open all the time.
Any suggestions ?
 

Attachments

  • IMG_4177.jpg
    IMG_4177.jpg
    250.6 KB · Views: 73

bozo

Active Member
View Badges
Joined
Nov 19, 2015
Messages
497
Reaction score
153
Rating - 100%
2   0   0
I have changed on my DDR the optical sensor for a Contactless Liquid Level Sensor.
It shows on the apex but stay always open. the light on the sensor change when in touch with the liquid but on the apex nothing change, stay open all the time.
Any suggestions ?
I use the same exact sensor

I followed this guide


nunoml

Community Member
View Badges
Joined
Nov 6, 2020
Messages
31
Reaction score
8
Location
Costa de Caparica
Rating - 0%
0   0   0
I use the same exact sensor

I followed this guide

Thank you
But i want to plug it to the ddr original cable..
 

bozo

Active Member
View Badges
Joined
Nov 19, 2015
Messages
497
Reaction score
153
Rating - 100%
2   0   0
Thank you
But i want to plug it to the ddr original cable..
You sure you have your wiring set up correctly

That thread should show you what each wire does on the contactless sensor.
 

bozo

Active Member
View Badges
Joined
Nov 19, 2015
Messages
497
Reaction score
153
Rating - 100%
2   0   0
I dont know, it looks that work but on the apex dont change nothing..
Maybe i will do a diy cable
The optical sensors have 4 wires just like how the non contact sensors have 4 wires.

You need to look at the wiring diagram for the non contact sensor and see how its set up.

Also you need to look at the DDR wiring diagram set up.

If I remember correctly, the DDR has 4 connectors. You have to find out what each connector does on the DDR cable. Then you wire the non contact sensor accordingly.
 

e-sully

Community Member
View Badges
Joined
Jul 17, 2015
Messages
31
Reaction score
13
Location
New York
Rating - 0%
0   0   0
I have the same problem with the contactless sensor and DOS. I've verified the connections, but it does not register properly in Apex.

Unlike the optical sensors, the 4th wire (black) on the contactless sensor simply switches from NO to NC (i.e., changes whether the output sends 5V when liquid is present or absent). You can confirm the sensor is working as its LED goes on and off as expected. (Note that this LED is not triggered separately by PIN 4 of the DOS DDR connector as it is for optical sensors.)

I've measured 5V coming off the trigger output wire, so I wonder if there is insufficient current coming to the DOS trigger input to detect the change in state.

Has anyone ever wired a contactless (non-contact) level sensor to a DOS through the DDR port and got it to work?
 

nunoml

Community Member
View Badges
Joined
Nov 6, 2020
Messages
31
Reaction score
8
Location
Costa de Caparica
Rating - 0%
0   0   0
I have the same problem with the contactless sensor and DOS. I've verified the connections, but it does not register properly in Apex.

Unlike the optical sensors, the 4th wire (black) on the contactless sensor simply switches from NO to NC (i.e., changes whether the output sends 5V when liquid is present or absent). You can confirm the sensor is working as its LED goes on and off as expected. (Note that this LED is not triggered separately by PIN 4 of the DOS DDR connector as it is for optical sensors.)

I've measured 5V coming off the trigger output wire, so I wonder if there is insufficient current coming to the DOS trigger input to detect the change in state.

Has anyone ever wired a contactless (non-contact) level sensor to a DOS through the DDR port and got it to work?
yes, its the same with me
 

DeputyDog95

Active Member
View Badges
Joined
May 12, 2019
Messages
410
Reaction score
106
Rating - 0%
0   0   0
I've been reading through the thread, lots of good info. I guess there are two paths... With and without optical sensors. And if you go without optical sensors, with and without a resistor.

I am dosing out of 5 liter Red Sea containers and simply want to have the tile on my dash to see the approximate levels of both Alk and Ca. No interest in optical sensors.

Since this has been experimented with for a while now, I'm sure there are definitive answers at this point.

If I have no interest in using optical sensors but want the DOS tile, what specifically do I need to purchase and from where?'

Do we actually need to use the resistor?
How is this wired?

Also, what is the process of changing the DOS' default volume to your preferred volume?

Thanks!
 

Jason_MrFrags

Well-Known Member
View Badges
Joined
Jun 8, 2017
Messages
843
Reaction score
359
Location
Grand Rapids, Michigan
Rating - 100%
26   0   0
I've been reading through the thread, lots of good info. I guess there are two paths... With and without optical sensors. And if you go without optical sensors, with and without a resistor.

I am dosing out of 5 liter Red Sea containers and simply want to have the tile on my dash to see the approximate levels of both Alk and Ca. No interest in optical sensors.

Since this has been experimented with for a while now, I'm sure there are definitive answers at this point.

If I have no interest in using optical sensors but want the DOS tile, what specifically do I need to purchase and from where?'

Do we actually need to use the resistor?
How is this wired?

Also, what is the process of changing the DOS' default volume to your preferred volume?

Thanks!
 

DeputyDog95

Active Member
View Badges
Joined
May 12, 2019
Messages
410
Reaction score
106
Rating - 0%
0   0   0
Thanks, I read that page but left with more questions than answers :)
 

DeputyDog95

Active Member
View Badges
Joined
May 12, 2019
Messages
410
Reaction score
106
Rating - 0%
0   0   0
This video makes it look pretty simple if you're not using sensors, and he didn't use a resistor:

Should work, right?
 

e-sully

Community Member
View Badges
Joined
Jul 17, 2015
Messages
31
Reaction score
13
Location
New York
Rating - 0%
0   0   0
yes, its the same with me
Thought I'd post a solution for anyone looking for a way to use a non-contact (contactless) fluid level sensor with the Neptune DOS 6-pin molex port. Refer to this post (https://www.reef2reef.com/threads/apex-dos-diy-level-switch.246352/post-2897212) for pin numbers on the DOS connector. The problem I and at least one other user @nunoml were having was that unlike the DIY optical sensor, the DIY non-contact sensor was not triggering the switch in the Apex.

First, why a non-contact switch? Perhaps you are using a disposable container or a solution that may not be suitable to leave an optical sensor submerged. I am using them for monitoring a Heinz vinegar (carbon dose) jug, a gallon hydrogen peroxide bottle, and a DIY frozen food dosing container (I can elaborate on this separately if anyone is interested). For the first two uses, the jugs can easily be replaced when empty and the sensor is just moved to the new bottle.

There are basically two types of sensors easily obtained from Amazon or similar (there are many sellers selling the same thing so just find the best price):
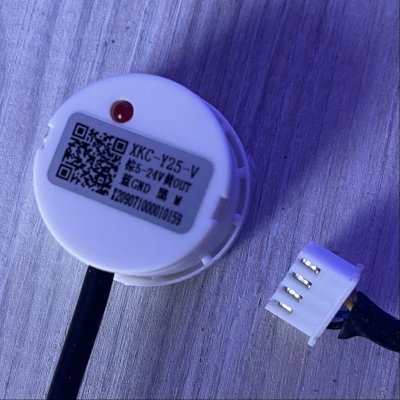
1. The XKC-Y25 version, good for flat surfaces: https://a.co/d/ficCrYb
2. The XKC-Y26 version, good for zip tying to curved surfaces/pipes: https://a.co/d/guN2t7b

The wiring is different than the optical sensors used in this thread. On the sensors, the brown wire is a 5V input (comes from pin 1 on the DOS plug). The yellow wire is switch output (goes to pin 3 or 5 on the DOS plug) and the blue wire is ground (goes to pin 6). The black wire can be ignored or if you connect it to the blue wire, will switch from normally-open (NO) to normally-closed (NC) (i.e. the behavior of the sensor when there is liquid present is reversed). Both sensors have built-in LEDs so there is no additional wiring needed for those.

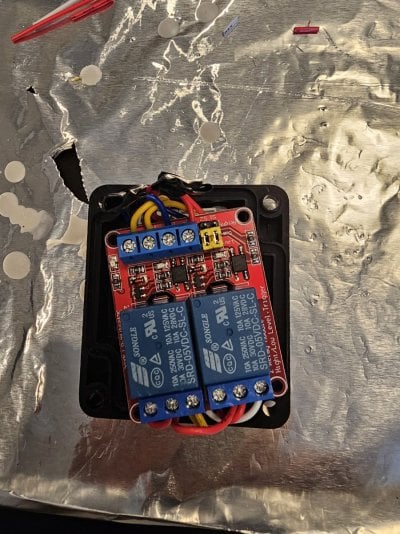
The issue with using these (I least my best guess) is that the current is so low that when the built in relay in the sensor is switched, it is not enough to be detected by the DOS. The solution is to use an external, low current relay. I used this relay (https://a.co/d/0MwNw90) which allows for two inputs/outputs (2 channel) so one of these will be good for both sensors on the DOS. I have two DOS, so the two pack was perfect. You need to switch these to be low level triggers to make it work with the DOS. This is easily done by just shifting the jumpers on the board (they are yellow in the picture below). Then you just wire it up.

1. 5V out from the DOS (pin 1) goes to the following locations: brown wire from sensor, DC+, COM1, and COM2.
2. Ground from the DOS (pin 6) should be connected to pin 4 in order to get the tiles in Apex Fusion (I didn't use a resister as discussed in this thread) and connects to the following: blue wire from sensor, DC-
3. Input 1 wire from DOS (pin 3) connects to NC1 (if it doesn't work, try NO1)
4. Input 2 wire from DOS (pin 5) connects to NC2 (if it doesn't work, try NO2)
5. Yellow wire from the sensor connects to IN1 or IN2 (one of each sensor if you use two sensors)

A few things to make it all look pretty:

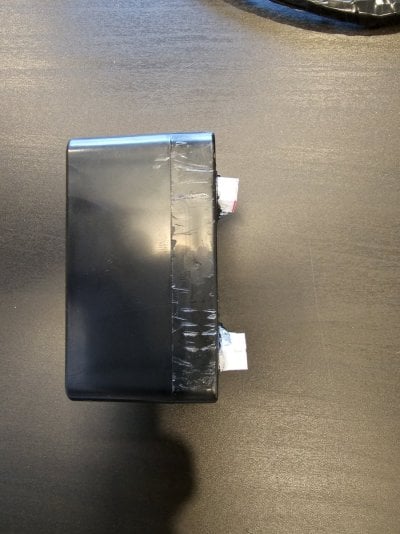
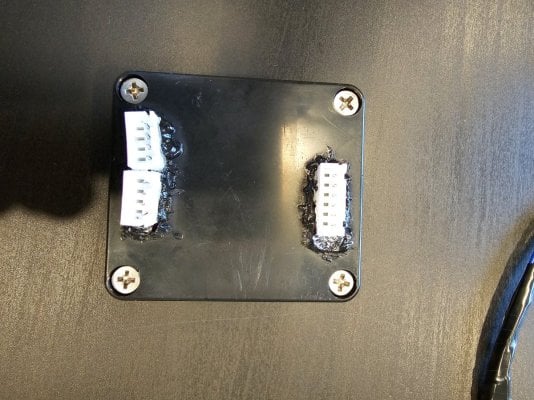
1. A watertight box to hold the board and contain the wires: https://a.co/d/fo8FptV. I used a drill to cut out openings in the lid for female molex connects I made (see pics).
2. A XH2.54 no-crimp molex connector kit. The sensors have XH2.54 molex plugs so you can just make some female plugs for the box to connect to: https://a.co/d/drKX1W8
3. 4 pin, XH2.54 molex extension cables so you are not limited by the length of the sensor wire: https://a.co/d/9Rmkvct
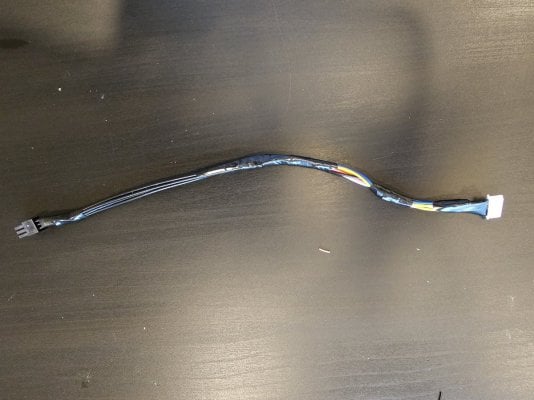
4. 6 pin micro-fit 3.0 to free wire connectors for easy wiring to the DOS port. I then connected these to a male XH2.54 6-pin plug which plugs into the female 6-pin plug on the box (see pics). Makes it easy to disconnect everything: https://www.newark.com/molex/214756-1061/wtb-cord-micro-fit-rcpt-free-end/dp/65AH2747?ost=65ah2747

I don't mind soldering, but the relay board doesn't require it as all connections are screw terminals. The terminals really only hold two wires each, so you have to get creative to get all the 5V wires connected together. You will need to crimp or solder the XH2.54 connector to the connector going into the DOS.

Here are some photos of the relay, the wire between the DOS and the relay box, and the box itself with female plugs (the two on the left are for the sensors and the 6pin on the right is for the wire to the DOS). I was sloppy, but it gets the job done. I tried using one of these on a skimmer cup, but even after adjusting sensitivity (via the screw on the side of the sensor), the fluid in the neck of the skimmer often triggered the sensor.

Happy to provide more details to anyone interested.
 

Attachments

  • 20230610_084828.jpg
    20230610_084828.jpg
    246 KB · Views: 63
  • 20230610_084805.jpg
    20230610_084805.jpg
    315 KB · Views: 72
  • 20230610_084757.jpg
    20230610_084757.jpg
    216.9 KB · Views: 68
  • 20230610_082554.jpg
    20230610_082554.jpg
    278.2 KB · Views: 66

nunoml

Community Member
View Badges
Joined
Nov 6, 2020
Messages
31
Reaction score
8
Location
Costa de Caparica
Rating - 0%
0   0   0
Thought I'd post a solution for anyone looking for a way to use a non-contact (contactless) fluid level sensor with the Neptune DOS 6-pin molex port. Refer to this post (https://www.reef2reef.com/threads/apex-dos-diy-level-switch.246352/post-2897212) for pin numbers on the DOS connector. The problem I and at least one other user @nunoml were having was that unlike the DIY optical sensor, the DIY non-contact sensor was not triggering the switch in the Apex.

First, why a non-contact switch? Perhaps you are using a disposable container or a solution that may not be suitable to leave an optical sensor submerged. I am using them for monitoring a Heinz vinegar (carbon dose) jug, a gallon hydrogen peroxide bottle, and a DIY frozen food dosing container (I can elaborate on this separately if anyone is interested). For the first two uses, the jugs can easily be replaced when empty and the sensor is just moved to the new bottle.

There are basically two types of sensors easily obtained from Amazon or similar (there are many sellers selling the same thing so just find the best price):
1. The XKC-Y25 version, good for flat surfaces: https://a.co/d/ficCrYb
2. The XKC-Y26 version, good for zip tying to curved surfaces/pipes: https://a.co/d/guN2t7b

The wiring is different than the optical sensors used in this thread. On the sensors, the brown wire is a 5V input (comes from pin 1 on the DOS plug). The yellow wire is switch output (goes to pin 3 or 5 on the DOS plug) and the blue wire is ground (goes to pin 6). The black wire can be ignored or if you connect it to the blue wire, will switch from normally-open (NO) to normally-closed (NC) (i.e. the behavior of the sensor when there is liquid present is reversed). Both sensors have built-in LEDs so there is no additional wiring needed for those.

The issue with using these (I least my best guess) is that the current is so low that when the built in relay in the sensor is switched, it is not enough to be detected by the DOS. The solution is to use an external, low current relay. I used this relay (https://a.co/d/0MwNw90) which allows for two inputs/outputs (2 channel) so one of these will be good for both sensors on the DOS. I have two DOS, so the two pack was perfect. You need to switch these to be low level triggers to make it work with the DOS. This is easily done by just shifting the jumpers on the board (they are yellow in the picture below). Then you just wire it up.

1. 5V out from the DOS (pin 1) goes to the following locations: brown wire from sensor, DC+, COM1, and COM2.
2. Ground from the DOS (pin 6) should be connected to pin 4 in order to get the tiles in Apex Fusion (I didn't use a resister as discussed in this thread) and connects to the following: blue wire from sensor, DC-
3. Input 1 wire from DOS (pin 3) connects to NC1 (if it doesn't work, try NO1)
4. Input 2 wire from DOS (pin 5) connects to NC2 (if it doesn't work, try NO2)
5. Yellow wire from the sensor connects to IN1 or IN2 (one of each sensor if you use two sensors)

A few things to make it all look pretty:

1. A watertight box to hold the board and contain the wires: https://a.co/d/fo8FptV. I used a drill to cut out openings in the lid for female molex connects I made (see pics).
2. A XH2.54 no-crimp molex connector kit. The sensors have XH2.54 molex plugs so you can just make some female plugs for the box to connect to: https://a.co/d/drKX1W8
3. 4 pin, XH2.54 molex extension cables so you are not limited by the length of the sensor wire: https://a.co/d/9Rmkvct
4. 6 pin micro-fit 3.0 to free wire connectors for easy wiring to the DOS port. I then connected these to a male XH2.54 6-pin plug which plugs into the female 6-pin plug on the box (see pics). Makes it easy to disconnect everything: https://www.newark.com/molex/214756-1061/wtb-cord-micro-fit-rcpt-free-end/dp/65AH2747?ost=65ah2747

I don't mind soldering, but the relay board doesn't require it as all connections are screw terminals. The terminals really only hold two wires each, so you have to get creative to get all the 5V wires connected together. You will need to crimp or solder the XH2.54 connector to the connector going into the DOS.

Here are some photos of the relay, the wire between the DOS and the relay box, and the box itself with female plugs (the two on the left are for the sensors and the 6pin on the right is for the wire to the DOS). I was sloppy, but it gets the job done. I tried using one of these on a skimmer cup, but even after adjusting sensitivity (via the screw on the side of the sensor), the fluid in the neck of the skimmer often triggered the sensor.

Happy to provide more details to anyone interested.
Thank you very much. im going to try it !
 

nunoml

Community Member
View Badges
Joined
Nov 6, 2020
Messages
31
Reaction score
8
Location
Costa de Caparica
Rating - 0%
0   0   0
Thought I'd post a solution for anyone looking for a way to use a non-contact (contactless) fluid level sensor with the Neptune DOS 6-pin molex port. Refer to this post (https://www.reef2reef.com/threads/apex-dos-diy-level-switch.246352/post-2897212) for pin numbers on the DOS connector. The problem I and at least one other user @nunoml were having was that unlike the DIY optical sensor, the DIY non-contact sensor was not triggering the switch in the Apex.

First, why a non-contact switch? Perhaps you are using a disposable container or a solution that may not be suitable to leave an optical sensor submerged. I am using them for monitoring a Heinz vinegar (carbon dose) jug, a gallon hydrogen peroxide bottle, and a DIY frozen food dosing container (I can elaborate on this separately if anyone is interested). For the first two uses, the jugs can easily be replaced when empty and the sensor is just moved to the new bottle.

There are basically two types of sensors easily obtained from Amazon or similar (there are many sellers selling the same thing so just find the best price):
1. The XKC-Y25 version, good for flat surfaces: https://a.co/d/ficCrYb
2. The XKC-Y26 version, good for zip tying to curved surfaces/pipes: https://a.co/d/guN2t7b

The wiring is different than the optical sensors used in this thread. On the sensors, the brown wire is a 5V input (comes from pin 1 on the DOS plug). The yellow wire is switch output (goes to pin 3 or 5 on the DOS plug) and the blue wire is ground (goes to pin 6). The black wire can be ignored or if you connect it to the blue wire, will switch from normally-open (NO) to normally-closed (NC) (i.e. the behavior of the sensor when there is liquid present is reversed). Both sensors have built-in LEDs so there is no additional wiring needed for those.

The issue with using these (I least my best guess) is that the current is so low that when the built in relay in the sensor is switched, it is not enough to be detected by the DOS. The solution is to use an external, low current relay. I used this relay (https://a.co/d/0MwNw90) which allows for two inputs/outputs (2 channel) so one of these will be good for both sensors on the DOS. I have two DOS, so the two pack was perfect. You need to switch these to be low level triggers to make it work with the DOS. This is easily done by just shifting the jumpers on the board (they are yellow in the picture below). Then you just wire it up.

1. 5V out from the DOS (pin 1) goes to the following locations: brown wire from sensor, DC+, COM1, and COM2.
2. Ground from the DOS (pin 6) should be connected to pin 4 in order to get the tiles in Apex Fusion (I didn't use a resister as discussed in this thread) and connects to the following: blue wire from sensor, DC-
3. Input 1 wire from DOS (pin 3) connects to NC1 (if it doesn't work, try NO1)
4. Input 2 wire from DOS (pin 5) connects to NC2 (if it doesn't work, try NO2)
5. Yellow wire from the sensor connects to IN1 or IN2 (one of each sensor if you use two sensors)

A few things to make it all look pretty:

1. A watertight box to hold the board and contain the wires: https://a.co/d/fo8FptV. I used a drill to cut out openings in the lid for female molex connects I made (see pics).
2. A XH2.54 no-crimp molex connector kit. The sensors have XH2.54 molex plugs so you can just make some female plugs for the box to connect to: https://a.co/d/drKX1W8
3. 4 pin, XH2.54 molex extension cables so you are not limited by the length of the sensor wire: https://a.co/d/9Rmkvct
4. 6 pin micro-fit 3.0 to free wire connectors for easy wiring to the DOS port. I then connected these to a male XH2.54 6-pin plug which plugs into the female 6-pin plug on the box (see pics). Makes it easy to disconnect everything: https://www.newark.com/molex/214756-1061/wtb-cord-micro-fit-rcpt-free-end/dp/65AH2747?ost=65ah2747

I don't mind soldering, but the relay board doesn't require it as all connections are screw terminals. The terminals really only hold two wires each, so you have to get creative to get all the 5V wires connected together. You will need to crimp or solder the XH2.54 connector to the connector going into the DOS.

Here are some photos of the relay, the wire between the DOS and the relay box, and the box itself with female plugs (the two on the left are for the sensors and the 6pin on the right is for the wire to the DOS). I was sloppy, but it gets the job done. I tried using one of these on a skimmer cup, but even after adjusting sensitivity (via the screw on the side of the sensor), the fluid in the neck of the skimmer often triggered the sensor.

Happy to provide more details to anyone interested.
The relay its this one ?

Thank you
 

e-sully

Community Member
View Badges
Joined
Jul 17, 2015
Messages
31
Reaction score
13
Location
New York
Rating - 0%
0   0   0

DeputyDog95

Active Member
View Badges
Joined
May 12, 2019
Messages
410
Reaction score
106
Rating - 0%
0   0   0
Thought I'd post a solution for anyone looking for a way to use a non-contact (contactless) fluid level sensor with the Neptune DOS 6-pin molex port. Refer to this post (https://www.reef2reef.com/threads/apex-dos-diy-level-switch.246352/post-2897212) for pin numbers on the DOS connector. The problem I and at least one other user @nunoml were having was that unlike the DIY optical sensor, the DIY non-contact sensor was not triggering the switch in the Apex.

First, why a non-contact switch? Perhaps you are using a disposable container or a solution that may not be suitable to leave an optical sensor submerged. I am using them for monitoring a Heinz vinegar (carbon dose) jug, a gallon hydrogen peroxide bottle, and a DIY frozen food dosing container (I can elaborate on this separately if anyone is interested). For the first two uses, the jugs can easily be replaced when empty and the sensor is just moved to the new bottle.

There are basically two types of sensors easily obtained from Amazon or similar (there are many sellers selling the same thing so just find the best price):
1. The XKC-Y25 version, good for flat surfaces: https://a.co/d/ficCrYb
2. The XKC-Y26 version, good for zip tying to curved surfaces/pipes: https://a.co/d/guN2t7b

The wiring is different than the optical sensors used in this thread. On the sensors, the brown wire is a 5V input (comes from pin 1 on the DOS plug). The yellow wire is switch output (goes to pin 3 or 5 on the DOS plug) and the blue wire is ground (goes to pin 6). The black wire can be ignored or if you connect it to the blue wire, will switch from normally-open (NO) to normally-closed (NC) (i.e. the behavior of the sensor when there is liquid present is reversed). Both sensors have built-in LEDs so there is no additional wiring needed for those.

The issue with using these (I least my best guess) is that the current is so low that when the built in relay in the sensor is switched, it is not enough to be detected by the DOS. The solution is to use an external, low current relay. I used this relay (https://a.co/d/0MwNw90) which allows for two inputs/outputs (2 channel) so one of these will be good for both sensors on the DOS. I have two DOS, so the two pack was perfect. You need to switch these to be low level triggers to make it work with the DOS. This is easily done by just shifting the jumpers on the board (they are yellow in the picture below). Then you just wire it up.

1. 5V out from the DOS (pin 1) goes to the following locations: brown wire from sensor, DC+, COM1, and COM2.
2. Ground from the DOS (pin 6) should be connected to pin 4 in order to get the tiles in Apex Fusion (I didn't use a resister as discussed in this thread) and connects to the following: blue wire from sensor, DC-
3. Input 1 wire from DOS (pin 3) connects to NC1 (if it doesn't work, try NO1)
4. Input 2 wire from DOS (pin 5) connects to NC2 (if it doesn't work, try NO2)
5. Yellow wire from the sensor connects to IN1 or IN2 (one of each sensor if you use two sensors)

A few things to make it all look pretty:

1. A watertight box to hold the board and contain the wires: https://a.co/d/fo8FptV. I used a drill to cut out openings in the lid for female molex connects I made (see pics).
2. A XH2.54 no-crimp molex connector kit. The sensors have XH2.54 molex plugs so you can just make some female plugs for the box to connect to: https://a.co/d/drKX1W8
3. 4 pin, XH2.54 molex extension cables so you are not limited by the length of the sensor wire: https://a.co/d/9Rmkvct
4. 6 pin micro-fit 3.0 to free wire connectors for easy wiring to the DOS port. I then connected these to a male XH2.54 6-pin plug which plugs into the female 6-pin plug on the box (see pics). Makes it easy to disconnect everything: https://www.newark.com/molex/214756-1061/wtb-cord-micro-fit-rcpt-free-end/dp/65AH2747?ost=65ah2747

I don't mind soldering, but the relay board doesn't require it as all connections are screw terminals. The terminals really only hold two wires each, so you have to get creative to get all the 5V wires connected together. You will need to crimp or solder the XH2.54 connector to the connector going into the DOS.

Here are some photos of the relay, the wire between the DOS and the relay box, and the box itself with female plugs (the two on the left are for the sensors and the 6pin on the right is for the wire to the DOS). I was sloppy, but it gets the job done. I tried using one of these on a skimmer cup, but even after adjusting sensitivity (via the screw on the side of the sensor), the fluid in the neck of the skimmer often triggered the sensor.

Happy to provide more details to anyone interested.

What scenario would you need a level sensor?

If you're using the DOS and you can "trick" it to think you're using the Neptune DDR, and you can manually set the volume for the container you're using instead, and it tracks what you're dosing and subtracts it from your present volume to display what you have left...

Why bother with a sensor?
 

e-sully

Community Member
View Badges
Joined
Jul 17, 2015
Messages
31
Reaction score
13
Location
New York
Rating - 0%
0   0   0
What scenario would you need a level sensor?

If you're using the DOS and you can "trick" it to think you're using the Neptune DDR, and you can manually set the volume for the container you're using instead, and it tracks what you're dosing and subtracts it from your present volume to display what you have left...

Why bother with a sensor?
It does, but it is not entirely accurate. For example, with my refrigerated mysis dosing, I back flush the tubing with DOS (it runs backward), but the volume tracking doesn't add that volume back into the container volume. So it thinks the container is emptying very fast and that is what the graphic shows. The sensor lets you know if the container is actually empty.

Also, you can program things based on the sensor (e.g. if empty, set email alarm or turn off DOS, etc.), but you can't refer to the volume in the container in the Apex code.

Lastly, the sensors can be used anywhere in your setup (e.g. ATO, sump overflow sensor, etc) and don't have to be tied into the DOS function even though they are using the port on the DOS. They basically provide two sensor ports as you would find on an FMM.
 
Back
Top