Acrylic Fabrication Q & A

biecacka

Valuable Member
View Badges
Joined
Jan 1, 2012
Messages
2,319
Reaction score
2,132
Location
columbus ohio
Rating - 0%
0   0   0
The bubble is level but there is a slight gap under the level in the center. The gap is somewhere around 1/16 an inch over about 8 inch span.
I'm going to pass on that board from Menards. I'm going to order the neoprene pad.

Corey
 
OP
OP
Turbo's Aquatics

Turbo's Aquatics

Super Duper Member
View Badges
Joined
Jun 7, 2011
Messages
2,823
Reaction score
4,143
Location
West Des Moines, IA
Rating - 0%
0   0   0
Is that a thickness variation in the plywood? The Aruco plywood usually does not have that issue. Have you tried shimming between the plywood and the stand prior to screwing it down to the stand?
 

biecacka

Valuable Member
View Badges
Joined
Jan 1, 2012
Messages
2,319
Reaction score
2,132
Location
columbus ohio
Rating - 0%
0   0   0
It is not a thickness but the way of the warp/cup. I have shimmed it some, I will finish it up tomorrow. Once I get to a good saw to cut some shims to that length.

Corey
 

KustomAquarium

Community Member
View Badges
Joined
Oct 1, 2019
Messages
57
Reaction score
24
Rating - 0%
0   0   0
Generally, when going rimless, you have to add a factor of about 2.5 to the wall thickness. The usual thickness for a eurobraced 30" tall tank is 3/4". So you're looking at 2" acrylic.
So even though I'm only spanning 24" across of I go with a euro braced design I'll need 3/4"?
 
OP
OP
Turbo's Aquatics

Turbo's Aquatics

Super Duper Member
View Badges
Joined
Jun 7, 2011
Messages
2,823
Reaction score
4,143
Location
West Des Moines, IA
Rating - 0%
0   0   0
correct. That being said, I've seen 30" tall tanks built with 1/2". The one in particular that scares the ever living %%#$ out of me is a 6' one with bent corners that bows so bad, when you put a level on the center of it it's 4" off the corner at each end of the level

It's been in place for 10+ years.
 

GuppyHJD

Valuable Member
View Badges
Joined
Jun 15, 2020
Messages
1,209
Reaction score
738
Location
North Port, FL
Rating - 0%
0   0   0
I am looking to create a top-off water reservoir - any recommendations for what arylic to use (thickness) and glue/method?
I have a space under my stand 24" long, 5" deep and probably 16-18" tall.
This will be my first attempt a working with acrylic but I really don't want it to leak
 

Vested

Well-Known Member
View Badges
Joined
Feb 28, 2021
Messages
827
Reaction score
711
Location
Colorado
Rating - 0%
0   0   0
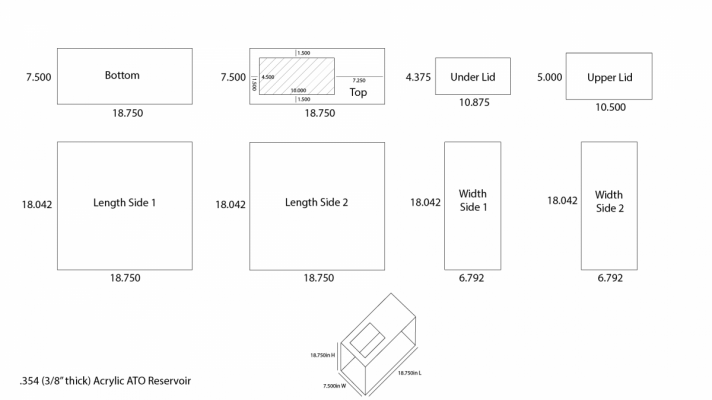
Looking for feedback on this reservoir layout, got the pieces priced for the sheets and cutting with a CNC around $130 is that a fair price? Mainly just worried about the integrity at nearly 19inches tall 3/8" thick.

ato_reservoir.png
 

shneerf

Community Member
View Badges
Joined
Jan 2, 2020
Messages
96
Reaction score
94
Rating - 0%
0   0   0
Looking for feedback on this reservoir layout, got the pieces priced for the sheets and cutting with a CNC around $130 is that a fair price? Mainly just worried about the integrity at nearly 19inches tall 3/8" thick.

ato_reservoir.png
That sounds about right. I paid around $100 for a sheet of 1/4 inch with free straight cuts by a saw. CNC is much better.
 

Vested

Well-Known Member
View Badges
Joined
Feb 28, 2021
Messages
827
Reaction score
711
Location
Colorado
Rating - 0%
0   0   0
OK.. So unfortunately I'm pretty sure i butchered my acrylic project and will be pretty surprised if it holds water, at this point its more of a "for science" lol. So what I'd like to test is if there is anything I can use to make a fillet in the corners to create a better seal? I was originally thinking weldon #16 but read about it just making things worse, is that true? Any other options?
 

Vested

Well-Known Member
View Badges
Joined
Feb 28, 2021
Messages
827
Reaction score
711
Location
Colorado
Rating - 0%
0   0   0
Looks like #40/42 is the best option at this point, I need to do some sourcing hopefully someone local carries it if anyone has advice working with it please let me know ill be searching around the forum and stuff as well.
 

Not_Eeyore

Active Member
View Badges
Joined
May 24, 2021
Messages
140
Reaction score
64
Location
Dickson City
Rating - 0%
0   0   0
Looks like #40/42 is the best option at this point, I need to do some sourcing hopefully someone local carries it if anyone has advice working with it please let me know ill be searching around the forum and stuff as well.
I bought mine from eBay.
Tips...
Gather a sacrificial glass bowl, glass turkey baster, glass eyedropper, teaspoon, tablespoon, and an applicator for IPS 4 (yes 4 not 40.) When the 40 arrives..prepare a calming beverage, open the box and read the mixing instructions. Drink some beverage and let the Whhaaaattttt?? moment pass. Google how many whatevers are in a drop, then how many drops are in a teaspoon, and lastly how many teaspoons are in a tablespoon. Drink more beverage as the Why the blank did they not put that on the label moment passes. Read instructions again and pick an easy practice batch size. Prep the object so that the outside of the seam section to be sealed is touching the floor. I wedged mine between the couch and a leather foot rest. Use sacrificial items as needed to get correct amount of thick part in bowl and thin part in applicator. Applicator adds to bottom of bowl in slow stir motion then suck that up with baster and apply a bead along the inside of the seam. It will level itself.
 

Vested

Well-Known Member
View Badges
Joined
Feb 28, 2021
Messages
827
Reaction score
711
Location
Colorado
Rating - 0%
0   0   0
I bought mine from eBay.
Tips...
Gather a sacrificial glass bowl, glass turkey baster, glass eyedropper, teaspoon, tablespoon, and an applicator for IPS 4 (yes 4 not 40.) When the 40 arrives..prepare a calming beverage, open the box and read the mixing instructions. Drink some beverage and let the Whhaaaattttt?? moment pass. Google how many whatevers are in a drop, then how many drops are in a teaspoon, and lastly how many teaspoons are in a tablespoon. Drink more beverage as the Why the blank did they not put that on the label moment passes. Read instructions again and pick an easy practice batch size. Prep the object so that the outside of the seam section to be sealed is touching the floor. I wedged mine between the couch and a leather foot rest. Use sacrificial items as needed to get correct amount of thick part in bowl and thin part in applicator. Applicator adds to bottom of bowl in slow stir motion then suck that up with baster and apply a bead along the inside of the seam. It will level itself.
Thank you for the tips! Made me laugh cause your totally right about a calming beverage ;) would have helped. I actually finished it maybe a month ago now I used a kitchen scale and got the correct portions that way, i have no idea who thought it was a good idea to make it 1 to 100 or whatever.. sigh guess its not meant for such small mixtures lol. I updated a thread on monster fish keepers if you want to check that out just search weldon 40. One question though, I still havent put water in it.. Cant get the glue smell to go away without removing the lid? Maybe I should wash it out?or more time idk
 

Not_Eeyore

Active Member
View Badges
Joined
May 24, 2021
Messages
140
Reaction score
64
Location
Dickson City
Rating - 0%
0   0   0
Thank you for the tips! Made me laugh cause your totally right about a calming beverage ;) would have helped. I actually finished it maybe a month ago now I used a kitchen scale and got the correct portions that way, i have no idea who thought it was a good idea to make it 1 to 100 or whatever.. sigh guess its not meant for such small mixtures lol. I updated a thread on monster fish keepers if you want to check that out just search weldon 40. One question though, I still havent put water in it.. Cant get the glue smell to go away without removing the lid? Maybe I should wash it out?or more time idk
Thread I found was old... Amazon warehouse deals gets filter carbon in damaged boxes and sells it at a discount. Pour some in, cover sealed bits + 2 inches hot water, ignore for a day, stir, ignore for another day, remove, and let dry.
 

TheHarold

5000 Club Member
View Badges
Joined
Oct 3, 2015
Messages
5,163
Reaction score
8,785
Rating - 0%
0   0   0
I am an acrylic amateur but learned a bunch making this fish isolation box. I tried to use half-lap joints which made it IMPOSSIBLE to avoid bubbles. It was a remnant concept from my woodworking I suppose, but; in this case just typical butt joints would come out stronger and more clear.

IMG_0280.jpeg


Said half-lap joints that were a mistake:
IMG_0211.jpeg
 

Not_Eeyore

Active Member
View Badges
Joined
May 24, 2021
Messages
140
Reaction score
64
Location
Dickson City
Rating - 0%
0   0   0
I am an acrylic amateur but learned a bunch making this fish isolation box. I tried to use half-lap joints which made it IMPOSSIBLE to avoid bubbles. It was a remnant concept from my woodworking I suppose, but; in this case just typical butt joints would come out stronger and more clear.

IMG_0280.jpeg


Said half-lap joints that were a mistake:
IMG_0211.jpeg
Still very nice.
 

qy7400

Community Member
View Badges
Joined
Feb 25, 2014
Messages
49
Reaction score
18
Location
Long Island, NY
Rating - 0%
0   0   0
Is there a recommended repair for this seam? While this is the largest I have a few spots like this but it's been like this for at least 3 years and does not appear to have grown. I'm planning to move the tank and while it was empy thought would be a good time to repair it. The pics are from the same corner, side and back views.


seam 3.jpg
seam 2.jpg
 

HAVE YOU EVER KEPT A RARE/UNCOMMON FISH, CORAL, OR INVERT? SHOW IT OFF IN THE THREAD!

  • Yes!

    Votes: 32 45.7%
  • Not yet, but I have one that I want to buy in mind!

    Votes: 9 12.9%
  • No.

    Votes: 26 37.1%
  • Other (please explain).

    Votes: 3 4.3%
Back
Top