Acrylic Fabrication Q & A

TherealplexiG

Well-Known Member
View Badges
Joined
Jun 18, 2016
Messages
606
Reaction score
277
Location
Mars
Rating - 0%
0   0   0
I guess taylor has used it for gross calculations in real life..
Btw haven't seen him in a while..
 

TaylorPilot

Valuable Member
View Badges
Joined
Aug 8, 2015
Messages
1,455
Reaction score
1,267
Rating - 0%
0   0   0
I guess taylor has used it for gross calculations in real life..
Btw haven't seen him in a while..

Yea, I used to to calculate max flow for each of the systems. I did some real world testing using pumps and it seemed to match up. There is a little difference on mine because I round the edges of the slots, so it isn't exact in my situation. I calculated my 35" systems would process right at 3000 GPH and it was right at the top of the slit when calculated 3000 GPH from the pump.
 

cromag27

CUSTOM ACRYLICS - octoaquatics.com - view my sig
View Badges
Joined
Sep 7, 2013
Messages
8,262
Reaction score
11,294
Location
arizona
Rating - 0%
0   0   0
Very cool. I don't do a lot of overflows but I can see it as a handy tool.
 

SerpentSlick

Active Member
View Badges
Joined
Jul 28, 2015
Messages
104
Reaction score
55
Location
DFW Texas
Rating - 0%
0   0   0
I saw a few "repair" questions answered here and there, but I have one as well.

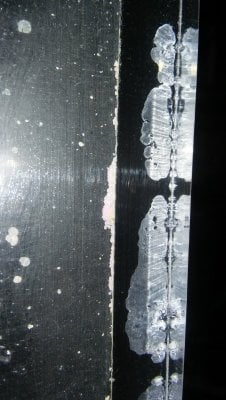
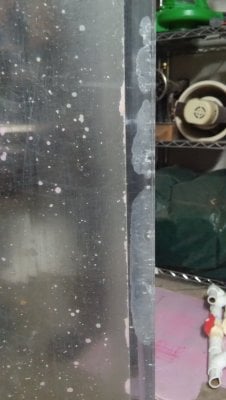
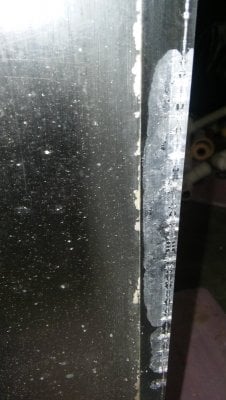
I'm not sure if these marks happened while transporting or are from storage, but they are there so I need to address them before I get too far. I was about to polish and get this frag tank up and running that I bought used from a LFS and I noticed these areas on the bottom seam. It did NOT leak when I purchased it and I don't think will leak now, but I will certainly test before set-up.

Can I properly fix these? I was going to try capilary bonding to wick up the solvent but after reading the first few pages I think that's a bad idea.
20160905_223602_HDR.jpg 20160905_223635.jpg 20160905_224237.jpg
Any advice?

20160905_224248.jpg


20160905_223842.jpg


20160905_223833.jpg
 
OP
OP
Turbo's Aquatics

Turbo's Aquatics

Super Duper Member
View Badges
Joined
Jun 7, 2011
Messages
2,823
Reaction score
4,143
Location
West Des Moines, IA
Rating - 0%
0   0   0
The issue is that the void there is really tight, so while you can likely get some capillary action and fill a bit of it, you're not going to be able to get it all filled as you will trap air. Also there will be particles/debris that you won't be able to get out.

Probably the best thing to do is put a new bottom on, but that's a huge undertaking, next best is to gusset the joint.

Take paper towels and soak with vinegar, place them along the inside joint for an hour, scrape off the coralline

If you can find some right-triangle rod (vs isosceles rod, which won't work) and weld-on 40, this would be ideal. It's not a perfect triangle, it actually leaves gaps so that the gaps can be filled with 40, which is what you want. give the bonding surfaces a light sanding then vacuum and wipe down with Denatured Alcohol, prop the tank up so that your joint forms a valley, mix and pour the 40 into the joint, and place in the triangle rod, then brace it with wood or something to keep it in place where you want it, wait 20-30 minutes, and go to the next joint.

The corners are generally the strongest point in a tank so you can cut gussets to go all the way around but leave the corners open, the 40 will pool up there with each pour so you won't be able to piece the triangle rod together there like you would baseboard on drywall, because you will have a glob there that is dried from the last joint (and you won't be able to easily do this in one pour all around the perimeter...although it is possible)

Anyone else feel free to chime in if I missed something....
 

SerpentSlick

Active Member
View Badges
Joined
Jul 28, 2015
Messages
104
Reaction score
55
Location
DFW Texas
Rating - 0%
0   0   0
Those spots are isolated to one joint along the bottom front seam. Should I bond the gussets all along the perimeter or just that seam?

Also, is there a technique where you make the void bigger and then (re)fill it with the WO40? ...as to keep the stock appearance?

The triangular rod seems very logical from an application and structural standpoint, but if this type of fix is okay I'd like your opinion, direction, and pros/cons.
 

TaylorPilot

Valuable Member
View Badges
Joined
Aug 8, 2015
Messages
1,455
Reaction score
1,267
Rating - 0%
0   0   0
A few of those places are paper thin. I would be very worried about putting water in it the way it sits. I would do like Turbo says. Clean up the acrylic and put gussets on the inside, and if you would like to back fill the gap with liquid solvent, then do that also. However, it will be the gusset that will really be holding the thing together.
 

SerpentSlick

Active Member
View Badges
Joined
Jul 28, 2015
Messages
104
Reaction score
55
Location
DFW Texas
Rating - 0%
0   0   0
What size triangular rod would be appropriate for this fix?

The piece is 48"x24"x12" with 12mm panels.
 
OP
OP
Turbo's Aquatics

Turbo's Aquatics

Super Duper Member
View Badges
Joined
Jun 7, 2011
Messages
2,823
Reaction score
4,143
Location
West Des Moines, IA
Rating - 0%
0   0   0
Also, is there a technique where you make the void bigger and then (re)fill it with the WO40? ...as to keep the stock appearance?
you wouldn't want to do this and only this. No matter what you're going to need the gusset.

The only thing I can think of is (and this is COMPLETELY off the top of my head - have never attempted this) would be to take an oscillating tool to cut it the joint, then try to fill that with WO40, but even then I'm not sure how you would do this exactly. Either you would have to cut apart the whole joint, or just cut out the areas where there is the whiting/separation, and then fill it somehow, then sand and polish off any excess, etc....not sure if I've ever seen anyone saying that they did such a thing. Also I'm not sure if that would actually make the joint weaker or stronger.

What size triangular rod would be appropriate for this fix?
http://www.eplastics.com/Plastic/Plexiglass_Acrylic_Profiles/ACRTRI-LARGE

Note that the reason they have that nice little diagram that shows the right-triangle shape and the other products that specifically say "equilateral" is because of me. Their pics make it look like they are all right-triangle rod but they are not...I found that out when I opened the shipping tube
 

SerpentSlick

Active Member
View Badges
Joined
Jul 28, 2015
Messages
104
Reaction score
55
Location
DFW Texas
Rating - 0%
0   0   0
Your "off the top..." thought is exactly what I was thinking, as a layman.

I imagined using some sort of skillsaw type tool with a shallow thin blade to run the length of the damage and create one long void that was wide enough for some sort or applicator. Since I'm not familiar with the integrity of such materials I did not know if this was "how it worked".

My other idea was to basically Dremel out the whited area with a narrow conical shaped but that would allow the applicator inside the void, but narrow as it deepened and have gravity do the work in the crevice.

...almost like a "V" shaped groove/channel for pooling, something that might resemble a welder's gap between two pieces of stock.
 

Lowell Lemon

2500 Club Member
View Badges
Joined
May 23, 2015
Messages
4,179
Reaction score
18,145
Location
Washington State
Rating - 0%
0   0   0
Your "off the top..." thought is exactly what I was thinking, as a layman.

I imagined using some sort of skillsaw type tool with a shallow thin blade to run the length of the damage and create one long void that was wide enough for some sort or applicator. Since I'm not familiar with the integrity of such materials I did not know if this was "how it worked".

My other idea was to basically Dremel out the whited area with a narrow conical shaped but that would allow the applicator inside the void, but narrow as it deepened and have gravity do the work in the crevice.

...almost like a "V" shaped groove/channel for pooling, something that might resemble a welder's gap between two pieces of stock.

I have made repairs like you are thinking about. I would recommend the Weldon 42 with the applicator gun if you have it available. The applicator tip would allow you to "force" the 42 into the "V" grove seam and the allow for some excess as both 40 and 42 shrink during the setting process. I think the gusset idea is better in this case even though you may not like the look.

The best repair is to cut the bottom off and bond on a new bottom. This is quite a difficult process and requires tooling you may not have access to. Not sure what causes the seam to fail like the picture but it may involve improper support of the tank bottom.
 

SerpentSlick

Active Member
View Badges
Joined
Jul 28, 2015
Messages
104
Reaction score
55
Location
DFW Texas
Rating - 0%
0   0   0
I'm not sure what caused it either. I has a metal stand that "seems" to be flat and they did have it on a dense foam sheet, even though I know that's not necessary.

I'm going to go back and look at pics I took from that same day so if I can see if they were already there. At this point it's not like I'll be able to do anything, but I am curious.
 
OP
OP
Turbo's Aquatics

Turbo's Aquatics

Super Duper Member
View Badges
Joined
Jun 7, 2011
Messages
2,823
Reaction score
4,143
Location
West Des Moines, IA
Rating - 0%
0   0   0
It could actually be the foam sheet that caused it. The tank should have been placed directly on to plywood on top of the stand (2x 3/4" ply). foam (any kind) allows the material to deflect under load. For instance, if you made a huge rock structure in the middle of the tank, this could cause the center of the bottom to push into the foam and compress it, which would add to the stress load at the seams (making it uneven). Also the edges of foam sheets tend to get worn off, and any loads on a foam sheet that are on the edge do not disperse in all directions like a similar point load does in the center. So for a foam sheet to "spread" the load, the foam sheet would have to extend past the footprint of the tank. Instead they are usually cut to the exact dimension, usually after the tank is set, which can mean the edges of the tank push down more and the center is then essentially pushed up by the foam. Now you would think a big rock pile would balance that out but it does not, it probably makes the stress even more uneven...

This is why you don't set acrylic tanks on foam. You can set them on 1/4" neoprene but that's expensive, and if you have a flat surface, unnecessary.
 

SerpentSlick

Active Member
View Badges
Joined
Jul 28, 2015
Messages
104
Reaction score
55
Location
DFW Texas
Rating - 0%
0   0   0
Well, unfortunately for me that makes perfect sense. Lol

I'm glad I read(a lot) of your post and discovered the foam is a bad thing. I figured it was more unnecessary, but harmful is a while different thing.

With whom might you suggest I speak to find out if filling the enlarged gap with WO42 would be a safe or even "smart" course of action?

If it's not a stupid idea, in general, I might like to go that route. However, if it would be considered unsafe or too risky I'll just go with the gusset.
 

HAVE YOU EVER KEPT A RARE/UNCOMMON FISH, CORAL, OR INVERT? SHOW IT OFF IN THE THREAD!

  • Yes!

    Votes: 32 45.7%
  • Not yet, but I have one that I want to buy in mind!

    Votes: 9 12.9%
  • No.

    Votes: 26 37.1%
  • Other (please explain).

    Votes: 3 4.3%
Back
Top