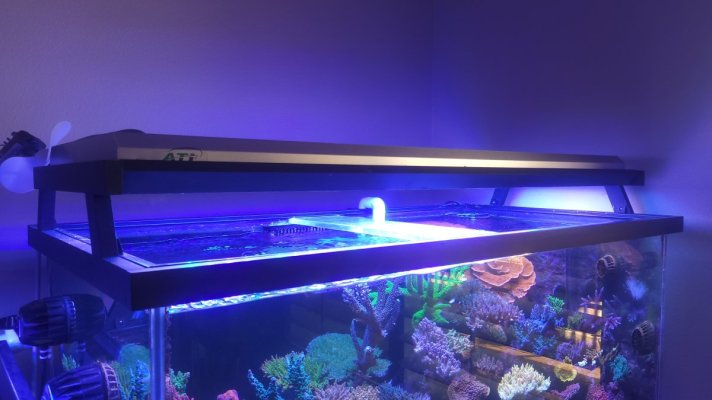
I have a lot of people asking me how I mount my T5 fixtures so I figure I'll post it up here.
It's a simple design and I'm not looking to win any design awards for it, but here goes..

The light stands are made of wood. They are 1x2s screwed and glued together. 1x2s are long skinny pieces of wood that are actually 0.75 inches X 1.5 inches X [whatever length]. The light stand is essentially two rectangular frames connected by 4 legs.
The base frame is around the top of the tank. The top frame holds the light. There are four little plastic pieces that I 3D printed to hold the whole thing up. So the whole stand is resting on the tank.
The top frame was made so the fixture can sit on top nicely. Because of the 45 degree surfaces of the fixture, the two long sides of the top frame are angled to accommodate that. The light is just resting on top.
Everything is screwed and glued together. There is no hinging ability so once a year when I change bulbs I have to lift the light off which is a pain but once a year isn't bad.
Showing base frame around the tank rim.

Showing plastic pieces to hold the whole thing up.

Showing angled wood to accommodate the fixture.


There is also a little space to let the fixture vent out.

Whole thing.
It's a simple design and I'm not looking to win any design awards for it, but here goes..
The light stands are made of wood. They are 1x2s screwed and glued together. 1x2s are long skinny pieces of wood that are actually 0.75 inches X 1.5 inches X [whatever length]. The light stand is essentially two rectangular frames connected by 4 legs.
The base frame is around the top of the tank. The top frame holds the light. There are four little plastic pieces that I 3D printed to hold the whole thing up. So the whole stand is resting on the tank.
The top frame was made so the fixture can sit on top nicely. Because of the 45 degree surfaces of the fixture, the two long sides of the top frame are angled to accommodate that. The light is just resting on top.
Everything is screwed and glued together. There is no hinging ability so once a year when I change bulbs I have to lift the light off which is a pain but once a year isn't bad.
Showing base frame around the tank rim.
Showing plastic pieces to hold the whole thing up.
Showing angled wood to accommodate the fixture.
There is also a little space to let the fixture vent out.
Whole thing.


