120G Rimless shallow peninsula tank

Janci

Staghorns will prevail
View Badges
Joined
Mar 14, 2016
Messages
3,005
Reaction score
9,317
Location
Belgium
Rating - 0%
0   0   0
Hi everyone
""EDIT""
When starting this thread I did not leave the beginner post open for updated full tank shots.
So I will just insert the pic here, as well with the equipment list.

FTS 8th of June 2019

2019-06-08_08-42-41.jpg


2019-06-08_08-42-51.jpg


Current equipment list
- return pump Royal Exclusiv Red Dragon (80W)
- sump circulating pump Jeboa DCS-4000 (for chiller and UV)
- skimmer Royal Exclusiv BubbleKing Deluxe 200 RD3 Speedy pump
- chiller Teco TK-2000
- lighting 3 x Ecotech Radions XR30WG4Pro
- additional lighting iQuatics T5 2x54W Croal+
- Wavemakers Ecotech MP40QD 3 pieces
- CaRx reactor Dastaco Xtrema1
- controller GHL Profilux 3.1
- Doser 2 x GHL Doser 2
- UV lamp Deltec 20W
- GHL Power bars 3 pieces
- Auto feeder Grasslin
- Auto top off Pacific Sun Sentry w/ solenoid valve
- Reeflink

""EDIT""

I have been on the forum for some time now and have had aquariums since i was 14. Started with fresh water for 6+ years and than took a break due to working and not being able to spend enough time at home.
Since 3 years now I am back at it and started with salt water set ups.
First tank was a Juwel Lido200 which soon because a Red Sea Reefer 450.
Now we have to move house in the near future and I will take the advantage to get rid of the reefer and go for a custom built tank.
When I started the reefer and upgrading my system from the Lido, i always took in mind a future upgrade to a shallow peninsula tank.

Now, time has come for the preparations and it will be the first time that I will keep the process on the forum.

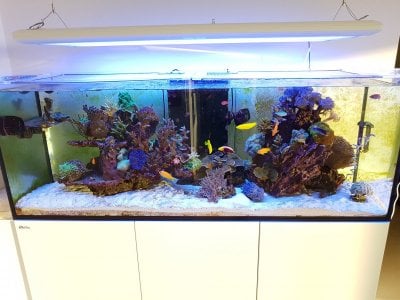
This is my current tank, with mostly SPS, some LPS.
20161118_164425.jpg

The new built will have following features:
- 55 x 27.5 x 21 rimless peninsula tank
- external overflow with 2 main drains, 1 emergency drain. 2 return lines next to the overflow box.
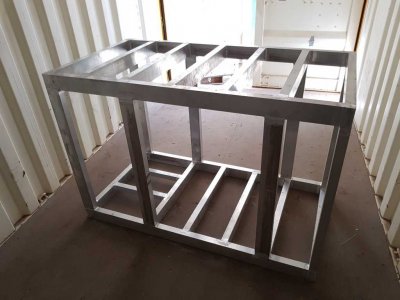
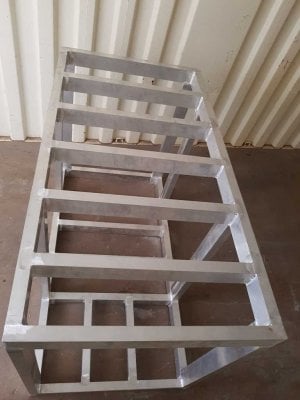
- aluminium stand (welded), probably powder coated in white
- 40 x 24 x 16 custom sump

Other equipment which I will use from the existing set up:
- Nyos 160 skimmer
- Giesemann Matrixx Dimtec 8 x 54W T5
- Ecotech MP40 QD. I have 1, will most probably need 1 more.
- GHL Profilux 3.1 with measuring probes
- GHL doser2 (2 pieces)
- Deltec UV
- 2 TLF reactors for some carbon
 
Last edited:
OP
OP
Janci

Janci

Staghorns will prevail
View Badges
Joined
Mar 14, 2016
Messages
3,005
Reaction score
9,317
Location
Belgium
Rating - 0%
0   0   0
I will take this slowly.
First things first...tank, stand and sump design.

Tank:
Cristal clear glass, 15mm in the main sides, 12mm for the smaller sides.
I need to add that I am in Dubai where the reef supply is good, but not abundant. Still, sufficient to maintain a tank. Lot of my equipment was ordered from Europe.
I always wanted the tank to be clear from any obstruction. The oveflow cannot be inside the tank, so I will go for an external oveflow box. It will need to be dead silent in order to be able to hear my other half asking why I am still working on these reef tanks ;)
I liked the ghost overlow, but this is not available for shipping so a Synergy Shadow overflow will be perfect.

Sump:
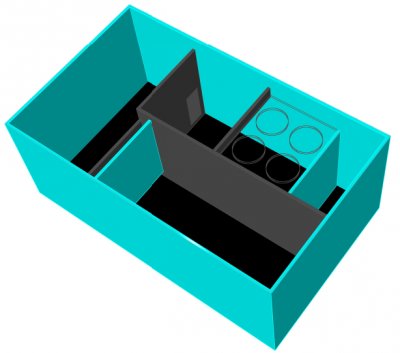
due to the peninsula style, I want the drains and retun next to each other in order to have a minimum of piping between tank and sump. So I came up with this idea for the sump.
Overflow section, 4 filter socks ( i am a favorite of socks and change/clean them in due time), skimmer section, refugium section and return section.
Any ideas on this? Pro/cons?

Stand:
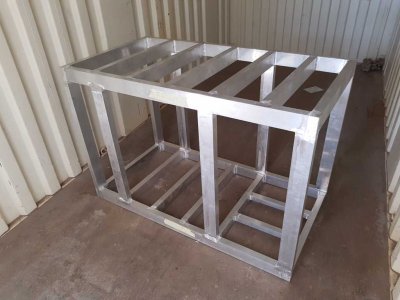
Aluminium welded stand with use of 80x40x3(mm) profile. Inside the stand the sump section, with separated chiller section and extra space for the GHL equipment with holding tanks for ALK, Mg, Ca,...
 

Attachments

  • Tank preview 3D.pdf
    9 KB · Views: 610
  • Sump preview 3D.pdf
    5 KB · Views: 585
  • Tank preview 2D.pdf
    6.4 KB · Views: 491
Last edited:
OP
OP
Janci

Janci

Staghorns will prevail
View Badges
Joined
Mar 14, 2016
Messages
3,005
Reaction score
9,317
Location
Belgium
Rating - 0%
0   0   0
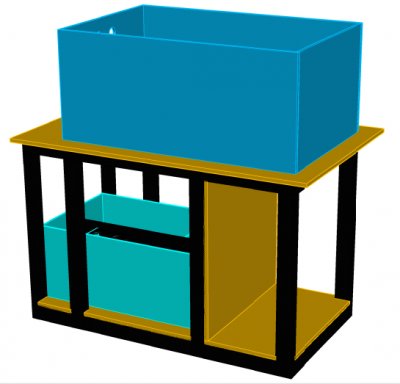
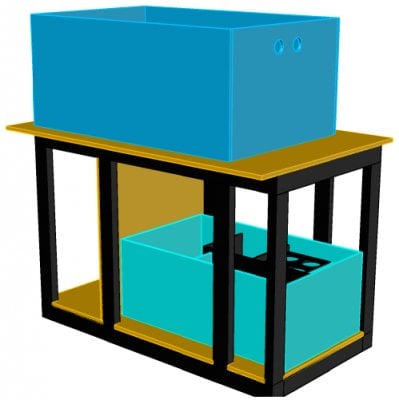
I have found some more time and started drawing in a real 3D program... I had to subscribe as a student in order to get a licence to the program and now starting to learn some moves.
So far I got this
- tank with stand and sump. Separate area for chiller and other equipment.
- I still have to find out where to place the dosers, UV light, Profilux controller,...
- I like this visualisation. If taken the time, you can check out every millimeter (or inch) and plan accordingly. It is good to be a student.

Tank design (01).jpg
Tank design (02).jpg
Sump.jpg
 
OP
OP
Janci

Janci

Staghorns will prevail
View Badges
Joined
Mar 14, 2016
Messages
3,005
Reaction score
9,317
Location
Belgium
Rating - 0%
0   0   0
The sump design allows me to:
- have 4 filter socks. I like to use socks. They keep the water clean of small particles, are easy to clean and even though many reefers think that they are a source of nitrates, I never had any problem with them
- after the filter socks there is the skimmer section. Just enough to fit the Nyos Quantum 160.
- following a section where I most probably will add live rock/siporax/... to increase the bacterial environment. I like a minimalistic set up in the display tank and this area in the sump will compensate this.
- a large return section. I travel quiet often and need the system to be able to maintain itself for several days, weeks. The ATO will of course add the necessary water loss, but thsi return section will also work as a reservoir (just in case)

The return pump will be placed next to the drain which is at the same side of the overflow of the display tank --> less, simple piping.
 
OP
OP
Janci

Janci

Staghorns will prevail
View Badges
Joined
Mar 14, 2016
Messages
3,005
Reaction score
9,317
Location
Belgium
Rating - 0%
0   0   0
I will continue to place the UV and doser containers on the design. Not sure yet where to place these. I prefer to have them somewhere in the sump section of the cabinet.
The other side of the cabinet is where the chiller will come at one side, other equipment next to it.
The drawing indicates a black stand, but all will be painted white.

I have an idea for the doors which I saw on a thread about a "smart aquarium in Taiwan" in the other forum. He did not use any hinges to place the doors and I wil work out a copy of that later.

More to follow...

Please feel free to advise where necessary.
 
OP
OP
Janci

Janci

Staghorns will prevail
View Badges
Joined
Mar 14, 2016
Messages
3,005
Reaction score
9,317
Location
Belgium
Rating - 0%
0   0   0
Nice, Stand. Look really solid.

Thank you. I hope it is solid. The aluminium is great. The stand is hugh, but I can lift it by myself.
I used 80x40x3mm profile and have changed the tank dimensions a little to make it shorter.
The weight of the tank, with water only will be 700kg. Add some rock and sand and we have 750kg.

The tank will be 50" x 31" x 21" and I will go with the 16" Synergy shadow overflow.
Now I am searching a controllable return pump that can be connected to the GHL Profilux.
 
OP
OP
Janci

Janci

Staghorns will prevail
View Badges
Joined
Mar 14, 2016
Messages
3,005
Reaction score
9,317
Location
Belgium
Rating - 0%
0   0   0
So after few months of drawing, measuring, again drawing we finally got to the stage where the tank was ordered and the first stage of the stand was finalized.
Today all was delivered and placed in position.
I was little worried about the drilling of the holes to fit the Synergy Shallow overflow, but it fits as a glove.

Final dimensions:
Display 135x80x57cm
Sump 98x65x40cm

It is now waiting for the arrival of the rest of the equipment that seems to be stuck somewhere in customs at the airport. No sign of it for the last 2 weeks.
After the weekend it will be a struggle to get that sorted out.
eed34aedf5ac67d0fd4941691a771fdd.jpg
ba0fd939745dfd60a341ca2695a9599d.jpg
de02367c0bcc4dfc9d93ddc975b88ea9.jpg
f1608c28fca90848e81c45dd5f56ca99.jpg
1e28de1f227c3eb9d81791d642eea782.jpg
 
Last edited:
OP
OP
Janci

Janci

Staghorns will prevail
View Badges
Joined
Mar 14, 2016
Messages
3,005
Reaction score
9,317
Location
Belgium
Rating - 0%
0   0   0
As we just moved to a new house, I will have to divide my spare time between house-finishing-touches and tank-system-building.
 
OP
OP
Janci

Janci

Staghorns will prevail
View Badges
Joined
Mar 14, 2016
Messages
3,005
Reaction score
9,317
Location
Belgium
Rating - 0%
0   0   0
That looks like amazing tank , can't wait [emoji4]

I hope it will be.
I have some doubts about the Synergy Shadow overflow. It came with 2 pieces of 180 degree elbows and both have a hole in the top.
As i can read on other threads, there is supposed to be only 1 with a hole for the open channel in this kind of setups.
I am not sure if I should blank this or not.
 
OP
OP
Janci

Janci

Staghorns will prevail
View Badges
Joined
Mar 14, 2016
Messages
3,005
Reaction score
9,317
Location
Belgium
Rating - 0%
0   0   0
On the previous tank (Red Sea Reefer 450) the stand and cabinet was installed with a thin sheet of rubber. This was a perfect protection for the display and sump.
I was lucky enough to find the same in 5mm thickness and white colour.
It was glued to the painted plywood for the display tank (same size as the tank so not visible) and inside the stand the complete bottom was foam-glued as well.
A double sheet was added where the sump is placed.

I also added a 10mm rubber sheet under the stand.
As the stand is a square frame without adjustable feet, this rubber sheet will give me 2 advantages:
- it will take away minor differences in level of the flooring
- it will prevent water from entering under the stand in case of spills or accidents.
It is remarkable how resistent this rubber foam sheet is as the compression is very limited and withstands well the weight of the complete tank and stand.

20170421_175117.jpg
20170421_175121.jpg
 
Last edited:
OP
OP
Janci

Janci

Staghorns will prevail
View Badges
Joined
Mar 14, 2016
Messages
3,005
Reaction score
9,317
Location
Belgium
Rating - 0%
0   0   0
Little off topic... but I finalised the "catio" which I promised my wife.
We moved from an apartment to a house with garden and the deal was to have a place for tha cats at the outside.
Dubai is not the most cat/pet friendly place so they are not allowed to run freely in the garden.
With this project finished, I will have more time for the tank.
20170422_140747.jpg
 
OP
OP
Janci

Janci

Staghorns will prevail
View Badges
Joined
Mar 14, 2016
Messages
3,005
Reaction score
9,317
Location
Belgium
Rating - 0%
0   0   0
Some good news.
My shipment has been found and was forwarded to the post office for pick up.
Today is a local holiday so tomorrow I can go to collect the box and start unpacking.
More updates to come.
 
Last edited:

litenyaup

2500 Club Member
View Badges
Joined
Sep 30, 2009
Messages
3,420
Reaction score
3,287
Location
Florida
Rating - 0%
0   0   0
On the previous tank (Red Sea Reefer 450) the stand and cabinet was installed with a thin sheet of rubber. This was a perfect protection for the display and sump.
I was lucky enough to find the same in 5mm thickness and white colour.
It was glued to the painted plywood for the display tank (same size as the tank so not visible) and the complete bottom inside the stand was filled as well.
A double sheet was added where the sump was placed.

I also added a 10mm rubber sheet under the stand.
As the stand is a square frame without adjustable feet, this rubber sheet will give me 2 advantages:
- it will take away minor differences in level of the flooring
- it will prevent water from entering under the stand in case of spills or accidents.
It is remarkable how resistent this rubber foam sheet is as the compression is very limited and withstands well the weight of the complete tank and stand.

20170421_175117.jpg
20170421_175121.jpg

Is that the new stand? It looks wood
 
Back
Top