Heyas. A few weeks ago I set out to build my own home-brew automatic fish food feeder. The project is coming along nicely and I figured it's time to share my progress.
CONOPS:
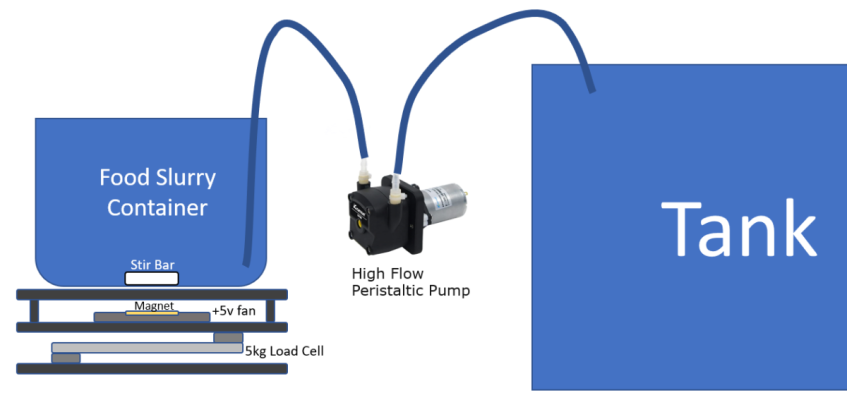
The general premise is to keep "frozen" food in a salt-water bath, chilled to just below normal freezing point. The food mix is placed on a combination stir-plate scale - such that I can mix the food with a stir-bar and measure the weight of the food mix as well. The food is pumped out directly to the tank via a peristaltic pump. The whole setup is controlled via a custom ESP32S2 board, running a web page for control & status.


The cooler:
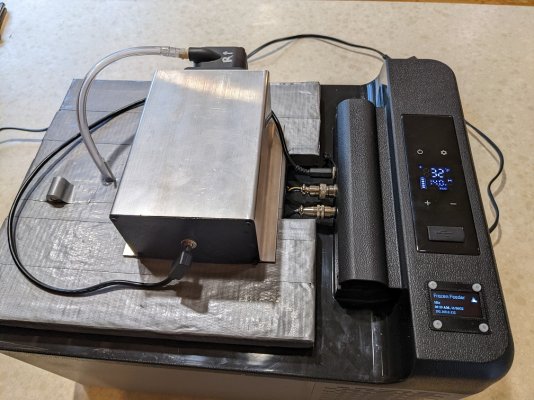
I purchased a small 9L portable 12v refrigerator cooler that chills via a small compressor. This is more costly than equivalently sized Peltier/TEC coolers but reaching freezing is just at the cusp of what a TEC cooler can do. And it certainly wouldn't be efficient. Link to the cooler I purchased here. I've been running the cooler at -2F for a week now and it seems to be holding temp steady. The lid is also easily removable so I'll be able to fabricate a custom lid for feedings, and then return the unit to stock for camping/picnick purposes.

The scale/stir plate:
I cut 3 6"x6" plates from acrylic. The load cell is a standard 5kg cell purchased from Amazon. The cell connects to an HX711 amp. The HX711 board is soldered to the load cell with very short leads to reduce noise. Unfortunately, this means that it'll be stored in the cooler. I have not verified it'll run at the colder temps and I may need to conformal coat the board at some point.

The stir plate is a very small thin laptop exhaust fan with a strong hard-drive magnet glued to the top.

Controller Board:
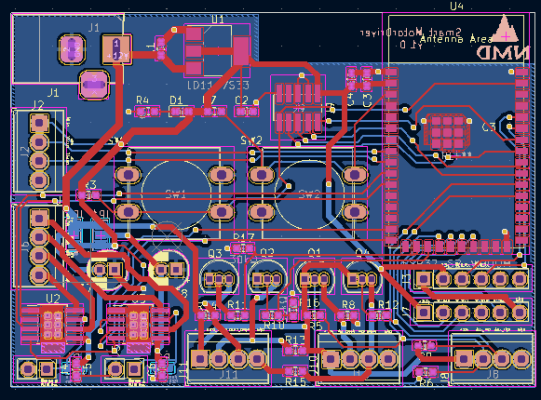
I designed a PCB board to mount an ESP32-S2-WROOM module, a DC power jack, a switching regulator/LDO, some motor drivers, and an interface for a 1.3" OLED display. Using the motor drivers, I can control pump speed via PWM as well as run the pump forward and reverse.
I screwed up the schematics/electrical design in a couple of different ways but learned a bunch. At some point, I'll fix the issues and build a v2 board (particularly if anyone else is interested in building one of these too). Schematic & PCB designed with KiCad and I'd be happy to share as well.

ESP32 Design:
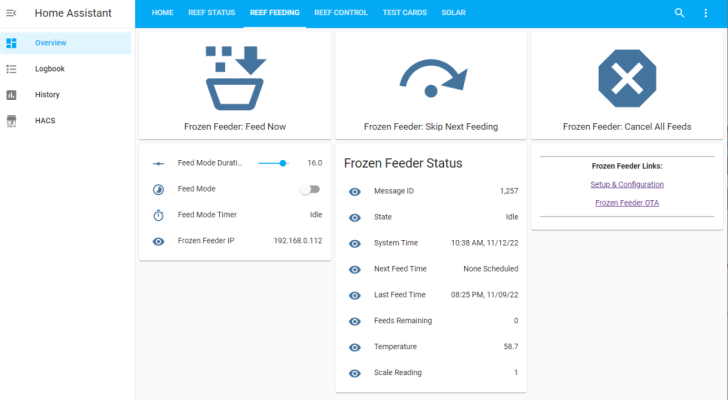
The ESP32 hosts a very simple webpage that provides the main user interface and performs all of the state machine control/automation for feedings. The MCU first connects to WIFI, grabs current time via NTP, pulls parameters from flash memory, and then goes idle until the next scheduled feeding:

Link to the ESP32 project code for anyone who's really interested. I rushed the code and there are a few things done poorly (thread safety issues), but this will get me through the prototype stage. I'll clean it up at some point. Maybe.
Scale calibration:
The scale must be calibrated to convert raw HX711 ADC measurements into units (grams). The user is instructed to clear the scale and then the scale is tared. Next, the user is instructed to place a 20-gram weight on the scale, ADC measurements are read, and the corresponding multiplier is stored in flash memory.
Tubing calibration:
To account for the unknown tubing length, a tubing calibration is required. The user first places an empty food container on the scale. The pump then runs forward for 60 seconds, pumping air through the tube to ensure it's empty. The scale is then tared and the pump is run in reverse until the scale measures water filling the food container. The time it takes to pump water from the tank to the food container is saved in flash memory and used then used during feedings.
Scheduling feedings:
The user is instructed to weigh the food container, first empty, and then with the prepared food mixture. The user then enters the number of feedings they would like. Dividing the weight of the mixture by the number of feedings gives the weight of the mixture per feeding, and this value is stored in flash.
Feeding:
First, the stir bar is run for 15 seconds to ensure the food mixture is, well, mixed well. The pump then runs at a slow speed until the scale indicates the appropriate amount of mixture has been pumped out. The pump then runs for the tubing calibration time saved above to push all the food into the tank. The pump then runs in reverse, drawing fresh tank water into the tube to clean it out.
Next steps:
Assembly & test. I need to put the controller board and pump in a project box and re-wire everything. I'll also need to fabricate a lid. After that, I plan on doing week-long tests. I hope to have the full thing ready to go such that I can use it with confidence over the holidays.


CONOPS:
The general premise is to keep "frozen" food in a salt-water bath, chilled to just below normal freezing point. The food mix is placed on a combination stir-plate scale - such that I can mix the food with a stir-bar and measure the weight of the food mix as well. The food is pumped out directly to the tank via a peristaltic pump. The whole setup is controlled via a custom ESP32S2 board, running a web page for control & status.
The cooler:
I purchased a small 9L portable 12v refrigerator cooler that chills via a small compressor. This is more costly than equivalently sized Peltier/TEC coolers but reaching freezing is just at the cusp of what a TEC cooler can do. And it certainly wouldn't be efficient. Link to the cooler I purchased here. I've been running the cooler at -2F for a week now and it seems to be holding temp steady. The lid is also easily removable so I'll be able to fabricate a custom lid for feedings, and then return the unit to stock for camping/picnick purposes.
The scale/stir plate:
I cut 3 6"x6" plates from acrylic. The load cell is a standard 5kg cell purchased from Amazon. The cell connects to an HX711 amp. The HX711 board is soldered to the load cell with very short leads to reduce noise. Unfortunately, this means that it'll be stored in the cooler. I have not verified it'll run at the colder temps and I may need to conformal coat the board at some point.
The stir plate is a very small thin laptop exhaust fan with a strong hard-drive magnet glued to the top.
Controller Board:
I designed a PCB board to mount an ESP32-S2-WROOM module, a DC power jack, a switching regulator/LDO, some motor drivers, and an interface for a 1.3" OLED display. Using the motor drivers, I can control pump speed via PWM as well as run the pump forward and reverse.
I screwed up the schematics/electrical design in a couple of different ways but learned a bunch. At some point, I'll fix the issues and build a v2 board (particularly if anyone else is interested in building one of these too). Schematic & PCB designed with KiCad and I'd be happy to share as well.
ESP32 Design:
The ESP32 hosts a very simple webpage that provides the main user interface and performs all of the state machine control/automation for feedings. The MCU first connects to WIFI, grabs current time via NTP, pulls parameters from flash memory, and then goes idle until the next scheduled feeding:
Link to the ESP32 project code for anyone who's really interested. I rushed the code and there are a few things done poorly (thread safety issues), but this will get me through the prototype stage. I'll clean it up at some point. Maybe.
Scale calibration:
The scale must be calibrated to convert raw HX711 ADC measurements into units (grams). The user is instructed to clear the scale and then the scale is tared. Next, the user is instructed to place a 20-gram weight on the scale, ADC measurements are read, and the corresponding multiplier is stored in flash memory.
Tubing calibration:
To account for the unknown tubing length, a tubing calibration is required. The user first places an empty food container on the scale. The pump then runs forward for 60 seconds, pumping air through the tube to ensure it's empty. The scale is then tared and the pump is run in reverse until the scale measures water filling the food container. The time it takes to pump water from the tank to the food container is saved in flash memory and used then used during feedings.
Scheduling feedings:
The user is instructed to weigh the food container, first empty, and then with the prepared food mixture. The user then enters the number of feedings they would like. Dividing the weight of the mixture by the number of feedings gives the weight of the mixture per feeding, and this value is stored in flash.
Feeding:
First, the stir bar is run for 15 seconds to ensure the food mixture is, well, mixed well. The pump then runs at a slow speed until the scale indicates the appropriate amount of mixture has been pumped out. The pump then runs for the tubing calibration time saved above to push all the food into the tank. The pump then runs in reverse, drawing fresh tank water into the tube to clean it out.
Next steps:
Assembly & test. I need to put the controller board and pump in a project box and re-wire everything. I'll also need to fabricate a lid. After that, I plan on doing week-long tests. I hope to have the full thing ready to go such that I can use it with confidence over the holidays.


