- Joined
- Aug 24, 2016
- Messages
- 2
- Reaction score
- 0
I know it has been awhile since you did the ATO refugium build, but could you please tell me where you purchased your bulkheads for this, particularly the ⅜" bulkhead push connect?
Also where you picked up the hole saws for this.
Thank you,
Bryan
Also where you picked up the hole saws for this.
Thank you,
Bryan
As I previously promised, here is an overview of how I converted my stock Red Sea ATO reservoir into a refugium.
Parts list:
Overflow Drain:
Input Feed:
- 3/4" bulkhead, threaded inside and slip fitting outside
- 3/4" threaded strainer
- 3/4" PVC elbow
- 3/4" PVC pipe
Misc:
- 3/8" bulkhead, push connect on both ends
- 3/8" push connect elbow (qty 2)
- 3/8" push connect T fitting
- 3/8" push connect straight coupler
- 3/8" poly tubing
Tools:
- Black corrugated plastic (for light-blocking siding)
- Plumbers putty
- Silicon caulking
Process:
- 21 mm diamond coated hole saw for 3/8" input bulkhead
- 35 mm diamond coated hole saw for 3/4" overflow bulkhead
- Drill
- Clamps
- 2 scraps of wood for drill guide and backing
- 2 scraps of 3/8" poly tubing for guide spacers
- Masking tape
- Glass marking pen
- Mark where you want the input and output holes on the glass. I left 1" from each edge to reduce the risk of cracking the glass. I placed the input nearest the bottom rear of the refugium so the input water will flow forward from the bottom end of the tank. I'm hoping this will cause the chaeto to rotate from the flow on the bottom of the tank.
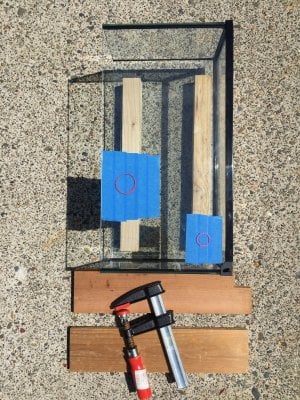
- Place a ring of plumbers putty around the marked hole, leaving about 1/2" buffer around the marked circle to allow a good pool of water to cool the drill bit.
- Cover the inside of the glass with masking tape to both catch the cutout as well as help to prevent chipping.
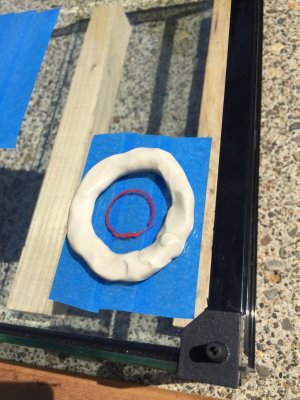
- Cut a 90 degree notch out of one of the scraps of wood to use as a drill guide. You only need to support the drill bit against two solid surfaces, so it's not necessary to cut a guide hole through the wood. This also allows you to cut any size hole using the same guide.
- Place one scrap of wood inside the tank over the masking tape, then place the two scraps of poly tubing on the outer glass surface.
- Place the guide wood block on top of the poly tubing, align the 90 degree notch with the marked hole on the glass, and clamp it in place so the clamp holds both pieces of wood in place. The poly tubing underneath the wood guide is there to provide spacing so the wood does not smash down on the plumbers putty. You could use anything else you like for a spacer, but the poly tubing was what I had on hand and was the right thickness. Do not over-tighten the clamp to avoid cracking the glass. It only needs to be secure enough to resist light pressure from the hole saw bit pressing against it.
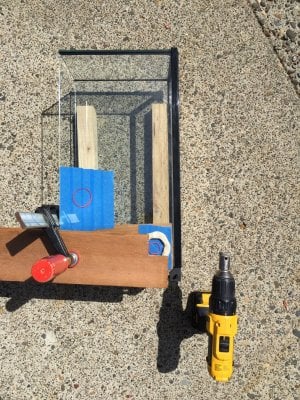
- Pour some water into the ring of plumbers putty to create a pool of water over the marked hole.
- Place the hole saw bit onto the glass surface and gently press it against the notch in the wood block so it's tucked nicely into that corner. Begin drilling slowly and just focus on keeping the drill bit pressed sideways against the wood. Do not actually press down on the drill against the glass. The weight of the drill alone is enough to cut the glass.
- I stopped drilling after about 30 seconds and poured more water to flush out the cloudy water, then resumed drilling. After about 1.5 - 2 minutes, the hole was completed. You will feel the difference when the drill bit gets through the glass and hits the wood backing block.
- Remove the drilled hole scrap of glass, remove the clamp, and remove the tape. You should have a nicely drilled hole with no cracks and no chips.
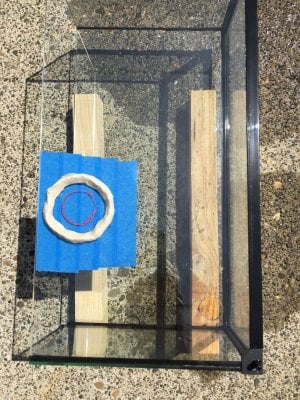
- Repeat these steps for the 2nd hole.
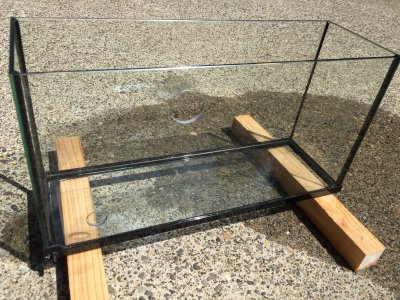
- Verify the bulkheads fit properly.
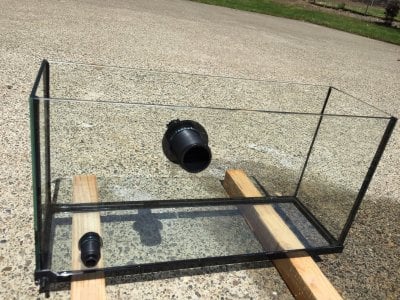
- Cut a piece of the corrugated plastic sheet to fit the side of the tank and the bottom of the tank. This will be used to block the refugium light from shining into the rest of your sump to avoid growing algae in the sump.
- Place the plastic sheet against the side of the refugium and mark where the bulkhead holes are. Using either scissors or another hole saw, cut out the bulkhead holes in the plastic.
- Glue the corrugated plastic to the side and bottom of the refugium with the silicon caulking.
- Place the bulkheads in place and tighten.
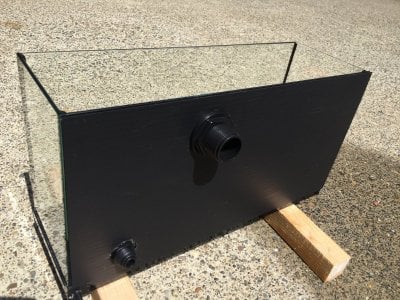
- Attach the push connect fittings and tubing.
- Attach the PVC elbow, drain pipe, and straining filter. I did not glue these PVC fittings because it's a tight fit getting the refugium into and out of the sump area, so the ability to easily remove the drain pipe will make this process easier.
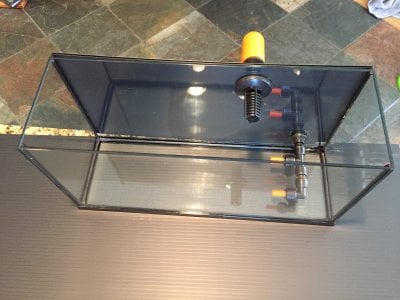
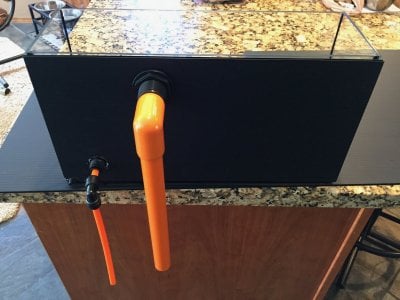
Once the silicon has set, I will place the refugium on top of the sump and attach my Neptune PMUP to the 3/8" feed line, and attach my ChaetoMax grow light on top. I'll configure the Apex to turn on the refugium lights on the opposite schedule of my display tank lights.
Now I just need to purchase some chaeto!
(EDIT: On 6/5/18 I changed out the strainer with a low-profile strainer because the chaeto was getting snagged and stopped rotating. See this post for updated details: https://www.reef2reef.com/threads/s...eefer-xl-425-build.358990/page-8#post-4796540)
As I previously promised, here is an overview of how I converted my stock Red Sea ATO reservoir into a refugium.
Parts list:
Overflow Drain:
Input Feed:
- 3/4" bulkhead, threaded inside and slip fitting outside
- 3/4" threaded strainer
- 3/4" PVC elbow
- 3/4" PVC pipe
Misc:
- 3/8" bulkhead, push connect on both ends
- 3/8" push connect elbow (qty 2)
- 3/8" push connect T fitting
- 3/8" push connect straight coupler
- 3/8" poly tubing
Tools:
- Black corrugated plastic (for light-blocking siding)
- Plumbers putty
- Silicon caulking
Process:
- 21 mm diamond coated hole saw for 3/8" input bulkhead
- 35 mm diamond coated hole saw for 3/4" overflow bulkhead
- Drill
- Clamps
- 2 scraps of wood for drill guide and backing
- 2 scraps of 3/8" poly tubing for guide spacers
- Masking tape
- Glass marking pen
- Mark where you want the input and output holes on the glass. I left 1" from each edge to reduce the risk of cracking the glass. I placed the input nearest the bottom rear of the refugium so the input water will flow forward from the bottom end of the tank. I'm hoping this will cause the chaeto to rotate from the flow on the bottom of the tank.

- Place a ring of plumbers putty around the marked hole, leaving about 1/2" buffer around the marked circle to allow a good pool of water to cool the drill bit.
- Cover the inside of the glass with masking tape to both catch the cutout as well as help to prevent chipping.

- Cut a 90 degree notch out of one of the scraps of wood to use as a drill guide. You only need to support the drill bit against two solid surfaces, so it's not necessary to cut a guide hole through the wood. This also allows you to cut any size hole using the same guide.
- Place one scrap of wood inside the tank over the masking tape, then place the two scraps of poly tubing on the outer glass surface.
- Place the guide wood block on top of the poly tubing, align the 90 degree notch with the marked hole on the glass, and clamp it in place so the clamp holds both pieces of wood in place. The poly tubing underneath the wood guide is there to provide spacing so the wood does not smash down on the plumbers putty. You could use anything else you like for a spacer, but the poly tubing was what I had on hand and was the right thickness. Do not over-tighten the clamp to avoid cracking the glass. It only needs to be secure enough to resist light pressure from the hole saw bit pressing against it.

- Pour some water into the ring of plumbers putty to create a pool of water over the marked hole.
- Place the hole saw bit onto the glass surface and gently press it against the notch in the wood block so it's tucked nicely into that corner. Begin drilling slowly and just focus on keeping the drill bit pressed sideways against the wood. Do not actually press down on the drill against the glass. The weight of the drill alone is enough to cut the glass.
- I stopped drilling after about 30 seconds and poured more water to flush out the cloudy water, then resumed drilling. After about 1.5 - 2 minutes, the hole was completed. You will feel the difference when the drill bit gets through the glass and hits the wood backing block.
- Remove the drilled hole scrap of glass, remove the clamp, and remove the tape. You should have a nicely drilled hole with no cracks and no chips.

- Repeat these steps for the 2nd hole.

- Verify the bulkheads fit properly.

- Cut a piece of the corrugated plastic sheet to fit the side of the tank and the bottom of the tank. This will be used to block the refugium light from shining into the rest of your sump to avoid growing algae in the sump.
- Place the plastic sheet against the side of the refugium and mark where the bulkhead holes are. Using either scissors or another hole saw, cut out the bulkhead holes in the plastic.
- Glue the corrugated plastic to the side and bottom of the refugium with the silicon caulking.
- Place the bulkheads in place and tighten.

- Attach the push connect fittings and tubing.
- Attach the PVC elbow, drain pipe, and straining filter. I did not glue these PVC fittings because it's a tight fit getting the refugium into and out of the sump area, so the ability to easily remove the drain pipe will make this process easier.


Once the silicon has set, I will place the refugium on top of the sump and attach my Neptune PMUP to the 3/8" feed line, and attach my ChaetoMax grow light on top. I'll configure the Apex to turn on the refugium lights on the opposite schedule of my display tank lights.
Now I just need to purchase some chaeto!
(EDIT: On 6/5/18 I changed out the strainer with a low-profile strainer because the chaeto was getting snagged and stopped rotating. See this post for updated details: https://www.reef2reef.com/threads/s...eefer-xl-425-build.358990/page-8#post-4796540)


