Skep's 225 gallon build

Robinson44

New Member
View Badges
Joined
Apr 2, 2018
Messages
3
Reaction score
2
Rating - 0%
0   0   0
Awesome build! I'm contemplating the same size tank as a peninsula from customaquariums. It's neat to follow your build. Keep up the good work!
 
OP
OP
Skep18

Skep18

Valuable Member
View Badges
Joined
Feb 3, 2018
Messages
1,149
Reaction score
901
Location
Southeast US
Rating - 100%
1   0   0
Small update.

Stuff came in the mail. BRS replacement RODI parts.

20180628_153114.jpg


More BRS order stuff. Got the Red Sea test kit. Was a little nervous as a bunch of reviews complained of them arriving with chemicals spilled everywhere. But my kit came in south no issues. Also got some nets.

20180628_152051.jpg


And the new hood with second led came in from Amazon. Definitely not needed but IMO it looks so much better, no matter the PAR viability or lack thereof.

20180628_151445.jpg
 
OP
OP
Skep18

Skep18

Valuable Member
View Badges
Joined
Feb 3, 2018
Messages
1,149
Reaction score
901
Location
Southeast US
Rating - 100%
1   0   0
They seem like they're settling in. They all come out frequently. They come out when you approach looking for food. They're eating aggressively now compared to days past. Prazipro should be in soon to start that treatment.

20180628_163633.jpg
 
OP
OP
Skep18

Skep18

Valuable Member
View Badges
Joined
Feb 3, 2018
Messages
1,149
Reaction score
901
Location
Southeast US
Rating - 100%
1   0   0
Awesome build! I'm contemplating the same size tank as a peninsula from customaquariums. It's neat to follow your build. Keep up the good work!

I definitely recommend them. The wait was kinda long but well worth it. If you do reach out to them, I was very satisfied working with Bob Pontow one of their salesman on my order. Should you feel so inclined, you might request him as he was very responsive in communications and clearly knew his stuff. Super easy to work with. (feel free to tell him I recommended you if you awant. ;) )

Nice build

Ty!
 
Last edited:
OP
OP
Skep18

Skep18

Valuable Member
View Badges
Joined
Feb 3, 2018
Messages
1,149
Reaction score
901
Location
Southeast US
Rating - 100%
1   0   0
Been a busy day. Another update.

The WALL

Spent the latter half of my afternoon (before work, night shift) working on "the Wall". I'm building this kinda for two reasons.

  1. I want to make sure no moisture or tank water/salt spray makes its way onto the drywall/trim. I've worked in a saltwater fish store. I've seen the behind the scenes of the sales tanks in cabinets. Obviously not the complete same but to say the least, its pretty gross. All the materials swell up. The salt mist covers stuff. It stinks sometimes. No thanks.
  2. I want to build the canopy/hood into the whole cabinet and not rely on the tank top to carry the weight, at least not the majority of it. Having some real wall anchors to build off of will be helpful, or so I hope.
Other minor benefits include being able to attach equipment anywhere along the back wall as needed as it will be plywood. It'll be thin, but for reactors and stuff, it should be fine. With everything enclosed, controlling moisture/ventilation will be done on my terms and control. It should help with keeping things quiet. My bedroom is behind that wall. I don't want to hear equipment or water in my sleep. Etc, etc.

Kinda kept taking photos as I didn't know when I would end up stopping. Figure I'll just toss em up here as its kinda a progress series.

Finished the horizontal supports. Spaced the top a bit tighter for the aforementioned canopy reasoning.

wall 001.jpg


I added a 3.5mil (IIRC) vapor barrier behind the plywood. It's glued on the wood with liquid nails and the covering plywood was secured while it was still wet as to not allow it to harden and add dimension.

I will say this felt overboard but like a good idea nonetheless considering the low cost. This way should the plywood every take on moisture for whatever reason it will protect the wall. I did drill some holes in the drywall in each chamber as to not completely seal off that interior void though I suspect that does more in my mind than in real life.

As you can see, I left sheeting length on the bottom. I intend to pull that through the stand over the base framing before I secure the painted plywood shelf. This will just help ensure any internal leaks don't end up under the stand. If water ever gets under there, that will be a salty crusty mess that will haunt my OCD dreams and I will likely never get to clean... ;Wacky

wall 002 - moisture barrier 1.jpg


wall 002 - moisture barrier 2.jpg


Here I brought in the plywood bottom shelf. I find its best, when possible, to build off existing hardware rather than building to marked measurements. Since I'm not a human CNC machine, this makes for a better fit and ensures I don't have a crazy moment when nothing lines up...

wall 003 - tank stand base 1.jpg


wall 003 - tank stand base 3.jpg


Threw on the bottom plywood wall piece. I painted both sides as to better seal the wood. One coat of Kiltz does't feel like a completely sealed surface but its better than bare wood. If the back side was left unpainted any exposure on the front side would likely wick into the wood easier if it was left unpainted. With no "venting" through the back, hopefully it'll better hold out moisture.

wall 004 - plywood bottom 1.jpg


wall 004 - plywood bottom 2.jpg


Finally I attached the top piece of plywood and trimmed the excess vapor barrier sheet. The back side of this was painted but not the front yet. I'm going to Kilts the whole thing one more time, both top and bottom. Then I'm going to apply that floor paint to thew whole thing to finish.

wall 005 - plywood top 1.jpg


wall 005 - plywood top 2.jpg


And then I had to go into work...

THE END again...
 
OP
OP
Skep18

Skep18

Valuable Member
View Badges
Joined
Feb 3, 2018
Messages
1,149
Reaction score
901
Location
Southeast US
Rating - 100%
1   0   0
Today is currently my transition day where I change from night shift work week to daytime weekend. But could things to update.

Fish treatments came in. Gonna test my QT water tomorrow to ensure I'm processing ammonia well enough. If all looks good I'll start Prazipro tomorrow following those results. If not we do some water changes and monitor the cycle some more.

Also got Copper Safe and the API test kit. I hear this is the more reliable copper method as it is more tolerant with the concentration. This will come following prazipro.

20180629_212056.jpg


And I put an exterior coat of Kiltz on the cabinet wall.

20180629_211948.jpg
 
OP
OP
Skep18

Skep18

Valuable Member
View Badges
Joined
Feb 3, 2018
Messages
1,149
Reaction score
901
Location
Southeast US
Rating - 100%
1   0   0
Tested my QT water. I think it's good. Test colors are hard to differentiate. But ammonia levels are low. Total ammonia is either 0 or 0.1ppm. My pH is 7.6 (lowest on chart). According to the Red Sea kit, my total toxic ammonia (meaning ammonia as opposed to ammonium if I understand correctly) is 0.0023 at most. Nitrites are near 0. Nitrates are somewhere between 2 and 5ppm.

With water parameters looking OK and recent WC, I've dosed half the Prazipro. I'll add the second half tonight I think.

EDIT: Does anyone know why these images keep attaching to my replies? I didn't add the image below to this post and in my edit, I can delete it but it doesn't delete in the posting... It just shows back up.

EDIT2: TY @NY_Caveman !!!
 
Last edited:

NY_Caveman

likes words, fish and arbitrary statistics
View Badges
Joined
Sep 8, 2017
Messages
17,010
Reaction score
108,407
Location
New York
Rating - 0%
0   0   0
Try this:
  • Click to edit your post
  • At the bottom click “more options”
  • You will see a list of attached files
  • Delete the ones you want to remove
 

Mark Gray

2500 Club Member
View Badges
Joined
Jul 13, 2015
Messages
2,960
Reaction score
2,834
Location
Athens GA
Rating - 0%
0   0   0
Tested my QT water. I think it's good. Test colors are hard to differentiate. But ammonia levels are low. Total ammonia is either 0 or 0.1ppm. My pH is 7.6 (lowest on chart). According to the Red Sea kit, my total toxic ammonia (meaning ammonia as opposed to ammonium if I understand correctly) is 0.0023 at most. Nitrites are near 0. Nitrates are somewhere between 2 and 5ppm.

With water parameters looking OK and recent WC, I've dosed half the Prazipro. I'll add the second half tonight I think.

EDIT: Does anyone know why these images keep attaching to my replies? I didn't add the image below to this post and in my edit, I can delete it but it doesn't delete in the posting... It just shows back up.

EDIT2: TY @NY_Caveman !!!
Glad I am not the only one that has trouble with the colors on the test charts
 
OP
OP
Skep18

Skep18

Valuable Member
View Badges
Joined
Feb 3, 2018
Messages
1,149
Reaction score
901
Location
Southeast US
Rating - 100%
1   0   0
Wow... Let me just say I learned two things in the past two days...
  1. Gluing PVC in general can suck... But it especially sucks when dealing with two overflow boxes (i.e. two fixed positions) as to not strain the polycarbonate outputs. While I may be overly cautious or obsurd, one degree in an elbow angle and/or 1/16" in a run can make problems.
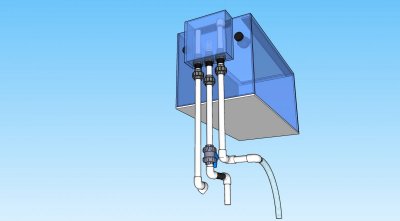
  2. Resist the urge to not dry fit just because it can be frustrating to get it back apart. Not wanting false dimensions with dry fitments not all the way pushed in, I finished runs of multiple pieces to a union and then glued. This let me work off these definite dimensions moving forward. Well, when I realized I overlooked some things downstream, let's just say its literally throwing money in the garbage can.
Also, wanting to be all "extra" and whatnot, I bought some Weldon 705 as well as the P-70 primer. This is probably some good stuff but in the hands of a amateur, I can't exactly explained what happened but using the "turn 1/4 rotation as you fit the glued joint" caused my markings to line up but my dimensions were off. And not just off a little bit but by a considerable amount. The stuff didn't necessarily dry fast but its like it twisted stuff around or something and idk what the heck. Stuff was off. I changed to the Oatey PVC cement recommended by Synergy Reef for their overflow. My problems seem to have gone away.

Now to add a long update. Update incoming.
 

sikorskys

Active Member
View Badges
Joined
Jan 2, 2014
Messages
356
Reaction score
463
Location
Ukraine
Rating - 0%
0   0   0
Gluing PVC in general can suck... But it especially sucks when dealing with two overflow boxes (i.e. two fixed positions) as to not strain the polycarbonate outputs. While I may be overly cautious or obsurd, one degree in an elbow angle and/or 1/16" in a run can make problems.

That's why you should always draw it before, if you can :) Makes life sooo easier.

Plumbing.jpg
 
OP
OP
Skep18

Skep18

Valuable Member
View Badges
Joined
Feb 3, 2018
Messages
1,149
Reaction score
901
Location
Southeast US
Rating - 100%
1   0   0
That's why you should always draw it before, if you can :) Makes life sooo easier.

Plumbing.jpg

You are definitely not wrong. And I totally did start to, weeks before, months even. However, given my background in using solids modeling software in the past and the fact that I was utilizing SketchUp for this project now, I grew frustrated with the software features and just kinda stopped... lol. No doubt it would've saved me a few bucks and headaches though in the long run.
 
OP
OP
Skep18

Skep18

Valuable Member
View Badges
Joined
Feb 3, 2018
Messages
1,149
Reaction score
901
Location
Southeast US
Rating - 100%
1   0   0
Been crazy busy lately. I definitely will follow up with a detailed build post but I finally got my drains finished. Learned a lot along the way. There's some things that are very intentional in some of the "design details" that will hopefully prove to pay off in the future. I'll elaborate on all that though next week some time.

Until then, enjoy.

20180705_175101.jpg


20180705_175135.jpg


20180705_175125.jpg


20180705_175142.jpg


20180705_175247.jpg


20180705_175232.jpg


20180705_175226.jpg


20180705_175207.jpg


20180705_175158.jpg
 

LBReefer

Well-Known Member
View Badges
Joined
Jun 22, 2016
Messages
995
Reaction score
741
Location
Long Beach
Rating - 0%
0   0   0
Plumbed my return today. Still gotta add the pump and paint the return manifold black.

20180707_190949.jpg


20180707_190958.jpg

This is incredibly impressive. I really like the idea of having the the parallel returns join together, but that takes a level of design magic I do not have.

I also had two overflow boxes and my plumbing is not half as good.
 
Back
Top