Reefer 250 build with veneered stand

Sactoreefer

New Member
View Badges
Joined
Jul 13, 2024
Messages
14
Reaction score
1
Location
Sacramento
Rating - 0%
0   0   0
First post here on R2R, posting this to share my build.

My first aquarium was a 10 gallon freshwater I got when I was 6 years old. When I was 12 or 13 I remember going to Petco with my dad and he randomly decided to buy a 29g tank/stand for me. Awesome! At some point I got real into cichlids (shelldwellers mostly) and set up the tank for that. Had that tank until I broke it down when I went to college. I always wanted a reef tank but that's tough to do on a young man's budget (and unpredictable living situation). Well here we are 15 years later...

So my wife and I bought a house last year, and I figured since we're not renting anymore, what better time than to set up the reef tank I always wanted. So I started researching, and convincing. She was not too thrilled with the idea, but eventually relented with one condition. No black/white furniture. Nothing that looks like it came from Ikea. This was a hard no from her, she could not be swayed! Well, pretty much every commercially available and reasonably priced tank stand is black (or white) and looks like it came from Ikea. My first thought was to just build a custom stand, but quickly decided this would be a pain and fairly expensive for good materials. I also don't have a table saw, only a crosscut sled for my circular saw. Precise cuts are possible, but the setup is time consuming. So I decided that veneering a commercially available stand would be a good option. I scoured the internet and couldn't find anyone who has done this, so I'm in uncharted waters here.

A few months ago I started buying equipment as I researched and things were on sale. Here is what I settled on.

Tank: Red Sea Reefer 250 G2+
Lighting: 2x Reefi Uno 2.1 Pro
Return Pump: Reef Octopus Varios 4 return pump
Circulation: 2x Jebao SLW-30 Powerheads
ATO: Tunze Osmolator 3
Heaters: Inkbird/2x BRS 200w titanium combo
Skimmer: Reef Octopus Classic 110INT
Rock/Sand: Marco Dry Rock and Caribsea Arag Alive
Testing: Hanna for phos/alk/nitrate, Red Sea kit for Ca, Aquaforest for Mag.
RODI: BRS 75 GPD 4 stage and a Smart Buddie booster pump

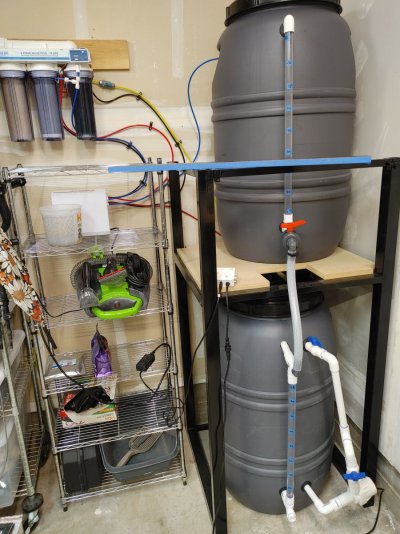
I plan to QT everything that goes into the tank, so I also picked up the Hanna copper and ammonia testers, and a cheap complete QT setup from FB marketplace. Mixing station built by myself from 2 olive barrels from marketplace. I have plans for AWC and a controller but that can come later, I'd like to stop the hemorrhage of money for now.

I've been working on this for a while, and am finally at the point that I can assemble the stand and hopefully get water in this thing in the next few days!
 
OP
OP
S

Sactoreefer

New Member
View Badges
Joined
Jul 13, 2024
Messages
14
Reaction score
1
Location
Sacramento
Rating - 0%
0   0   0
While waiting for the tank and other components, I started thinking about my mixing station. My garage shares a wall with the location of the tank, so I decided to create a small passage between the two covered by a brush wall plate. There is also a sink nearby for freshwater/waste water disposal. For containers, I wanted something nicer looking than brute cans (nothing wrong with them though!) but less expensive than some of the other fancy water tanks I've seen people use. I settled on plastic barrels from marketplace that were used to hold olives. $30 for each, not too bad. These hold something like 65 gal each and have a large screw top lid. Cleaning was a pain, and they probably will forever smell like olives, but from what I've read online, lots of people use these and it shouldn't be an issue.

I wanted a vertical stand to save space. I decided to make it out of steel since I own a welder, and the cost of metal seemed similar to making it out of wood/carriage bolts. Sturdier too. The barrels are plumbed with 3/4" PVC, and I found some clear PVC at a local plumbing supplier that I used to make a level indicator for each barrel. I used Uniseal bulkheads as the sides of these containers are curved. These haven't leaked a drop, and are super cheap. The top barrel is for RODI storage, and the bottom salt water. A valve lets RODI water into the mixing container, and a pump can circulate or send water out of the lower container depending on what valves are turned.

I tested my RODI unit and was only getting 45 PSI out of my water supply, so I picked up a smart buddie booster pump. Now I am getting 80 PSI with 2 ppm TDS out of the membrane and 0 PPM out of the mixed resin bed. I'm also getting about 150 GPD out of this 75 GPD unit, which I can only attribute to the higher pressure and my good source water! RODI water from the booster pump enters the top of the container through a float valve.

I found a guy on marketplace selling a used Varios 2 for cheap which I am using for the mixing pump, though I had to buy BSPT adapters from Mcmaster-Carr to plumb it. I figure if my Varios 4 return pump fails, I can use this as a backup until I buy a new pump.
 

Attachments

  • 20240713_191431_HDR.jpg
    20240713_191431_HDR.jpg
    223.3 KB · Views: 51
OP
OP
S

Sactoreefer

New Member
View Badges
Joined
Jul 13, 2024
Messages
14
Reaction score
1
Location
Sacramento
Rating - 0%
0   0   0
Tank arrived well packaged on a pallet, and I got to finishing the stand. I went with a walnut veneer finished with General Finishes Arm-R Seal urethane wipe on finish. There may be more durable finishes, but I have experience with this finish and it is reasonably durable. The only surfaces that I veneered were the outer panels that are visible. The two sides, the doors, and the small piece at the bottom that is visible under the doors.

20240614_122458.jpg

This stand is made out of marine plywood that is veneered with plastic (melamine or something like that). Fortunately they included some scrap pieces to take up space in the packaging, which I used to experiment on. I tried several methods of removal, most of which failed. A sharp chisel with heat kind of worked, but was too difficult to not remove any chunks of the underlying plywood. A thickness planer probably would have worked great, but who has a 20" wide planer? Hand planers did nothing. Sanding was the only was for me to get this stuff off.

So I started off by removing the edge banding. I clamped each piece to a guide and used a flush trim router bit to remove about 1mm from each edge. This worked very well. Removing the face veneer was a different story though. I ended up using a hand held belt sander with 36 grit paper to remove the bulk of the plastic veneer. This stuff is tough! It took me around 2 hours of sanding for each side panel, and once I got mostly down to the glue I switched to a random orbital sander to finish. Just so you know, harbor freight sanding belts are trash, I went through 3 to finish my the first panel. They would eventually come apart at the seam where the edges are glued together. I needed more for the second panel, so I bought Diablo belts from home depot. One belt did the whole panel, and still has life in it.

Fortunately the door panels were much easier, it turns out they are made from MDF and veneered with something much less durable. Each door took me about 20 minutes to have veneer ready.

I used Titan DX contact cement and a veneer scraper to apply the veneer. Finished with 6 coats of Arm R seal gloss, and a final coat of Satin. It is best to build the coat with gloss rather than satin as multiple coats of satin/flat can get cloudy. I think this project turned out very well, I just hope that this holds up and doesn't peel or anything like that. Hopefully I didn't void the warranty on my tank! But like I said, the boss wasn't gonna sign off on this if I didn't improve the look of the stand, so it is what it is.

Attached is a pic of one of the finished panels. I'll have the stand assembled tomorrow, so stay tuned for some more pics. 20240713_191358.jpg
 
OP
OP
S

Sactoreefer

New Member
View Badges
Joined
Jul 13, 2024
Messages
14
Reaction score
1
Location
Sacramento
Rating - 0%
0   0   0
Aquascape time! I ordered 50 lbs of Marco Rocks from BRS. I didn't order any specific pieces (foundation or arches), just the bulk box of whatever they wanted to send me. I used Aqua Forest Stone Fix cement, no superglue or epoxy. It would have been easier with superglue, but the AF cement does set up really fast so it is enough to just shore up each piece for 5 or 10 min before moving on. For design, I looked at various aquascape threads here on R2R, as well as used the BRS negative space videos as well as other on youtube as a guide.

I started by sorting the rocks and finding some with reasonably flat bases. I cemented these together to create two flat foundations for my scape. I broke up the rest of the rock into smaller pieces and started building. Each side has some nice shelves, caves, and arches. It's hard to see in the photos, but there is an interesting depth to each piece. I probably only used 35 lbs of the rock I bought, so I have extra to add islands later or to throw in my sump.

20240713_191518.jpg
 

Daniel@R2R

Living the Reef Life
View Badges
Joined
Nov 18, 2012
Messages
38,395
Reaction score
67,446
Location
Fontana, California
Rating - 100%
1   0   0
Cool!! Following along! Looks like this is gonna be a really nice build!
 
OP
OP
S

Sactoreefer

New Member
View Badges
Joined
Jul 13, 2024
Messages
14
Reaction score
1
Location
Sacramento
Rating - 0%
0   0   0
Alright, I got the stand put together and water in the tank today! Putting the stand together was fairly time consuming. Thanks to my lovely wife for helping me get the tank off the pallet and then onto the completed stand. Fortunately I had some help assembling the stand. Nemo (name unrelated to reefkeeping) is the QC guy, here he is inspecting my assembly for defects. Not pictured is the other cat who stole multiple bags of fasteners during the process and then slept on the job.

20240714_052530_HDR.jpg

Tank is on the stand.

20240714_102223_HDR.jpg 20240714_102233_HDR.jpg

I got it all leveled and added the aquascape and sand. Then began the process of hauling ~60 gallons of salt water from my garage to the tank. I used the bags my sand came in to cushion the impact of the water and filled the entire tank by dipping out of the 5 gallon container with a 1 gallon bucket. This actually wasn't too bad of a process.

Unfortunately the Jebao powerheads I bought are nowhere near strong enough to attach through the 1/2" thick glass of this tank. Bummer, at least they were cheap, not sure if I can return them now. Anyone have any powerhead recommendations? I really don't want to spend MP40 money, but also want something fairly low profile inside the tank.

I have the Varios 4 running at 3/5 and the flow doesn't seem that high, honestly it is probably bottlenecked by the small return pump tubing/fittings that this tank comes with. Dialing in the overflow valve turned out to be pretty easy, but it is also very sensitive and I can see this thing needing frequent adjustment. Hopefully I'm wrong as the tank settles in. As of right now I can't hear the tank at all sitting 15 feet away, and close up can only hear a slight trickle of water that seems to be from the filter sock area.

Lights are about 8" above the water line. I would like them a bit higher, but the boss objected. Though the coverage of 2 Reefi Uno's on a 3 ft tank should be pretty good, so I'm not too worried about it. I will definitely get some PAR readings in the future. I know this may be heresy in 2024, but I am also contemplating building a canopy as she also is not too happy about the light spill. This would also solve some problems such as cats/cat hair getting in the tank and fish jumping. A problem for another day, though.

Heaters are in the sump, not that I need them this time of year. The tank is sitting at around 79 degrees. Still need to set up the ATO. The inside of the cabinet is a wiring disaster, so I won't show that. Another project for a different day.

20240714_164431.jpg
 
OP
OP
S

Sactoreefer

New Member
View Badges
Joined
Jul 13, 2024
Messages
14
Reaction score
1
Location
Sacramento
Rating - 0%
0   0   0
So it turns out I that the Jebao powerheads work perfectly fine. They come out of the box with two magnets, but this isn't immediately apparent as they are stuck firmly together. There is an outside magnet, and and an inside one with a concave rubber cup on it. the powerhead sticks to the concave cup and it can be angled a little bit. So all is well.

I did some more tuning on the sump water level and got the ATO set up today. The ATO sensor is in the return pump chamber of the sump. My original plan was to have the Tunze ATO pump outside of the RODI reservoir in my garage connected through a bulkhead into the reservoir (so I didn't have to drill another hole into the res). I found a threaded adapter at home depot with 1/2" threads into the tunze pump and 3/4" hose threads that I connected to the garden hose to RODI tubing connector that came with my BRS RODI unit. I got this all plumbed and once running it immediately started leaking, seeming from where the translucent pump part with the threaded connector attaches to the pump body. See picture. 21028.jpg
No big deal, so I put the pump in the RODI reservoir with some tubing going through the bulkhead and out to the tank. Initially I put the ATO output into the top of the tank because it would siphon if put into the sump, but it was quickly apparent that this wasn't going to work well. Water levels took too long to equalize which slightly overfilled the tank with RODI water, but it also seemed to mess with the finicky Red Sea overflow valve. So I settled on putting the ATO line into the return pump section of the sump and drilling a couple of holes at the top part of the tube inside the reservoir to act as a siphon break. I drilled two for redundancy. When the pump runs it sprays water out of these two holes, but that's not an issue because the container has a lid, and the flow to the sump is still perfectly fine.
 
OP
OP
S

Sactoreefer

New Member
View Badges
Joined
Jul 13, 2024
Messages
14
Reaction score
1
Location
Sacramento
Rating - 0%
0   0   0
The reefer g2+ comes with a reef ato+, any reason u went with osmolator?
Somehow I missed that my tank would have an ATO included lol. Once it arrived though I did some research and it seems like the red sea ATO has mixed reviews, despite having some features that I am interested in (temp sensor, app connected). I decided to use the Tunze as I had already bought it, and it is the ATO that seems to be most loved by the reefing community. I'll probably sell the Red Sea ATO at some point.
 

FreshSaltyGuy

Active Member
View Badges
Joined
Sep 28, 2022
Messages
426
Reaction score
224
Location
Central California
Rating - 0%
0   0   0
While waiting for the tank and other components, I started thinking about my mixing station. My garage shares a wall with the location of the tank, so I decided to create a small passage between the two covered by a brush wall plate. There is also a sink nearby for freshwater/waste water disposal. For containers, I wanted something nicer looking than brute cans (nothing wrong with them though!) but less expensive than some of the other fancy water tanks I've seen people use. I settled on plastic barrels from marketplace that were used to hold olives. $30 for each, not too bad. These hold something like 65 gal each and have a large screw top lid. Cleaning was a pain, and they probably will forever smell like olives, but from what I've read online, lots of people use these and it shouldn't be an issue.

I wanted a vertical stand to save space. I decided to make it out of steel since I own a welder, and the cost of metal seemed similar to making it out of wood/carriage bolts. Sturdier too. The barrels are plumbed with 3/4" PVC, and I found some clear PVC at a local plumbing supplier that I used to make a level indicator for each barrel. I used Uniseal bulkheads as the sides of these containers are curved. These haven't leaked a drop, and are super cheap. The top barrel is for RODI storage, and the bottom salt water. A valve lets RODI water into the mixing container, and a pump can circulate or send water out of the lower container depending on what valves are turned.

I tested my RODI unit and was only getting 45 PSI out of my water supply, so I picked up a smart buddie booster pump. Now I am getting 80 PSI with 2 ppm TDS out of the membrane and 0 PPM out of the mixed resin bed. I'm also getting about 150 GPD out of this 75 GPD unit, which I can only attribute to the higher pressure and my good source water! RODI water from the booster pump enters the top of the container through a float valve.

I found a guy on marketplace selling a used Varios 2 for cheap which I am using for the mixing pump, though I had to buy BSPT adapters from Mcmaster-Carr to plumb it. I figure if my Varios 4 return pump fails, I can use this as a backup until I buy a new pump.
CONGRATS!! Looks AWESOME! Question for you. I have the exact same 2 barrels you do. Do you have plans that you followed to put it all together? Can you share a diagram of how you connected everything and a parts list if you don't mind?

Thank you!
 
OP
OP
S

Sactoreefer

New Member
View Badges
Joined
Jul 13, 2024
Messages
14
Reaction score
1
Location
Sacramento
Rating - 0%
0   0   0
CONGRATS!! Looks AWESOME! Question for you. I have the exact same 2 barrels you do. Do you have plans that you followed to put it all together? Can you share a diagram of how you connected everything and a parts list if you don't mind?

Thank you!
Sure. I used the following:

6 3/4" uniseal bulkheads (bought from BRS)
3/4" PVC pipe (all PVC parts bought from Home depot)
3 3/4" threaded PVC tee fittings
3 3/4" threaded to slip fittings
1 3/4" threaded plug
1 3/4" threaded Sch 80 PVC nipple
3 3/4" slip PVC elbow
2 3/4" slip ball valves
1 3/4" cepex ball valve (from BRS)
Clear flexible tubing and a couple of barbed fittings from BRS
10 ft of clear PVC if you want the level indicator. This is sold online, but is very expensive. I found a local plumbing supplier (Harrington Industrial plastics) that sold 10 ft lengths for about $20. I see you are in central Ca, so check them out if they're not too far.
2 BSPT to 1" PVC slip fittings (McMaster Carr). This will depend on the mixing pump you decide to use, if possible find something that uses standard threads as the BSPT fittings are tough to find in the US.
2 1" to 3/4" PVC slip fittings
PVC cement/primer
Teflon tape

Drill holes for uniseals. From the top, put a length of PVC into the top of the barrel. This should be over the planned water line. Glue an elbow and a length of clear PVC going down to the bottom Uniseal. Add another length of PVC into the bottom of the barrel with a tee. Out of the front of the tee attach the ball valve. Do the same for the bottom barrel (see pic). RODI water then can flow by gravity from the top barrel to the bottom when the top ball valve is opened.

Plumbing for the mixing pump is similar. Hard to see in the pic, but there is a tee in the middle of the pipe which comes out a bit and has a ball valve on it. This is so depending on what valve is turned it will either discharge water back into the top of the tank or into a bucket/hose.

Water from my RODI unit enters the top barrel through a float valve to prevent any overflows.
 

FreshSaltyGuy

Active Member
View Badges
Joined
Sep 28, 2022
Messages
426
Reaction score
224
Location
Central California
Rating - 0%
0   0   0
Sure. I used the following:

6 3/4" uniseal bulkheads (bought from BRS)
3/4" PVC pipe (all PVC parts bought from Home depot)
3 3/4" threaded PVC tee fittings
3 3/4" threaded to slip fittings
1 3/4" threaded plug
1 3/4" threaded Sch 80 PVC nipple
3 3/4" slip PVC elbow
2 3/4" slip ball valves
1 3/4" cepex ball valve (from BRS)
Clear flexible tubing and a couple of barbed fittings from BRS
10 ft of clear PVC if you want the level indicator. This is sold online, but is very expensive. I found a local plumbing supplier (Harrington Industrial plastics) that sold 10 ft lengths for about $20. I see you are in central Ca, so check them out if they're not too far.
2 BSPT to 1" PVC slip fittings (McMaster Carr). This will depend on the mixing pump you decide to use, if possible find something that uses standard threads as the BSPT fittings are tough to find in the US.
2 1" to 3/4" PVC slip fittings
PVC cement/primer
Teflon tape

Drill holes for uniseals. From the top, put a length of PVC into the top of the barrel. This should be over the planned water line. Glue an elbow and a length of clear PVC going down to the bottom Uniseal. Add another length of PVC into the bottom of the barrel with a tee. Out of the front of the tee attach the ball valve. Do the same for the bottom barrel (see pic). RODI water then can flow by gravity from the top barrel to the bottom when the top ball valve is opened.

Plumbing for the mixing pump is similar. Hard to see in the pic, but there is a tee in the middle of the pipe which comes out a bit and has a ball valve on it. This is so depending on what valve is turned it will either discharge water back into the top of the tank or into a bucket/hose.

Water from my RODI unit enters the top barrel through a float valve to prevent any overflows.
Wow thanks for this! Here is the next question lol. Sounds like this is not automated and all a manual process? If manual then you pump the water out of your tank manually and then open the valves to your barrels salt water to refill or ?
 
OP
OP
S

Sactoreefer

New Member
View Badges
Joined
Jul 13, 2024
Messages
14
Reaction score
1
Location
Sacramento
Rating - 0%
0   0   0
Wow thanks for this! Here is the next question lol. Sounds like this is not automated and all a manual process? If manual then you pump the water out of your tank manually and then open the valves to your barrels salt water to refill or ?
Yes its completely manual. I will probably add an AWC setup in the future, but for the initial tank fill I lugged 5 gallon buckets full of mixed SW from the garage. That will be the plan for water changes in the near future.
 

ckaz

New Member
View Badges
Joined
Jun 27, 2024
Messages
4
Reaction score
0
Location
san diego
Rating - 0%
0   0   0
Congrats on the tank and welcome to the party! I've got a RS 250 as well. For powerhead set-up, I'm using an AI Nero 3 and a IceCap 2K Gyre and seems to be working well.
 

ckaz

New Member
View Badges
Joined
Jun 27, 2024
Messages
4
Reaction score
0
Location
san diego
Rating - 0%
0   0   0
Also, it kinda ruins the purpose of a rimless tank, but I've been a huge fan of the canopy for my tank. Beside containing the light spill, it keeps the jumping fish inside, provides a place to mount a cooling fan and autofeeder and helps contain spills from a powerhead getting excited. And i think it looks good.

IMG_8365.jpg
 
OP
OP
S

Sactoreefer

New Member
View Badges
Joined
Jul 13, 2024
Messages
14
Reaction score
1
Location
Sacramento
Rating - 0%
0   0   0
Started my cycle on July 17th with a 32 oz bottle of Fritz Zyme 9 bought from a LFS because it's what they had. I had initially bought a bottle of Microbacter7 with all my other equipment, but decided that it probably isn't the right tool for the job (still been adding a few capfuls daily though). I didn't want to have anything shipped because it's been so hot here.

I added the whole bottle of Fritz along with 4.5 ml Ace Hardware Ammonia, which should have gotten me to around 2.0 PPM ammonia per online calculators. However, I was only at 0.34 PPM, my bottle of ammonia must be weak. So I added another 30 ml ammonia which got me up to 2.07 PPM. I chose ~2 PPM as my goal as the Hanna checker only reads up to 2.5 PPM.

On the 18th I tested Ammonia and Nitrite just for fun since I had nothing better to do, not expecting any change. 2.10 PPM ammonia, 0 PPM Nitrite.

On the 20th (just now) I tested again, 2.05 PPM ammonia and what looked like 0.25-0.5 PPM nitrite. I am a little bit color blind so the nitrite test is hard for me to read (hence buying Hanna checkers for most stuff lol). But there was definitely some color to the nitrite test, whereas on the 18th it was completely clear. So something seems to be happening, even if my interpretation of the nitrite test isn't too accurate.
 
OP
OP
S

Sactoreefer

New Member
View Badges
Joined
Jul 13, 2024
Messages
14
Reaction score
1
Location
Sacramento
Rating - 0%
0   0   0
Also, it kinda ruins the purpose of a rimless tank, but I've been a huge fan of the canopy for my tank. Beside containing the light spill, it keeps the jumping fish inside, provides a place to mount a cooling fan and autofeeder and helps contain spills from a powerhead getting excited. And i think it looks good.

IMG_8365.jpg
Nice tank! I like the canopy a lot, will definitely consider building one in the future! How tall is the canopy?

I got the Jebao powerheads working, I posted earlier about the magnets on them. Though one is a little bit noisy at higher speeds (not bad but definitely audible as it ramps up and down in a quiet room). I guess that's what I get for going cheap.
 
OP
OP
S

Sactoreefer

New Member
View Badges
Joined
Jul 13, 2024
Messages
14
Reaction score
1
Location
Sacramento
Rating - 0%
0   0   0
Cycle Update.

On 7/21 I started seeing some good progress. Ammonia 1.66, nitrite between 1 and 2. Didn't test nitrate.

Today (7/22) my ammonia is 1.25, nitrite between 2 and 4, and nitrate 12.8.

I am using the Salifert nitrite kit hence the ranges, had my non colorblind wife read them for me, though we both agreed on the readings.

I'm happy to see that things are progressing with the cycle, I'll keep checking daily and probably dose ammonia when it gets under 1 PPM and keep going until all that ammonia is converted within 24 hours. Once the cycle seems complete and I see some algae growth, I'll buy some CUC members and after that add some easier corals.

I plan to QT everything that goes into this tank, so I'd like to add some inverts and corals and let the tank lie fallow for at least 6 weeks before I add any fish. I'll definitely be setting up separate coral/invert and fish QT tanks in the future. I may also buy some pre-QT fish for my first additions once the initial fallow period is over, just to get things going. Or only buy QT fish and skip the hassle, who knows! That way I can just focus on quarantining corals in a separate tank and not have to deal with copper/med dosing.
 

ckaz

New Member
View Badges
Joined
Jun 27, 2024
Messages
4
Reaction score
0
Location
san diego
Rating - 0%
0   0   0
Nice tank! I like the canopy a lot, will definitely consider building one in the future! How tall is the canopy?

I got the Jebao powerheads working, I posted earlier about the magnets on them. Though one is a little bit noisy at higher speeds (not bad but definitely audible as it ramps up and down in a quiet room). I guess that's what I get for going cheap.
The canopy is 7" tall, and has a lip that sits a 1/4" below the glass on the inside edge to hold it in place
 

TOP 10 Trending Threads

HAVE YOU EVER KEPT A RARE/UNCOMMON FISH, CORAL, OR INVERT? SHOW IT OFF IN THE THREAD!

  • Yes!

    Votes: 32 45.7%
  • Not yet, but I have one that I want to buy in mind!

    Votes: 9 12.9%
  • No.

    Votes: 26 37.1%
  • Other (please explain).

    Votes: 3 4.3%
Back
Top