Red Sea Reefer Max 425 G2+ Help

rdelrosario

New Member
View Badges
Joined
Dec 4, 2023
Messages
7
Reaction score
0
Location
Michigan
Rating - 0%
0   0   0
Hi, I just bought a Red Sea Reefer Max 425 G2+. I'm new to the hobby and need a little help. The Red Sea instructions just show pictures, but don't narrate anything, which is hard for me being a first time reefer. Can someone answer the below questions for me.

Equipment List (All Red Sea):
(2x) ReefLED 90 and Mounting Arm
(1x) Reefer DC Skimmer 600
(2x) ReefWave 45 Gyre Powerhead
(2x) ReefRun 5500 Return Pump
(2x) ReefRun Controller
(1x) ReefMat 500 Automatic Filter Roller
(1x) ReefATO+ Auto Top Off System
(1x) Slide-Out Control Panel 60
(1x) Utility Basket

1. The pane of glass in the sump in the overflow chamber is supposed to come out to make room for the ReefMat. It doesn' budge. Is it glued in and do you have to scrape the glue from underneath to remove it? Must it be removed to use the reefmat?

2. When putting in the plumbing pipes from the top of the tank, I was able to screw them in past the 1st set of threads, then when it hits the second set of threats, its nearly impossible to tighten all the way. I don't know if the teeth even caught. It seems tight, but are those supposed to screw in tighly and stop by hand... is that tight enough?

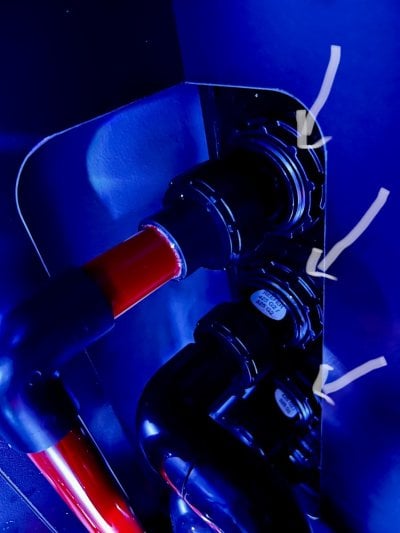
3. The bulkhead built into the tank has 4 connections. They each have a screw on collar on each. What is the purpose of the grey collars. I can screw them in tight, don't see what that does. I can even unscrew them completely off. Please enlighten me on what their used for? Again they seem to just screw on and off, but they don't seem to do anything. What am I missing

5. what size tubing does the return pump to the return plumbing be? Is it 3/4 Inside Diameter. I haven't been able to validate this.

6. When filling up the tank for the first time, am I supposed to fill up the sump half way first or just fill up the display tank until it overflows into the sump... How do I know when to stop filling the display tank going this method.
 

TX_REEF

Kessil Fanboy
View Badges
Joined
Mar 12, 2023
Messages
3,086
Reaction score
3,642
Location
Texas
Rating - 0%
0   0   0
1. you don't need to remove that glass panel to fit the reefmat. On my 350 g2, I just removed the "easy to remove" larger baffle to make sure I can fit all my equipment. You can remove it if you wish; if you decide to do that, red sea sells a special tool with a super fine blade to cut the silicone which I've read is way easier than trying to use a utility knife or scalpel. I think it's just called the "sump modification kit"
2. tight as possible by hand should be fine, you could also use a pipe wrench (carefully) and give it a little more
3. I can't remember, sorry - do you have photos?
4. where did number 4 go? :grinning-squinting-face:
5. I think the kit should have come with vinyl tubing for the connection - just use boiling water on the joint end of the vinyl to soften it, then ram it onto the PVC. When it cools it will be secure. You can also add a tube clamp around it (plastic or stainless steel)
6. I just filled from the display, but you could fill the sump halfway first as well. Basically fill it until the return pump chamber has enough water to fully submerge the return pump, power on the return pump and keep filling until the display has the water level you desire and the return ump chamber has enough water to submerge the return pump with a few inches extra.
 
OP
OP
R

rdelrosario

New Member
View Badges
Joined
Dec 4, 2023
Messages
7
Reaction score
0
Location
Michigan
Rating - 0%
0   0   0
thanks so much for the information. My kit didn’t come with any tubing. I thought it would be in return pump box .. it didn’t. What size should I buy? Inside diameter?

Regarding the glass panel not needing to remove… if I leave it in place there’s no room to plumb the flexible hose from the reefmat to the overflow pipe. What am I missing
 

TX_REEF

Kessil Fanboy
View Badges
Joined
Mar 12, 2023
Messages
3,086
Reaction score
3,642
Location
Texas
Rating - 0%
0   0   0
I’d just choose whatever diameter vinyl is largest that your pump can handle and sill fit forcible over the PVC.

Regarding the glass, here’s how I have it set up… not ideal and I should probably remove that panel and shorten the flexible drain tube, but it works.


Last edited:
OP
OP
R

rdelrosario

New Member
View Badges
Joined
Dec 4, 2023
Messages
7
Reaction score
0
Location
Michigan
Rating - 0%
0   0   0
Is that pane of glass removable on your setup? Or is your glued too? BTW your video doesn’t show or play.
 

TX_REEF

Kessil Fanboy
View Badges
Joined
Mar 12, 2023
Messages
3,086
Reaction score
3,642
Location
Texas
Rating - 0%
0   0   0
Sorry about that, maybe the file was too big. See below link. The panel is secured with silicone.

 
OP
OP
R

rdelrosario

New Member
View Badges
Joined
Dec 4, 2023
Messages
7
Reaction score
0
Location
Michigan
Rating - 0%
0   0   0
Also item 3 pics with the white arrows pointing to part in wuestion

3. The bulkhead built into the tank has 4 connections. They each have a screw on collar on each. What is the purpose of the grey collars. I can screw them in tight, don't see what that does. I can even unscrew them completely off. Please enlighten me on what their used for? Again they seem to just screw on and off, but they don't seem to do anything. What am I missing
 

Attachments

  • IMG_3369.jpeg
    IMG_3369.jpeg
    105.5 KB · Views: 84

TX_REEF

Kessil Fanboy
View Badges
Joined
Mar 12, 2023
Messages
3,086
Reaction score
3,642
Location
Texas
Rating - 0%
0   0   0
I believe they are creating a watertight seal for the bulkhead, when you tighten them it also tightens the flange on the other side of the glass
 

temphermitcrab

Community Member
View Badges
Joined
Apr 18, 2023
Messages
29
Reaction score
37
Location
Los Angeles
Rating - 0%
0   0   0
I have the same tank and found some of the same things confusing.

Removing the glass from the slide-out sock holder was very difficult. I used rubber gloves to get a grip and just kept carefully rocking it with my hands until it finally budged.

I didn't screw in the top tubes far enough at first and nearly broke the outpipes trying to get them to go into the slots that hold them. Once I screwed the tubes in further - I wish I remembered how much - they fit in place as they should.

If you want to use soft tubing you can get the below items from BRS. The bulkhead is metric and includes a 20mm (0.787402 in.) barb expanding to 25mm (0.984252). I think a 1" tube might be slightly loose so I chose the .75". It will only go onto the barb until it expands to 25mm., which is fine. You can also hard plumb it but that seemed like more work and I wasn't sure of the benefit.

Ratchet Clamp for 3/4” Tubing203071 $1.19 $1.01
  • Ordered2
  • Shipped2
$2.02
3/4” Braided Vinyl Tubing - Kuri-Tec203061 $3.19 $2.71
  • Ordered2
  • Shipped2
$5.42

I followed the Operation manual to fill it and it worked without an issue:
  • Open the main valve to maximum.
  • Add 6" water to overflow box to check for leaks.
  • Add water to the main tank. As soon as it overflows into sump watch it until there's 6" in pump compartment.
  • Turn on skimmer or anything else that lowers water and adjust. Let it run and adjust the level and flow valve as needed.
 

CraigLiz

New Member
View Badges
Joined
Jan 26, 2024
Messages
7
Reaction score
8
Location
Colorado
Rating - 0%
0   0   0
2. When putting in the plumbing pipes from the top of the tank, I was able to screw them in past the 1st set of threads, then when it hits the second set of threats, its nearly impossible to tighten all the way. I don't know if the teeth even caught. It seems tight, but are those supposed to screw in tighly and stop by hand... is that tight enough?
I feel your pain, I just set up a Reefer 425 this weekend and it is also my first tank. I also felt the instructions left a little room for improvement.
I had the same issue with those pipes in the overflow box. I felt my hand was a bit too large to really get in there. My solution was to tighten them with my hand from down below. There was just enough pipe for me to get ahold of them and tighten them. I felt the same way about not being sure if they were actually threaded on at first.

Good luck with everything
 

Naturalreef

Well-Known Member
View Badges
Joined
Oct 3, 2015
Messages
805
Reaction score
638
Rating - 100%
3   0   0
Just to reiterate, with a new Red Sea tank G2-G2+, the filter sock panel slides out to fit the reefmat effortlessly. There is no need to cut any silicone anywhere. The tank was made to use filter socks OR a reefmat with no modifications. Just didn’t want you ruining your new tank. Hope you enjoy it!
 

Kven

Community Member
View Badges
Joined
Jan 5, 2024
Messages
32
Reaction score
12
Location
Lake Charles, Louisiana
Rating - 0%
0   0   0
I feel your pain, I just set up a Reefer 425 this weekend and it is also my first tank. I also felt the instructions left a little room for improvement.
I had the same issue with those pipes in the overflow box. I felt my hand was a bit too large to really get in there. My solution was to tighten them with my hand from down below. There was just enough pipe for me to get ahold of them and tighten them. I felt the same way about not being sure if they were threaded on at first.

Good luck with everything
Thank you for that explanation. Going from the bottom to tighten did the trick. I have a 350 G2+, and I had the same issue. You would think Red Sea has had enough comments about this issue and would amend or add to its instructions. Thank you so much. Problem solved!
 

HAVE YOU EVER KEPT A RARE/UNCOMMON FISH, CORAL, OR INVERT? SHOW IT OFF IN THE THREAD!

  • Yes!

    Votes: 32 45.7%
  • Not yet, but I have one that I want to buy in mind!

    Votes: 9 12.9%
  • No.

    Votes: 26 37.1%
  • Other (please explain).

    Votes: 3 4.3%
Back
Top