ProClear Cylinder 125

OP
OP
drmdvl

drmdvl

Community Member
View Badges
Joined
Apr 21, 2020
Messages
60
Reaction score
81
Rating - 0%
0   0   0
Tank update: Had my first big scare this past weekend where Colorado had a "snowpocalypse" - 3ft for our location, although this is Colorado and its winter so not sure why it made national news - lol. Anyways, had a power outage and thankfully only for 4 hours. I resorted to a few manual sump to DT water exchanges with a gallon pitcher about 10x per hour in desperation of providing some aeration, trying to close the lid as much as possible to keep heat in and avoided my morning feed. Also dropped a bit of prime in the display and sump. Thankfully the acrylic seems to insulate well and I only lost 1.5° of temp in that time even with pouring water from the pitchers - and house temp was 64 during the outage. So now I am on the hunt for a solution to run the Sicce 55W return pump and maybe a small heater. I dont think UPS/APC is the solution or a good value as a generator will provide more run time for much cheaper than the APC with only minutes of run time. However, a UPS is a nice feature if I am not home to catch a future outage. So I am pondering what to do??
I see threads about this all the time and think, meh.. not happening to me... well then it does and it made me realize how much I really care for these little guys. In the end, no losses and I think I stressed more than they did - they just seemed PO'd that the lights were out and all went into their bedding down must defend my territory routine.

Second, I dont know what possessed me to try this, but I bought some Brightwell MB7 and dosed the 2 week loading dose and now have accumulating white stringy stuff in the tank which I assume are bacterial flocs - but the water is crystal clear. Will back off and see how long it takes to disappear. It was never broken, so dont know what I was trying to fix.
 
Last edited:

SALTWATER FISH HIPPIE

Active Member
View Badges
Joined
Feb 6, 2021
Messages
163
Reaction score
85
Location
47394
Rating - 0%
0   0   0
thumbnail_IMG_6048.jpg
would you be willing to help a somewhat newbie set up his sump similar to yours? i do not have any experience with sump filtration or adding reactors, skimmers, ato systems.
thumbnail_IMG_6047.jpg
i have this exact tank. will be finishing the set up in mid june. waiting till our vacation is over. anyhow i will be setting up as a fowlr. so far have added an ocean revive led and an fluval 24 hr light cycle led. also i just built my rockscape combing two caribsea liferock coral tree kits. i am going to initially fill with natures ocean nutri seawater as my rodi unit is not hooked up at this time. thanks and i can only hope my tank can be half as nice as yours.
 

SALTWATER FISH HIPPIE

Active Member
View Badges
Joined
Feb 6, 2021
Messages
163
Reaction score
85
Location
47394
Rating - 0%
0   0   0
Oh man - that in wall sounds cool. Will get some more pics up soon - everything is going great. Inside panels are a breeze with the flipper and NOPOX is making even that minimal. But if you have to reach in to the bottom to flip a snail or something... annoying but worth it. And forget catching a fish in there.
what is the flipper and nopox? thanks
 

whitcory

Active Member
View Badges
Joined
Jul 26, 2020
Messages
104
Reaction score
133
Location
home
Rating - 0%
0   0   0
what is the flipper and nopox? thanks
Hey I have a similar style tank with live reef. Went through some trial and error but seem to have things going ok for no. Check it out here:

 
OP
OP
drmdvl

drmdvl

Community Member
View Badges
Joined
Apr 21, 2020
Messages
60
Reaction score
81
Rating - 0%
0   0   0
Maintenance update - the filter socks are a PITA ProClear - I can live with them being housed in the far back of the sump as a compromise for the uniqueness of the tank but proprietary sized 4" socks is a bit sneaky - they are 3.75", not readily available and spendy. Running NOPOX makes them clog way too fast as that's where the bacterial flocs tend to congregate - which on a side note is great for exporting. Rimer and Rimer to the rescue with their 4" (also a tad hilarious) high flow filter media cup - which is about 3.6-3.7" in diameter and fits the filter chamber perfectly!! These things are almost a god send. Just stuff them with poly-fill and enjoy the relatively painless and cheap maintenance. Highly recommended for anyone with the odd ball sized filter socks.
filter cups.jpg
 

kados

Well-Known Member
View Badges
Joined
Dec 6, 2019
Messages
849
Reaction score
1,175
Rating - 100%
1   0   0
Perfect timing. I literally pulled the socks out today w the intention of keeping them out. They clog way too fast and I usually let it sit for a week (on a good week) usually longer lol. I installed a filter pad in the next chamber instead on that perforated drip tray.. So water will flow through there instead but it's a little noiser now without the socks. I've looked for cups and socks that fit but you nailed it - All others are too wide. Thanks for posting this today!!
 
OP
OP
drmdvl

drmdvl

Community Member
View Badges
Joined
Apr 21, 2020
Messages
60
Reaction score
81
Rating - 0%
0   0   0
What filters do you put in your media cups? Do you also use carbon? Thanks.
I literally buy a 50oz bag of
Premium poly fill from Wally-world. Put a handful of it in each cup. I was already doing this with the socks and it really polished the water well!
1 bag should last a year. I change it every 3 days or so.

 
OP
OP
drmdvl

drmdvl

Community Member
View Badges
Joined
Apr 21, 2020
Messages
60
Reaction score
81
Rating - 0%
0   0   0
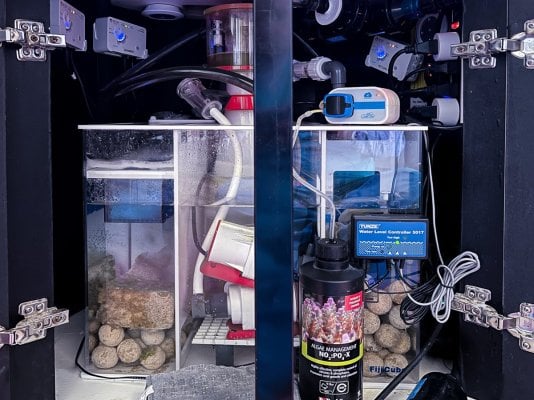
The under cabinet space in this thing is so tight, I can see how it would turn away many potential owners, but it can be done!! Tore down and re-arranged the sump this weekend - the lack of cord management was making me ill every time I opened the doors and sloppily stuffing all the equipment in there makes changing the filter cups in the rear chamber a major PITA.
Found these cool zip tie mounts to get my UV sterilizer mounted up and to the side of the cabinet. Leaving the carbon reactor more accessible on the left side of the sump and allows better access to the filter cups. (Zip tie mounts here)
Rear chamber - filter cups with polyfil, temp probe.
Mid chamber - heaters, bio media, UV and carbon reactor pumps, ATO, chaeto and fuge light.
Front chamber - skimmer, UV/Reactor return, doser, ATO sensor, return pump.

ATO water reservoir still lives behind the tank stand.

IMG_8266.JPG
IMG_8265.JPG
 

Tanksfishtank

Well-Known Member
View Badges
Joined
Nov 5, 2013
Messages
585
Reaction score
160
Location
Iowa
Rating - 100%
1   0   0
Looks awesome and clean now for the space you have! Any pics of the tank? Thanks for sharing
 

whitcory

Active Member
View Badges
Joined
Jul 26, 2020
Messages
104
Reaction score
133
Location
home
Rating - 0%
0   0   0
Beyond impressive. I have the same tank and it is tight in there. Wish I would have mounted my stuff outside the sump as you did. Well done.
 
OP
OP
drmdvl

drmdvl

Community Member
View Badges
Joined
Apr 21, 2020
Messages
60
Reaction score
81
Rating - 0%
0   0   0
Long overdue tank update (novel):


Overall - I am still very impressed with this tank setup from Pro Clear. There are several little things that a prospective buyer may want to think hard on before purchasing one and I’ve made some recommendations at the end of the post. Here are some key points: this is definitely form over function but still functional, it takes a little more work to make modifications but is fine as is, it’ll be nearly impossible to catch a fish in there once introduced without a tear down or drain down, don’t put anything in the bottom of the tank unless you are committed to it – its hard to reach in there even with extended forceps / graspers and it takes quite a bit more time to do general maintenance given the cramped space and layout of the sump / cabinetry.

However, I must say – cleaning the walls is no bigger a deal than a traditional tank – for stubborn algae or build up, the flipper works great on the curved acrylic with the acrylic scraper attached without scratching and I only have to scrub it down once a month or so. For general wipe downs, I use The algae free hammerhead. The outside walls kept developing this weird haze / streaking and I had a tough time keeping it clear for viewing the first few weeks of ownership. The secret is Novus 1 plastic polish (blue label), just spray and wipe with a microfiber cloth and the acrylic is clear as can be. Water changes are a piece of cake and syphoning is a breeze since the tank sits so high up. Smaller water changes are done off the manifold in the sump. Regarding the sand bed – the combination of flow, clean up crew, in check parameters and my diamond goby (a heavy weight champ for sure) means my sand is always pristine, thank the lord. Any little nuance or annoyance here and there is well worth the uniqueness for me.

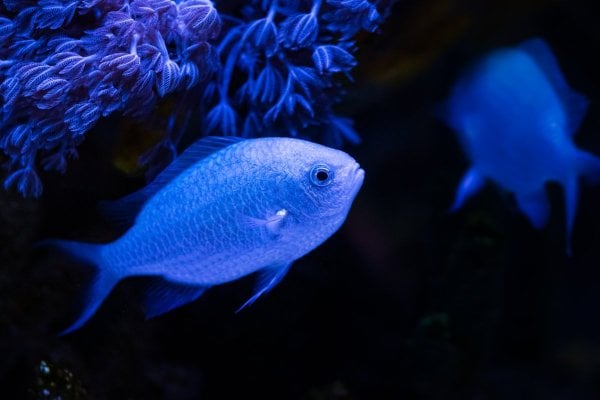
Everything is thriving! Ive got an amazing colony of copepods growing in the sump pod hotel, sand etc – they literally litter the filter floss with each change despite my goby. The fish are fat and healthy with great color, very little aggression and the large fish swim racetrack style when they get a little burst of energy – I am convinced swim distance is not an issue in this tank. It’s so cool that all the fish prefer to inhabit different levels of the water column. I am dabbling in some softies and added some weeds – an island of pulsing xenia and some GSP which is kindly encrusting the top of the coral insert as planned – I wouldn’t mind if it took to the back wall too. Will add some mushrooms and maybe a couple other relatively easy things later but this is still primarily FO. The coral insert turned out to be a blessing – it affords a ton of hiding places and territory for all the fish and is maintenance free. Had a couple losses – my banggai cardinals were wild caught and slowly all passed after two years. I have never had the best long-term success with these guys in the past and may try a captive one in the future. Pencil urchin didn’t have enough to eat – that was just a really bad decision on my part. And lost 1 of 7 green chromis early on and 1 female lyretail who honestly didn’t look too hot coming out of QT last year – they all 4 came in infested with internal parasites and flukes poor things. Going into QT shortly, pyramid butterfly, melanuris wrasse and one spot foxface.

Updated livestock

CUC: turbo x3, fighting conch x1 and assorted nassarius, trochus, astrea, nerite, red and blue legged hermits, cleaner x2 and fire shrimp (these guys are HUGE so hopefully not snacks for a tiny wrasse).
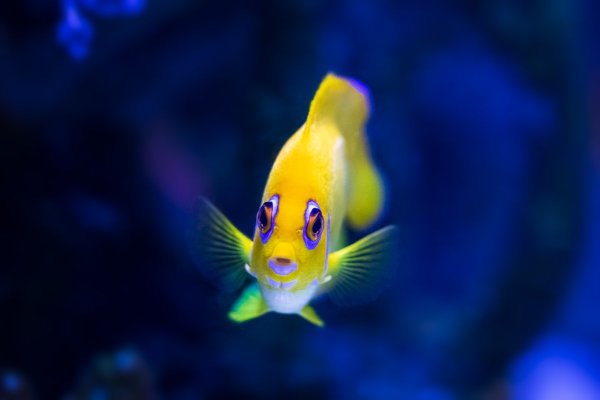
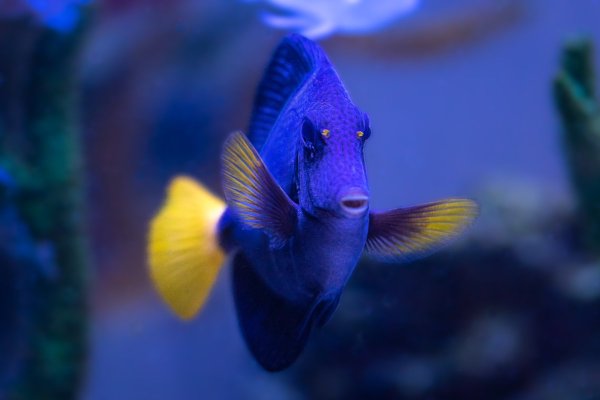
Fish: Shoal of blue green chromis all huge and fat, pair of ocellaris clowns, 1 red firefish who goes on a month-long sabbatical every other month but makes an appearance looking fatter and more colorful each time, 1 lemon peel angel who thinks she can stab other fish like a tang, diamond goby, 1 yellow and 1 purple tang, full grown yellow eyed kole, 1 large blue hippo (who thinks he’s a chromis) and 1M/2F lyretail anthias.

Coral: huge colony of pulsing xenia on its own island, small colony of GSP

Updated Equipment List:
Tank: ProClear Cylinder 125 AIO
Return: Reef Octo Varios 8 setting 4
Lighting: AI Hydra 32HD x2
Power Heads: Vortech MP10mQD x3
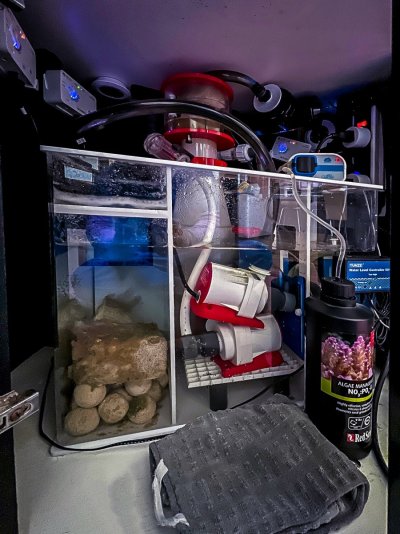
Sump: more on that below – running second gen Fiji Cube Fiji-20 advanced (in love)
Mechanical Filtration: Chamber #1 – Still have the 4” Rimer and Rimer high flow cups x2 but currently using the included fiji basket with polyfil.
Chemical Filtration: BRS dual chamber media reactor – ROX/GFO, backed way off on this and run as needed, sometimes just use chemipure elite instead.
Biological Filtration: Chamber 1&3 - 1gal Marine Pure spheres, blocks and dosing below.
Skimmer: Chamber 2 - Reef Octo Regal 150 INT
Doser: Kamoer x1 Bluetooth
Dosing: NoPOX and PNS YelloSno, ProBio and Algae Barn Ocean Magik.
UV: 25W Ultra Aquaviolet on a varios 4 for tunability
Heaters: BRS/Ink Bird WiFi controller with dual 300W titanium finnex heaters
ATO: Tunze Osmolator 3155
ATO Reservoir: Arrow 2.5g slimline water container from Walmart (holds almost 3 gal for $8)
RODI: AquaFX Barracuda 200gpd water saver (I can fill a 30g Brute in about 3 hours)
Sand: 60# arag alive fiji pink
Coral Insert: Aqua Globe
Salt: Instant Ocean Reef Crystal 5g
Mixing: 30g Brute with dolly
Electrical: Smart life wifi power strip and smart plugs for light timers and remote monitoring of power. GFCI multiplex outlet.
Fuge: Ditched Chaeto (actually killed it with Vibrant - never to be used again once it was discovered to be algicide and not bacterial based)
Fuge light: Kessil H80 – taken off tank
Food: alternating PE mysis, LRS reef and fish frenzy twice a day, TDO chroma boost and Hikari seaweed extreme every now and then and on vacations, nori sheets almost daily, fortify feedings with selcon.

The only thing housed outside of the cabinet is the ATO reservoir and my 3 ecotech flow controllers Velcro’d to the back of the cabinet.

Revisions and recommendations for buyers and Pro Clear (if you are listening)

  • The sump is doable but god awful and not sustainable in the long run – the filter socks in the rear chamber are a PITA to reach, a proprietary size and the acrylic lid warps and cannot contain the splashing. The teeny tiny drain / overflow chamber “tube” is literally just large enough to house the drain plumbing so it leads to major splash and salt creep in the rear of the cabinet which is impossible to maintenance. Granted, it was engineered with their return pump and flow in design but I cant imagine Pro Clear expects all it’s buyers will keep the cheap OE return pump. I would recommend Pro Clear ditch one of the 3 filter socks and enlarge the drain chamber to prevent splashing in higher flow conditions at minimum. I swapped the filter socks for filter cups that worked great; but in the end, the sump had to go. Sadly, Bashsea was not interested in making one no matter the begging and pleading so replaced with a Fiji-20 which was the only one I could find that would fit dimensionally and OMG what a game changer. First of all, the sump can be oriented side to side instead of front to back making filter floss changes a snap – its right up front now! You can actually visualize, reach and maintain all the chambers now. The return chamber is appropriately located now and reduces head pressure by approx 2.5 feet of less plumbing. It has super tight fitting lids and there is NO overflow splash. There are a lot of usable bells and whistles on this thing and I am using almost all of them. It’s like this thing was layed out for this cabinet’s real estate and even includes a tiny built in fuge and separate return chamber that will just fit the varios 8 – take notes please PC!
  • The standard plumbing…. Geeze, you went through the trouble even with union fittings so why not use standard schedule 40/80?? Every single piece of piping is some custom Chinese crap size and fits NOTHING, and why glue drains and returns to the bulkhead?!? Thank goodness for compression couplings! Second, I hate not having an emergency drain but not enough to convert the return piping in the weir to a drain and running an over the top return in the back of the tank, but could be done.
  • The single overflow standpipe drain… uggh… its incredibly loud and obnoxious – like you have to talk over the noise at the dinner table loud. Again, to PC’s defense, it was designed with their flow rating in mind but is still unbearable with the original pump and that’s under an acrylic lid and again under the heavy duty canopy. On the other hand, it’s designed with a 2 inch “ish” overflow that tapers to 1.25” in the cabinet, so they must have been thinking about high capacity in the design. The fix, converted it to a dorso drain for $10… parts list: Teflon tape to add bulk to the stand pipe, 2” slip tee with a little trimming to fit in the weir, 2” 90° street elbow fitting, 2” pipe plug with a 5/16” hole drilled in the top of it and tada – silence and bliss!
  • More power in the cabinet please. And instead of the useless airline / stone, a conduit for electrical from the cabinet to the canopy would be nice… but that would be a big ask.
  • Immediately replace the SS hose clamps for plastic or at least marine rated clamps.
These are relatively small but thoughtful things that make owning this tank a joy and I would do it all over again!

If you own this or are thinking about owning one, please PM me with any questions you may have and I would be happy to share what I’ve done or any other suggestions.

Pics to follow.

Fish (2 of 5).jpg Fish (4 of 5).jpg Fish (5 of 5).jpg Tank Sump (1 of 2).jpg Tank Sump (2 of 2).jpg
 
Last edited:

billm05

New Member
View Badges
Joined
Nov 21, 2023
Messages
3
Reaction score
0
Location
pa
Rating - 0%
0   0   0
Long overdue tank update (novel):


Overall - I am still very impressed with this tank setup from Pro Clear. There are several little things that a prospective buyer may want to think hard on before purchasing one and I’ve made some recommendations at the end of the post. Here are some key points: this is definitely form over function but still functional, it takes a little more work to make modifications but is fine as is, it’ll be nearly impossible to catch a fish in there once introduced without a tear down or drain down, don’t put anything in the bottom of the tank unless you are committed to it – its hard to reach in there even with extended forceps / graspers and it takes quite a bit more time to do general maintenance given the cramped space and layout of the sump / cabinetry.

However, I must say – cleaning the walls is no bigger a deal than a traditional tank – for stubborn algae or build up, the flipper works great on the curved acrylic with the acrylic scraper attached without scratching and I only have to scrub it down once a month or so. For general wipe downs, I use The algae free hammerhead. The outside walls kept developing this weird haze / streaking and I had a tough time keeping it clear for viewing the first few weeks of ownership. The secret is Novus 1 plastic polish (blue label), just spray and wipe with a microfiber cloth and the acrylic is clear as can be. Water changes are a piece of cake and syphoning is a breeze since the tank sits so high up. Smaller water changes are done off the manifold in the sump. Regarding the sand bed – the combination of flow, clean up crew, in check parameters and my diamond goby (a heavy weight champ for sure) means my sand is always pristine, thank the lord. Any little nuance or annoyance here and there is well worth the uniqueness for me.

Everything is thriving! Ive got an amazing colony of copepods growing in the sump pod hotel, sand etc – they literally litter the filter floss with each change despite my goby. The fish are fat and healthy with great color, very little aggression and the large fish swim racetrack style when they get a little burst of energy – I am convinced swim distance is not an issue in this tank. It’s so cool that all the fish prefer to inhabit different levels of the water column. I am dabbling in some softies and added some weeds – an island of pulsing xenia and some GSP which is kindly encrusting the top of the coral insert as planned – I wouldn’t mind if it took to the back wall too. Will add some mushrooms and maybe a couple other relatively easy things later but this is still primarily FO. The coral insert turned out to be a blessing – it affords a ton of hiding places and territory for all the fish and is maintenance free. Had a couple losses – my banggai cardinals were wild caught and slowly all passed after two years. I have never had the best long-term success with these guys in the past and may try a captive one in the future. Pencil urchin didn’t have enough to eat – that was just a really bad decision on my part. And lost 1 of 7 green chromis early on and 1 female lyretail who honestly didn’t look too hot coming out of QT last year – they all 4 came in infested with internal parasites and flukes poor things. Going into QT shortly, pyramid butterfly, melanuris wrasse and one spot foxface.

Updated livestock

CUC: turbo x3, fighting conch x1 and assorted nassarius, trochus, astrea, nerite, red and blue legged hermits, cleaner x2 and fire shrimp (these guys are HUGE so hopefully not snacks for a tiny wrasse).
Fish: Shoal of blue green chromis all huge and fat, pair of ocellaris clowns, 1 red firefish who goes on a month-long sabbatical every other month but makes an appearance looking fatter and more colorful each time, 1 lemon peel angel who thinks she can stab other fish like a tang, diamond goby, 1 yellow and 1 purple tang, full grown yellow eyed kole, 1 large blue hippo (who thinks he’s a chromis) and 1M/2F lyretail anthias.

Coral: huge colony of pulsing xenia on its own island, small colony of GSP

Updated Equipment List:
Tank: ProClear Cylinder 125 AIO
Return: Reef Octo Varios 8 setting 4
Lighting: AI Hydra 32HD x2
Power Heads: Vortech MP10mQD x3
Sump: more on that below – running second gen Fiji Cube Fiji-20 advanced (in love)
Mechanical Filtration: Chamber #1 – Still have the 4” Rimer and Rimer high flow cups x2 but currently using the included fiji basket with polyfil.
Chemical Filtration: BRS dual chamber media reactor – ROX/GFO, backed way off on this and run as needed, sometimes just use chemipure elite instead.
Biological Filtration: Chamber 1&3 - 1gal Marine Pure spheres, blocks and dosing below.
Skimmer: Chamber 2 - Reef Octo Regal 150 INT
Doser: Kamoer x1 Bluetooth
Dosing: NoPOX and PNS YelloSno, ProBio and Algae Barn Ocean Magik.
UV: 25W Ultra Aquaviolet on a varios 4 for tunability
Heaters: BRS/Ink Bird WiFi controller with dual 300W titanium finnex heaters
ATO: Tunze Osmolator 3155
ATO Reservoir: Arrow 2.5g slimline water container from Walmart (holds almost 3 gal for $8)
RODI: AquaFX Barracuda 200gpd water saver (I can fill a 30g Brute in about 3 hours)
Sand: 60# arag alive fiji pink
Coral Insert: Aqua Globe
Salt: Instant Ocean Reef Crystal 5g
Mixing: 30g Brute with dolly
Electrical: Smart life wifi power strip and smart plugs for light timers and remote monitoring of power. GFCI multiplex outlet.
Fuge: Ditched Chaeto (actually killed it with Vibrant - never to be used again once it was discovered to be algicide and not bacterial based)
Fuge light: Kessil H80 – taken off tank
Food: alternating PE mysis, LRS reef and fish frenzy twice a day, TDO chroma boost and Hikari seaweed extreme every now and then and on vacations, nori sheets almost daily, fortify feedings with selcon.

The only thing housed outside of the cabinet is the ATO reservoir and my 3 ecotech flow controllers Velcro’d to the back of the cabinet.

Revisions and recommendations for buyers and Pro Clear (if you are listening)

  • The sump is doable but god awful and not sustainable in the long run – the filter socks in the rear chamber are a PITA to reach, a proprietary size and the acrylic lid warps and cannot contain the splashing. The teeny tiny drain / overflow chamber “tube” is literally just large enough to house the drain plumbing so it leads to major splash and salt creep in the rear of the cabinet which is impossible to maintenance. Granted, it was engineered with their return pump and flow in design but I cant imagine Pro Clear expects all it’s buyers will keep the cheap OE return pump. I would recommend Pro Clear ditch one of the 3 filter socks and enlarge the drain chamber to prevent splashing in higher flow conditions at minimum. I swapped the filter socks for filter cups that worked great; but in the end, the sump had to go. Sadly, Bashsea was not interested in making one no matter the begging and pleading so replaced with a Fiji-20 which was the only one I could find that would fit dimensionally and OMG what a game changer. First of all, the sump can be oriented side to side instead of front to back making filter floss changes a snap – its right up front now! You can actually visualize, reach and maintain all the chambers now. The return chamber is appropriately located now and reduces head pressure by approx 2.5 feet of less plumbing. It has super tight fitting lids and there is NO overflow splash. There are a lot of usable bells and whistles on this thing and I am using almost all of them. It’s like this thing was layed out for this cabinet’s real estate and even includes a tiny built in fuge and separate return chamber that will just fit the varios 8 – take notes please PC!
  • The standard plumbing…. Geeze, you went through the trouble even with union fittings so why not use standard schedule 40/80?? Every single piece of piping is some custom Chinese crap size and fits NOTHING, and why glue drains and returns to the bulkhead?!? Thank goodness for compression couplings! Second, I hate not having an emergency drain but not enough to convert the return piping in the weir to a drain and running an over the top return in the back of the tank, but could be done.
  • The single overflow standpipe drain… uggh… its incredibly loud and obnoxious – like you have to talk over the noise at the dinner table loud. Again, to PC’s defense, it was designed with their flow rating in mind but is still unbearable with the original pump and that’s under an acrylic lid and again under the heavy duty canopy. On the other hand, it’s designed with a 2 inch “ish” overflow that tapers to 1.25” in the cabinet, so they must have been thinking about high capacity in the design. The fix, converted it to a dorso drain for $10… parts list: Teflon tape to add bulk to the stand pipe, 2” slip tee with a little trimming to fit in the weir, 2” 90° street elbow fitting, 2” pipe plug with a 5/16” hole drilled in the top of it and tada – silence and bliss!
  • More power in the cabinet please. And instead of the useless airline / stone, a conduit for electrical from the cabinet to the canopy would be nice… but that would be a big ask.
  • Immediately replace the SS hose clamps for plastic or at least marine rated clamps.
These are relatively small but thoughtful things that make owning this tank a joy and I would do it all over again!

If you own this or are thinking about owning one, please PM me with any questions you may have and I would be happy to share what I’ve done or any other suggestions.

Pics to follow.

Fish (2 of 5).jpg Fish (4 of 5).jpg Fish (5 of 5).jpg Tank Sump (1 of 2).jpg Tank Sump (2 of 2).jpg
I’m curious how you installed your lights as well
 
Back
Top