Did you connect the 3-way Electric AC110 Ball valve via USB? (to Apex)Using a CO2 Scrubber to Maintain Stable pH Levels without Affecting Alkalinity Levels
Hypothesis: I believe by varying the source air going into a protein skimmer by way of a ball valve and CO2 scrubber I can stabilize the pH levels in my reef tank without additional additives or impacts to my current alkalinity levels.
Using an APEX pH probe I will be monitoring the levels and pH swings in an existing reef tank and seeing how they change after adding a controllable electric ball valve to change the source air for a Reef Octopus Classic protein skimmer.
This has been a progression over the last couple of months that is mostly owed to my constant need to tinker with things that are not broken. I am by no means a chemist, electrician or engineer, just a guy who got an APEX for Christmas and has now turned this hobby into a fun obsession. Seriously, getting an APEX will completely change how you look at your tank and try to manipulate it. Disclaimer: the following is mostly a brain dump and I'm sure there are flaws in steps I've taken.
In true tinkering fashion: "If its not broken, try to change it and make it better."
I started this experiment with the belief that a reef tank focused on coral growth should be an enclosed ecosystem with optimal parameters and not something that is emulating the natural reefs in our world. I know that major comparisons are made to natural seawater being the baseline for our systems but WHAT IS natural seawater? Where in the world are those numbers pulled from? What human influences have changed what seawater actually is in today's day and age? I'm not trying to change the entire way of thinking, just stating what my mind questions when I see people make the argument that we have to match all the levels we see in today's reefs.
Before tinkering, my Red Sea Reefer 350 had a relatively normal pH swing. 8.21 as a high around 8pm and then 7.97 as a low around 8am. Perfectly acceptable and coral was showing some growth. First, I wanted to try and boost my overall pH numbers without adding any dosing systems or additives. I decided to purchase the relatively cheap BRS Universal CO2 Skimmer and attached it to my Reef Octopus skimmer. The results were achieved in the first day and I noticed an increase in coral growth within the first few weeks. My pH swing changed to being 8.32 as a high and 8.15 as a low. Perfectly acceptable.
Then I got tired of manually dosing and started dosing Calcium, Alk, Magnesium and Tropic Marin Part C using BRS's two part system. Love it and have now had extremely consistent levels for the last few weeks but the downside is my pH has been all over the place. Dosing during the low points in my usual pH swing changed my highs upwards of 8.5 and lows in the 8.3 area. I did not want my pH that high and really wanted to try and level the swing out as much as possible. This is where the actual experiment begins.
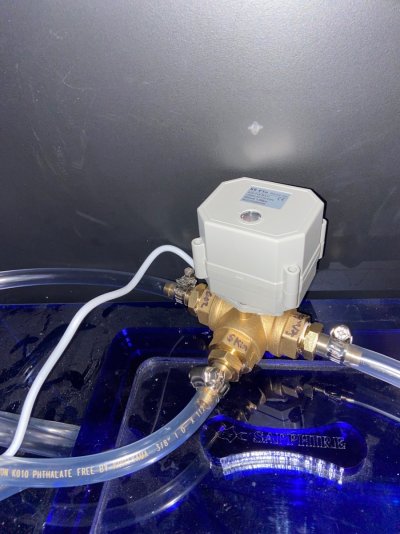
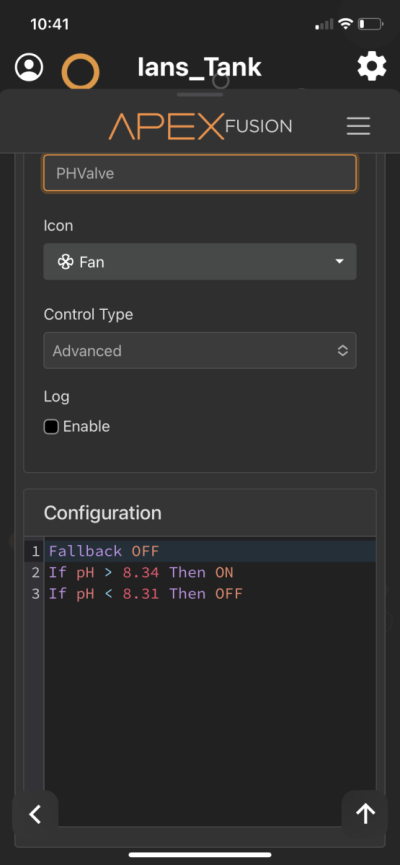
I purchased a 3-way Electric AC110 Ball valve from HSH Flo and added it in-line to my tubing going from my protein skimmer to my CO2 scrubber. Had to add a plug to the wiring so I could control it via my APEX and then set the guidelines to pull air from my CO2 scrubber when the pH falls below 8.31 and then to pull air from the ambient space in my cabinet when the pH rises above 8.34. The goal was to keep the pH between 8.3 and 8.35 initially to see how quickly the change would occur by changing the air source. So far (today is the first day) I have managed to keep the pH within the 8.31-8.34 range just by turning the ball valve on and off and changing the air source.
Will keep updates going after this test going through an alkalinity dosing tomorrow morning and has been running for a couple of weeks. But so far results are very encouraging and I now have stable calcium, alkalinity, magnesium and pH. Included some photos below showing the parts and build, I know I have heard of others doing this but was not able to find any detailed explanations or builds.
If you made it this far thanks for reading! Let me know if there are any questions or suggestions for improvement!

The Parts.

The Valve from HSH. I purchased the 110 version with 1/2"NPT openings. I did not want anything smaller that would reduce the airflow and choke the skimmer. I know Neptune has a ball valve but it is too small to be controlling the airflow to a protein skimmer.

The wiring. This valve comes with 5 wires, only black and red are needed. The other three are for controlling lights which would indicate what way the valve is facing, did not need this. Make sure you slide heat shrink tubing over the wires before you make these crimped connections! I forgot the first time and had to redo it.

Sitting on my ATO for now, trying to figure out a mounting bracket for it next.

Homemade silencing cup for the "regular" non CO2 scrubbed air. Works fantastic, will make it prettier later.

Simple instructions on the APEX.

Before adding the ball valve.

Day 1 of the experiment.

And in Apex FUSION You just write 3 commands what You share the picture, right?


