Old Aqueon 215g Rebuild

LST3

New Member
View Badges
Joined
Feb 8, 2024
Messages
13
Reaction score
0
Location
Rochester
Rating - 0%
0   0   0
Hey guys,

I am new to the site but it seemed like there were plenty of people who were knowledgeable with tank rebuilding and repair.

I got an older used 215 gallon aquarium with dual overflows that I am thinking about tearing completely apart and rebuilding. I am not sure how I would brace the bottom or if it is needed.

The tank is 1/2" thick glass (I know the bottom is tempered) and measures 72" long, 24" front to back, and 29" tall.

The top and bottom frames are an old fake wood grain (that I wouldn't mind eliminating). The top frame has a small crack on the end and the bottom frame has one small crack in the front and one in the back (I cannot find a place to get replacement frames).

I am thinking I want to rebuild it and do some kind of glass bracing. Euro bracing sounds cool, but I really have no need/desire to have no center brace at all.

What I am unsure of is how the bottom bracing would work. Can I take a framed aquarium and remove the bottom frame and use it? Would it be fine I just need to use foam between the tank and the stand?
Should I add euro racing to the inside of the tank at the bottom?

I have another 125g aquarium that I am thinking about cutting up to use the glass for whatever bracing that I decide to use for the 215.

Any guesses on what the top edges of the glass are going to look like under the plastic frame? A local person told me that the top edges of the Aqueon tanks that they have seen are generally pretty nice anyways even under the trim.

If anybody else has any other suggestions then I am all ears. I really just want to reseal the tank for reliability. And I wouldn't want to use the damaged (and ugly wood grain) trim again if I am going through all of that work.
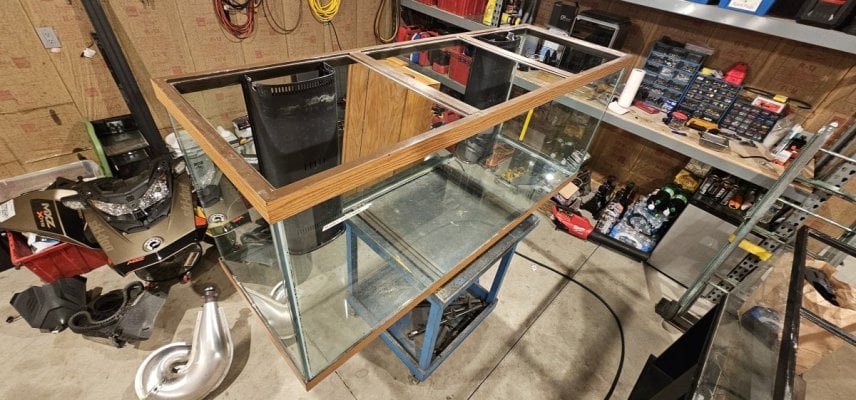
20240208_213736.jpg
 

Rifken

Community Member
View Badges
Joined
Apr 18, 2023
Messages
71
Reaction score
81
Location
New Mexico
Rating - 0%
0   0   0
I see you have no replies. I ran into the same problem when I posted asking the same type of questions about rebuilding Marineland 265 gallon tanks. I did not get replies either. I am no expert but I will share what I have found out so far.

As for taking the tank apart it seems that you need a bunch of razor blades, a snap blade knife, a drywall putty knife (very flexible) and "high E" guitar strings or any combination thereof.

Based on what I've read and watched videos on it seems patience is what is required the most especially with getting the trim off. They say the guitar string cuts thru silicone like butter and is great for separating the glass.

You really need to clean the hell out of the glass. There can be no residue of old silicone left. I plan on using single edge razor blades to scrap as much as possible off followed by acetone then possibly Barkeeper's friend.

ASI silicone seems to be very strong and comes in clear or black. The only negative about the ASI silicone is that it takes like 8-10 days to full cure

I have not found a source for trim yet. I have seen some vids about having aluminum frames made and I have seen one person that made a frame out of wood. Neither looked too great so I continue to search.

-Bob
 
OP
OP
L

LST3

New Member
View Badges
Joined
Feb 8, 2024
Messages
13
Reaction score
0
Location
Rochester
Rating - 0%
0   0   0
I see you have no replies. I ran into the same problem when I posted asking the same type of questions about rebuilding Marineland 265 gallon tanks. I did not get replies either. I am no expert but I will share what I have found out so far.

As for taking the tank apart it seems that you need a bunch of razor blades, a snap blade knife, a drywall putty knife (very flexible) and "high E" guitar strings or any combination thereof.

Based on what I've read and watched videos on it seems patience is what is required the most especially with getting the trim off. They say the guitar string cuts thru silicone like butter and is great for separating the glass.

You really need to clean the hell out of the glass. There can be no residue of old silicone left. I plan on using single edge razor blades to scrap as much as possible off followed by acetone then possibly Barkeeper's friend.

ASI silicone seems to be very strong and comes in clear or black. The only negative about the ASI silicone is that it takes like 8-10 days to full cure

I have not found a source for trim yet. I have seen some vids about having aluminum frames made and I have seen one person that made a frame out of wood. Neither looked too great so I continue to search.

-Bob
Thanks! Yeah I was kindof bummed seeing that I had no replies yet, so I really appreciate the help.

I am somewhat familiar with taking the aquarium apart and definitely know that cleaning the glass is paramount (actually ordered another 100 pack of blades and a 5 pack of E guitar strings on Wednesday haha). I've done some glass/silicone work before, but never close to a 200+ gallon tank obviously...

I am fine with the ASI silicone taking that long to cure if that is the good stuff to use. I wonder if that means that it takes longer to skin over also? That would be a godsend IMO. It seems like the biggest hassle is going to be getting everything done and getting the tape removed before it skins over.
With the silicone work that I have done, once the silicone starts to skin over you better be done and have had your tape completely off everywhere, or the whole thing is ruined lol. A longer skinning silicone would be a huge help.


There is a store in NYC that seems to have the trim for sale, problem is that it is only a local pickup sale. They will not ship it. So that doesn't work for me unfortunately. I haven't found it from anywhere else.


I think the top I am going to go with a bunch of pieces of glass to create the trim/bracing.
It is the bottom that I have not nailed down exactly what to do yet. I do have the current top trim that only has one tiny crack in the middle of one of the sides (basically best case scenario for a crack location) that I could use on the bottom. But it is still a weird brown Wood grain look.

Id love to eliminate plastic trim completely and figure something out for the bottom. Ideally glass.
My family does own a custom metal shop though, so stainless steel is also an option.
 

Dom

Full Time Reef Keeper
View Badges
Joined
Apr 29, 2016
Messages
6,449
Reaction score
6,945
Location
NY
Rating - 0%
0   0   0
There is a really cool after-market bracing system. I saw it deployed by another member in a post.

Basically, they are stainless steel clips that fit over the glass, front and back. Those two pieces are connected by a thin, stainless steel wire whose strength is capable of bracing the tank.

You could try that.

I am a big fan of Aqueon tanks. They are sturdy and I've never had one leak. The braces in the photo seem fine, although, they are kind of ugly in wood grain.

They can be removed and reinstalled if you are careful and take your time. Perhaps pop them off and hit them with a gloss black enamel spray finish?
 
OP
OP
L

LST3

New Member
View Badges
Joined
Feb 8, 2024
Messages
13
Reaction score
0
Location
Rochester
Rating - 0%
0   0   0
There is a really cool after-market bracing system. I saw it deployed by another member in a post.

Basically, they are stainless steel clips that fit over the glass, front and back. Those two pieces are connected by a thin, stainless steel wire whose strength is capable of bracing the tank.

You could try that.

I am a big fan of Aqueon tanks. They are sturdy and I've never had one leak. The braces in the photo seem fine, although, they are kind of ugly in wood grain.

They can be removed and reinstalled if you are careful and take your time. Perhaps pop them off and hit them with a gloss black enamel spray finish?
I think that I have seen the same picture you are talking about. It did look nice.
I just picked up a cheap 125g tank for $40 though that I planned to use the 3/8" glass for some bracing on the top.

I was also worried about the seals. It could use the collet silicone replaced. The actual joints look fine, but I was thinking knock it all out together.
I've also heard that just resealing the filler silicone (without doing the whole tank) is not the ideal anyways. Any thoughts on that?
215g of water in my living room would be a big issue haha.
 

Dom

Full Time Reef Keeper
View Badges
Joined
Apr 29, 2016
Messages
6,449
Reaction score
6,945
Location
NY
Rating - 0%
0   0   0
I think that I have seen the same picture you are talking about. It did look nice.
I just picked up a cheap 125g tank for $40 though that I planned to use the 3/8" glass for some bracing on the top.

I was also worried about the seals. It could use the collet silicone replaced. The actual joints look fine, but I was thinking knock it all out together.
I've also heard that just resealing the filler silicone (without doing the whole tank) is not the ideal anyways. Any thoughts on that?
215g of water in my living room would be a big issue haha.

You can't use the 125 for glass; it is tempered and you will not be able to cut it.

Any time I have resealed a tank, I have always resealed the entire tank and not just the side where I replaced glass.

I would use a straight edge razor and take off as much old silicon as possible. You want the glass clean. Don't worry about the silicon acting as adhesive between the two pieces of glass in question.

Then just reseal and test.

That tank has huge potential.
 
OP
OP
L

LST3

New Member
View Badges
Joined
Feb 8, 2024
Messages
13
Reaction score
0
Location
Rochester
Rating - 0%
0   0   0
You can't use the 125 for glass; it is tempered and you will not be able to cut it.

Any time I have resealed a tank, I have always resealed the entire tank and not just the side where I replaced glass.

I would use a straight edge razor and take off as much old silicon as possible. You want the glass clean. Don't worry about the silicon acting as adhesive between the two pieces of glass in question.

Then just reseal and test.

That tank has huge potential.
I actually checked the 125 to make sure it was not tempered when I bought it because I was worried about that (even at only $40, it would be a complete waste to me if it was all tempered anyways). I just used the polarized glasses and a white screen to check it out, but it seemed to pass with flying colors. Even the bottom is not tempered, which I was very surprised about.
I did the same test on a cheap 55g that I had in my garage (front, back, and bottom were clearly tempered, ends were not tempered) and I double checked this 215g (bottom is clearly tempered, sides and ends were not tempered, just as I had suspected based on the sticker on it).

When you say you have always "resealed the entire tank" you mean that you always replaced the "fillet" on all sides, or you always completely took it apart (like had the 5 pieces of glass laying together in a pile on the floor)?
I had heard that just replacing the fillet only on an older big tank like this is not ideal. And that you are better off completely disassembling the tank and building it again from the ground up (completely separating the glass panels) to replace that adhesive silicone also.

Again thanks for all of your help and responses.
 
OP
OP
L

LST3

New Member
View Badges
Joined
Feb 8, 2024
Messages
13
Reaction score
0
Location
Rochester
Rating - 0%
0   0   0
I actually checked the 125 to make sure it was not tempered when I bought it because I was worried about that (even at only $40, it would be a complete waste to me if it was all tempered anyways). I just used the polarized glasses and a white screen to check it out, but it seemed to pass with flying colors. Even the bottom is not tempered, which I was very surprised about.
I did the same test on a cheap 55g that I had in my garage (front, back, and bottom were clearly tempered, ends were not tempered) and I double checked this 215g (bottom is clearly tempered, sides and ends were not tempered, just as I had suspected based on the sticker on it).

When you say you have always "resealed the entire tank" you mean that you always replaced the "fillet" on all sides, or you always completely took it apart (like had the 5 pieces of glass laying together in a pile on the floor)?
I had heard that just replacing the fillet only on an older big tank like this is not ideal. And that you are better off completely disassembling the tank and building it again from the ground up (completely separating the glass panels) to replace that adhesive silicone also.

Again thanks for all of your help and responses.
What are your thoughts on leaving the tank assembled (only replacing all of the filler silicone) but then popping the top and bottom frames off.
Clean up the top frame and silicone it on to use it as the bottom frame.

Then take the top of the tank and silicone new 3/8" glass bracing on it and then call it a day? I can set it up in my heated garage and leave it for a few months if I need to to test. It will probably take me a while to get the sump all plumbed and setup anyways.

That way I'd be rid of the brown top trim. The brown bottom trim will probably be covered by the stand anyways. I plan to make a custom welded steel (or SS) stand for the tank that holds a big sump.

Originally I was thinking not disassembling the tank completely to replace the silicone gluing the panes together was a mistake.
The tank holds water fine right now as far as I know. But I'd bet that the tank is like 15-20+ years old. I know silicone doesn't last forever.
 

Dom

Full Time Reef Keeper
View Badges
Joined
Apr 29, 2016
Messages
6,449
Reaction score
6,945
Location
NY
Rating - 0%
0   0   0
I actually checked the 125 to make sure it was not tempered when I bought it because I was worried about that (even at only $40, it would be a complete waste to me if it was all tempered anyways). I just used the polarized glasses and a white screen to check it out, but it seemed to pass with flying colors. Even the bottom is not tempered, which I was very surprised about.
I did the same test on a cheap 55g that I had in my garage (front, back, and bottom were clearly tempered, ends were not tempered) and I double checked this 215g (bottom is clearly tempered, sides and ends were not tempered, just as I had suspected based on the sticker on it).

When you say you have always "resealed the entire tank" you mean that you always replaced the "fillet" on all sides, or you always completely took it apart (like had the 5 pieces of glass laying together in a pile on the floor)?
I had heard that just replacing the fillet only on an older big tank like this is not ideal. And that you are better off completely disassembling the tank and building it again from the ground up (completely separating the glass panels) to replace that adhesive silicone also.

Again thanks for all of your help and responses.

So you've done your homework on the tempered glass. Excellent!

When it comes to resealing a tank, smaller tanks (think 55 gallons or less), I will clean the silicon off the glass, but not separate the panels. Then I will give the glass a thorough cleaning and then put a fresh bead of silicon all around the tank.

On larger tanks (yours for example), the amount of water pressure against the glass is much greater. In this instance, I would completely disassemble the tank and separate the panes.

Do a thorough cleaning and scraping of the glass, and then reassemble.

Have you filled the tank with water to test for leaks?

This is a link to a resealing of a 20 gallon I did not too long ago. Have a look:


threebuoys

Valuable Member
View Badges
Joined
Nov 24, 2020
Messages
2,449
Reaction score
5,222
Location
Avon, NC
Rating - 0%
0   0   0
I believe if you check with aqueon, they will tell you all of the bracing is critical to the integrity of the tank. Although it is plastic, the bracing, particularly the cross bracing on the top plays an important role in controlling the bulging on the glass walls. Likewise, the plastic on the bottom prevents the glass from sitting on possibly an uneven surface. All of the downward force is supported by the bottom plastic rim. If any of the plastic is broken or cracked, be sure to repair.
 
OP
OP
L

LST3

New Member
View Badges
Joined
Feb 8, 2024
Messages
13
Reaction score
0
Location
Rochester
Rating - 0%
0   0   0
So you've done your homework on the tempered glass. Excellent!

When it comes to resealing a tank, smaller tanks (think 55 gallons or less), I will clean the silicon off the glass, but not separate the panels. Then I will give the glass a thorough cleaning and then put a fresh bead of silicon all around the tank.

On larger tanks (yours for example), the amount of water pressure against the glass is much greater. In this instance, I would completely disassemble the tank and separate the panes.

Do a thorough cleaning and scraping of the glass, and then reassemble.

Have you filled the tank with water to test for leaks?

This is a link to a resealing of a 20 gallon I did not too long ago. Have a look:

Yeah I was not about to bother bringing the 125g tank home just to find out it was tempered and no good to me haha. Somebody botched a partial reseal at some point, so I wouldn't have ever trusted filling it with water in a house.

I am thinking the silicone "injection" method of resealing it seems the most logical and the easiest way to do it. I am debating if I need to use spacers of some kind still too.
 
OP
OP
L

LST3

New Member
View Badges
Joined
Feb 8, 2024
Messages
13
Reaction score
0
Location
Rochester
Rating - 0%
0   0   0
I believe if you check with aqueon, they will tell you all of the bracing is critical to the integrity of the tank. Although it is plastic, the bracing, particularly the cross bracing on the top plays an important role in controlling the bulging on the glass walls. Likewise, the plastic on the bottom prevents the glass from sitting on possibly an uneven surface. All of the downward force is supported by the bottom plastic rim. If any of the plastic is broken or cracked, be sure to repair.
Yeah I would never trust a tank of this size with 1/2" glass to not have a top center bracing of some kind. I will most likely end up going with a euro brace on the front and back AND then adding atleast a front to back center brace (and one front to back brace at each end). Stacking the two types of bracing on the top seems like a good way to go. I have little desire to eliminate the center braces completely, one center brace doesn't bother me at all.

The bottom seems to be exactly like you said. I need to have something on the bottom glass edges that rest on the surface the tank is sitting on (to take up imperfections and protect the glass). That I will have to either save one of the plastic trims (the current top one seems best to use for that) or make a custom stainless steel bottom frame for the tank. I still have to work out exactly how that trim would need to be.
 

Bob Weigant

Valuable Member
View Badges
Joined
Feb 12, 2018
Messages
2,017
Reaction score
6,709
Location
Hayward
Rating - 0%
0   0   0
I wont be able to add much of anything to this thread other than a long long time ago I decided to cut the plastic piece that went across the tank. It was full and running. Once I was done I could see the tank shift. I had to go out and buy a new one as I was afraid it was gonna bust on the 2nd floor of my house. Not one of my smartest moves
 

Ironwill723

Well-Known Member
View Badges
Joined
Apr 25, 2009
Messages
658
Reaction score
390
Rating - 100%
1   0   0
You can just lightly sand the plastic trim and then tape off and respray with black kylon fusion. Tank will look brand new.
 
OP
OP
L

LST3

New Member
View Badges
Joined
Feb 8, 2024
Messages
13
Reaction score
0
Location
Rochester
Rating - 0%
0   0   0
You can just lightly sand the plastic trim and then tape off and respray with black kylon fusion. Tank will look brand new.
The trim has a few cracks on it. That is the biggest reason that I would like to eliminate it. I could save the top piece (to use as a new bottom) but I don't think the current bottom could be used. It has a crack on the front and one in the back. Adjacent to the two front to back braces (just outside of them).
 

HAVE YOU EVER KEPT A RARE/UNCOMMON FISH, CORAL, OR INVERT? SHOW IT OFF IN THE THREAD!

  • Yes!

    Votes: 32 45.7%
  • Not yet, but I have one that I want to buy in mind!

    Votes: 9 12.9%
  • No.

    Votes: 26 37.1%
  • Other (please explain).

    Votes: 3 4.3%
Back
Top