My 60 Gallon cube build

Blindzy

Community Member
View Badges
Joined
Dec 13, 2020
Messages
61
Reaction score
61
Location
Mishawaka
Rating - 0%
0   0   0
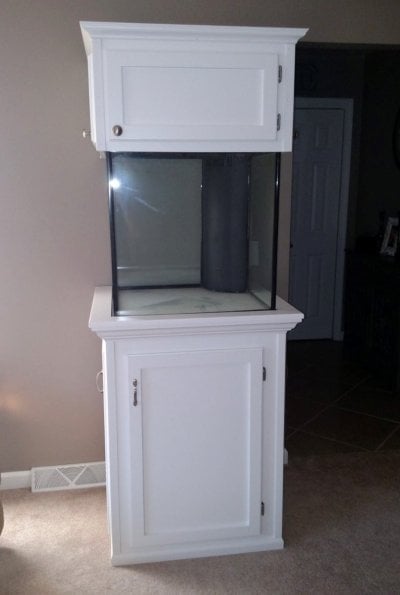
Hello all! So I'm in the midst of moving my packed 32 gallon Biocube to a 60 gallon reef ready cube. A great time to do this as my buddy (Varmette on here) just upgraded to a 120. I will just give a hint as of now for what is to come but, it will stay a mixed reef with mostly LPS and soft corals and eventually a few SPS. The pictures below are what I'm moving from and what it will be moving into. I'm keeping the stand and hood as they are both very well built. Just a change from white to gray. The picture of the 60 is from when he originally set it up I believe 5 years ago. The panels on the doors are a bit warped from the years Aaron had it and the expected humidity issues. For now I will get the loose material out, paint everything with marine paint. Once summer comes around I plan to build all new doors. More to come!
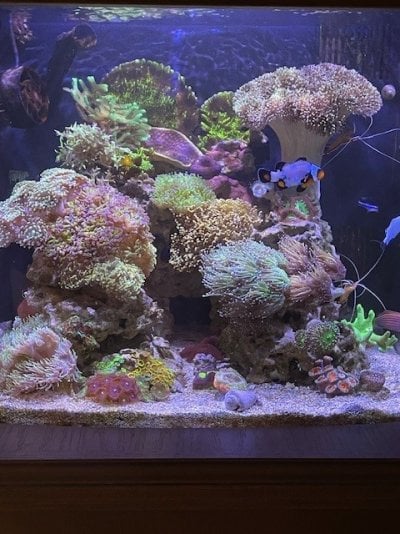
32.jpg 60.jpg
 

E.R.A.

Community Member
View Badges
Joined
Jan 4, 2024
Messages
36
Reaction score
43
Location
USA
Rating - 0%
0   0   0
I am currently designing a new cube. Why are you getting rid of the 32g? Just curious. Just space in the 32g or anything more specific.
 
OP
OP
Blindzy

Blindzy

Community Member
View Badges
Joined
Dec 13, 2020
Messages
61
Reaction score
61
Location
Mishawaka
Rating - 0%
0   0   0
I am currently designing a new cube. Why are you getting rid of the 32g? Just curious. Just space in the 32g or anything more specific.
Space! The Biocube has been great but with only 15" deep, 22" wide and 18" tall it gets cramped fast. The 60 is 24" x 24" x 24" pus I now have a 20 gallon tall sump for more filtration.
 

E.R.A.

Community Member
View Badges
Joined
Jan 4, 2024
Messages
36
Reaction score
43
Location
USA
Rating - 0%
0   0   0
Space! The Biocube has been great but with only 15" deep, 22" wide and 18" tall it gets cramped fast. The 60 is 24" x 24" x 24" pus I now have a 20 gallon tall sump for more filtration.
I just measured the area where I am setting it. Ill be going 60g.
 
Last edited:
OP
OP
Blindzy

Blindzy

Community Member
View Badges
Joined
Dec 13, 2020
Messages
61
Reaction score
61
Location
Mishawaka
Rating - 0%
0   0   0
So I started cleaning up the mold and prepping the stand for a new paint job. 99% of it was just fine. The back wall was a bit beat up but several coats of marine white paint would take care of it.
s1.jpg
s2.jpg
s3.jpg
 
OP
OP
Blindzy

Blindzy

Community Member
View Badges
Joined
Dec 13, 2020
Messages
61
Reaction score
61
Location
Mishawaka
Rating - 0%
0   0   0
Next to take on the doors. Frames were great and just needed scuffed up to be able to paint. The inner panels were rough! I peeled off a few layers and got down to solid wood that was paintable for now. In the summer I plan to build all new doors for the stand and hood.
d1.jpg
d2.jpg
d3.jpg
 
OP
OP
Blindzy

Blindzy

Community Member
View Badges
Joined
Dec 13, 2020
Messages
61
Reaction score
61
Location
Mishawaka
Rating - 0%
0   0   0
Inside of the doors, stand and hood all painted with marine white. 4 coats since it is a thin paint.
d.jpg
h.jpg
s2.jpg
If you guys are not using Marine grade paint on the insides of your hoods and stands you should! I have used it a my last 2 set ups and it is great! Mold may form on it but it wipes right off and will not pernitrate it!
 
OP
OP
Blindzy

Blindzy

Community Member
View Badges
Joined
Dec 13, 2020
Messages
61
Reaction score
61
Location
Mishawaka
Rating - 0%
0   0   0
Guess it is time for a run down on what equipment is going in this set up...

60 Gallon Reef ready corner overflow tank (1 3/4" return, 1 1" overflow
20 gallon high sump
Sicce Syncra 3.0 WIFI return pump
Aqumax Cones Q2 Skimmer
Aqumax internal midi reactor
150 Watt Jager heater run on a WIFI Inkbird controller
2 SLW-20 Jaboa wave makers
Duetto Auto top off with a 5 gallon Trigger Systems Sapphire reservoir
1 Kessil A360x LED light
All plugged into the good old American DJ PC-100 power strip.
 
OP
OP
Blindzy

Blindzy

Community Member
View Badges
Joined
Dec 13, 2020
Messages
61
Reaction score
61
Location
Mishawaka
Rating - 0%
0   0   0
Now with the inside painted I wanted to get an Idea of how stuff would fit. I mounted the DJ strip and put the sump, carbon reactor, and skimmer into test it out. Also installed the stand lights. NOTE* I know that is not how the filter cup and holder will sit...LOL
1.jpg
2.jpg
3.jpg
4.jpg
5.jpg
 
OP
OP
Blindzy

Blindzy

Community Member
View Badges
Joined
Dec 13, 2020
Messages
61
Reaction score
61
Location
Mishawaka
Rating - 0%
0   0   0
SO I got the stand, hood and doors painted the gray that I like. Installed the DJ strip and started planning out my false wall that will hide most all of the power cords and separate the controllers from the humidity inside the stand.
1.jpg
2.jpg
3.jpg
4.jpg
5.jpg
6.jpg
7.jpg
 
OP
OP
Blindzy

Blindzy

Community Member
View Badges
Joined
Dec 13, 2020
Messages
61
Reaction score
61
Location
Mishawaka
Rating - 0%
0   0   0
So my friend had the same DJ switch in the same spot and the humidity took its toll on it. The top was quite rusty and soft when I removed it. I know this will not prevent mine doing the same thing but I figure it will help. I plan on taking it out and checking it once a year or so. I found some nice beefy plastic hinges on Amazon that worked well for this. Plus I love cord management and this hides them well.
1.jpg
2.jpg
3.jpg

 
Last edited:

Gumbies R Us

Certified Noob
View Badges
Joined
Nov 10, 2022
Messages
14,188
Reaction score
24,058
Location
North Georgia
Rating - 0%
0   0   0
SO I got the stand, hood and doors painted the gray that I like. Installed the DJ strip and started planning out my false wall that will hide most all of the power cords and separate the controllers from the humidity inside the stand.
1.jpg
2.jpg
3.jpg
4.jpg
5.jpg
6.jpg
7.jpg
Stand is looking great!
 
OP
OP
Blindzy

Blindzy

Community Member
View Badges
Joined
Dec 13, 2020
Messages
61
Reaction score
61
Location
Mishawaka
Rating - 0%
0   0   0
Built and painted the false wall that will hide power cables and separate all the controllers from the "wet side". Will be about a 1.25" space in between the false wall and the control panel. All the controls will be in a 2-3" bump out cabinet on the side of the stand with a matching door.
1.jpg
2.jpg
3.jpg
4.jpg
5.jpg
 
OP
OP
Blindzy

Blindzy

Community Member
View Badges
Joined
Dec 13, 2020
Messages
61
Reaction score
61
Location
Mishawaka
Rating - 0%
0   0   0
So with the stand done and the plumbing complete I was able to set it all together in the shop to get an eye on it. I did have one door from the hood that is quite twisted and giving me fits. I searched YouTube and the below picture is what I found to do. I left it that way for 3 days and it really did not change much. I think I will need to sand the paint off the inside and hit it with a steamer and try one more time. Again, I plan on building all new doors this summer so not a huge deal but, I'm a bit OCD and it is bugging me...lol I also installed the Trigger System ATO reservoir. A bit expensive for what it is but I love it. And the 5 gallons will last quite a while. For now I have a Viparspectra black box LED light on it. I will be moving my Kessil over with the livestock.
1.jpg
2.jpg
3.jpg
4.jpg
 
OP
OP
Blindzy

Blindzy

Community Member
View Badges
Joined
Dec 13, 2020
Messages
61
Reaction score
61
Location
Mishawaka
Rating - 0%
0   0   0
Well, got the tank in the house and set in place, Filled with about 50 lbs of live sand and dry rock. Filled it up and checked for leaks. All good so far. I added some storage options on the doors and false wall. I'm pretty happy with the rock work so far. I will be grabbing a rock from my current tank to put in along with the bottle bacteria. I will give that a few days to settle in then start testing. I have had great success in the past with Turbo Start 900. I'm also using Microbactor.


9.jpg
.
1.jpg
2.jpg
3.jpg
4.jpg
6.jpg
7.jpg


kevgib67

10K Club member
View Badges
Joined
Apr 16, 2022
Messages
13,566
Reaction score
77,531
Location
Canfield, Ohio
Rating - 0%
0   0   0
Well, got the tank in the house and set in place, Filled with about 50 lbs of live sand and dry rock. Filled it up and checked for leaks. All good so far. I added some storage options on the doors and false wall. I'm pretty happy with the rock work so far. I will be grabbing a rock from my current tank to put in along with the bottle bacteria. I will give that a few days to settle in then start testing. I have had great success in the past with Turbo Start 900. I'm also using Microbactor.


9.jpg
.
1.jpg
2.jpg
3.jpg
4.jpg
6.jpg
7.jpg

Wow, your attention to detail, very nice!
 
Back
Top