Monocot's Micro Mangrove Build

monocot

New Member
View Badges
Joined
Apr 13, 2024
Messages
14
Reaction score
14
Location
New England
Rating - 0%
0   0   0
Hi all!

I'm a relatively experience reef keeper, but new to r2r. After a while of bouncing around without a reef tank, I've finally gotten restless enough to start a new build, and I figured this time I might as well document it and seek input from fellow enthusiasts.

All in all, I'm shooting for a dirt simple tank for my desk. I'm a PhD student in marine science, which is excellent in that I have endless access to NSW, RODI water, etc, though I do a fair bit of traveling and have been moving around from one ****** apartment to the next :) -- Luckily, I'm also in a lab full of marine scientists, so there will always be folks to check in on things if I'm in the field for an extended period.

Although diminutive in size, this project is, admittedly, a bit ambitious. I've gazed longingly at mangrove communities while doing fieldwork enough and I finally bit the bullet and decided to shoot for my own mini setup - after all, if people can grow them in soggy buckets in their backyards, why can't I keep a couple on my desk...

The setup: For the aquarium, I really wanted to shoot for something long and skinny - I've always like the look of lopsided/uneven tanks. I also think it's well suited for a mangrove tank as it gives a (tiny) "edge of the lagoon" feeling, if you know what I mean? My desk is pretty small, so I decided to pull the trigger on a 3 gallon 18" x 5.5" x 7.1" glass rimless tank from Amazon (50$; Tank).

Heating - for this, I just picked out the cheapest, most basic heater I could find (8$; Heater). The temp is preset to 78 F, which is easy enough. To be fair, our office is kept pretty much constantly at 70 F, so as long as it doesn't completely fry my tank, mangroves/macroalgae shouldn't care too much if my heater goes out. This is mainly if I decide to throw a few inverts in there somewhere down the line.

Lighting - with a tank this small and mostly mangroves, I'm not too worried about lighting. I also don't want a lamp that will burn my eyeballs out when I'm on my laptop. To that end, I might just start with of those "full spectrum grow" LED bulbs and a desk lamp fixture. Anyone have thoughts on the best way to light this baby for under 50$? Any advice appreciated! I also have some experience with DIY LED fixtures, but I'd like to stick with the KISS method here, and I can't imagine it would be cost effective on such a small scale.

Filtration - this is where things get fun! I considered just a small HOB filter, but I've been tempted to go all DIY and create my down AIO tank as I think it would be more aesthetic (and fun). To that end, I whipped up some designs for an acrylic insert that fits in one end of my tank. With the little heater and return pump I've picked up, it should occupy less than 3.5" of internal space (design below). We have a laser cutter in the basement, so I should be able to bust this out in however long it takes the epoxy/acrylic weld to dry. Initially, I wanted to just epoxy a wall into the tank, but I think I'll go for a fully removable insert that fits "flush" with the tank. The reason for this is that I'm a tinkerer through and through and I'm sure in a few months I'd be mad that I stuck the thing in there. I might add a few globs of epoxy on the edges just to keep it in place that I can slice off later to pull it, but I'm trying to be modular here. The design has a slot for a filter sock (DIY) and some media below, along with a return chamber. Note* theres a second baffle in left (return) chamber that isn't included in this render.

Screenshot 2024-04-13 at 7.46.06 PM.png
Screenshot 2024-04-13 at 7.46.13 PM.png

Screenshot 2024-04-13 at 7.48.58 PM.png


Ofc, with a tank this teeny and this kind of setup, consistent water level is essential. I'm thinking about just getting one of those lil optical ATOs from Amazon (50$; ATO). Ironic that the ATO is the most expensive part of this setup so far (tied with the tank), but I suppose that's how these things go. With the second baffle in the AIO insert, I can tuck everything in that section of the tank, which hides the cords and tubes a bit.

And here's a pic of the tank on the corner of my desk:

IMG_9509.jpg


As you can see, pretty teeny!

Finally, here's a rough drawing of the scape I'm going for (as you can see, I'm better with CAD...):

IMG_9510.jpg


So that's about where I'm up to on this! I'll probably start fabricating and messing with the AIO insert in the next few days, unless I made some stupid glaring error that I hope somebody points out :)

Should be a fun little build, and I'm hoping I can pull everything off for under 250$ - we'll see, though.

edit: Fixed the links (I hope)!
 
OP
OP
monocot

monocot

New Member
View Badges
Joined
Apr 13, 2024
Messages
14
Reaction score
14
Location
New England
Rating - 0%
0   0   0
Got rained out of a morning fishing trip (still managed some nice fish!), so I decided to play around in the shop a bit and test out my "AIO box" designs with some scrap 1/8" acrylic I had left over from another project.

As these things usually go, I measured twice, cut once, realized I botched the kerf compensation, measured again, and cut again (trimmed). I'm actually pretty happy with how it turned out! I modified the original design and shortened the overflow width to compensate for a second baffle. This way I have a third compartment for my little heater so it doesn't get stuck in the same compartment as my return, which would not be good if the ATO screws up or there's some other water level issue. For now, I'm pulling the DIY mini filter sock and swapping it with media. I'm lucky enough to have access to constant 0.2 um filtered seawater, so I'm not hugely worried about physical filtering. I do want to make sure I have a way of running carbon, GFO, etc., if needed, though.

IMG_9514.jpg

^^ First cuts are looking pretty snazzy!
IMG_9515.jpg

^^ The inevitable trimming - this I'll fix in the "pro" version...

IMG_9516.jpg
IMG_9517.jpg

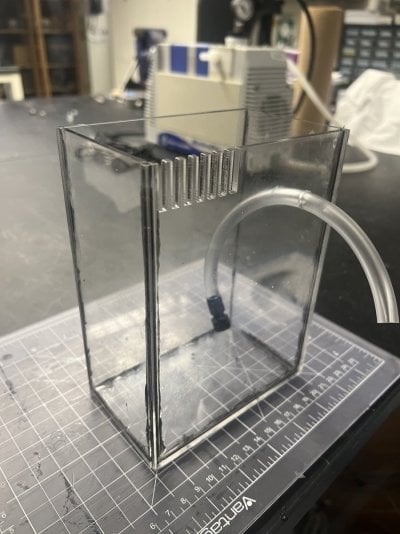
Now the pieces fit fairly well in the corner (before sealing)!

IMG_9518.jpg

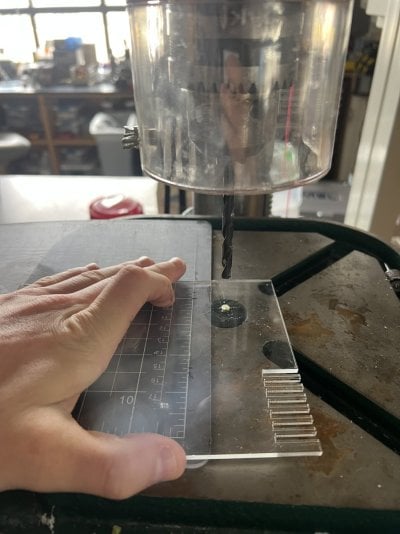
I manually drilled the return hole with a drill press because I was too lazy to measure my tubing - this I may also fix in the "pro" version, but we'll see...

IMG_9519.jpg

^^ Still fits in well with the return pump and heater - I'll have to double check when I cut the baffles - might need to make them out of 1/16" acrylic as it's getting tight...

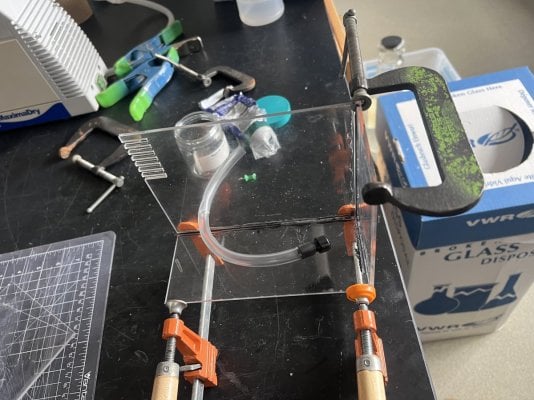
Currently, I'm letting some silicone seams set overnight. I did a slightly embarrassing job with them, but it's just a prototype, so who cares. I'm pleased with how the project is coming so far. Since the seams don't have to hold any serious pressure and the box is flush against the tank glass, I have some room for "good enough", which I appreciate!

My sheets of black cast acrylic come in on Wednesday, so I should have the "pro" AIO box finished by the end of the week.

And here's an unsolicited fishing pic to prove I didn't completely skunk before the sky opened up!

IMG_9530.jpg
 

Attachments

  • IMG_9536.jpg
    IMG_9536.jpg
    157.5 KB · Views: 39
  • IMG_9521.jpg
    IMG_9521.jpg
    195.9 KB · Views: 42
  • IMG_9518.jpg
    IMG_9518.jpg
    143.5 KB · Views: 46
OP
OP
monocot

monocot

New Member
View Badges
Joined
Apr 13, 2024
Messages
14
Reaction score
14
Location
New England
Rating - 0%
0   0   0
Alright so I got some materials in and made some progress!

Mangrove_AIO.png


Here are my final dims for the edited cuts - r2r won't let me upload .svg or .dxf files, but if anyone buys the exact same tank and wants to do a similar DIY project, shoot me a PM and I can send you all the proper files for laser cutting.

IMG_9551.jpeg

^ Here's some sleek, sexy 1/8 inch black acrylic - 10$ shipped for the two pieces


IMG_9555.jpeg

And the cuts look really clean!


IMG_9558.jpeg


And here's what it looks like before I do the seams and drill the return. I think it's going to be really cool! The angle here is a tad tricky - for context, the whole AIO insert assembly is 3.5 inches long (thick?) and the tank is 18 inches, so theres still 14.5" of water space (14.5"x5.5x7.1" LWH occupied space). That comes out to roughly 2 1/4 gallons of usable water - a true pico tank for sure!

Meanwhile, I also ordered a bunch of dry rock, which should come in over the weekend. I'm not going to add any live rock here because I don't have any on hand and it would be such a small quantity anyways. I am going to add in a bit of sediment from one of the seagrass tanks I've had running in the lab for a few years which will be chock full of bacteria with virtually every nitrogen metabolism imaginable. Plus, I use NSW so that should be good too. I'm not particularly worried about bacteria here.

The only major decision I have to make at this point is lighting. I'm thinking about just getting this one because it's cheap and has halfway decent reviews (Hygger 30W), but I'm not totally convinced. This is such a teeny (and shallow) tank, so I don't need much coverage, but I do want something that works. Anybody have thoughts/advice on this?

The first silicone seams for the AIO box are setting as I write, and I should be able to test it out with water this weekend. Fun stuff!
 
OP
OP
monocot

monocot

New Member
View Badges
Joined
Apr 13, 2024
Messages
14
Reaction score
14
Location
New England
Rating - 0%
0   0   0
Couple of moves this week! I got my ATO system and reservoir in. I opted for a 1.5 L reservoir because the tank volume is pretty small and all of his has to fit on my desk. The one I bought is intended for dosing, or at least use with one of those "lifting pumps" so it just has a straw. I made a few adjustments to the system and now it's all set.

IMG_9623.jpg


I also finished the last baffle for the AIO insert and the silicone is drying at the moment. I'll do a flow test tomorrow and if it works, I'll add the last bit of silicone to slot the thing in. So far, I'm pretty stoked on how it's turning out!

IMG_9625.jpg
IMG_9626.jpg
IMG_9627.jpg


I also got a shipment of dry rock in - way more than I need for this tank, but good to have on hand. I have my scape pretty much figured out, and I'll post a pic with the next update.
 
OP
OP
monocot

monocot

New Member
View Badges
Joined
Apr 13, 2024
Messages
14
Reaction score
14
Location
New England
Rating - 0%
0   0   0
Big moment! The silicone dried, I rinsed and leak tested, and got the tank wet (and salty) this morning!

IMG_9683.jpg
IMG_9684.jpg


Not fully wedded to this exact scape, but these are the bits of rock I have, so it'll probably be something close to this. I did also move the larger rock a bit further from the front glass since this photo.

The flow is pretty strong with just the return. It's very laminar, but since I'm shooting mostly for mangroves and macro, I dont think it should be a big issue. Worse case, I'll cut or print a little attachment to the return tube that'll break things up a bit.

At this point, the only serious hardware I still need to figure out is a light! Still figuring out how much I want to spend and whether I want to go mostly plant centric, or keep options open for some corals. We'll see, and I have time.

I also want to cut a lid for it with a cutaway for the mangroves. I really want to do the rim with neon green/yellow acrylic (like this) that matches the lid of the ATO as I think that would look super cool. Like a 1 or 1/2 cm ring around the outside in that color and then 1/16" clear acrylic in the middle for the light to get through. Either way, I'll def need a lid at some point to slow down evap.

All in all, I'm pleased! It turned out pretty much exactly how I intended, and depending on the light, right on the budget. As you can imagine, I'm already wishing I could have gone for a substantially larger tank, but this is all that reasonably fits on my desk and I'm pretty pumped! I ordered some mangrove propagules from Etsy, so things are moving. Not too worries about tossing them in during a cycle as they're probably not going to care much about a little extra fertilizer in there.
 
OP
OP
monocot

monocot

New Member
View Badges
Joined
Apr 13, 2024
Messages
14
Reaction score
14
Location
New England
Rating - 0%
0   0   0
IMG_0116.jpeg
IMG_0117.jpeg
IMG_0118 2.jpeg


Been a few weeks and time for an update. Things are going quite well! I have a half dozen mangrove pods in the tank now that seem to be perking up a bit and putting out a few first leaves. I ended up going with the NICREW 30W light, which fits quite nicely with this setup. It's tuned pretty far down, but I'll see if I change things up when the mangroves grow up a bit. I had underestimated how much eyestrain a reef light has when you're working all day on a laptop (hence the screen to cut glare) but it's not too bad.

Given I have a huge NSW tank about 30' from this little tank, I haven't been paying too much attention to parameters, aside from adding some fish food to jumpstart the cycle. It takes max 3 minutes to do a 90% water chance on this baby - one of the few advantages of a pico setup.

The AIO setup I built is working really well and I'm pleased with it! The only thing that stinks is the ATO reservoir only last about four days with all the evap. I have a bit of acrylic to cut a lid for the tank with a hole in the spot with all the propagules. Next step after that I think will be to pickup some decorative macroalgae and maybe test out a couple zoanthids or GSPs. Not planning to push it at all with stocking in this little tank, but a few colorful corals and algae species would be quite cool. If I eventually get some real nutrients in there, I'll probably toss a couple snails in for a CUC, but we'll see.

Let me know if you have any comments, questions or criticisms!
 
OP
OP
monocot

monocot

New Member
View Badges
Joined
Apr 13, 2024
Messages
14
Reaction score
14
Location
New England
Rating - 0%
0   0   0
This is awesome! Do you plan to add any livestock?

Still figuring out my "stocking plan", but I'll put a few things in there! I'm definitely sticking with inverts given the tiny water volume, but I still have to figure everything out. I do a lot of fieldwork in the Caribbean, so I'm kind of tempted to try a Caribbean biotope, but I can't really fit any gorgonians which are a fixture. Plus, I also have a whole pile of experimental aquaria in the lab that are Caribbean dominated (They're essentially just Thalassia monocultures....). Either way, I might try and get my hands on a Ricordia or two to start off the stocking list. I also have to figure out a little CUC - maybe just snails. I'm open to any suggestions!
 
OP
OP
monocot

monocot

New Member
View Badges
Joined
Apr 13, 2024
Messages
14
Reaction score
14
Location
New England
Rating - 0%
0   0   0
Couple of minor updates - the tank is starting to vaguely enter the"ugly stage" with what looks like a nice little diatom bloom. I'm pretty excited as it means things are moving along!

IMG_0201.jpeg
IMG_0202.jpeg


I did the first water change so far just to clear things out and keep the chemistry balanced. I use NSW, so I doubt it makes any substantial impacts to bacterial load. It took about 3 minutes to change 50% of the water - huge advantage of a pico reef!

Finally, I also got a substantially larger ATO reservoir for the tank. I had originally opted for a 1.5L reservoir and I wanted to put a lid on the tank with a cutout for the propagules, but I like the look of an open rimless tank so much better, and since I don't plan on stocking anything that could jump out, I just went with a larger (5L) reservoir. This should hold at least a week's worth of RODI water for top off - probably closer to 10 days, which is clutch, since I often go on expeditions and it stinks to have a lab mate top it off every three or four days. It's kind of bulky and detracts from the mini aesthetic a bit, but I'm pretty lazy...

IMG_0210.jpeg


As far as next steps, I think I'll grab some beginner corals maybe some other cool display macro algae soon. Perhaps also a couple snails for a CUC. I'm in the general Boston area, and it looks like European Aquatics is the closest/best LFS to me, so I suppose I'll wander in sometime soon when I have time to brave the traffic or am in the area... With a tank this teeny, it hurts a little bit to put in an order and pay for shipping as I can only fit a handful of corals, but we'll see once I keep a few corals alive and happy down the line a bit.

Once I get things going, I'm also considering starting to dose something like All For Reef through the ATO to enhance coral growth and such, but we'll see. It's so easy to do water changes that replenish trace elements and such, so I'm not too worried.
 

Eric R.

Well-Known Member
View Badges
Joined
Sep 23, 2019
Messages
698
Reaction score
765
Location
Vermont
Rating - 0%
0   0   0
Very cool setup, following!

I’m nearish to you, I live in Northern Vermont. Also am a newish high school science teacher. I have a 30” cube tank I want to setup in my classroom as a seagrass and mangrove tank, alongside our mixed reef tank and some other reef adjacent projects.

I’ve been growing mangroves in tanks and buckets for a few years with success, but am a bit concerned about trying seagrass, and they have a reputation in the hobby of being pretty difficult. Any suggestions for successfully keeping seagrass in glass boxes far from the ocean?
 
OP
OP
monocot

monocot

New Member
View Badges
Joined
Apr 13, 2024
Messages
14
Reaction score
14
Location
New England
Rating - 0%
0   0   0
Very cool setup, following!

I’m nearish to you, I live in Northern Vermont. Also am a newish high school science teacher. I have a 30” cube tank I want to setup in my classroom as a seagrass and mangrove tank, alongside our mixed reef tank and some other reef adjacent projects.

I’ve been growing mangroves in tanks and buckets for a few years with success, but am a bit concerned about trying seagrass, and they have a reputation in the hobby of being pretty difficult. Any suggestions for successfully keeping seagrass in glass boxes far from the ocean?

I'm always happy to chat seagrass and thanks for stopping by my thread! Seagrasses can be a little difficult to establish in tanks, but there are a couple of tricks I learned along the way that have made it much more doable.

First off (disclaimer), my experience is just with turtle grass (Thalassia testudinum), and I can't speak to all of the available seagrass species, but turtle grass is one of the most common and desirable species in the hobby, and I think most of the tips here should translate.

For any seagrass tank, you're going to have to run a pretty deep sand bed. They might survive with less sand, but 15-20 cm is a good number to shoot for. This can be quite difficult to maintain, but there are plenty of resources for DSB tanks on this and other sites. Mainly, I've found that it's important to keep on top of parameters, but useless to to chase numbers. People also worry a lot about the sulfide buildup - in my tanks, I actually add in sulfide and promote this because I study a symbiosis between Thalassia, a species of clam, and sulfide oxidizing bacteria, so I have to keep up with rapid sulfide consumption. In a regular tank dedicated to seagrass, this isn't going to be a huge issue as long as you have some things like snails digging in the sediment a bit. In the wild, Thalassia do fine up to 10 mmol sediment sulfide concentrations - realistically, it would take decades or more to hit this kind of level in a regular aquarium, unless you're just dumping in biomass. Seagrasses also pump oxygen down into their root system, so they can combat some of the sulfide buildup as well.

As far as sediment composition, the best thing to do is get your hands on some mud from the gulf coast and cut it with oolite for your mixture. Be careful, as collecting sand without a permit is illegal in a lot of places, but it's worth looking into. Obviously, that's a little tricky and expensive, so a mixture of Miracle Mud, "live" oolite, and a medium grain aragonite sand should be fine.

For sourcing seagrass, I only know of one website that reliably stocks healthy Thalassia and does a good job (https://aquaticusplants.com/). It's not cheap, but they're really liberal with quantities, and they've been very responsive. They actually aquaculture the stuff, rather than picking up washed up shoots from the beach after a storm.

This brings me to the most critical piece of info in my opinion for keeping seagrass: When you order shoots of seagrass, specifically request at least five shoots on the same rhizome.

This is essential! Thalassia are true grasses, and each of the shoots on a rhizome are clones. They share resources through the rhizome, but when you cut it, they can't regrow very well, and it takes a very long time (6-12 months at least) for them to heal and start putting out new rhiomes/shoots. A single shoot on a snip of rhizome is all alone, whereas shoots on the same rhizome can share resources and split the load a little.

My survival rate for single shoots is probably like 20%, for doubles it's probably 40% per shoot, but when I have 5 or more shoots together, I have a 100% survival rate, now for years down the line.

Before I had all my collection/import/export permits set for seagrasses, Aquaticus plants was awesome at sending me lots of shoots on the same rhizome when I asked for it. I actually think this is one of the number one reasons people say culturing seagrass is difficult in aquaria, but it's easy to overcome.

For other random things: I have cheap black box LEDs on my tanks. They grew better in the glasshouse under natural light, but the HVAC isn't good enough in our glasshouses to keep up with the now 95+ degree temps we regularly see in the Boston area. I still get great growth under cheap lights.

I have a tiny HOB filter on my tanks that I just use for cycling media through when things get funky. Otherwise, I just rely on a 20% WC every week. The seagrasses can get a little upset and release tannin type chemicals when they're getting settled, which gives the water a bit of a tea color. It's good to have some carbon ready to go when you put them in to suck all of that up.

For flow, I have two powerheads in each tank that mostly face each other to get some turbulent flow in there. Honestly, I think shooting for max (SPS level) flow is probably the best thing for them, as long as its turbulent. I've been tossed around countless seagrass beds while diving/snorkeling for research, and I think the seagrass really appreciate getting cleaned off and thrown around a bit. That being said, I've also worked on the same seagrass beds in dead still waters at low tide. These babies are found everywhere from ocean facing shores to super protected lagoons, so they're adaptable. For a practical approach, the more flow, the less you get algae and less desirable epiphytes growing on the blades. I usually run the blades of each shoot through my fingers when I do my weekly water change to loosely scrape off the algae a bit.

As with mangroves, try not to disturb the roots and rhizomes once they're in. It takes a ton of energy for them to make roots and rhizomes, and unlike breaking off a bit of coral, it can be hard for them to heal and bounce back.

Additionally, Thalassia does shed the outermost blades regularly, which have to be removed. In the tank pictured below, I pretty have one or more shed every day. This is a bit of a pain as they can clog your filter/powerheads, but it's usually not too much work to grab them every couple of days. Really nothing you can do about it, and it just means they're healthy!

Let me know if you have any more questions about seagrasses! I realize this is a bit of a haphazard info dump, but I had to do some experimenting when I started working with them since there's so little info online, so I'm happy to share my tips!

IMG_0220.jpeg
 
OP
OP
monocot

monocot

New Member
View Badges
Joined
Apr 13, 2024
Messages
14
Reaction score
14
Location
New England
Rating - 0%
0   0   0
Couple of updates! I finally hit the LFS near me to pick up some animals for the tank. I snagged two blue leg hermits (keeping with the Caribbean theme) . I also asked if they had any ceriths, which they didn't have in stock. No worries, but after a brief miscommunication, I ended up walking out with a couple Nassarius snails. The sandbed is wicked deep, so plenty of area for them to play around in, but since I don't plan to have fish or feed anything, I do have to feed them - ah well, it's fun to watch them pop out of the sand and eat.

I was wicked tempted to grab one of the sweet Ricordea they had lying around, but I panicked and went with a cheap candy cane coral to test things out before I drop more cash on nicer corals. Yikes, already broke the Caribbean biotope seal, but that was probably inevitable since there just aren't that many Caribbean corals I can have in a tank this short. 24 hours in and it seems to be doing fine - ironically, a slightly difficult coral to gauge how well things are in the tank since they don't really close up much. Either way, it looks reasonably puffed up, and all my inverts are cruising.

I don't think I'm going to add many more LPS corals to this tank since they're kind of chunky. If everything seems good for two weeks or so, I'll probably get a little zoa collection going and maybe test out a chunk of Montipora. I'm def going to cut everything off frag plugs once they get a little settled so I don't totally overwhelm the whole tank with frag plugs. I def prefer the look of corals without frag plugs, unless they're already quite encrusted. I've been dreaming up a scape and planning out my (limited) coral space, and maybe I'll draw it out a bit soon.

1718916812687.png
 
OP
OP
monocot

monocot

New Member
View Badges
Joined
Apr 13, 2024
Messages
14
Reaction score
14
Location
New England
Rating - 0%
0   0   0
IMG_0383.jpeg

Several of my other propagules are starting to pop out, which is really exciting stuff! Overall, the tank is really starting to come into form a bit.

The candy cane is a little peeved in this pic as I just had my hand in the tank, but overall has been looking quite good. I think my next step is grabbing a couple of Ricordea and perhaps getting a little colony of sexy shrimp going on in here. Would be pretty cool!

IMG_0384.jpeg
 

lbacha

Valuable Member
View Badges
Joined
Nov 16, 2017
Messages
2,160
Reaction score
2,877
Location
Cleveland
Rating - 0%
0   0   0
Nice looking setup, since you don’t have many inverts or fish you will probably need to add nutrients as those mangrove grow. I know when I wasn’t keeping nutrients up in my frag tank my big mangrove really didn’t grow much. Once I started dosing nitrate and phosphate again it took off again and is throwing tons of new leaves.
IMG_2664.jpeg
 
OP
OP
monocot

monocot

New Member
View Badges
Joined
Apr 13, 2024
Messages
14
Reaction score
14
Location
New England
Rating - 0%
0   0   0
Nice looking setup, since you don’t have many inverts or fish you will probably need to add nutrients as those mangrove grow. I know when I wasn’t keeping nutrients up in my frag tank my big mangrove really didn’t grow much. Once I started dosing nitrate and phosphate again it took off again and is throwing tons of new leaves.
IMG_2664.jpeg
Those mangroves look awesome! I'm definitely keen to get some solid growth so these guys can get established, but I have been a little hesitant to dump a bunch of nutrients in so far given the tiny water volume. What form have you been dosing them in? I have a huge bottle of f/2 that I've considered dosing starting at some teeny volume like 100ul and working my way up, but I'm open to anything!
 

lbacha

Valuable Member
View Badges
Joined
Nov 16, 2017
Messages
2,160
Reaction score
2,877
Location
Cleveland
Rating - 0%
0   0   0
I dose potassium nitrate and mono potassium phosphate. I buy it as bulk powder and mix my own solution. I would not dose unless you test regularly
IMG_2719.jpeg


I see you found a light but mangroves don’t need a fancy aquarium light. I use these par 30 led spotlights from Amazon and they are only $16. I have them over a lot of my houseplants and they work great.
IMG_2718.png
 
OP
OP
monocot

monocot

New Member
View Badges
Joined
Apr 13, 2024
Messages
14
Reaction score
14
Location
New England
Rating - 0%
0   0   0
Are you keeping everything at seawater salinity?

I am, yeah! I do spray the mangroves pretty much every weekday with RODI water, and I haven't many issues. These pods were picked up from the seashore, so full strength salinity is probably what they're used to. I did consider running it a little lower, but I wanted to keep stocking more open.

Now I keep thinking about how cool it would be to have a little rock flower anemone and Ricordea garden with a colony of sexy shrimp.
 

HAVE YOU EVER KEPT A RARE/UNCOMMON FISH, CORAL, OR INVERT? SHOW IT OFF IN THE THREAD!

  • Yes!

    Votes: 32 45.7%
  • Not yet, but I have one that I want to buy in mind!

    Votes: 9 12.9%
  • No.

    Votes: 26 37.1%
  • Other (please explain).

    Votes: 3 4.3%
Back
Top