Navigation
Install the app
How to install the app on iOS
Follow along with the video below to see how to install our site as a web app on your home screen.
Note: This feature may not be available in some browsers.
More options
You are using an out of date browser. It may not display this or other websites correctly.
You should upgrade or use an alternative browser.
You should upgrade or use an alternative browser.
Lets see your homemade stands
Built an all plywood stand for my 55g tank from 3/4" maple veneer ply, pocket screwed and glued together. No other fasteners. Still need to get the doors on it and stain it. First picture is a test fit. Second is before I added the face frame or other extra supports. Third pic is the inside showing the extra strips of ply I added for support.


Looks great! I like the all-ply build instead of stud frame, thats how id like to do the next one. Keep us updated when its finished!Built an all plywood stand for my 55g tank from 3/4" maple veneer ply, pocket screwed and glued together. No other fasteners. Still need to get the doors on it and stain it. First picture is a test fit. Second is before I added the face frame or other extra supports. Third pic is the inside showing the extra strips of ply I added for support.


I’ll bite, here’s my 180g stand I just finished. Wrapped in poplar wood and stained with red mahogany.

I built this out of red wood because it doesn't warp and the 4 X 4 legs are pressure treated. All the hardware are hot dipped galvanized steel at least 3/8" but some of it is 1/2" carriage bolts threaded all the way through with nuts. I didn't want any wood on wood where water could get in so I designed this to be very strong and simple. There is no sandwiched wood, plywood or screws.
It is 72" long.
It is behind a movable wall so you don't see any of it.

It is 72" long.
It is behind a movable wall so you don't see any of it.

Just finished this one. Check out my build thread.


nice!I’ll bite, here’s my 180g stand I just finished. Wrapped in poplar wood and stained with red mahogany.

Here's mine!
Family was bugging me about the fishes so I taped a pic of Nemo!
Don't have a recent FTS...!
Painted the sump area with Flex Seal Paint!


Family was bugging me about the fishes so I taped a pic of Nemo!
Don't have a recent FTS...!
Painted the sump area with Flex Seal Paint!
Very nice!Here's mine!
Family was bugging me about the fishes so I taped a pic of Nemo!
Don't have a recent FTS...!
Painted the sump area with Flex Seal Paint!


Looks Great!Here's mine!
Family was bugging me about the fishes so I taped a pic of Nemo!
Don't have a recent FTS...!
Painted the sump area with Flex Seal Paint!


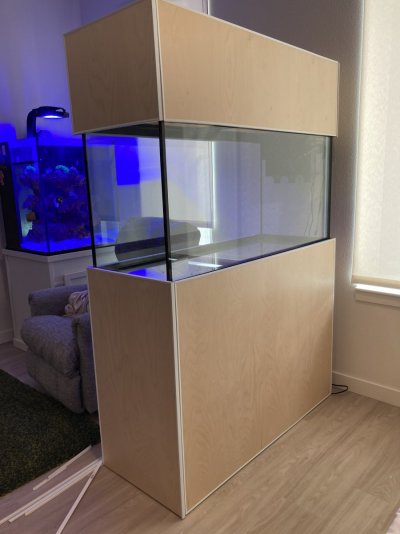
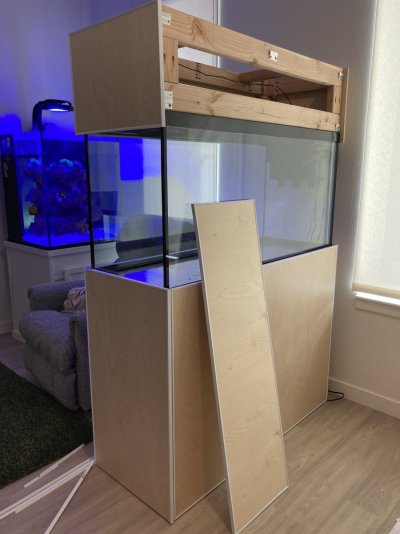
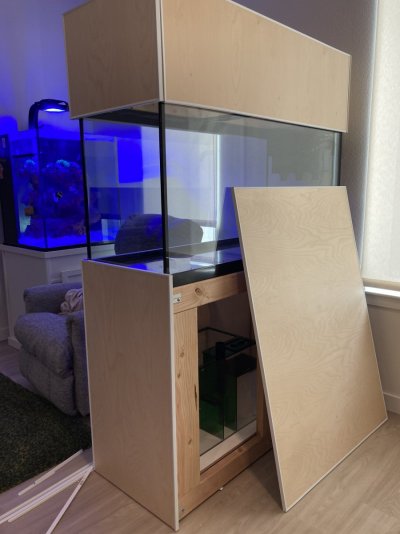
Latest stand is 2x6 and 2x4 pocket jig construction, with 1/2" modular birch panels that can be removed from both ends with aluminum Z-Clips. The front and back panels are permanently attached for additional stability. I was worried about trying to line up the clips so that everything lined up flush, but it was easier than expected. Highly recommend them! I am still in the process of putting an edgebanding on the corners of the panels.
Great looking stand and canopy! Do you have plans you’d be willing to share.
Nothing special, and my word working skills are..... Non existent?
Just a simple 3/4 birch ply sides with 31/32 CDX ply for the top and bottom. No doors yet in these pics, but I just finished painting it. Sump in one side, and electrical in the other.


Tank will be tore apart and sat in tubs for 3 days while they put down the new floor you can see in those pics.
Just a simple 3/4 birch ply sides with 31/32 CDX ply for the top and bottom. No doors yet in these pics, but I just finished painting it. Sump in one side, and electrical in the other.
Tank will be tore apart and sat in tubs for 3 days while they put down the new floor you can see in those pics.
Lol, would love too! But, i dont have any plans. Just kinda winged it. I litterally stood in the garage staring at it untill it took shape in my mind, and then translated it to reality(mostly). I can get you some measurements if youd like though and my build thread has a few pics of construction. Let me know if you have specific questions and ill do my best to get you what you need!Great looking stand and canopy! Do you have plans you’d be willing to share.
Thanks man. Measurements would be great if it’s no trouble.Lol, would love too! But, i dont have any plans. Just kinda winged it. I litterally stood in the garage staring at it untill it took shape in my mind, and then translated it to reality(mostly). I can get you some measurements if youd like though and my build thread has a few pics of construction. Let me know if you have specific questions and ill do my best to get you what you need!
Last edited:
Similar threads
- Replies
- 4
- Views
- 152
- Replies
- 5
- Views
- 243
- Price: 900obo
- Shipping NOT Available
- Replies
- 10
- Views
- 815


