**HELP** S.O.S IM 200 EXT Sump/plumbing

reefadelphia

New Member
View Badges
Joined
Nov 3, 2023
Messages
7
Reaction score
6
Location
usa
Rating - 0%
0   0   0
Hello Everyone,

I am sending up a prayer that the community can help me here. This is my first post, and I have used the search feature to help me first before posting but I cant exactly find a basic enough explanation to help me here.

I am brand new to sumps, but always wanted a giant planted aquarium. I know this is mainly a saltwater forum, but this is by far the largest community of sump/AIO tank people around and your knowledge will greatly help me.

I just ordered an IM 200 EXT. Its on the stand, empty, ready to be plumbed. I really underestimated my lack of experience here, because their build video really did nothing but confuse me, and when I look at other people's builds I cant tell if theyre using their own plumbing because you have to, or because they just want to, or if my IM plumbing was sent to me totally wrong.

From the video IM has posted to build the plumbing/sump, it appears the main drain line looks totally different from what I have, and I'm missing some hoses, and I can't figure out why I'm removing the drain plate on it and replacing it with another one. It's really not clear to me what connections go where and where to even start to fix this.

Can anyone who has plumbed an EXT fill me in a little and help out? I will post pictures later to exemplify my issues.
 

esquare

Well-Known Member
View Badges
Joined
Apr 10, 2017
Messages
650
Reaction score
694
Location
Northwest Indiana
Rating - 0%
0   0   0
I have never had an IM system and I'm not sure what video you are referring to but a quick review of the IM 200 EXT page indicates they are using a BeanAnimal Overflow/Drain (system named after the gentleman that developed it). This system uses 3 drain lines with the first being a full siphion (just like you would use to drain water when you do water changes) on one line which is regulated by a ball or preferably gate valve close to the sump. The 2nd line is a coincindently, secondary drain which usually has a small trickle of water draining to help balance the system. The 3rd line is an emergency line which should stay dry unless the first 2 drains clog or can't keep up for some reason. If water is going down the emergency tehn you have a problem and should investiget right away.

Hopefully this gives you a basic overview but I would suggest you google BeanAnimal Overflow and familiarize yourself with the system.
 
OP
OP
reefadelphia

reefadelphia

New Member
View Badges
Joined
Nov 3, 2023
Messages
7
Reaction score
6
Location
usa
Rating - 0%
0   0   0
I have never had an IM system and I'm not sure what video you are referring to but a quick review of the IM 200 EXT page indicates they are using a BeanAnimal Overflow/Drain (system named after the gentleman that developed it). This system uses 3 drain lines with the first being a full siphion (just like you would use to drain water when you do water changes) on one line which is regulated by a ball or preferably gate valve close to the sump. The 2nd line is a coincindently, secondary drain which usually has a small trickle of water draining to help balance the system. The 3rd line is an emergency line which should stay dry unless the first 2 drains clog or can't keep up for some reason. If water is going down the emergency tehn you have a problem and should investiget right away.

Hopefully this gives you a basic overview but I would suggest you google BeanAnimal Overflow and familiarize yourself with the system.
THank you for the reply!

So, my post was probably a little confusing. My fault. I understand the way a sump is supposed to work, the animal bean for the most part, although later on i may need more details answered if I choose to install a true animal bean with the 90* piping.

My confusion right now is with the IM itself. The instructional video parts and my own parts don't match exactly. I spent a bit of the morning trying to figure it out with a fresh mind and it appears what was confusing me was largely that their unions are in different places in the instructional video and in the kit i received.
But I still have a few questions I can't quite figure out. I brought pictures this time.

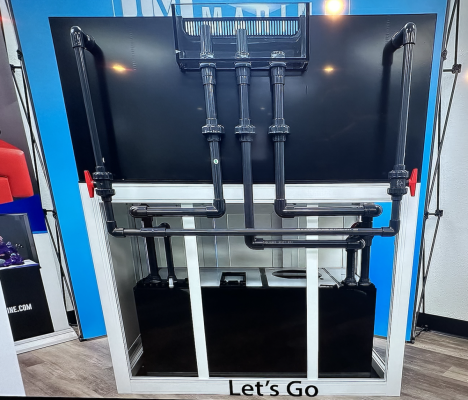
This is the complete setup shown in the video. If you notice, the drains have unions right after the drain at the top of the PVC piping. I still am very confused if I am just missing a part because when you look at my setup, im not sure my main drain will be long enough. It appears to be much smaller. Maybe just my eyes playing tricks.

IM Instructional video setup.png

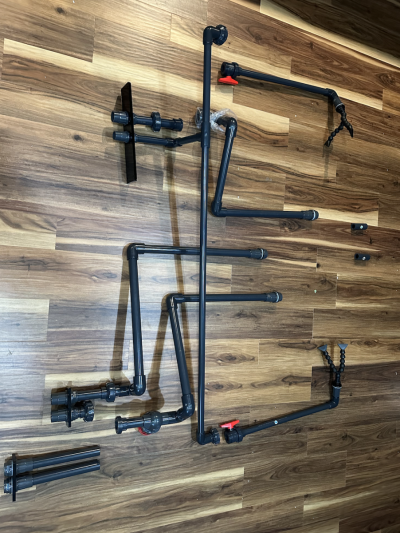
This is the kit I received laid out to the best of my ability on the floor. Excuse the debris, a lot of boxes were opened the last few days (aquarium, lights, sump, etc)


MY SETUP.png
If you notice here, I dont have that union as shown in the instructional video. Mine is way down by the ball valve and right above where it attaches into the sump. I just have bulk heads and the line. I am wondering if the video shows the 75 EXT and not the 200, and that explains the difference. Its a lot harder to get behind the 200 to screw so perhaps they just put it lower so you can reach it under the cabinet, but I want to know what I'm doing before I set it up and get even more confused. So if anyone has a 200 EXT please chime in!


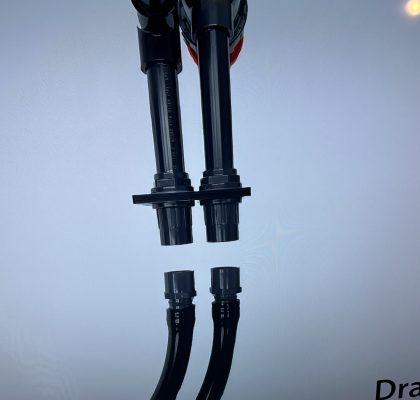
Here's where my heads out now. The video has you unscrew the drain plate, and attach rubber hoses to the main drain and secondary drain. Like this:

Screen Shot 2024-01-20 at 12.05.09 PM.png


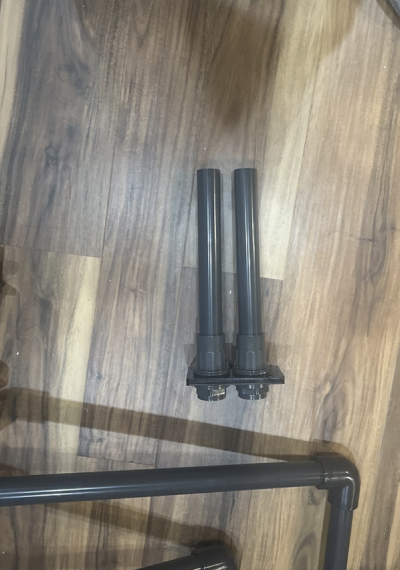
My kit came with no tubing at all. Instead, when you take out the drain plate it is long PVC pipes that look like this:

Screen Shot 2024-01-20 at 12.05.57 PM.png

Is this a typical way to plumb a sump instead of a tube? Is it louder? I want to make the sump as silent as possible, and if I have to go out and buy other attachments to ensure this is the case, I will do so. But I will need someones guidance on the right attachment to insert into the bulkhead to attach a hose.

Another question for the EXT 200 owners though....were you left with an extra drain plate at the end? I'm a little confused. It has you remove one from the sump attached to hoses (or in my case PVC pipes), and then unattach your drain pipes from a plate theyre already attached to (see picture of entire setup) and re attach to the plate you took off the sump. So youre left with a plate youre not using and some bulk heads, which seems strange. Why wouldnt they just leave the tubing off instead of having an extra plate for no reason and bulkheads? I must be missing something.


If anyone needs more clarity on what I mean I can provide. This is kind of hard to explain without being here looking at what I'm looking at, so I did my best with the pictures


Thank you to anyone who takes the time to read this and help me. I can pay it forward if anyone ever has any freshwater/plants/freshwater fish and husbandry questions! Greatful for this community.
 

TangerineSpeedo

2500 Club Member
View Badges
Joined
Jun 8, 2022
Messages
2,758
Reaction score
4,298
Location
SoCal
Rating - 0%
0   0   0
Hard to tell exactly from your pictures. But I think they gave you two options for your drain plate. One for hard plumbing and one for soft. I think the two little pieces in the right of your picture are the adapters. You would choose one or the other depending on your filtration.
As a side note: I would cut and add unions before the bottom of the level of your tank (like in their example) because if you ever have to move your tank you can set it down without 3 ft of plumbing hanging off it.
 

X-37B

Fight The Good Fight
View Badges
Joined
Sep 10, 2018
Messages
9,679
Reaction score
16,824
Location
The Outer Limits
Rating - 0%
0   0   0
I have the ext 170. Your plumbing is exactly like mine. No unions.
Just put it togther like you have it laid out. The emergency overflow that goes near the return needs no pipe or hose. The hose is for the return.
The extra plate is just how they ship it.
The two long pieces go into the bottom of the overflows, main and second.
 
OP
OP
reefadelphia

reefadelphia

New Member
View Badges
Joined
Nov 3, 2023
Messages
7
Reaction score
6
Location
usa
Rating - 0%
0   0   0
I have the ext 170. Your plumbing is exactly like mine. No unions.
Just put it togther like you have it laid out. The emergency overflow that goes near the return needs no pipe or hose. The hose is for the return.
The extra plate is just how they ship it.
The two long pieces go into the bottom of the overflows, main and second.
Thanks so much for your response.

SO basically, you have it connected and it just falls straight down into your drain chamber? no hose no pipe? Is that really noisy? I want to make this as silent as possible so any info ahead of time will help me

Also, do you know what the deal is with those PVC pipes you take out of the return chamber initially (all the way to the bottom right of my picture). Are you just not using those? What are they there for?
 

X-37B

Fight The Good Fight
View Badges
Joined
Sep 10, 2018
Messages
9,679
Reaction score
16,824
Location
The Outer Limits
Rating - 0%
0   0   0
Thanks so much for your response.

SO basically, you have it connected and it just falls straight down into your drain chamber? no hose no pipe? Is that really noisy? I want to make this as silent as possible so any info ahead of time will help me

Also, do you know what the deal is with those PVC pipes you take out of the return chamber initially (all the way to the bottom right of my picture). Are you just not using those? What are they there for?
Those tubes go into the bottom of the main overflow and the one next to it which is the scondary overflow. You want a trickle of water to flow into it. You control the level with the gate valve.
In your layout they go into the far left two holes under the plate.
 

esquare

Well-Known Member
View Badges
Joined
Apr 10, 2017
Messages
650
Reaction score
694
Location
Northwest Indiana
Rating - 0%
0   0   0
I just saw your avatar, cute, I have a Boston as well.

The Beananimal drain is probably as quiet as you're going to get due to the majority of the water being full siphon and only a trickle going down the secondary.

Hard plumbing the drain is a pretty normal way of doing the install, as you can see in mine below on the left side of the pic. But you will probably want a flexible hose for a short distance connected to the return pipe to isolate any vibrations. You can see this in my sump setup below on the right of the pic. I have 2 return pumps so there are 2 clear/opaque silicone tubes connected to the red vertical pipe.

Disregard the red circled area, i used the pic for something else previously.

https://www.bulkreefsupply.com/white-soft-silicone-tubing-sold-by-the-foot.html

DOS.jpg
 
OP
OP
reefadelphia

reefadelphia

New Member
View Badges
Joined
Nov 3, 2023
Messages
7
Reaction score
6
Location
usa
Rating - 0%
0   0   0
Hard to tell exactly from your pictures. But I think they gave you two options for your drain plate. One for hard plumbing and one for soft. I think the two little pieces in the right of your picture are the adapters. You would choose one or the other depending on your filtration.
As a side note: I would cut and add unions before the bottom of the level of your tank (like in their example) because if you ever have to move your tank you can set it down without 3 ft of plumbing hanging off it.
Thank you
Those tubes go into the bottom of the main overflow and the one next to it which is the scondary overflow. You want a trickle of water to flow into it. You control the level with the gate valve.
In your layout they go into the far left two holes under the plate.
youve been so helpful man i really appreciate it. Question, did you use those cotton like balls the media chambers came with? They seem kind of inefficient. I probably want to replace those with some more porous rocky media or bio balls right?
 
OP
OP
reefadelphia

reefadelphia

New Member
View Badges
Joined
Nov 3, 2023
Messages
7
Reaction score
6
Location
usa
Rating - 0%
0   0   0
I just saw your avatar, cute, I have a Boston as well.

The Beananimal drain is probably as quiet as you're going to get due to the majority of the water being full siphon and only a trickle going down the secondary.

Hard plumbing the drain is a pretty normal way of doing the install, as you can see in mine below on the left side of the pic but you will probably want a flexible hose for a short distance connected to the return pipe to isolate any vibrations as you can see in my sump setup below on the right of the pic. I have 2 return pumps so there are 2 clear/opaque silicone tubes connected to the red vertical pipe.

https://www.bulkreefsupply.com/white-soft-silicone-tubing-sold-by-the-foot.html

DOS.jpg
Awesome setup! So I guess what they say is that its not a "true" bean animal because it doesnt have the 90* pipes with the hole drilled out. Do you think that would be quieter if I added those to my overflow, or will it be just the same with an open pipe/bulkhead as it comes stock.

Ive seen people say they've gotten their sumps completely pin drop silent and I want to achieve that so when I'm watching movies or hanging out I don't hear that in the background. Its a pretty big deal for me, I have a low tolerance for noise haha. I went through several air pumps and many people telling me there was no such thing as a silent air pump until i actually found one so Im willing to mess around with stuff. I just want to start with the best advice up front. Ive heard mixed things about the Mighty Jet XL that comes with this sump so we will see!

The back of this cabinet is also open for the plumbing so it will have to be largely mechanical efficiency and less sound proofing layering when it comes to combating noise issues.

Thanks for your reply! hope you guys will be interested when I get a planted freshwater up and running, id love to share this with everyone.
 

X-37B

Fight The Good Fight
View Badges
Joined
Sep 10, 2018
Messages
9,679
Reaction score
16,824
Location
The Outer Limits
Rating - 0%
0   0   0
Thank you

youve been so helpful man i really appreciate it. Question, did you use those cotton like balls the media chambers came with? They seem kind of inefficient. I probably want to replace those with some more porous rocky media or bio balls right?
Yea those balls are now my endless supply of cat retrievers, lol.
I use mesh socks to catch the big stuff amd use one cup for media if needed.
 

esquare

Well-Known Member
View Badges
Joined
Apr 10, 2017
Messages
650
Reaction score
694
Location
Northwest Indiana
Rating - 0%
0   0   0
Awesome setup! So I guess what they say is that its not a "true" bean animal because it doesnt have the 90* pipes with the hole drilled out. Do you think that would be quieter if I added those to my overflow, or will it be just the same with an open pipe/bulkhead as it comes stock.

Ive seen people say they've gotten their sumps completely pin drop silent and I want to achieve that so when I'm watching movies or hanging out I don't hear that in the background. Its a pretty big deal for me, I have a low tolerance for noise haha. I went through several air pumps and many people telling me there was no such thing as a silent air pump until i actually found one so Im willing to mess around with stuff. I just want to start with the best advice up front. Ive heard mixed things about the Mighty Jet XL that comes with this sump so we will see!

The back of this cabinet is also open for the plumbing so it will have to be largely mechanical efficiency and less sound proofing layering when it comes to combating noise issues.

Thanks for your reply! hope you guys will be interested when I get a planted freshwater up and running, id love to share this with everyone.
Thank you

Not sure if the elbows will affect noise levels but I always take noise claims with a grain of salt as 1 person's "Dead Silent" could be another persons "Unbearably Loud". The elbows would be easy enough to ad and remove to test out, just don't use any pvc cement on them as they will be inside the overflow box and it won't matter if they have a tiny leak. I don't think you're supposed to use cement on the short vertical pipes in the overflow anyway.
 

Tangy Reefer

Community Member
View Badges
Joined
Jan 13, 2024
Messages
54
Reaction score
46
Location
Normal
Rating - 0%
0   0   0
I remember thinking the exact same thing when I got my plumbing, but I called IM and they told me the video is shows their older plumbing as they updated it and moved the unions that were behind the tank just under the overflow box to under the stand by the sump for easier access if you need to take apart for maintenance. It makes sense. They just need to update their installation videos . . .
 

wrongpolo

Community Member
View Badges
Joined
Sep 12, 2013
Messages
78
Reaction score
35
Location
Rockford IL
Rating - 0%
0   0   0
@wrongpolo I am having the same noisy issues with my 100 NUVO ext. sounds like an old washing machine.
I got mine dialed in by having the secondary drain just BARELY flowing over the pipe. Any more than that it got noisy and any less it would "flush" once every couple days. I adjusted the gate valve like 2-3* at a time, so BARELY moving it lol
 

code4

Valuable Member
View Badges
Joined
May 3, 2015
Messages
1,634
Reaction score
2,528
Location
wyoming
Rating - 0%
0   0   0
I got mine dialed in by having the secondary drain just BARELY flowing over the pipe. Any more than that it got noisy and any less it would "flush" once every couple days. I adjusted the gate valve like 2-3* at a time, so BARELY moving it lol
Thanks. I will have to work more with it. I don’t have an ATO though. There is just no room for one in the cabinet.
 

Naekuh

Valuable Member
View Badges
Joined
Feb 2, 2022
Messages
1,041
Reaction score
1,069
Location
Los Angeles
Rating - 0%
0   0   0
You have the return and drain flipped.

When looking at the tank.
This is the kit I received laid out to the best of my ability on the floor. Excuse the debris, a lot of boxes were opened the last few days (aquarium, lights, sump, etc)


MY SETUP.png
If you notice here, I dont have that union as shown in the instructional video. Mine is way down by the ball valve and right above where it attaches into the sump. I just have bulk heads and the line. I am wondering if the video shows the 75 EXT and not the 200, and that explains the difference. Its a lot harder to get behind the 200 to screw so perhaps they just put it lower so you can reach it under the cabinet, but I want to know what I'm doing before I set it up and get even more confused. So if anyone has a 200 EXT please chime in!


Here's where my heads out now. The video has you unscrew the drain plate, and attach rubber hoses to the main drain and secondary drain. Like this:

Screen Shot 2024-01-20 at 12.05.09 PM.png


My kit came with no tubing at all. Instead, when you take out the drain plate it is long PVC pipes that look like this:

Screen Shot 2024-01-20 at 12.05.57 PM.png

When the sump is in your tank, the drain should be on the left side, and return on the right.
The first picture you have the two parts flipped around.

As for the return you need to rotate 180 degrees.

piping.JPG


This should be how it looks like from the REAR.

help.JPG


Ack i see its an old necro post.... Sigh...
 
Back
Top