Dr, Jim's SPS: (NewCamera)

OP
OP
Dr. Jim

Dr. Jim

Valuable Member
View Badges
Joined
Nov 30, 2019
Messages
1,345
Reaction score
1,093
Location
Naples, FL
Rating - 0%
0   0   0
Canon isn’t wrong, but that setting is primarily for studio work where you have control of all the lightings. By setting, I meant your Radion’s. A dedicated setting closer to 10,000K where the camera doesn’t have to struggle so much. If you use the card with every photo you can use the W hite Point setting to fine tune every photo. What photo editing software do you use? Some of the more basic ones don’t have this option so you’d want to use Canon’s recommendation.

FYI RAW images give you 5-10 ‘steps’ of exposure adjustment (JPEG lock you to one exposure with little flexibility). If you look at the histogram of each photo you’ll see RED, GREEN and BLUE color mountains separated by little vertical lines. Each line represents a ‘stop’ which can be adjusted. You generally want all three colors to be centered. Anything that falls off the right or left side of photos is lost information. Keep this in mind while you are adjusting camera settings when taking photos.
I take my photos when the halides are on so they wash out the blues from the radions.

If I use the grey card with every photo, you said I can use the White Point Setting (WPS). The WPS isn't something I recall reading about in the Canon manual. I wonder if they call it something else; perhaps, Custom White Balance (CWB)? I have played around with the CWB but with that I shoot the grey card and set that as "white" for all the following photos. I'm not sure how to adjust the white balance for every photo with the grey card in the picture but that sounds interesting.

I load the photos onto Canon's Digital Photo Professional where I crop the photo and with the Histogram I can "bend" the three curves (Red, Green, Blue). The histogram is on a grid with 16 boxes but I don't see the "little vertical lines" you mentioned, nor do I see how the three colors can be "centered." I'll have to admit that I don't have a thorough understanding of what all I can do with the histogram box other than "bend" the 3 color curves.
I then transfer it to Adobe Photoshop Elements 2020 where I play around with other features.
 

Reef Psychology

Active Member
View Badges
Joined
Jul 15, 2020
Messages
296
Reaction score
286
Location
Flower Garden Banks
Rating - 0%
0   0   0
I take my photos when the halides are on so they wash out the blues from the radions.

If I use the grey card with every photo, you said I can use the White Point Setting (WPS). The WPS isn't something I recall reading about in the Canon manual. I wonder if they call it something else; perhaps, Custom White Balance (CWB)? I have played around with the CWB but with that I shoot the grey card and set that as "white" for all the following photos. I'm not sure how to adjust the white balance for every photo with the grey card in the picture but that sounds interesting.

I load the photos onto Canon's Digital Photo Professional where I crop the photo and with the Histogram I can "bend" the three curves (Red, Green, Blue). The histogram is on a grid with 16 boxes but I don't see the "little vertical lines" you mentioned, nor do I see how the three colors can be "centered." I'll have to admit that I don't have a thorough understanding of what all I can do with the histogram box other than "bend" the 3 color curves.
I then transfer it to Adobe Photoshop Elements 2020 where I play around with other features.
Oh wow, it's been years since I've used canon's bundled software. I'm not entirely sure if you can set white balance, but probably not.

Sorry, White/Black points are a little more advanced. I shouldn't have mentioned it. Basically, you tell your software what the white & black point are and this has the visual effect giving your image more POP without exaggerating colors.

Histogram's are the bread and butter of photography. Your camera can display a "Live Histogram" in the viewfinder. You can click on the "Info" button while looking through the eyepiece or turn on the feature in your "Display" settings. I left Canon for Fuji so you'll have to look in your manual.

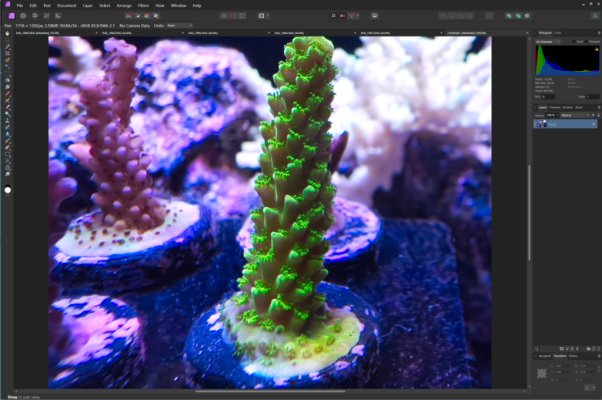
You have to shoot RAW and be in RAW editing mode to see the little lines in the Histogram. There will be five vertical lines. Example (see how when centered the image is neither too dark nor too light). RAW saves data +2.5 steps higher and -2.5 steps lower. You can slide your exposure 2.5 up or 2.5 lower than your original photo. So if you mess up, you have room to adjust. Shooting JPEG only gives you 1 exposure and very little room to adjust. The confusing part is your software may say it can go +5/-5 steps, but that's not really true as it's limited by the camera. The software will extrapolate after 2.5. And what I mean by "step" is all saved data like exposure, Curves and brightness (aka Curves). The Histogram is a visual representation of these steps and to adjust them you have to change the "Curves" for Red, Green, Blue, and Luminance.

Example. You take a photo and the blue's are WAY too bright. So, you can view your Histogram, switch to Blue's, and reduce them up to a factor of 2.5 lower without messing up your entire photo (you'd have to create something called a "Mask"). This tool is VERY powerful and can save a bad image from the garbage can.

If I remember correctly, Photoshop Elements allows you to mess with Curves and Levels, but I don't think it's very robust. In Photoshop you can make adjustments to every channel.

If you like we can go more in-depth with this tomorrow when I have time to take out the camera. I took a few photos with my iPhone as an example. The Histogram is at the top right corner. See how the peaks for RGB are way to the left and right? There's also a little yellow sign. That means there is a lot of blown out portions. The large acro in the center back is white because I set the WB on a whiteish spot near the frag.
 

Attachments

  • example.jpg
    example.jpg
    630.8 KB · Views: 51
Back
Top