Janci

Staghorns will prevail
View Badges
Joined
Mar 14, 2016
Messages
3,005
Reaction score
9,317
Location
Belgium
Rating - 0%
0   0   0
Wow... and from all what you wrote above I remember: "Make it look awesome".
You certainly do.

And do not tell us that the best part of reefing is not the planning, researching, comparing, reading, fabricating, installing, testing and hoping it will all work as planned...

I love the frag tank / overflow system to reuse the display tank water.
 
OP
OP
choss

choss

Well-Known Member
View Badges
Joined
Jul 29, 2015
Messages
809
Reaction score
802
Location
Scarsdale New York
Rating - 0%
0   0   0
Wow... and from all what you wrote above I remember: "Make it look awesome".
You certainly do.

And do not tell us that the best part of reefing is not the planning, researching, comparing, reading, fabricating, installing, testing and hoping it will all work as planned...

I love the frag tank / overflow system to reuse the display tank water.

Janci - I couldn't agree more. I love the planning and building as much as the eventual outcome. I still have so much to do before I even get the tank on the stand but I'm starting to see some progress. I still have a few twists to get to - my lighting will be a bit of an experiment but more on that later.
 
OP
OP
choss

choss

Well-Known Member
View Badges
Joined
Jul 29, 2015
Messages
809
Reaction score
802
Location
Scarsdale New York
Rating - 0%
0   0   0
A nice package arrived today. The final pieces are coming in. Hopefully I will have a productive weekend and get closer to getting the tank on the stand.

upload_2017-8-4_10-48-53.png


upload_2017-8-4_10-49-12.png


I spent a good amount of time researching sand options and Tropic Eden seemed to come out on top. I decided to go with the slightly smaller Meso flakes which also happen to be $17 cheaper per bag v. the Reefflakes. Here is a size comparison chart:

Aragasnow - 0.5mm
Tonga Special Pink - 0.8mm
Miniflakes - 2.0mm
Mesoflakes - 2.7mm
Reefflakes - 3.0mm
Reefflakes Grand Select - 4.5mm
 

Janci

Staghorns will prevail
View Badges
Joined
Mar 14, 2016
Messages
3,005
Reaction score
9,317
Location
Belgium
Rating - 0%
0   0   0
Well... how productive was the weekend?
 
OP
OP
choss

choss

Well-Known Member
View Badges
Joined
Jul 29, 2015
Messages
809
Reaction score
802
Location
Scarsdale New York
Rating - 0%
0   0   0
Well it didn't feel productive but I did get a few things done:

* Finished the backboard for the main stand - the backboard is made up of glued poplar planks, stained and poly, and has a channel attached to the rear that will hide any electrical going from the electrical cabinet to the sump area.
* Ordered and cut my neoprene rubber mat. I went with 3/8" neoprene but unfortunately the piece I ordered wasn't cut exactly to size. So I spent a bit of time trying to get the cut smooth enough so that it will not be noticeable beneath the tank.

I should attach the backboard this evening so I'll take a pic. Once that is done I can move the tank in place and start the plumbing. Unfortunately, I am traveling this next weekend so I will have to try and be productive during the week.
 
OP
OP
choss

choss

Well-Known Member
View Badges
Joined
Jul 29, 2015
Messages
809
Reaction score
802
Location
Scarsdale New York
Rating - 0%
0   0   0
Ty, I ordered everything from BRS. Waited for a 10% off sale. I did some extensive price shopping beforehand and in the end, with the sale, BRS was about the same price as other well recommended options on the forums. I also took the advice of BRSTV and I went in on higher end ball valves. I have some cheap ones in my fish room and I will replace them soon with these.
 
OP
OP
choss

choss

Well-Known Member
View Badges
Joined
Jul 29, 2015
Messages
809
Reaction score
802
Location
Scarsdale New York
Rating - 0%
0   0   0
Small Update
Ok so the summer is getting away from me but I thought I'd include a short update. While travel and weekends at our summer place are cutting into my productivity, I a just one free weekend away from being able to move the tank in place. In the meantime, I glued up, stained, and polyurethaned the backboard behind the tank stand. The main purpose is to hide the wired and John Guest pipes that will feed the sump cabinet from the electrical cabinet. The latter will hold my Profilux 4, future dosing pump (and containers), and most of the electrical related to the operation of the lights and tank.

To attach the backboard I had to unscrew the stand and slot in these collars

backboard mounting attachments by choerenz, on Flickr

Then before I attached the board, I added a wood and plastic electrical channel to neatly hide the wires and pipes.

This shows the corner of the backboard where I have attached the channels

Backboard electrical chanels by choerenz, on Flickr

Finally, 4 screws later and I have the attached backboard. Once I put the cabinets back in place, it really should tie everything together.

backboard mounted by choerenz, on Flickr

August will be a busy month so I'm not expecting a lot of progress but I will add a few small updates as I check things off the list. Still waiting on my frag tank to cycle - seems to be taking forever.
 

Janci

Staghorns will prevail
View Badges
Joined
Mar 14, 2016
Messages
3,005
Reaction score
9,317
Location
Belgium
Rating - 0%
0   0   0
Slowly bud steady.
Still following.
 
OP
OP
choss

choss

Well-Known Member
View Badges
Joined
Jul 29, 2015
Messages
809
Reaction score
802
Location
Scarsdale New York
Rating - 0%
0   0   0
Thanks Janci - yes trying to do it right. I will try to figure out how to hang my light fixture. Not sure if anyone has any advice for me on getting this right. I am using a hanging kit typical of a giesemann fixture and my thinking is rather than trust anchors, I may try to attach a wooden plate to the ceiling at the studs, then screw into the piece of wood. I have a leftover piece of walnut I could use for this. Centering the light also seems a small but important challenge. It will always bother me if I get this part wrong. ;Dead
 

Janci

Staghorns will prevail
View Badges
Joined
Mar 14, 2016
Messages
3,005
Reaction score
9,317
Location
Belgium
Rating - 0%
0   0   0
Thanks Janci - yes trying to do it right. I will try to figure out how to hang my light fixture. Not sure if anyone has any advice for me on getting this right. I am using a hanging kit typical of a giesemann fixture and my thinking is rather than trust anchors, I may try to attach a wooden plate to the ceiling at the studs, then screw into the piece of wood. I have a leftover piece of walnut I could use for this. Centering the light also seems a small but important challenge. It will always bother me if I get this part wrong. ;Dead

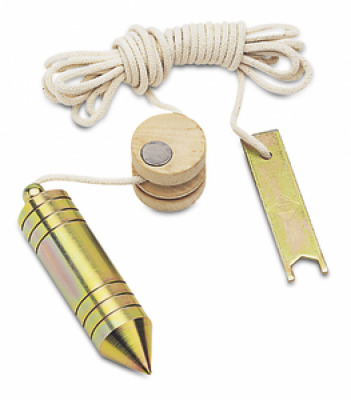
There are many way to hang the fixture.
I have always drilled straight in the ceiling. Once I drilled wrong ;Pompus and had to move the tank 10cm to have the fixture nicely in the middle. :(
The kit is the following?
p-101257-95635V-fish.jpg


From now on I follow the next procedure:
- put the tank in right position
- use some pieces of wood that are long enough to cover the witdh of the tank.
- place them on the tank and place the light fixture on the wood.
- position the light fixture now in the center of the tank or where you want it to be
- use this wire/lead to determine the exact hole position in the ceiling. Mark the holes and drill...
rubi-schietlood-met-magneet-4813.png

If you want to make sure... do not fill the tank so in the worst case you can stil call for help ;Writing and move it a little ;Snaphappy
 
OP
OP
choss

choss

Well-Known Member
View Badges
Joined
Jul 29, 2015
Messages
809
Reaction score
802
Location
Scarsdale New York
Rating - 0%
0   0   0
There are many way to hang the fixture.
I have always drilled straight in the ceiling. Once I drilled wrong ;Pompus and had to move the tank 10cm to have the fixture nicely in the middle. :(
The kit is the following?
p-101257-95635V-fish.jpg


From now on I follow the next procedure:
- put the tank in right position
- use some pieces of wood that are long enough to cover the witdh of the tank.
- place them on the tank and place the light fixture on the wood.
- position the light fixture now in the center of the tank or where you want it to be
- use this wire/lead to determine the exact hole position in the ceiling. Mark the holes and drill...
rubi-schietlood-met-magneet-4813.png

If you want to make sure... do not fill the tank so in the worst case you can stil call for help ;Writing and move it a little ;Snaphappy

Wow - ask and you shall receive. I am very grateful for the advice! Yes the kit is exactly the one you included above. I need to pick up that plumb line - do you recall where you found one of those? Also, I was thinking of using the foam mat that I have for under the tank as a proxy for the tank itself. Figuring that it would be easier to drill the ceiling without the tank in place. Also, last question, I haven't examine the kit in a while but I don't think it includes anchors or does it? What prevents the screw from yanking out of the sheet rock?
 

Janci

Staghorns will prevail
View Badges
Joined
Mar 14, 2016
Messages
3,005
Reaction score
9,317
Location
Belgium
Rating - 0%
0   0   0
In the giesemann hanging kit there are not anchors included.
You need 2 long but thin screws with matching Fishers (that is what we call it).
Drill bit is about 6mm if I am not mistaken.
Our walls and many celings are full concrete so we drill a big end. Not sure about yours.
download.jpg

These hanging kits seem like light weight, but are quit strong.
It looks ike like you are going with a Moonlight, Spectra or Infiniti?

The plumb line (i did not know it was called like that). We call it "schietlood" (Flemish) ;) and get in any hardware store.
 
OP
OP
choss

choss

Well-Known Member
View Badges
Joined
Jul 29, 2015
Messages
809
Reaction score
802
Location
Scarsdale New York
Rating - 0%
0   0   0
UPDATE!

Ok so I have been traveling for both work and pleasure. I just returned from a week in the Black Forest area of Germany where my dad lives 1/2 the year. I flew in to surprise him for his 87th birthday! So this is the first weekend back home since early August. I have two significant updates.

First, my frag tank has finally cycled so I can start moving corals over from my temp holding tanks. I will add a few pictures over the next few days but we're only looking at a few very small frags. Still, I'm excited to get things into the frag tank as I plan to very carefully quarantine anything I will add into the main display.

Unfortunately the main display still sits in a crate in the garage but now I'm just about there, where I can move it into place in the next week or two.

However, I did get something else done this weekend, and that is hang the main lighting for the tank. He is a pic of a brand new Giesemann Spectra.

Giesemann Spectra by choerenz, on Flickr

I'm really excited to see things grow under this light. I'll elaborate more on why I'm going with a MH/T5 combo but this decision is mostly based on my old school success I had with MH, and fantastic reviews I've seen of this light on forums, BRS TV, etc.

For bulbs, I will be starting with a 250 W Radium, 2 24" ATI Blue+, one ATI Coral Plus, and one Purple Plus. I also purchased a 250 Phoenix 14k bulb so I'd love to get opinions on one v. the other for growth and color.

I also will use a luxcore selectable ballast so that I can later go up to 400w but I think based on the dimensions of the tank, the 250 should be fine. As I am again traveling, I will post a few more pics of the light and frag tank by the weekend.
 
OP
OP
choss

choss

Well-Known Member
View Badges
Joined
Jul 29, 2015
Messages
809
Reaction score
802
Location
Scarsdale New York
Rating - 0%
0   0   0
Clayton - glad you are following along - we follow some of the same build so glad to have your feedback here! I'm hoping to have some good updates this weekend. Glad you like the lighting choice. I have a MH running on the frag tank right now and I've seen growth already in one week. This is taking a few small frags from two holding tanks - one with an LED and one with T5. I'm really fired up to get the spectra running with some livestock (and of course a wet tank!).
 
OP
OP
choss

choss

Well-Known Member
View Badges
Joined
Jul 29, 2015
Messages
809
Reaction score
802
Location
Scarsdale New York
Rating - 0%
0   0   0
reef savvy tank by choerenz, on Flickr

Ok so yesterday I had 2 of my soccer buds come over at 8:45 am (my reef buddies were busy so you have to go to the next best hobby group...). By 8:50 we figured out that the suction cups were not going to work. One popped off during the first lift and I went pale white, then sweat broke out everywhere.

So we used old fashioned muscle and lifted the tank on the dolly. 10 minutes later (by 9:15) we had the tank up on the stand and centered. I was so stressed the night before, and in the end it was in place in no time at all.

So then I started worrying about the weight of the loaded tank on the stand. The stand is 1.5 inch thick walnut, and super solid gator piping. But I still contacted the manufacturer of the pipes and was told "don't worry, each leg can hold 4,000 lbs". I estimate the full weight to be about 1,000- 1,200 lbs so I think it's all good.

Now the next chapter can start. This weekend I will start the plumbing.
 
Back
Top