180 Oceanic - "Heavy"

Grog

Community Member
View Badges
Joined
Jul 19, 2023
Messages
29
Reaction score
75
Location
Bastrop
Rating - 0%
0   0   0
Figured I'd finally start a build thread as this tank is actually progressing along.

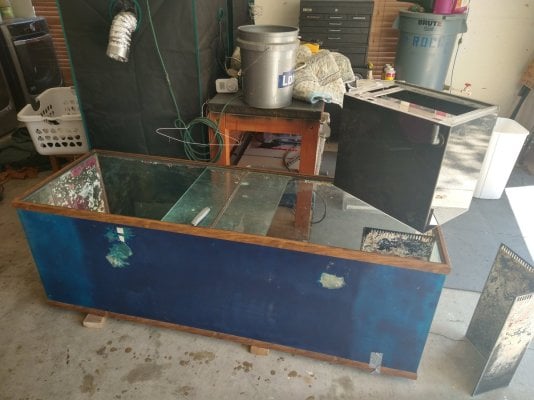
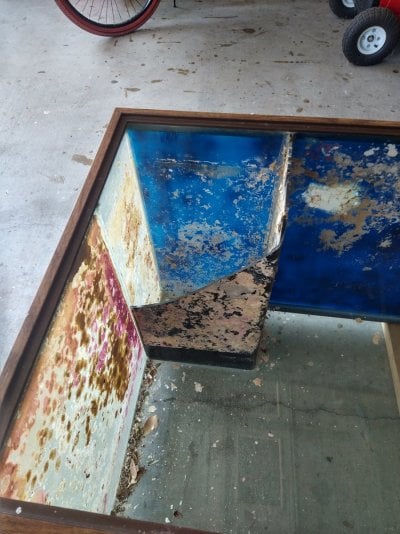
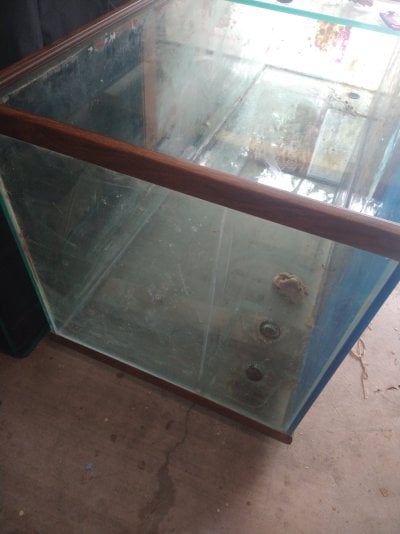
I got a used old Oceanic 180 from a buddy. Thanks @Timfish! It is ~25 years old and was in need of some TLC when I got it. It came with a sump, refugium, and some other stuff but I elected to only keep the tank itself. Here you get a great view of my crowded and messy garage, and the tank as it was received. Old wood grain trim on the Oceanic, lots of coralline, old silicone, and overflow boxes.
IMG_20230909_125329478_HDR.jpg
IMG_20230910_164914712.jpg

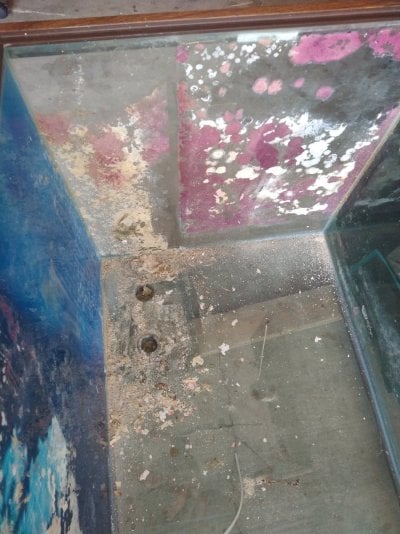
My thoughts were to clean it up and make it more presentable. So, I started by removing the overflow boxes. I broke them both trying to remove them, so reuse was out of the question. Then, I scraped off all the coralline and other stuff encrusting the walls. There were a lot of razor blades, vinegar, and choice words used for this operation, but I eventually got it all off.
IMG_20230910_164923800_HDR.jpg

IMG_20230911_171951982.jpg

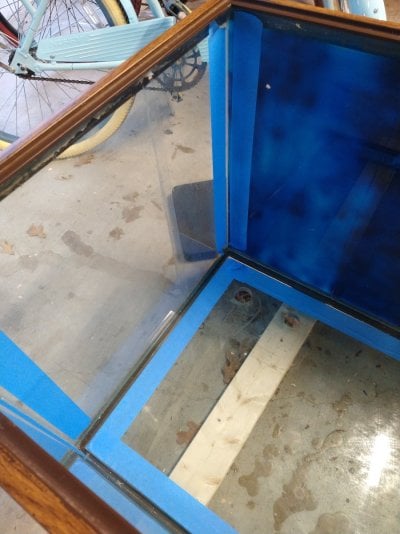
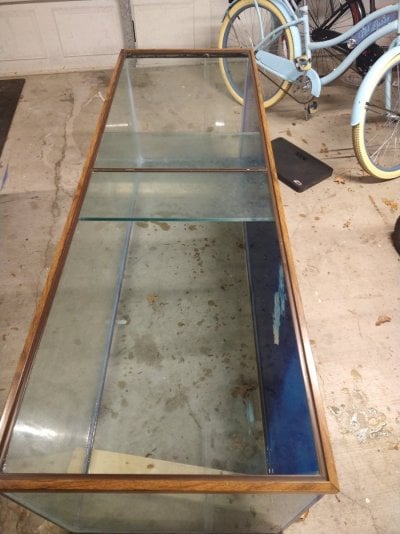
The tank has dual overflows and dual returns. The intent is to not have overflow boxes but have standpipes hidden by rock work which will allow me to use all that previously dead overflow box space for rocks and other stuff. I was not loving the idea of 180 gallons of saltwater in the living room with 25-year-old silicone. So, I removed all of the silicone from the edges. NOTE: I didn't pull the glass panels apart. They seemed fine. I stripped all the 'caulked' silicone, and resealed. Again, this involved a lot of razors, vinegar, and..... It is not an easy task. I taped it off to mask the walls and proceeded to silicone it up. I used the ASI silicone, and it STINKS! Tons of out gas with this. Open the garage door when you use this stuff. It will melt your eyebrows. I let it cure for an hour or so and yanked the tape off. The silicone job ain't the prettiest but it works so IDK.
IMG_20231011_183818414.jpg
IMG_20231011_211856853.jpg

I let it cure for a few days and while it was curing, I took some time to build a stand. I've used the design that Rocket Engineer shared a few other times, and it was worked great so figured I'd use it once again. I went with the optional center post brace to keep things from warping. Once assembled, we lifted Heavy onto the new stand and then did a 4-day leak check. No leaks! (Yes, one of the supports is not square. This has been subsequently resolved.)
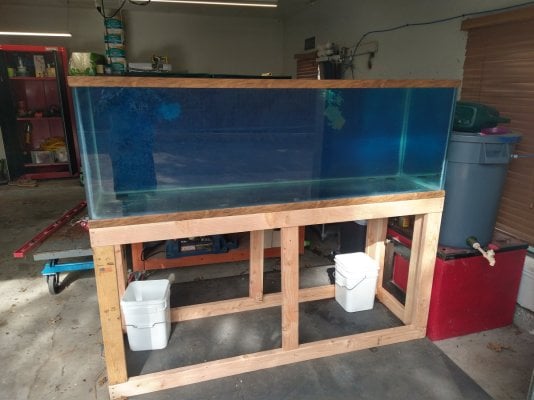
IMG_20231202_132912155_HDR.jpg

After leak check, I got the stand painted and covered up the old school wood grain trim with the same paint as the stand so it will all match. (Two coats of Kills Premium and two coats of paint.) Once it goes into the living room, I'll make some removable door panels to hide the sump and stuff. For the sump I'm using a 40-gallon breeder, with a Fiji Cube kit. So glad that I went with that kit. The installation was super easy and came out way better than my prior homebrew sumps. I got some new glass tops from a local glass shop.

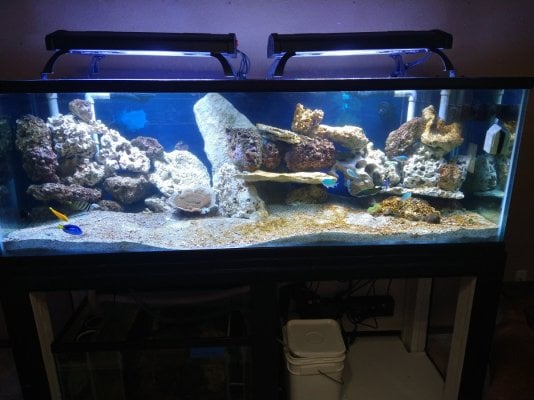
This is where we are today. Next week I'll work on plumbing and get the saltwater mixing and test pumps.

I'll post more as this develops.
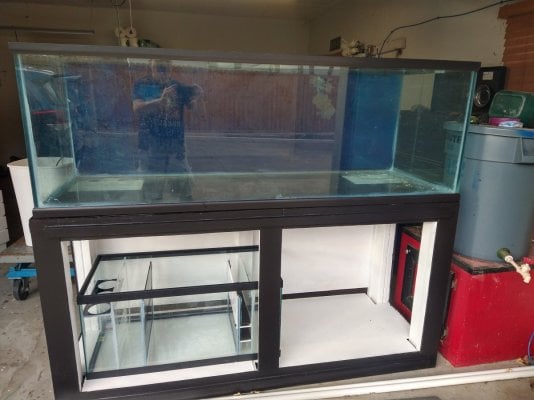
IMG_20240207_171007818_HDR.jpg
 
OP
OP
Grog

Grog

Community Member
View Badges
Joined
Jul 19, 2023
Messages
29
Reaction score
75
Location
Bastrop
Rating - 0%
0   0   0
My first post to start this thread took the 'build' in 'Build Thread' quite literally. What do I want to do with it? :p

The name: Heavy came from the original owner, and it fits. The tank is literally heavy. I'm kind of superstitious. You don't rename boats, and it seemed to be a bad idea to rename a tank, so I'm going with it. :)

I have an existing 75-gallon tank in the living room and all of the contents of that tank will be relocated into the new 180. The existing tank is WAY overstocked, there are tangs in there. (Hi tang police. *waves*) I knew this upgrade was coming and I bought them as motivation to get the upgrade completed before they outgrew the tank. They are still small, so it is all OK. They all get along and eat like pigs.

The current 75 has about 150# of rock from Tampa Bay Saltwater, live sand from them as well. It is sumpless and running HOB filters along with a Fluval FX-6 cannister. Again, it is overstocked. I know it. I do large weekly water changes and I'm still battling algae, but it is under control. There is NO coral in the 75. It was all moved to my 40-breeder. The lights on the 75 are total garbage and will not be reused.

This upgrade will be huge. Adding a sump will be awesome IMO, as it hides so many things, and makes cleaning easier. Having a larger water volume will be beneficial for nutrient dilution, and the space for the tangs and stuff to grow. All good.

Salt: I run IO Reef Crystals in all my tanks. Always have and don't see a reason to change it. I run with their default 1/2 cup per gallon, and it ends up right around 1.025 SG.

Lighting: The existing lights on the 75 will move to the garage. They are garbage. I will use two Odyssea T5 and halide fixtures over this for lighting. I've done LED and I'm not happy with it. I've fully reverted to T5 on my 40, but I want the halide here for punch. The idea is to run T5 for 12 hours and the halides for around 6. I'll adjust based on coral needs. I have one of the 36" fixatures already, so I just need to buy one more. Relatively inexpensive, and I'm happy with the improvements they've made to their design over the years. Right now, I'm running 250W Plusrite 14k bulbs in the halide. The 36" T5 are two Aquablue Special and two ATI True Actinic. I have a ReefBrite 20k bulb and I'll test those side by side to see which one I'll use long term. Leaning towards the Plusrite strangely enough. They cost $15 and after a few days burn in, look decent. (I miss the old Phoenix bulbs.)

Scape: I plan to reuse the existing rock as much as possible and add a bunch of dry rock to fill it out. The scape will be a large column on the left and another on the right to hide the plumbing. I intend to build an archway or shelf in between the two to get some caves for the inhabitants and some shelves for corals. Existing sand from the 75 is very shelly, coarse, and will go into the sump. I have another large tote full of sand from TBS ready to add to the 180 once the move is underway. (Sand is live, with water, and a powerhead, and looks way better than the stuff I have in the 75.)

Sump: Used a Fiji Cube 40-breeder kit. I'll run a deep sand bed, and a small ATO to keep the water levels right. It came with filter socks. I've never used them before, so I'm on the fence. I'll try them and see how I feel after a month. Easy enough to leave them out. I have two Sicce return pumps, two drains, and two returns. We love redundancy.

Fish: This tank idea was set up mainly to be a FOWLR tank. But I've been talked into adding corals. I know that I will lose cleanup crew to some of these fish. These guys are all in the 75 today.

  • Lemon Peel Angel
  • Foxface
  • Blue Green Chromis X5 (These things have grown faster than the tangs, insanely fast.)
  • Black Ocellaris Clown
  • Niger Trigger, Red Toothed (He is a huge scaredy cat.... Love this fish though, so cool)
  • Yellow Tailed Blue Tang
  • Sailfin Tang

Future plans are to add the fish below, all are already in quarantine at a friend's house while this build is happening.

  • 2 other Ocellaris clowns
  • Lunare wrasse (which is why I got new glass tops!)

Inverts: These are all in the 75 and will be migrated. I know some will be 'at risk' once the trigger grows and the lunare is added. Oh well. I plan on adding a 'refresher' crew every so often. I'm OK with this.

  • Peppermint Shrimps 5 or so.
  • Various Hermits, Blue Eyed, red legged, Blue Knuckle Hermit,
  • Various Snails, Dwarf Cerith, Knobby Creeper
  • Lightbulb Anemone (Hitchhiker)
  • Donkey Dung Sea Cucumbers
  • Black Urchins X5
  • Red Mantis Shrimp - (He may go into the sump.)
  • a crazy pod population

Corals: I've given in and will have corals. With the halide and t5 combo, I could have whatever, but I want to keep it relatively easy, with one exception. I know that some of the fish may not be the most reef safe and may nip at things but I'm willing to take that risk and not be bothered if they do.
  • GSP - for the back wall
  • Xenia
  • Kenya Tree
  • Various Mushrooms
  • Zoas and palys
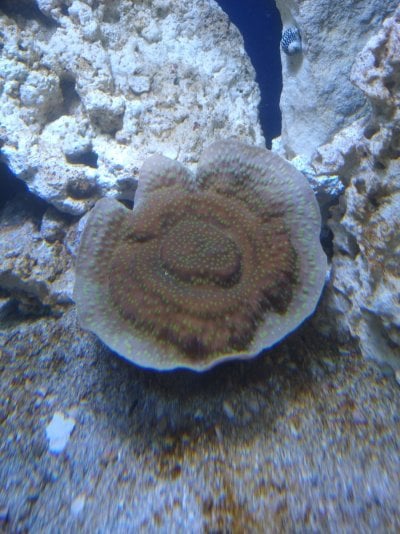
  • Toadstool
  • Purple Stylo
  • Green Stylo
  • Chalices
  • Magnifica Anemone
The anemone will go on the right-hand side for the clowns and have access to a 250W halide. This is my one difficult item to have. I've successfully kept several other anemones in the past and want to try one of these for a change once the tank is settled in.

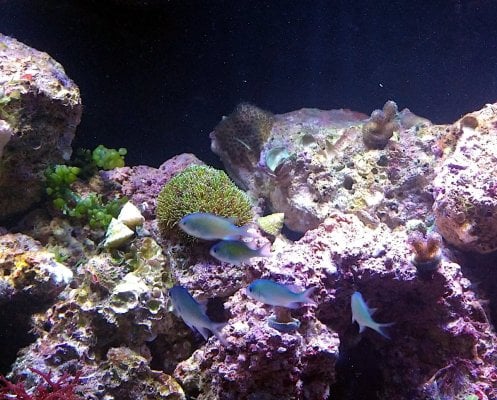
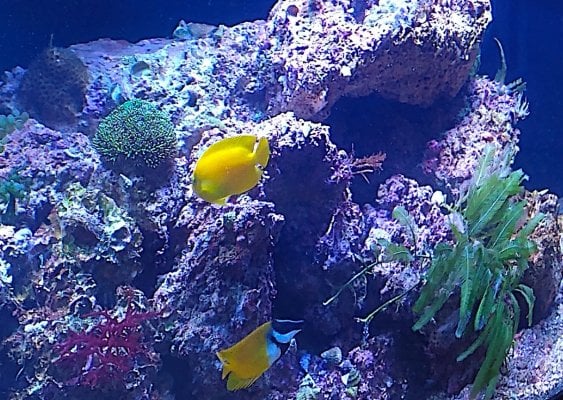
Attached is an older picture of the 75 inhabitants and rocks, the corals have subsequently been removed. Not at home so no recent photos.

More updates to come next week. I won't be able to work on the new build at all until the weekend.

Chromis.jpg
Lemonpeel.jpg
 
OP
OP
Grog

Grog

Community Member
View Badges
Joined
Jul 19, 2023
Messages
29
Reaction score
75
Location
Bastrop
Rating - 0%
0   0   0
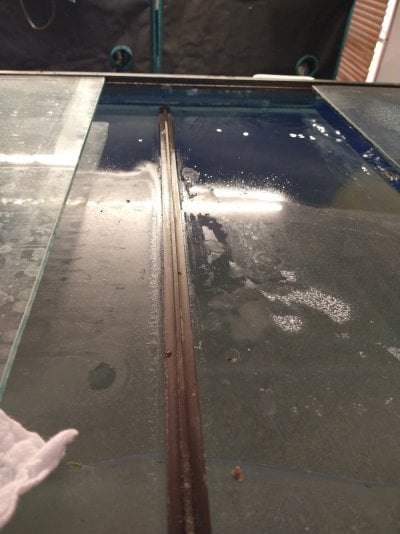
Filled the tank. Started taking water out and adding sand.... I was done. Went inside for a drink. Came outside to close the glass lids so it doesn't evaporate so much, and splash everywhere.

Center brace popped!

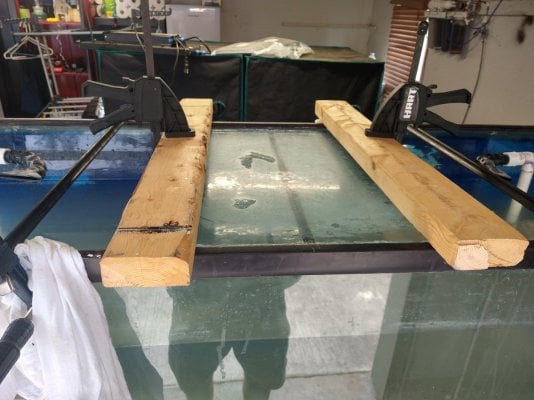
Got two bar clamps on it now. (Thank you, Harbor Freight, for the good prices and opening at 9:00 AM on Sunday!) I drained 75G of water out. Gonna silicone it at lunch. That was the one silicone joint I didn't redo. Figures. Funny this happened after I had already done a 4-day leak test. Just my luck.

Seems fixable. Glad it was NOT in the house. We were going to move it in but decided to not do it yesterday as I forgot to bring the water up to temp. Never really think about heating water in Texas. :p
IMG_20240407_084734361.jpg

This all happened after plumbing. I got all that done. Pumps and fittings and return all done and working nicely.

I'm too far into this to give up. Plan is to redo the brace at lunch and let the silicone cure for a few weeks, then try this again.

Also on a good note, I took delivery of the Lunare and lightning clowns yesterday. Lunare is skittish but faster than any fish I've ever had. It is out and eating. Clowns are like clowns are doing their thing.
 
OP
OP
Grog

Grog

Community Member
View Badges
Joined
Jul 19, 2023
Messages
29
Reaction score
75
Location
Bastrop
Rating - 0%
0   0   0
My buddy and I resealed the center brace.

Interesting note: After removing the center brace, it was obvious that one end of the center brace did not have any silicone in the butt joint. Only caulking around it. :eek:

So, IMO the original build was not done correctly. But, it held for 30 years like that, and finally gave away. Pretty amazing strength in silicone.

We caulked the butt joint, clamped it into place, and caulked around the seams. I'll recalk again after. Glad I had a few tubes of the ASI silicone left over from the seal.

Bar clamps keeping the tank from bowing. Top clamps to keep the brace up against the trim. I'll remove them next Saturday.

Hoping a disaster was averted. :face-exhaling:

This has been a rough weekend.
IMG_20240407_130417390_HDR.jpg
 
OP
OP
Grog

Grog

Community Member
View Badges
Joined
Jul 19, 2023
Messages
29
Reaction score
75
Location
Bastrop
Rating - 0%
0   0   0
Looks like it took some elbow grease but it payed off, tank looks great!
This was way more work than I anticipated. Would I do it over? Maybe not. But I did save a ton over a new tank cost.

I've learned a lot from it. School of hard knocks kind of stuff though. :p
 

kevgib67

10K Club member
View Badges
Joined
Apr 16, 2022
Messages
13,566
Reaction score
77,531
Location
Canfield, Ohio
Rating - 0%
0   0   0
This was way more work than I anticipated. Would I do it over? Maybe not. But I did save a ton over a new tank cost.

I've learned a lot from it. School of hard knocks kind of stuff though. :p
The goods news is it’s behind you and now you have a beautiful tank to enjoy, well done!
 
OP
OP
Grog

Grog

Community Member
View Badges
Joined
Jul 19, 2023
Messages
29
Reaction score
75
Location
Bastrop
Rating - 0%
0   0   0
The silicone fix to the center brace worked!

So we did the tank move today. Thanks @Timfish ! Your help is greatly appreciated.

This took all day, a good 8 hours. We tore down the 75. Scrubbed rocks. Brought the 180 inside and refilled. My back is sore.

Celebrated by getting two large neon dottybacks afterwards. :p

Obligatory cloudy FTS. I'll get a better shot tomorrow when it clears up.

I have some iffy LED on there for now. May keep them but I want to add some T5 to get rid of the shadows. I need to fix the lighting. Waiting on the fixtures to be available.

IMG_20240413_175620293.jpg
 
OP
OP
Grog

Grog

Community Member
View Badges
Joined
Jul 19, 2023
Messages
29
Reaction score
75
Location
Bastrop
Rating - 0%
0   0   0
The tank cleared up overnight.

I'm liking the 'shelves'. It will be good for coral placement. Triggerfish is digging the holes in the Texas holey rocks...

I did some testing today. Put a halide fixture over it to see how I liked it. I liked it. :p

So, I pulled the trigger on 3X 24" halide T5 fixtures. Adding another 250W halide to each side will make it look nice. I was very reluctant to go with 3X halides but that is what it will take to look good, so that is what is being done.

I like the Odyssea fixtures, but the ballasts and bulbs are trash. This pic is with a Reef Brite 20k bulb. I'll run those in the new fixtures. The plan is to run the Odyssea ballasts for a little bit and replace with another ballasts. FWIW the Reef Brite bulbs are packaged super well. No worries about a broken bulb in shipment.

Going to build a sort of a canopy next. The idea of how I want it to look is still percolating in my brain. I want to elevate the lights off the glass for heat and spread reasons. Also, I don't want the legs of the fixtures on the glass so I can open up the top and feed, clean, scape, etc. (And I'm tired of burning my arm on the halides.) I'm definitely going to add some exhaust fans to the 'canopy'. And.... I want to hide that light spillage you see in the picture. I want a block in front of the fixtures so I don't see the halide anywhere but the tank. Details to follow as I work this out in my mind. I'll probably wake up at 4:00 AM with the full drawing in my head.

IMG_20240414_134632634.jpg
 
OP
OP
Grog

Grog

Community Member
View Badges
Joined
Jul 19, 2023
Messages
29
Reaction score
75
Location
Bastrop
Rating - 0%
0   0   0
All my bulbs came in, so now I'm running 20k Reef Brite halides for 6 hours a day. The T5 mix is ATI actinic and ATI Aquablue Special with 4 of each. The right side looks a little yellower but that is a bit of a illusion. 1.) That bulb has been running for longer so its more 'burned in'. 2.) That side had the lights on all week so the diatom bloom is much more prominent over there.

The filter socks are pulling a lot of stuff out of the water. Much easier to deal with than a HOB filter.

I have a 8" Hollywood Stunner that was in my 40 breeder with some Galaxea. Figured it was time to move him from the 40 into Heavy so he can have some room to grow. I'm impressed with its growth rate. It has gotten this big from a small frag in 10 months. Also, added some GSP to the back wall, a large plug of Night Eyes zoanthids, pulsing Xenia, and a toadstool.

I'm going to wait a few weeks and then I'll add some plating montis.

Raining a lot here. (Its Texas, I won't ever complain about rain.) So, zero progress on the canopy or front panels for the stand. The good news is I did get a BUNCH of stuff moved out of the garage and I can actually work in there now. So, even if it is raining, I may get some of that done next week.

FTS
IMG_20240427_131924820.jpg

Hollywood Stunner
IMG_20240427_132738290.jpg
 
OP
OP
Grog

Grog

Community Member
View Badges
Joined
Jul 19, 2023
Messages
29
Reaction score
75
Location
Bastrop
Rating - 0%
0   0   0
Lots of new frags came in last week. I won't bother with shots of those till they are mounted in their 'permanent' locations. All are acclimating in the sand bed this week.

The new cool thing is an LTA. I acclimated it and it seems to like the spot I picked, center stage under the halide about halfway down. :beaming-face-with-smiling-eyes: It has very good expansion, seems to be in good shape. When fully expanded, its about 7-8" across. FWIW I was successful getting it to adhere quickly by propping it in place with some 1" PVC plugs that I had laying around. It adhered and then I pulled the plugs out after about an hour. Nem has been there ever since. Woot! I fed it a small shrimp on Saturday. It readily accepted. I missed having a nem in my tank. It has been far too long.

The clowns have not found it yet.

IMG_20240502_141024013.jpg
 

HAVE YOU EVER KEPT A RARE/UNCOMMON FISH, CORAL, OR INVERT? SHOW IT OFF IN THE THREAD!

  • Yes!

    Votes: 32 45.7%
  • Not yet, but I have one that I want to buy in mind!

    Votes: 9 12.9%
  • No.

    Votes: 26 37.1%
  • Other (please explain).

    Votes: 3 4.3%
Back
Top