Water level in display tank too low

ConorE

Community Member
View Badges
Joined
May 27, 2020
Messages
27
Reaction score
34
Rating - 0%
0   0   0
Hi Guys

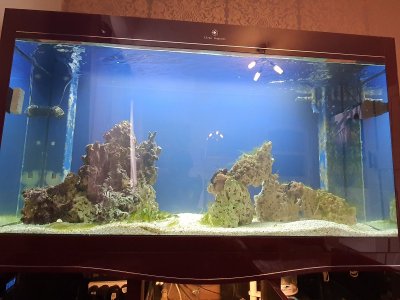
The water level in my display tank is just under the top acrylic, so I can see a half inch above my water, which isnt great.

My sump is also fairly noisy from the drain pipe into it, as the display water level is so low it takes quite a bit of air with it and I get a lot of gargling.

I have seen most people say to never restrict the flow onto the sump by turning the valve, but I tried it anyway to see what would happen, and voila my display level started to rise and the noise issue disappeared, however it went too high and I couldn't seem to find the sweet spot.

Any ideas on what I could do with this, or is it a case of sitting and watching my levels until they level themselves off where I want them, by restricting flow into the sump?

Many Thanks!
20200627_173605.jpg
 

andrewey

2500 Club Member
View Badges
Joined
Apr 9, 2016
Messages
2,659
Reaction score
6,117
Location
Virginia
Rating - 0%
0   0   0
Any reason you don't just raise the level of the weir in your overflow? That would likely solve all problems. You can test it by temporarily clamping a piece of acrylic/plastic at different levels in front of the weir until your desired height is achieved (restrciting waterflow through the weir so the water must pass through the weir at a higher spot). If successful, simply glue the new piece in place permanently (may or may not need to renotch your plastic, depending on your particular tank.
 
OP
OP
ConorE

ConorE

Community Member
View Badges
Joined
May 27, 2020
Messages
27
Reaction score
34
Rating - 0%
0   0   0
@andrewey

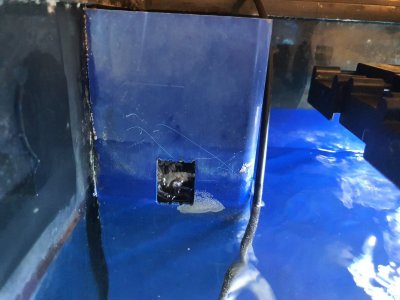
My overflow doesn't have a weir that I know of, certainly not one I can change anyway. I have these holes, which have the top of the overflow pipe in (I'll attach a photo so you can see what I mean).

15932765742897927967683247024752.jpg
 

andrewey

2500 Club Member
View Badges
Joined
Apr 9, 2016
Messages
2,659
Reaction score
6,117
Location
Virginia
Rating - 0%
0   0   0
Two things. One, super easy to remedy the situation then! Simply cover the hole and cut a new hole 1/2-3/4" higher!

Secondly, don't use the same design! That's a terrible design and is asking for a couple of snails/floating nori/rogue anemone, etc. to cover that opening and plug your overflow! Take this opportunity to cut a notch the full length of the overflow or better yet, take this time to make a weir!
 
OP
OP
ConorE

ConorE

Community Member
View Badges
Joined
May 27, 2020
Messages
27
Reaction score
34
Rating - 0%
0   0   0
Two things. One, super easy to remedy the situation then! Simply cover the hole and cut a new hole 1/2-3/4" higher!

Secondly, don't use the same design! That's a terrible design and is asking for a couple of snails/floating nori/rogue anemone, etc. to cover that opening and plug your overflow! Take this opportunity to cut a notch the full length of the overflow or better yet, take this time to make a weir!


Yeah it's not the best. It's a second hand tank so presumably the holes had some form of weir on them previously and were removed for whatever reason.

I guess now I need to figure out how to do that without ticking off the fish too much
 

andrewey

2500 Club Member
View Badges
Joined
Apr 9, 2016
Messages
2,659
Reaction score
6,117
Location
Virginia
Rating - 0%
0   0   0
It's really not as bad as you think- I've had to do similar jobs on running tanks where I needed to make adjustments to the weir or notch our the rim for HOB equipment. Drain the DT so you have plenty of room to work, try and place some items to catch the debris (but understand there wills till be plastic shavings everywhere that will need to be collected with a filter sock or targeted siphoning). If you have a handheld dremmel, you can likely do the job in 10-15 minutes. In terms of sealing the holes, you'll need to need to take your overflows offline for a few days while the products cure, so you'll need to move your heater into the display and ensure the water can't come in contact with whatever product you are using (uncured silicone, weld on, etc.). Obviously the best practice is to do this with the tank drained, but if you can't do that, it's not as big of a deal as you would think- you're simply draining the tank a bit and converting it from a sumped tank to a regular tank for a few days.

Go slow, prep all areas, try and cover as much as you can, don't drip anything into the tank, and always remember that electricity and water don't mix and you'll be fine ;)

Bonus points if you can direct your cuts so that majority of the shavings fall into the overflow- makes collection of the pieces with a filter sock 1000x easier!
 

CollectOyster04

Active Member
View Badges
Joined
Jul 25, 2019
Messages
142
Reaction score
276
Location
Oklahoma City
Rating - 0%
0   0   0
What's your drain situation like (one or two pipes) ? The overflow itself looks like it could use some modification, but if you only have one drain line going into the sump, that can limit how quiet your tank is and can put your tank at risk for overflows. If said snail ventured in the overflow and clogs the drain, you can be in trouble. A Herbie or bean animal setup would be so much better if possible. I have a standard 125 with dual overflows, and I made both sides herbie style drains, and have return lines plumbed in the back coming over the rim instead of through the overflow. Gives redundancy incase one of the drains gets clogged for whatever reason.
Also, are you using a gate valve on your drain or ball valve ? Gate valve gives you much more control in tuning the flow so that you're not having to constantly adjust
 
OP
OP
ConorE

ConorE

Community Member
View Badges
Joined
May 27, 2020
Messages
27
Reaction score
34
Rating - 0%
0   0   0
It's really not as bad as you think- I've had to do similar jobs on running tanks where I needed to make adjustments to the weir or notch our the rim for HOB equipment. Drain the DT so you have plenty of room to work, try and place some items to catch the debris (but understand there wills till be plastic shavings everywhere that will need to be collected with a filter sock or targeted siphoning). If you have a handheld dremmel, you can likely do the job in 10-15 minutes. In terms of sealing the holes, you'll need to need to take your overflows offline for a few days while the products cure, so you'll need to move your heater into the display and ensure the water can't come in contact with whatever product you are using (uncured silicone, weld on, etc.). Obviously the best practice is to do this with the tank drained, but if you can't do that, it's not as big of a deal as you would think- you're simply draining the tank a bit and converting it from a sumped tank to a regular tank for a few days.

Go slow, prep all areas, try and cover as much as you can, don't drip anything into the tank, and always remember that electricity and water don't mix and you'll be fine ;)

Bonus points if you can direct your cuts so that majority of the shavings fall into the overflow- makes collection of the pieces with a filter sock 1000x easier!


Life saver! I'll have to give it a go. Its driving me nuts being able to see above the water line .

Thanks so much for your help!
 

Brucealmighty

Active Member
View Badges
Joined
Aug 15, 2020
Messages
381
Reaction score
780
Location
Coventry
Rating - 0%
0   0   0
I have the same tank as you mate and the square hole is a bit of a DIY job someone has done, I have round holes with vented/grille covers same as at the bottom of the tank hope you got this sorted
 
Back
Top