Trevor's Reef Lab (Fish Room Build Thread)

AquaCave

trevorhiller

Reef
Review score
+7 /0 /-0
View Badges
Joined
Oct 22, 2021
Messages
936
Reaction score
643
Review score
+7 /0 /-0
Location
Williamsport
Rating - 100%
1   0   0
My Saltwater Story
I was introduced to the saltwater aquarium hobby by a fellow coworker back in 2016. I had a couple different nano tank for a few years. I believe my first was ~10 gallons that I used gallons of distilled water from Wal-Mart and a float arm hydrometer to make instant ocean saltwater. I had a couple corals and a few fish, but really had no clue what I was doing.

At the end of 2021, the saltwater bug reared its ugly head and I decided to setup a 15 gallon Waterbox to see if I really wanted to get back into the hobby and have a tank again. As soon as those Petco clownfish were swimming around I knew I was in trouble. That quickly progressed to a 60 gallon Cade Aquarium (my current tank).

Me and my partner discussed finishing our basement to make a bar/lounge area and this presented the perfect opportunity to get a big tank once and for all.

The Tank
The plan is a 60" x 30" x 20" Glass Cages tank that will be mounted through the wall with an adjacent fish room behind it located in the mechanical area of the house to hide all the "fish crap" as my partner says. It's going to become my "reef lab" complete with frag tanks, QT tanks and space to do all my crazy coral & fish stuff. The tank hasn't been ordered yet, we are currently working on the infrastructure for the reef room and are in the process of finishing the lounge area. This is all being done by us (mainly me) so it's slow progress, but I wanted to document the build since I think it's going to pretty great when it's all done. The sump will be a Rubbermaid stock tank.

The Reef Lab
The mechanical area of our house is about 17' x 12'. It houses the HVAC unit, water heater, electrical panel, etc. The remainder of the space is for me and my reefing madness. :cool:
 
Last edited:
AquaCave Logo Banner
OP
OP
trevorhiller

trevorhiller

Reef
Review score
+7 /0 /-0
View Badges
Joined
Oct 22, 2021
Messages
936
Reaction score
643
Review score
+7 /0 /-0
Location
Williamsport
Rating - 100%
1   0   0
FRAMING THE ROOM

I'm fortunate that our basement is nice and dry and already had some electricity, easy access to water, the main house drain pipe and lots of space to work in.

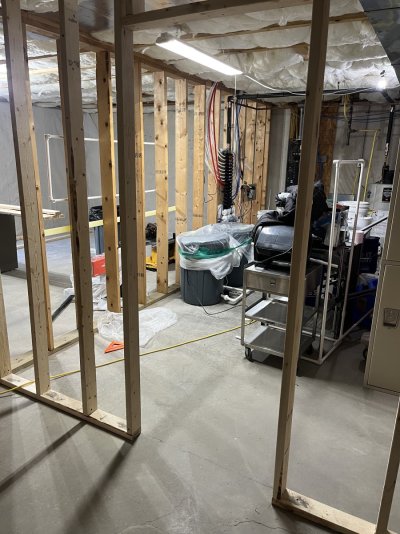
We started with the framing. In this picture you can see the Reef Lab to the right, the lounge/bar area straight ahead (that was already framed) and if you look closely the PVC mock-up of the tank footprint hanging in place on the wall where it is going to go.

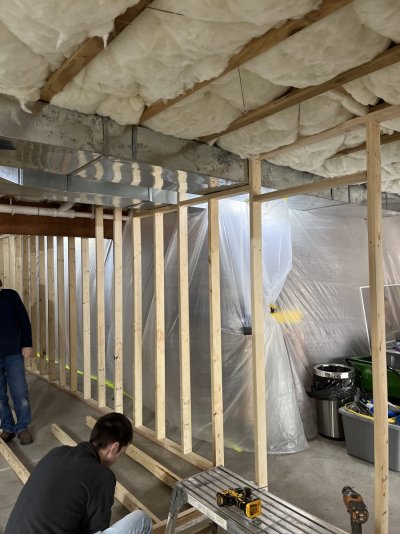
We built the wall to close in the Reef Lab and installed a doorway. With any construction comes lot of dust, so we hung a temporary plastic wall to keep our belongings (mostly) free of the wood dust.

Reef Room Framing.jpg More Framing.jpg
 
Last edited:
OP
OP
trevorhiller

trevorhiller

Reef
Review score
+7 /0 /-0
View Badges
Joined
Oct 22, 2021
Messages
936
Reaction score
643
Review score
+7 /0 /-0
Location
Williamsport
Rating - 100%
1   0   0
ELECTRICAL INFRASTRUCTURE

The basement had minimal outlets in it and only a few screw in light sockets. We all know aquariums use a lot of outlets! Especially when you are an equipment junkie like myself!

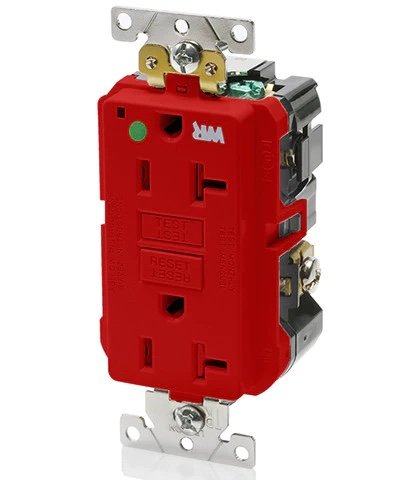
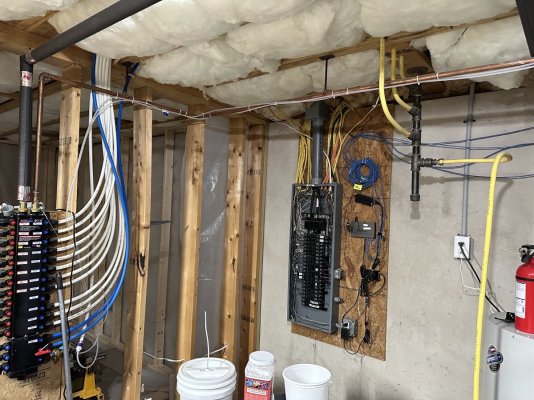
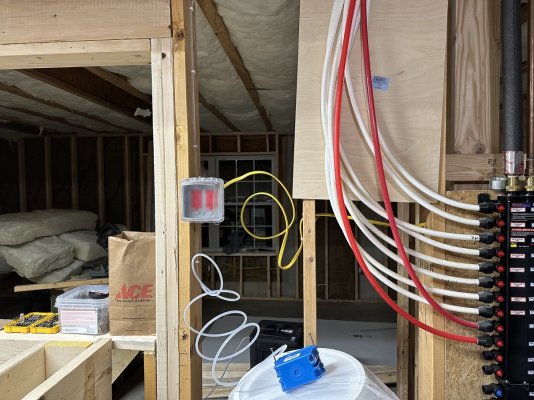
I installed four two gang 20 Amp GFCI circuits wired in parallel to provide independent GFCI protection. Each receptacle next to the tank stand (4 outlets each) has a dedicated 20 Amp line to its own breaker for the bulk of the aquarium equipment. The wall opposite the tank has two, two gang GFCI outlets on a third shared 20 AMP circuit, again wired in parallel to provide independent GFCI protection. This way if one device trips a GFCI outlet, the remainder of the devices still have power. The theory is this will prevent any catastrophic failures due to nuisance trips by having multiple circuits. It will also minimize the need for power strips.

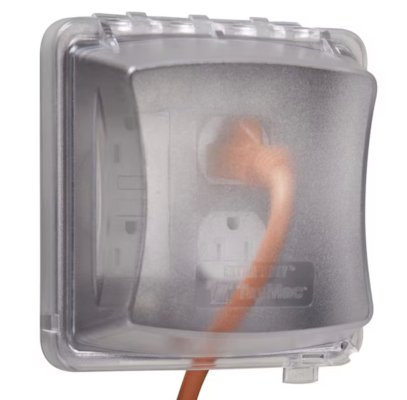
For the actual outlets I went with Leviton 20 AMP Hospital Grade Weather/Tamper Resistant receptacles. All outlets in the fish room have TayMac In-Use Weatherproof covers to keep salt spray off the 120 volt plugs. I'm still working on a solution for the EB832s, but some sort of plastic cabinet to house them is in order.

Leviton Hospital Grade WR TR 20 AMP GFCI.jpg TayMac In Use Weatherproof Outlet Covers.jpg Electrical Panel.jpg Dedicated GFCI Outlets.jpg
 
Last edited:
OP
OP
trevorhiller

trevorhiller

Reef
Review score
+7 /0 /-0
View Badges
Joined
Oct 22, 2021
Messages
936
Reaction score
643
Review score
+7 /0 /-0
Location
Williamsport
Rating - 100%
1   0   0
PLUMBING INFRASTRUCTURE

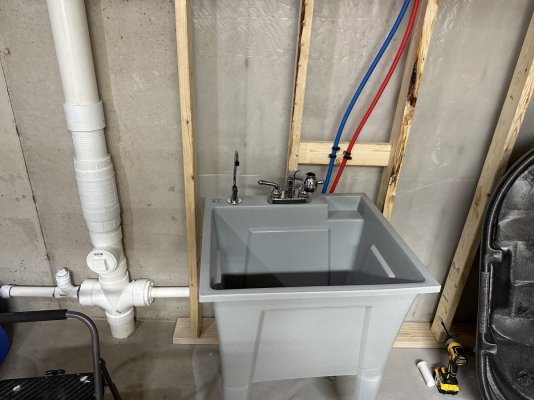
No fish room is complete without a utility sink!

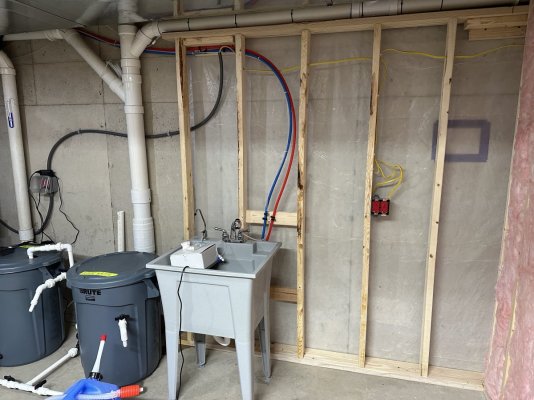
I picked up a cheap, all plastic sink from Lowe's and a cheap RO drinking water style faucet. The sink has a little utility drying rack with it and came with a non-metallic faucet. The RO faucet will provide on-demand filtered water and is connected straight to my RODI system.

My basement floor does have a drain for the HVAC unit, but it's not easily accessed as it's back in the corner of the room near the water heater and furnace. (Kind of annoying as having a centrally mounted floor drain/sloped floor would have been ideal, but it's better than nothing).

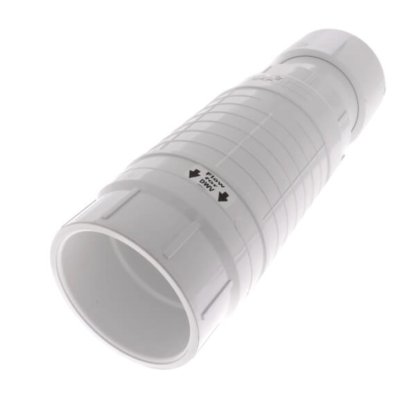
Therefore, I had to tap into the 4" main stack of the house to make the drain connection for the utility sink. This was a little interesting, but luckily I found a 4" telescoping repair coupling made by Spears on supplyhouse.com. It was a little pricey (~$120), but it was the only way to cut into the main stack and get it back together without MacGyvering it. This was difficult to find, but I highly recommend this part if you have a similar situation and need to add a T to your main drainage stack for adding a basement drain. It was literally a lifesaver.

While I was tapping into the drainage for the house, I figured I would install a T so I can connect the tank plumbing to it in the future for EASY water changes. :cool:

You can see the additional 2 gang weatherproof GFCIs and conduit I used for the wiring in this photograph.

Utility Sink.jpg
Drainage T Installed for Water Changes.jpg
4%22 Telescoping Repair Coupling.jpg Utility Sink w:RODI Water Faucet.jpg
 
Last edited:
OP
OP
trevorhiller

trevorhiller

Reef
Review score
+7 /0 /-0
View Badges
Joined
Oct 22, 2021
Messages
936
Reaction score
643
Review score
+7 /0 /-0
Location
Williamsport
Rating - 100%
1   0   0
FRESH AIR INFRASTRUCTURE

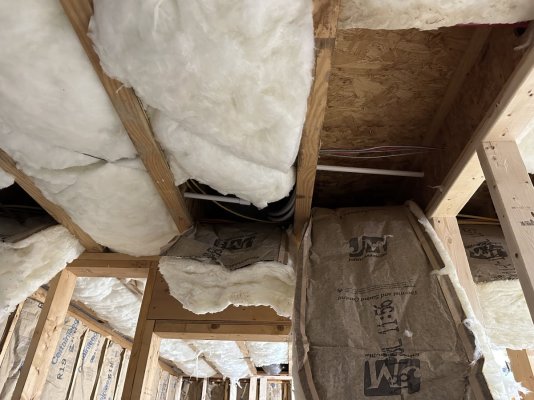
I've been experimenting with Sodium Hydroxide and Kalkwasser to raise my pH. My home is relatively new construction and is insulated quite well. I picked up a cheap Inkbird CO2 meter on Amazon and found out that my indoor CO2 levels were frequently >1000 ppm driving down my pH. While I had access to the newly framed walls, I ran a 1/2" Schedule 40 PVC pipe for a fresh air snorkel to connect the future protein skimmer to. I had the 1/2" PVC lying around with a bunch of connections from mocking up various tank sizes to see what size tank I wanted so I used that to prevent excessive waste. I'm hoping it's large enough diameter to provide adequate air flow for the skimmer. I probably would have went a little larger just because the run is a little long, but I had it on hand and it just cost me a little PVC cement.

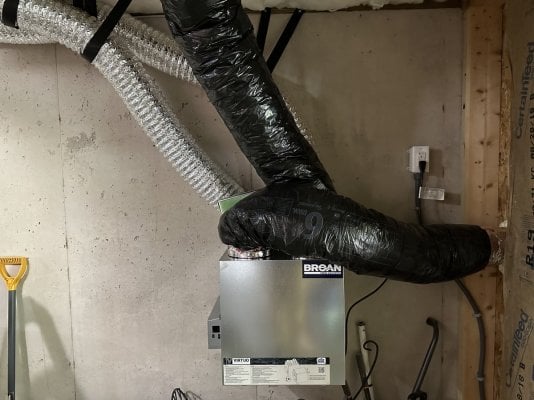
We also installed a whole home energy recovery ventilation system. For this I had to install 2 6" flexible ducts and vents through the wall along with a GFCI outlet. One thing always leads to another with construction. :face-with-rolling-eyes:

I selected a Broan 160 CFM 75% efficiency unit from supplyhouse.com. It autobalances when you set it up making installation quite easy. I simply tapped into the return and supply ducts of my home's HVAC system rather than running dedicated ducts. Despite the shortcut, my home's CO2 level is now down to 400-600 ppm everytime I check. The only downside to this installation method is you need to run the HVAC ventilation fan while the ERV is running to prevent any condensation (and subsequent mold) in the vents.

Fresh Air Supply Line.jpg Broan ERV Installed.jpg
 
Last edited:
OP
OP
trevorhiller

trevorhiller

Reef
Review score
+7 /0 /-0
View Badges
Joined
Oct 22, 2021
Messages
936
Reaction score
643
Review score
+7 /0 /-0
Location
Williamsport
Rating - 100%
1   0   0
THE STAND

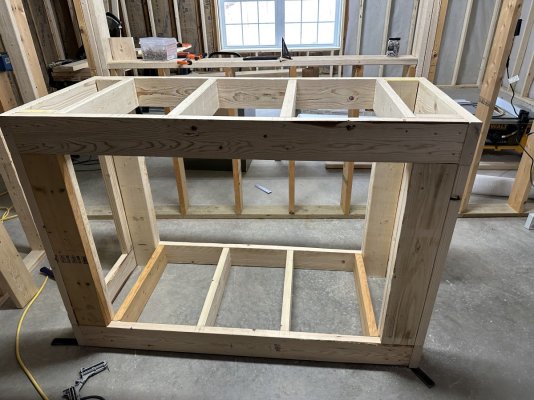
I really wanted to go with a 80/20 Aluminum T-Slot stand for the tank so I didn't have to worry about it ever. I never trust my own carpentry skills being a nervous nelly and all.

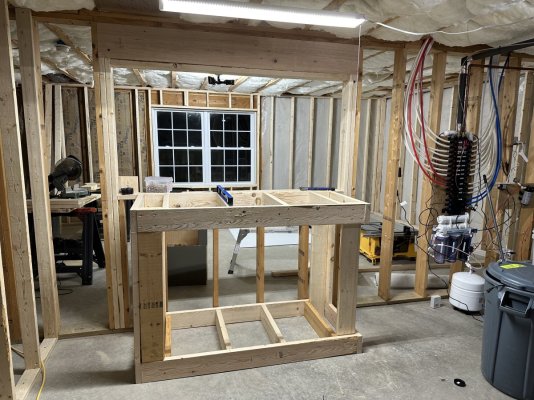
But, pricing them out I was looking at probably $1300-$1500 for the aluminum vs a few hundred for the wooden stand, hardware and trim. Therefore I opted for a DIY 2x6 wooden stand that will be skinned with 7/16" OSB and topped with 3/4" plywood. I used screws rated for marine spray areas and some galvanized structural brackets to reinforce the stand to be excessively overkill. I plan to put a nice finish around the stand for water/splash resistance. I'm likely going to use some FRP sheets and PVC trim to make it look as nice as possible. It's also going to be topped with foam before the tank goes on it.

DIY Aquarium Stand In Progress 2.jpg DIY Aquarium Stand In Progress.jpg
 
Last edited:
www.dinkinsaquaticgardens.com
OP
OP
trevorhiller

trevorhiller

Reef
Review score
+7 /0 /-0
View Badges
Joined
Oct 22, 2021
Messages
936
Reaction score
643
Review score
+7 /0 /-0
Location
Williamsport
Rating - 100%
1   0   0
MANAGING SALT-SPRAY

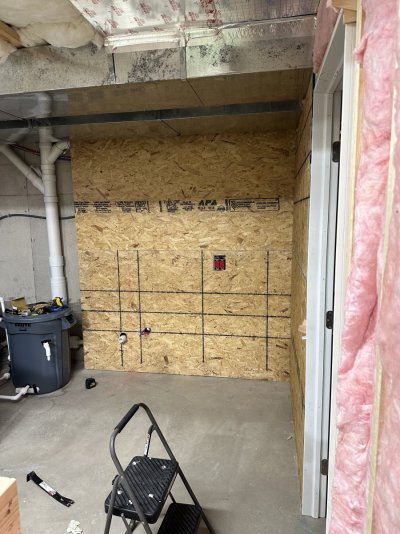
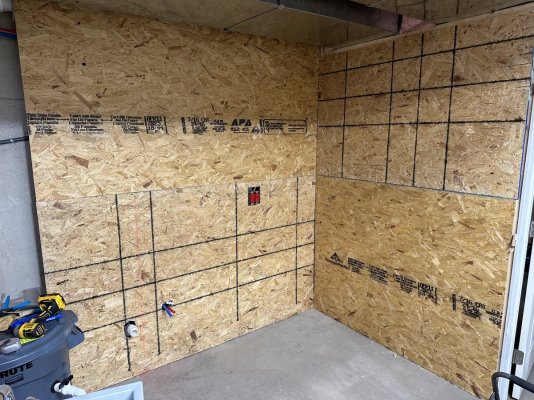
Once you've had a couple reef tanks, you realize that salt spray is a very real concern. I'm opting for fiberglass reinforced plastic panels in lieu of drywall in the Reef Lab. The opposite side of the dividing wall between the Reef Lab and the lounge/bar area will be water resistant drywall. FRP needs to be glued to the walls so I chose some 7/16" OSB panels and screwed them up to the walls.

Installing OSB Sheathing for FRP Wall Covering 1.jpg Installing OSB Sheathing for FRP Wall Panels 2.jpg
 
Last edited:
Nutramar Foods
Top Shelf Aquatics
www.dinkinsaquaticgardens.com
AquaCave Logo Banner
AquaCave

Polyp polynomial: How many heads do you start with when buying zoas?

  • One head is enough to get started.

    Votes: 27 10.6%
  • 2 to 4 heads.

    Votes: 145 57.1%
  • 5 heads or more.

    Votes: 65 25.6%
  • Full colony.

    Votes: 10 3.9%
  • Other.

    Votes: 7 2.8%
AquaNerd
Back
Top