I'm coming back into the hobby after about a six year break. I've been wanting to start up a new tank for the past two years, but we had been thinking about moving and I didn't want to start a new tank only to sell the house and then have to break it down and try to move it. Moved into a new house last March and bought everything for the new tank during the November/Black Friday sales. I have followed this forum and one or two others regularly and have received a lot of valuable information, but I have rarely posted anything. The types of threads that have always been the most informative and enjoyable for me are the build threads. So, with this new build I have decided to start a thread in hopes that I might be able to share some information or points that might help someone else who is contemplating the Red Sea tank and other equipment I've chosen, and possibly learn from the invariable mistakes (not too big I hope) I will make along the way.
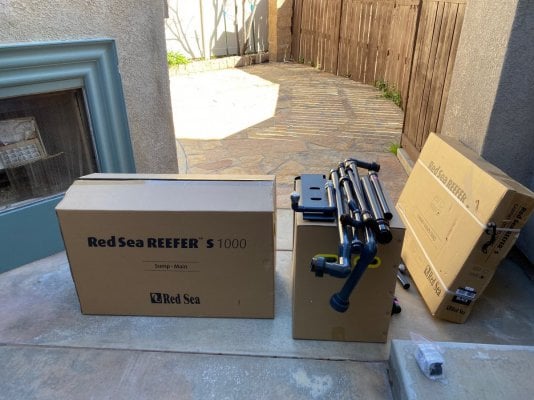
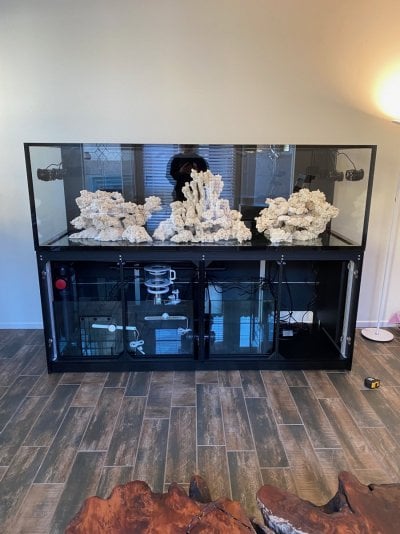
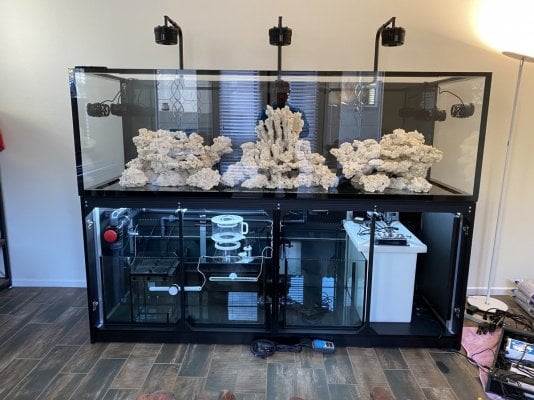
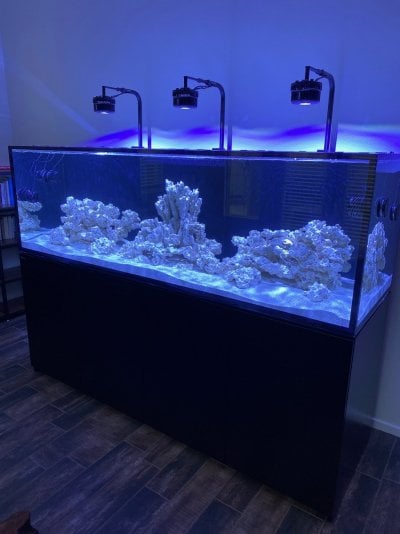
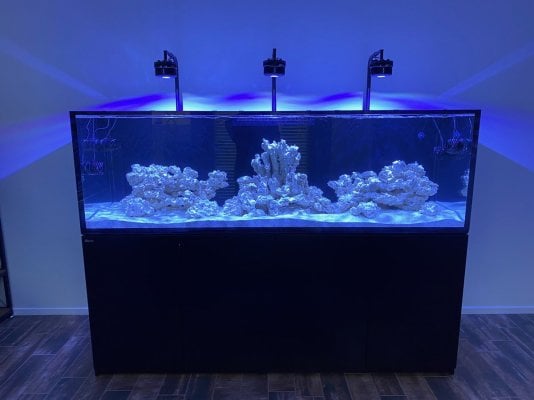
I wanted a six or seven foot tank and was considering various custom options, Cade, Waterbox, Innovative Marine, and Red Sea. I finally decided on the Reefer - S 1000. I decided on the Red Sea mainly due to the metal stand, the Euro bracing, the bracing on the bottom panel, the armored seams, and the price. I ordered the tank mid-November, but like many people who also ordered one around that time, it took a couple months to get. It finally arrived last Thursday, February the 10th.
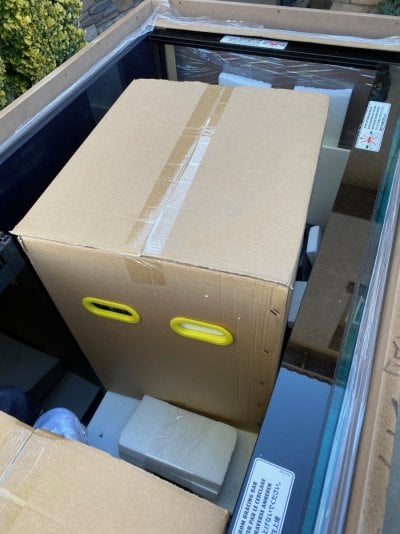
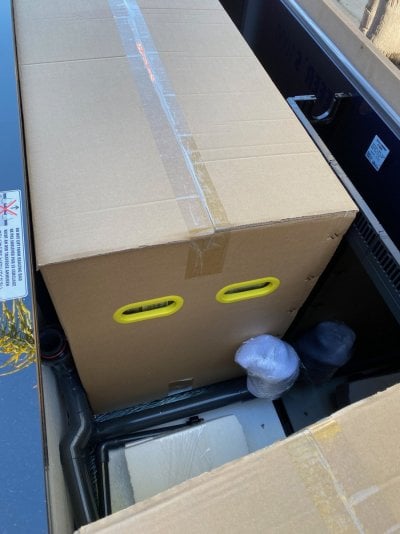
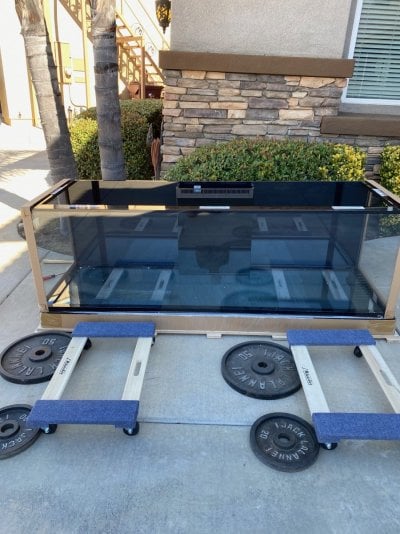
A single guy delivered the tank. Both the outer rails of the pallet were gone and it was just balancing on the center rail, so I had to help the guy unload it from the truck using his pallet jack and a floor jack that I have. The way it had been loaded into the truck made it incredibly difficult to get out to the loading gate, and in the process we had to remove the center rail from the pallet. This turned out to be a good thing because the stand is packaged under the tank on the pallet. You have to lift the tank off the stand first. My plan was to lift the tank onto two furniture dollies, and with the center brace of the pallet gone the plywood base of the crate now could sit directly on the ground. This allowed the height of the bottom of the tank to be almost as the same height of the dollies, so all I had to do is basically move the tank straight across from the pallet to the dollies without having to lift it up or drop it down too much. For anyone interested, I got the Milwaukee dollys at U-Haul for $19.99 a piece.
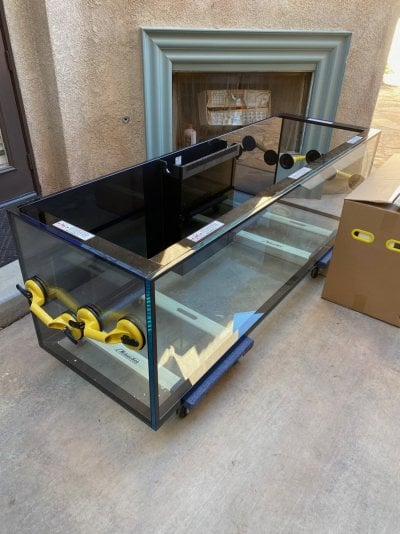
To unpack this thing, move the tank to the dollies, and then build the stand, at least two strong people would be the best. Unfortunately, I didn't have anyone to give me a hand, so it can be done with one person, but I'm still pretty sore two days later. I'm 53 and in decent shape, so it can be done, but the more the merrier on this one. Anyway, I bought two sets of FCHO glass suction cups from Amazon ($25.99 per set of two) to lift and move the tank. I am really happy with the dollys and the suction cups, well worth the money.
After unpacking everything out of the tank, and removing all the sides of the crate, I managed to move the tank onto the dollies one side at a time. My God this thing is heavy. To unpack everything from the tank, it took me about 45 minutes. Then, to remove the sides of the crate, move the tank to the dollies, move the tank into my courtyard, unpack the stand, finish breaking down the crate and cleaning everything up, it took me about another hour. I will hire a LFS to place the tank on the stand and level it for me.
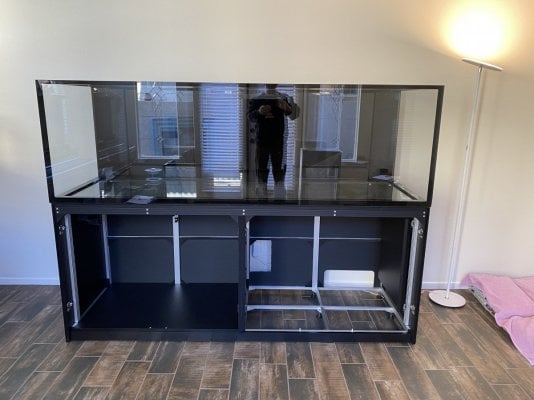
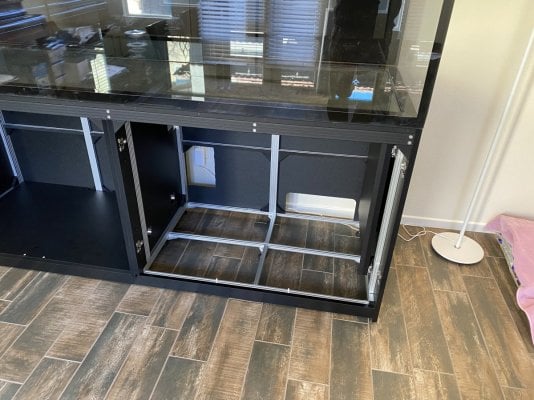
I then laid all the stand parts out and began putting it together. Some people have said that the instructions are bit hard to understand but I thought they are pretty straight forward. You do have to look at the diagrams really carefully to make sure you orient the pieces correctly, and in a couple of steps I found it helpful to look a couple steps ahead to make sure everything was oriented correctly. The only steps that had me stumped were steps 4 and 5. These steps have you attach part of the door hinges to two panels. They label the part as "L1" and the parts page shows two separate parts, "L1" and "L2" for the hinges, but in my parts box, I only had eight hinges. I couldn't for the life of me find the hinge base plate L1. I thought I was going to have to contact the retailer to let them know that I had parts missing. It turns out that L1 is packaged as already being connected to the L2 hinges though. You have to remove L1 from L2 to install L1. The instructions were not very clear about this. But for me, everything else was pretty easy to follow. You will also need to have a couple hand tools. Most of the screws have a torx bit head. You get two torx bits in the kit, but you need a screwdriver and/or power driver that can accept bits to be able to use the tools. A few screws are Phillips head, so you need a Phillips screwdriver too. It takes a bit of strength to get all the screws into the metal frame. To get the stand assembled to the point in the instructions where it says to place the tank on the stand, it took me about five hours.
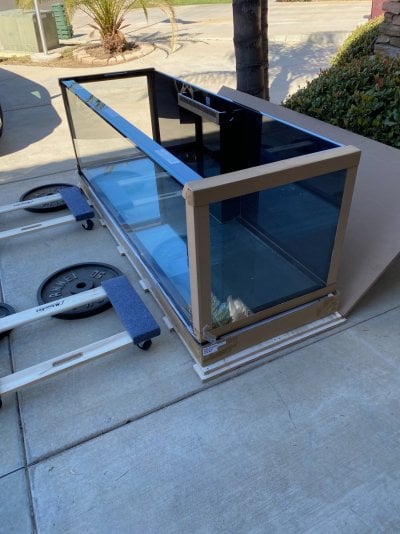
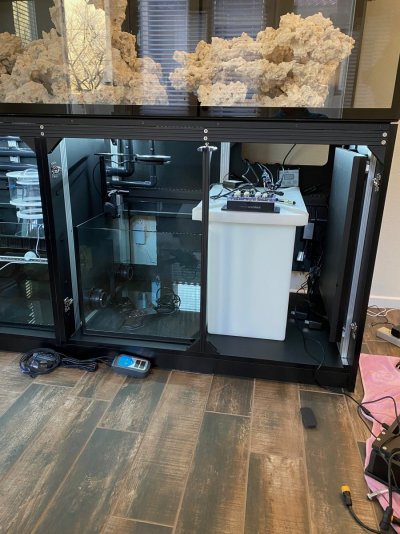
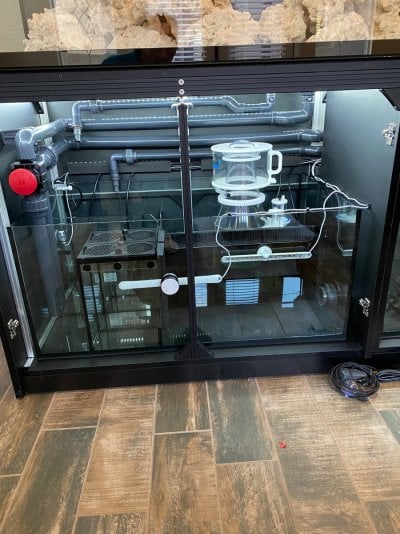
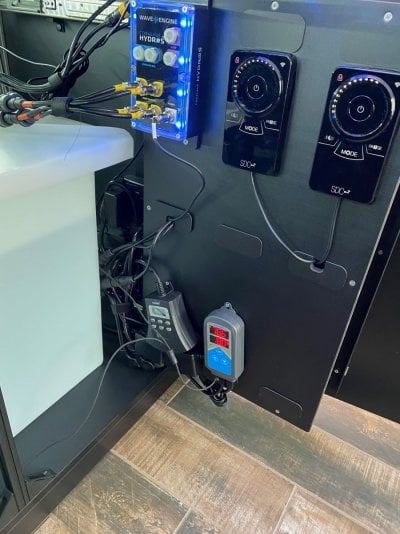
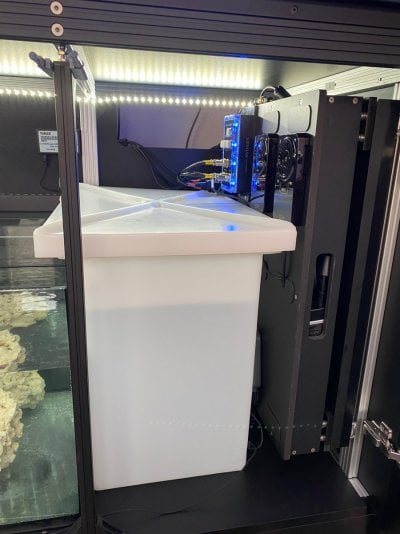
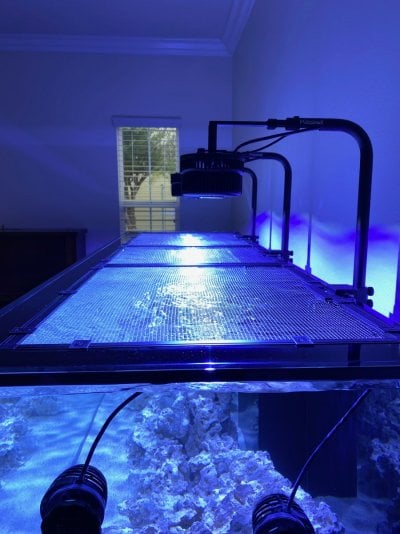
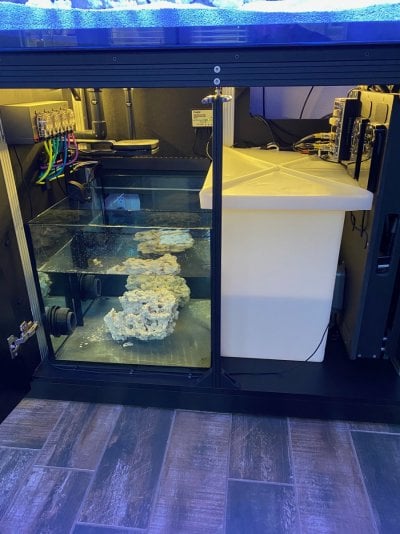
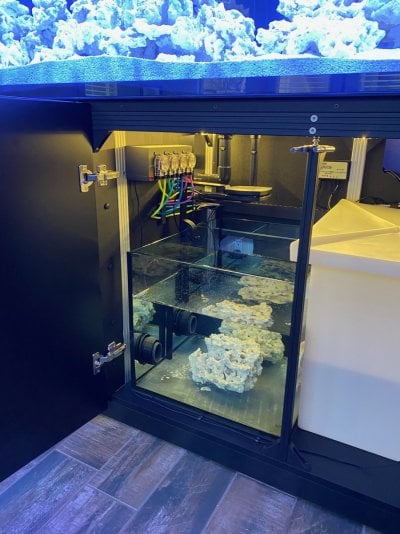
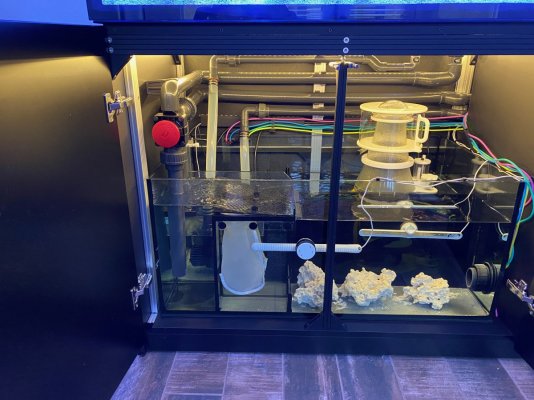
My impressions of the tank are that it is very, very well made. The extra bracing everywhere gives me a lot of confidence that this will be very reliable. All the edges have been cut and polished perfectly, and all the silicon seems to be perfect. The glass is very clear, and they even used low iron glass on the back panel which is black, so they didn't really even need to. The quality of the sump and all the plumbing is also very high. I am also very, very impressed with the quality of the fit and finish of the stand. Anyone who has purchased furniture and things like that online that require assembly by the purchaser knows that the fit of a lot of that stuff is questionable. Holes don't line up, gaps between panels and parts, cheap hardware, and flimsy materials are not uncommon. However, every single hole on all this stand's parts lined up perfectly. Nothing had to be "massaged" into place. No gaps between the panels and the braces. The hardware is high quality stainless. The panels all seem to be real plywood instead of MDF. The door hinges are soft close. It's really a very high quality stand. There are cheaper options than Red Sea, and this is the first Red Sea tank that I have ever had, but in my opinion the premium quality of everything so far really justifies the premium price. No corners have been cut on anything to do with this tank, stand, sump, and plumbing. I have absolutely no complaints at this point.
If anyone has any questions, please let me know. I will try to do an update with pictures once a week as I go through the process of getting the tank fully set up, cycled, and then filled with life.
Enjoy!


I wanted a six or seven foot tank and was considering various custom options, Cade, Waterbox, Innovative Marine, and Red Sea. I finally decided on the Reefer - S 1000. I decided on the Red Sea mainly due to the metal stand, the Euro bracing, the bracing on the bottom panel, the armored seams, and the price. I ordered the tank mid-November, but like many people who also ordered one around that time, it took a couple months to get. It finally arrived last Thursday, February the 10th.
A single guy delivered the tank. Both the outer rails of the pallet were gone and it was just balancing on the center rail, so I had to help the guy unload it from the truck using his pallet jack and a floor jack that I have. The way it had been loaded into the truck made it incredibly difficult to get out to the loading gate, and in the process we had to remove the center rail from the pallet. This turned out to be a good thing because the stand is packaged under the tank on the pallet. You have to lift the tank off the stand first. My plan was to lift the tank onto two furniture dollies, and with the center brace of the pallet gone the plywood base of the crate now could sit directly on the ground. This allowed the height of the bottom of the tank to be almost as the same height of the dollies, so all I had to do is basically move the tank straight across from the pallet to the dollies without having to lift it up or drop it down too much. For anyone interested, I got the Milwaukee dollys at U-Haul for $19.99 a piece.
To unpack this thing, move the tank to the dollies, and then build the stand, at least two strong people would be the best. Unfortunately, I didn't have anyone to give me a hand, so it can be done with one person, but I'm still pretty sore two days later. I'm 53 and in decent shape, so it can be done, but the more the merrier on this one. Anyway, I bought two sets of FCHO glass suction cups from Amazon ($25.99 per set of two) to lift and move the tank. I am really happy with the dollys and the suction cups, well worth the money.
After unpacking everything out of the tank, and removing all the sides of the crate, I managed to move the tank onto the dollies one side at a time. My God this thing is heavy. To unpack everything from the tank, it took me about 45 minutes. Then, to remove the sides of the crate, move the tank to the dollies, move the tank into my courtyard, unpack the stand, finish breaking down the crate and cleaning everything up, it took me about another hour. I will hire a LFS to place the tank on the stand and level it for me.
I then laid all the stand parts out and began putting it together. Some people have said that the instructions are bit hard to understand but I thought they are pretty straight forward. You do have to look at the diagrams really carefully to make sure you orient the pieces correctly, and in a couple of steps I found it helpful to look a couple steps ahead to make sure everything was oriented correctly. The only steps that had me stumped were steps 4 and 5. These steps have you attach part of the door hinges to two panels. They label the part as "L1" and the parts page shows two separate parts, "L1" and "L2" for the hinges, but in my parts box, I only had eight hinges. I couldn't for the life of me find the hinge base plate L1. I thought I was going to have to contact the retailer to let them know that I had parts missing. It turns out that L1 is packaged as already being connected to the L2 hinges though. You have to remove L1 from L2 to install L1. The instructions were not very clear about this. But for me, everything else was pretty easy to follow. You will also need to have a couple hand tools. Most of the screws have a torx bit head. You get two torx bits in the kit, but you need a screwdriver and/or power driver that can accept bits to be able to use the tools. A few screws are Phillips head, so you need a Phillips screwdriver too. It takes a bit of strength to get all the screws into the metal frame. To get the stand assembled to the point in the instructions where it says to place the tank on the stand, it took me about five hours.
My impressions of the tank are that it is very, very well made. The extra bracing everywhere gives me a lot of confidence that this will be very reliable. All the edges have been cut and polished perfectly, and all the silicon seems to be perfect. The glass is very clear, and they even used low iron glass on the back panel which is black, so they didn't really even need to. The quality of the sump and all the plumbing is also very high. I am also very, very impressed with the quality of the fit and finish of the stand. Anyone who has purchased furniture and things like that online that require assembly by the purchaser knows that the fit of a lot of that stuff is questionable. Holes don't line up, gaps between panels and parts, cheap hardware, and flimsy materials are not uncommon. However, every single hole on all this stand's parts lined up perfectly. Nothing had to be "massaged" into place. No gaps between the panels and the braces. The hardware is high quality stainless. The panels all seem to be real plywood instead of MDF. The door hinges are soft close. It's really a very high quality stand. There are cheaper options than Red Sea, and this is the first Red Sea tank that I have ever had, but in my opinion the premium quality of everything so far really justifies the premium price. No corners have been cut on anything to do with this tank, stand, sump, and plumbing. I have absolutely no complaints at this point.
If anyone has any questions, please let me know. I will try to do an update with pictures once a week as I go through the process of getting the tank fully set up, cycled, and then filled with life.
Enjoy!