"Painted" Rockwork using Colored Mortars

polyppal

2500 Club Member
View Badges
Joined
Feb 16, 2018
Messages
3,311
Reaction score
6,486
Location
Colorado
Rating - 100%
1   0   0
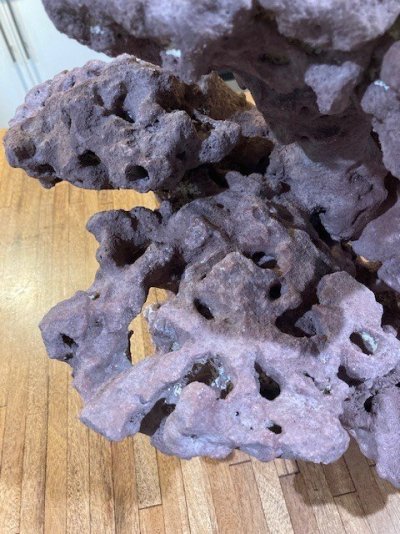
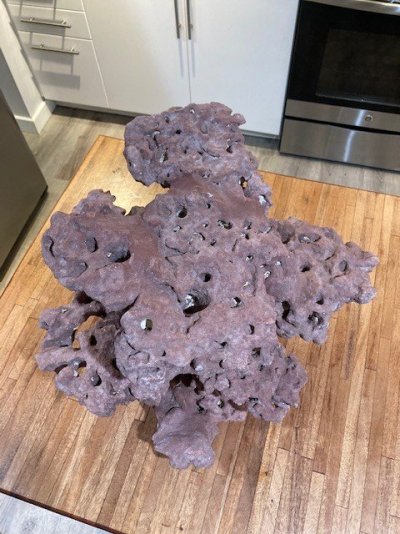
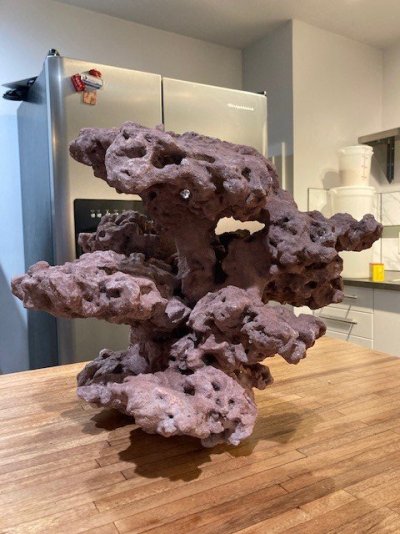
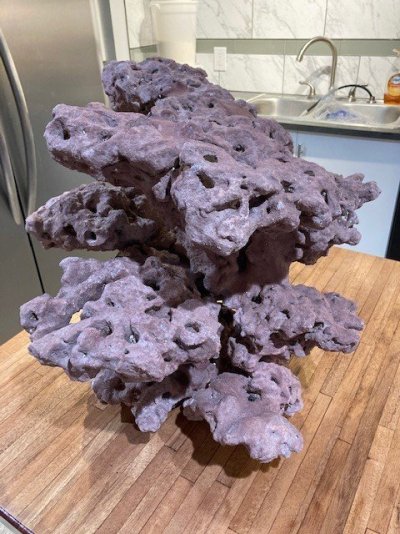
I am a big time aquascaper and have spent about 2 weeks sculpting the rockwork for my new cube. It is composed of reefsaver that I chiseled and dremeled into shelves, then cemented together to give it a stepped branching/tabling look. This piece is a monster - about 17hx22l and 60lbs!

Originally I was planning on just living with the white rock until cca naturally grew in, however when the piece was finally finished - with 25+ epoxy/cement/mortar joints and reinforcements all over the structure - it was REALLY ugly :confused:

jjj.jpg

(Cemented joint, unpainted)

I decided to try coating it in a colored reef safe mortar and see how it goes, so I used my @Bulk Reef Supply customer appreciation gift certificate to buy a bucket of Marcos Rocks E-Marco-400 mortar in the 'pink' (totally purple) color. These mortars are just a specially formulated hydraulic cement with an acrylic fortifier and a non-toxic pigment added for the color, it seems like it should be a much safer more solid option to coloring rockwork than other methods.

lll.jpg

(Same joint above painted with thinned E-Marco 'pink' mortar)

I reinforced the existing concrete or epoxy joints with the mortar as it would normally be used, then I thinned it out significantly and 'painted' it on the surface of the rock to give it a uniform purple look. While the rock was wet I dusted on more dry mortar with the brush. After letting it dry a few days, I thoroughly rinsed the structure with a pressure washer on a very low setting to help clear away any residual debris.

rrr.jpg

(Pore structure of the dried painted rock)

I am thus far thrilled with how it came out! Underwater, the coloration is a deeper purple, while not appearing to be 'neon' purple like some of the fake rock finishes. I am not aware of anyone else who has tried this yet for coloration, this rockwork might serve the purpose of seeing if painting on the colored mortar has any adverse effects on tank chemistry. The progress of the rockwork will be documented in my build thread.
ppp.jpg
mmm.jpg
sss.jpg
ttt.jpg
 
Last edited by a moderator:

Daniel@R2R

Living the Reef Life
View Badges
Joined
Nov 18, 2012
Messages
38,421
Reaction score
67,446
Location
Fontana, California
Rating - 100%
1   0   0
Very nice! Great job on the scape!
 
OP
OP
polyppal

polyppal

2500 Club Member
View Badges
Joined
Feb 16, 2018
Messages
3,311
Reaction score
6,486
Location
Colorado
Rating - 100%
1   0   0
Good idea! I had some ugly rocks that took YEARS to get covered and to look the way I wanted... what you did is good insurance that they will look good now and later.
Right! The CCA seems to take its time covering the ugly joints on rockwork IME
 

Weasel1960

Valuable Member
View Badges
Joined
Aug 22, 2020
Messages
2,139
Reaction score
9,995
Location
Monticello, WI
Rating - 0%
0   0   0
Looks awesome. My only thought is stability. Your first full picture on the table appears to lean to the right. I presume it is base heavy and won’t tip?
 
OP
OP
polyppal

polyppal

2500 Club Member
View Badges
Joined
Feb 16, 2018
Messages
3,311
Reaction score
6,486
Location
Colorado
Rating - 100%
1   0   0
Looks awesome. My only thought is stability. Your first full picture on the table appears to lean to the right. I presume it is base heavy and won’t tip?
Yeah its pretty well balanced, when I was assembling it I intentionally wanted to make it look unstable without it actually being so. Probably half the 60lb weight is solid rock at the base that keeps it stable.
 

stefdvm

Community Member
View Badges
Joined
Oct 31, 2014
Messages
96
Reaction score
105
Location
Elon, NC
Rating - 0%
0   0   0
I love this! I wish I'd seen your post before I put my rocks in water... sigh. I used the "pink" mortar because the grey was out of stock and none of it actually matches the rocks anyway - and my rocks are a mix of old dead / dry rock and new dry rock so it's a royal hot mess. This was a great solution!
 
OP
OP
polyppal

polyppal

2500 Club Member
View Badges
Joined
Feb 16, 2018
Messages
3,311
Reaction score
6,486
Location
Colorado
Rating - 100%
1   0   0
I love this! I wish I'd seen your post before I put my rocks in water... sigh. I used the "pink" mortar because the grey was out of stock and none of it actually matches the rocks anyway - and my rocks are a mix of old dead / dry rock and new dry rock so it's a royal hot mess. This was a great solution!
Thanks, yeah about 3 months in with this structure and no issues whatsoever!
 

stefdvm

Community Member
View Badges
Joined
Oct 31, 2014
Messages
96
Reaction score
105
Location
Elon, NC
Rating - 0%
0   0   0
Thanks, yeah about 3 months in with this structure and no issues whatsoever!
So, inspired by your work, I pulled my rock out of the water (I'm in the new-build phase so it was just percolating in saltwater in the garage, not actually in the tank), let it dry out and I'm "painting" it all with watered down Marco mortar. I've done almost half of it so far and I LOVE it.
 
OP
OP
polyppal

polyppal

2500 Club Member
View Badges
Joined
Feb 16, 2018
Messages
3,311
Reaction score
6,486
Location
Colorado
Rating - 100%
1   0   0
So I had to unexpectedly move down the hallway this week to another apartment after a pipe in my wall burst... Not a huge ordeal, but it required doing the think reefkeepers dread the most - moving the tank.

Everything went pretty smoothly, since the new apartment was just down the hall I was able to bucket most of the water and get things setup again pretty quickly. Because I had to pull the rockwork from the tank, I decided to take the opportunity to fix a few things about it I didn't like...


I added more rockwork to the front, adding two new ledges that were just open/wasted space before. This also added a few more overhangs and a new cave at the front of the structure im sure the fish will appreciate, since there wasn't much cover before.

Used Emarco to add the rocks, and painted the new sections. Let dry for a few hours and (after nearly throwing out my back) its in the display!


A few tips id have for anyone trying to do something similar with their aquascape:

1) Shine a light over your structure as your building it up. There are areas of the platforms that I thought would receive direct light, but after mounting the Radion there are more obstructed areas than I thought.

2) Create plenty of hiding spaces/caves/etc in your rockwork for your fish. I didn't really think about hiding spaces for my livestock when I was constructing, and they were always crowding the one or two dark spots. I felt pretty bad every time I noticed it :(. In the future, Id give the livestock more consideration when planning it out.

3) Consider the WEIGHT of what your building and how you will logistically install/remove it! This piece of rockwork weighs about 80lbs, and with the ridiculous height of the tank, it was extremely difficult to install and (especially) remove without damaging the rockwork or tank! I cant imagine what a nightmare it will be moving when its full of corals... If I did it again, I would think about creating 2 or 3 structures that are more manageable in the future, rather than one massive/super heavy one!
 

stefdvm

Community Member
View Badges
Joined
Oct 31, 2014
Messages
96
Reaction score
105
Location
Elon, NC
Rating - 0%
0   0   0
Looks great!! I’m pleased with how mine turned out after I “painted” it all. I had also gone back in and increased overhangs and cave like areas for the fish. Good pointers!
 
Back
Top