OM’s 260 gallon SPS dominant build

Om84

Active Member
View Badges
Joined
Oct 26, 2018
Messages
323
Reaction score
291
Location
Chicago Suburbs
Rating - 100%
1   0   0
My tank has been up and running a little over 2 years. This is a delayed build thread. I never got around to writing all this up but I have kept logs, pictures, and videos to document the build. I have gone through many challenges and learned a ton. I plan on sharing and documenting all of this here. I am from the Chicago suburbs and have been reefing since 2009. I have mostly kept mixed reef tanks. I really got into SPS a few years ago and kept a 66 gallon SPS tank before. I decided to upgrade to a larger reef when I saw a local reefer selling his 260 gallon tank.

Aquarium: Miracle's 260 gallon 84" L x 30" W x 24" H eurobraced tank with 3/4" Starfire glass on 3 sides. 48" rear external overflow with three 1.5" bulkheads with bean animal drain. There are two 3/4" returns one on either side
Stand: Metal
Sump: Advanced Acrylics custom 48" x 20" x 20" with four 4" filter socks holder
Light: ATI Straton x 3 + Reefi Uno 2.0 x 2 mounted inside white acrylic canopy
Skimmer: LifeReef run by Vectra M1
Return: Reef Octopus VarioS 8 x 2
UV: AquaUV 57 W
Powerheads: MaxSpect XF350 x 4, MP40 x 2, Reef Octopus Pulse 4 x 2
Kalk Reactor: Avast Marine K2 Stirrer
Controller: Apex
Dosing: DOS x 2 for dosing 2 part (Alk + Ca)
Chiller: JBJ Arctica 1/4 HP
Feeder: Avast Marine Plank
Substrate: Bare bottom / Starboard
Rock: Marco Rocks dry rock

Here is a recent teaser clip of the tank before I get into the details of how I got here.

 
Last edited:

Jimbo327

Active Member
View Badges
Joined
Jun 12, 2007
Messages
487
Reaction score
495
Location
Orange County, CA
Rating - 0%
0   0   0
Gorgeous tank! And I love these build threads that have been set up, so I can zoom through 2 years of progress.

And a fellow Straton user and SPS lover. I need to PM you regarding this light and how you are setting it. I see you have 2 reefi Uno.

That tank is the perfect dimension.
 
OP
OP
O

Om84

Active Member
View Badges
Joined
Oct 26, 2018
Messages
323
Reaction score
291
Location
Chicago Suburbs
Rating - 100%
1   0   0
It took a moving company with 4 guys to move this to my office on ground level. Most companies refused moving aquariums so I had to call around until I found one. The tank was placed on a wooden board and foam and leveled. The metal stand came with a wooden frame to wrap it.

20211005_160527250_iOS.jpg
 
OP
OP
O

Om84

Active Member
View Badges
Joined
Oct 26, 2018
Messages
323
Reaction score
291
Location
Chicago Suburbs
Rating - 100%
1   0   0
Here is the sump from Advanced Acrylics. I liked the all black acrylic except for the front viewing pane. There are 3 1.5" returns and 4 filter sock holders. The first chamber after is for the skimmer followed by refugium, bubble trap, and finally the return chamber.

Sump.jpg
 
OP
OP
O

Om84

Active Member
View Badges
Joined
Oct 26, 2018
Messages
323
Reaction score
291
Location
Chicago Suburbs
Rating - 100%
1   0   0
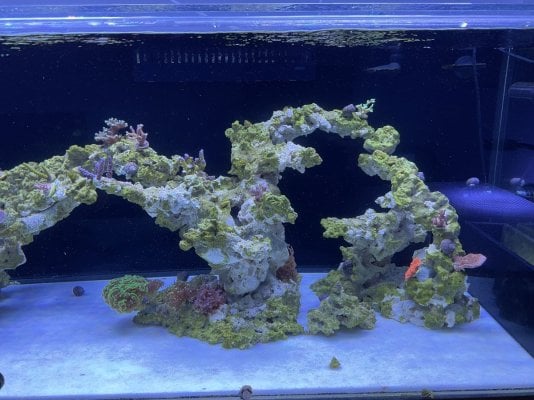
I wanted to build my own rock scape for this tank. I had a particular idea in my mind. I used all dry reef saver marco rock. I forgot how many pounds I used.

Rocks1.jpg


Through a kind of pain staking process I broke rocks into small pieces and finally used mortar, sand, and glue to come up with a structure that was made of 4 individual pieces that came together to give the final look. I planned on keeping a heavily stocked tank and I included many hiding spots for fish but have a lot of space for mounting SPS and keeping flow uninterrupted throughout the structure.

rocks2.jpg


I wanted to have a lot of overhangs and arches yet keep only 4 major rock structures that touched the substrate.

rocks3.jpg
 
OP
OP
O

Om84

Active Member
View Badges
Joined
Oct 26, 2018
Messages
323
Reaction score
291
Location
Chicago Suburbs
Rating - 100%
1   0   0
The plumbing involves three 1.5" drains in bean animal style that drain into the left side of the sump. One of the drains has a gate valve to control flow through the sump. There is also an emergency drain. The right side of the sump has two return pumps (Varios 8) mostly for redundancy. One pump is dedicated as the main return pump. The second pump returns to the display but also is connected to a manifold with five outlets. I planned on having reactors for carbon and GFO. I also planned to have flow to the UV and chiller.

plumbing1.jpg
 
OP
OP
O

Om84

Active Member
View Badges
Joined
Oct 26, 2018
Messages
323
Reaction score
291
Location
Chicago Suburbs
Rating - 100%
1   0   0
The right side of the sump in the return chamber had a pre-drilled hole. This was originally used for an external return pump. I had the option to close this up with a bulkhead but I used it as a drain. With a flip of a valve I am able to drain about 40 gallons from the sump to help with water changes.

drain.jpg
 
OP
OP
O

Om84

Active Member
View Badges
Joined
Oct 26, 2018
Messages
323
Reaction score
291
Location
Chicago Suburbs
Rating - 100%
1   0   0
Once I filled the tank up to test unfortunately the sump leaked from the side at the seams! I should have tested it before installing the sump. I thought there wouldn't be an issue since I saw the system set up before and the sump didn't have any leaks. Damage must have been done during the move. I welded acrylic pieces where the leak was from inside and outside and hoped it would work. It wasn’t pretty but it has held up so far!


I have never had to weld acrylic in my life. This is what I love about this hobby. Having to learn things I have never done before. I do fear leaks in the future. I have leak alarms set up in the area. My back up will be to install another sump that I have on stand by. It's going to be a lot of work so I have held off for now.

weldedacrylic.jpg
 
Last edited:
OP
OP
O

Om84

Active Member
View Badges
Joined
Oct 26, 2018
Messages
323
Reaction score
291
Location
Chicago Suburbs
Rating - 100%
1   0   0
After cycling and placing fish in the tank unfortunately I had ich in the tank after introduction of a tang. I had to remove and treat all the fish which was very painful. I went fallow for about 2 months. After this I had to be diligent in buying only completely quarantined fish and observing them before placing them in the DT. I set up a QT and observation system. Any fish purchased locally went through TTM and observation before going in DT.

IMG_2965.jpeg
 
Last edited:
OP
OP
O

Om84

Active Member
View Badges
Joined
Oct 26, 2018
Messages
323
Reaction score
291
Location
Chicago Suburbs
Rating - 100%
1   0   0
I went through a series of ugly phases in the next few months. I had one of the worst cases of hair algae that I had ever seen. This was despite using low levels of light. I expected this specially with using all dry rock.

 
OP
OP
O

Om84

Active Member
View Badges
Joined
Oct 26, 2018
Messages
323
Reaction score
291
Location
Chicago Suburbs
Rating - 100%
1   0   0
I started adding corals around October and November of 2022. I still didn’t have any fish in the DT. This helped keep nutrients to a minimum as I added fish back slowly. I did dose Nitrates to keep them around 5 ppm to keep corals happy. As you can see hair algae has been pretty much eliminated.

IMG_0130.jpeg


IMG_0131.jpeg


IMG_0132.jpeg
 

Attachments

  • IMG_0132.jpeg
    IMG_0132.jpeg
    237.2 KB · Views: 38
OP
OP
O

Om84

Active Member
View Badges
Joined
Oct 26, 2018
Messages
323
Reaction score
291
Location
Chicago Suburbs
Rating - 100%
1   0   0
Nicely done. How is it working with 30" wide? Planned a tank with the same width.
I absolutely love the width! Honestly, my ideal width would be at least 48”. I don’t have any more space for corals lol. Now that the sps have grown quite a bit, the rock work is getting hidden and I wish I could push the scape back more to have more open space for fish to swim. My next build ideally will be a peninsula maybe 96” x 48” x 24”. But that’s not gonna be for a while!
 

danreef55

Valuable Member
View Badges
Joined
Dec 9, 2023
Messages
1,086
Reaction score
2,386
Location
New York
Rating - 0%
0   0   0
This is a work in progress and far from done. We had similar ideas. 72x30x25. I am leaving the rear of the rock work 4" from the glass.
1719191472162.png
 
Back
Top