New / Redo Red Sea 425XL

AquaCave

Etto

Community Member
Review score
+0 /0 /-0
View Badges
Joined
Jun 23, 2019
Messages
64
Reaction score
33
Review score
+0 /0 /-0
Rating - 0%
0   0   0
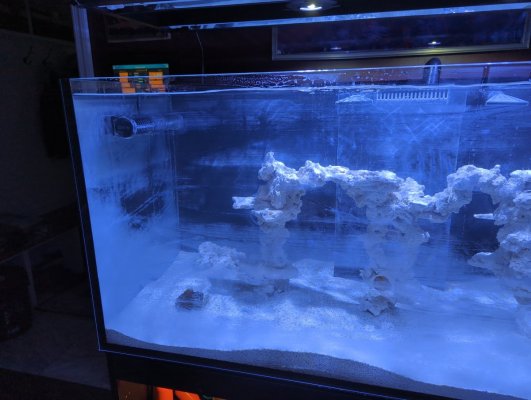
A crash about a month ago I was all set to pack it up, but the wife and kids objected so I'm starting over from scratch. I made mistakes and learned a lot the first time around and hopefully able to do better or at least make new mistakes and not repeat them. I've been cleaning the tank/equipment and planning the setup for the past month. I've been through several versions of the way I was going to do it and was all set to start gluing the plumbing when I changed it again last weekend. The tank was always on the right side of my home office, but realized that if I removed the Tv I rarely use I could have it on the wall that the RODI setup is on in the closet in the hall outside my office. Very excited about this setup and a bit embarrassed that I didn't think of it sooner.
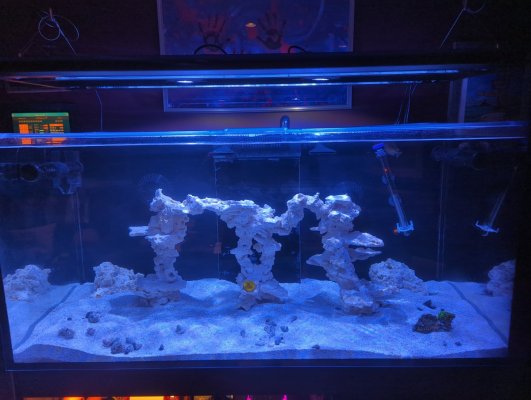
Red Sea 425XL
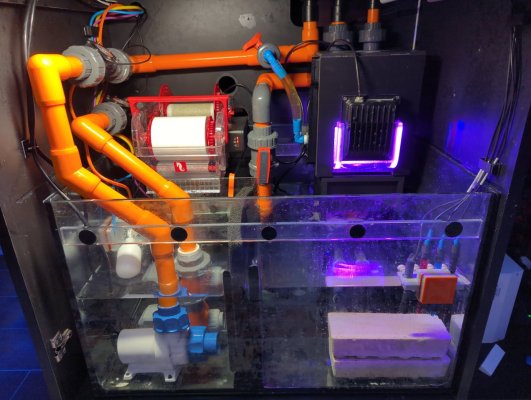
Neptune COR20 feeding the Aqua UV 25W Sterilizer
Vectra M1 as primary return
Reefwave 45 (2)
Vortex MP40 (2)
ReefMat 500
Clear Water Algae Scrubber CW-50
Vortech Battery Backup
Inkbird Heat Controller with 2 titanium heaters
Neptune Apex
Neptune Trident
Neptune DOS for auto water change
Neptune DOS for 2 part
Neptune Energy Bar (2)

Marco Rock - Process of creating something

Preorder Rea Sea ATO which I hope ships soon.

I haven't decided on a skimmer yet, Waiting to see how much room I have in the sump and purchase accordingly.

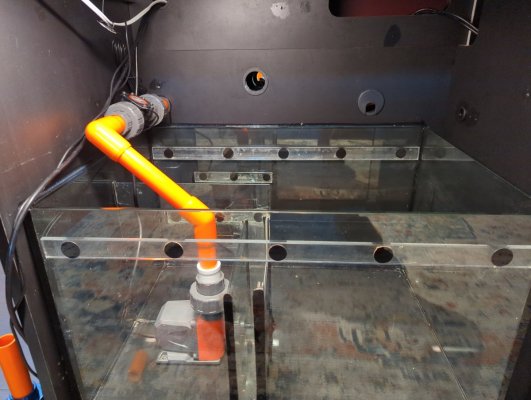
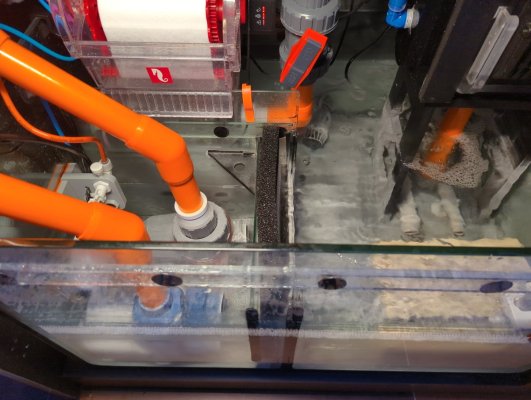
Trying to be a lot more organized this time around. The first build became a hot mess with wires and equipment.

I hope to have the plumbing completed this weekend, so I will update soon.
 
Top Shelf Aquatics
Corals.com
OP
OP
Etto

Etto

Community Member
Review score
+0 /0 /-0
View Badges
Joined
Jun 23, 2019
Messages
64
Reaction score
33
Review score
+0 /0 /-0
Rating - 0%
0   0   0
I thought I would give as much information on this redo journey to help others that are bound to have the same issues.

The tank had a lot of coralline algae and I wanted to clean up as much as possible. Researched and watched many videos and decided on using apple cider vinegar. I soaked paper towels in the vinegar and covered the glass and let it set overnight. The next day 90% was able to be rubbed off easily. I repeated another treatment and it looks as new as possible. The pipes I soaked in vinegar with similar results.

When I added the Reefmat and Algae Scrubber the sump was unmanageable. I looked into getting a new sump, but finally decided to keep the Red Sea sump with some changes. I turned it 180 degrees so that the return is now on the left front and allowing me to put the Reefmat and Scrubber at the back. Hopefully this will work as expected.

The part you need to connect the pipes to the sump is R42436. I got this information from the Red Sea support. I have never dealt with better support personal. The woman helping me emailed back and forth several times and when I couldn't find the parts she called their warehouse and shipped them directly. She was amazing.

I dry fit the plumbing today, but ran out of orange 90 elbows so won't be able to glue until next week.

2023-03-23 16.18.45.jpg
 
Last edited:
OP
OP
Etto

Etto

Community Member
Review score
+0 /0 /-0
View Badges
Joined
Jun 23, 2019
Messages
64
Reaction score
33
Review score
+0 /0 /-0
Rating - 0%
0   0   0
This is the first return pump. It goes out the back into the closet passes through the UV sterilizer and then back through the wall and over the top into the tank. I'm still working on an elegant over the top instillation.
 

Attachments

  • 2023-03-23 16.15.29.jpg
    2023-03-23 16.15.29.jpg
    158.4 KB · Views: 13
AquaCave Logo Banner
OP
OP
Etto

Etto

Community Member
Review score
+0 /0 /-0
View Badges
Joined
Jun 23, 2019
Messages
64
Reaction score
33
Review score
+0 /0 /-0
Rating - 0%
0   0   0
The down flow to the Reefmat I ran out of orange elbows but this is what it looks like. In order to get the valve on I had to come forward and then back. I think it's fine, but decreases the space for the eventual Skimmer.

The final setup as well.
 

Attachments

  • 2023-03-23 17.52.28.jpg
    2023-03-23 17.52.28.jpg
    149.7 KB · Views: 11
  • 2023-03-23 17.53.29.jpg
    2023-03-23 17.53.29.jpg
    160.3 KB · Views: 13
OP
OP
Etto

Etto

Community Member
Review score
+0 /0 /-0
View Badges
Joined
Jun 23, 2019
Messages
64
Reaction score
33
Review score
+0 /0 /-0
Rating - 0%
0   0   0
I worked on the rocks the past couple of day.

Marco Rock (50 lbs)
Marco Rock Powder (1 container)
Glue Master (thin viscosity) Glue (9 tubes 2oz)
Exam gloves
Goggles
Mask

I watched many videos of this and no one mentioned just how toxic the fumes are. The first attempt I only got a couple of rock together before it was overwhelming and had to stop because it was burning my eyes and nose. If I was able to do it outside it probably would have been better but I would still recommend the goggle and respirator. I tried a different glue that was recommended, but it just ran off the powder and didn't soak into it. The Glue Master bonds well and fairly quickly. I bought 50 lbs of Marco Rock, but I think 25 lbs would have been fine because I'm not sure I even used half. The Marco powder was a huge help (I used almost the entire container. Some videos collected the powder after breaking up the rocks but that would have been time consuming. I won't go into the technique because there are so many videos online, but happy to answer any questions.
I built it in 3 section and plan to connect them once in the tank. I would appreciate anyone's comments about it's construction. Not sure if I need more hiding spots for the fish or more depth. The outer line on the cardboard is the tank and the inner is about 5-6 inches from the glass.

2023-03-25 08.38.33.jpg 2023-03-25 08.40.38.jpg 2023-03-25 08.38.09.jpg
 
OP
OP
Etto

Etto

Community Member
Review score
+0 /0 /-0
View Badges
Joined
Jun 23, 2019
Messages
64
Reaction score
33
Review score
+0 /0 /-0
Rating - 0%
0   0   0
Good luck on the new setup!

I also have a RSR425 XL and happy to help with any questions.
I looked at your build. Very nice.

I've been looking at light. How do you like the Radions? It's a really clean look. I added the XHO to the Kessil 360s but I feel like all the lights without a hood is a distraction from the display.

Why did you choose the Pro over the Blue?

Thanks for your help.
 
Top Shelf Aquatics

PeterC99

Living The Reef
Review score
+2 /0 /-0
View Badges
Joined
Aug 28, 2020
Messages
6,234
Reaction score
29,748
Review score
+2 /0 /-0
Location
White Plains, NY
Rating - 0%
0   0   0
I looked at your build. Very nice.

I've been looking at light. How do you like the Radions? It's a really clean look. I added the XHO to the Kessil 360s but I feel like all the lights without a hood is a distraction from the display.

Why did you choose the Pro over the Blue?

Thanks for your help.
I really like the Radions, they grow coals very well and make them look spectacular.

I like the Pros over the Blues because you get much more of the warm & cool whites. Blues make the corals look great (which the Pros have enough of IMO) but the whites are what really make the corals grow.
 
OP
OP
Etto

Etto

Community Member
Review score
+0 /0 /-0
View Badges
Joined
Jun 23, 2019
Messages
64
Reaction score
33
Review score
+0 /0 /-0
Rating - 0%
0   0   0
I had a couple of set backs, but finally sorted through and on my way. I started the cycle and all was going well and on day 3 the ammonia was decreasing and nitrite was increasing. I figured that I would be done within a week. On day 5 the ammonia spiked and the nitrite spiked. I was a bit confused until I realized that when the pods came for the other tank my lovely wife misunderstood and placed them in the new tank. My error, but it did set us back about 7-10 days. I added additional Dr Tim's bacteria and it went on and cycled fine. After a couple of days I added 2 fish and a couple of corals. Everything looked good when I went to bed, but when I got up in the morning it looked like a winter storm came through. Everything was covered white in the display and sump. I had know idea that calcium precipitation was a thing, but know I do. I let it set for a couple of days and the calcium eventually went to zero. I started cleaning 1 side of the display per day. The calcium buildup was so think I didn't want to do more than that. When the display was cleaned I did the sump which involved removing everything, soaking and putting things back. Actually turned out ok because I changed some things up.
I attached some photos of before and after.
 

Attachments

  • 2023-04-23 16.53.08.jpg
    2023-04-23 16.53.08.jpg
    169.9 KB · Views: 4
  • 2023-04-23 16.53.14.jpg
    2023-04-23 16.53.14.jpg
    169.3 KB · Views: 6
  • 2023-05-02 18.57.52.jpg
    2023-05-02 18.57.52.jpg
    186.8 KB · Views: 6
  • 2023-05-02 18.59.33.jpg
    2023-05-02 18.59.33.jpg
    174.9 KB · Views: 6
AquaCave

Polyp polynomial: How many heads do you start with when buying zoas?

  • One head is enough to get started.

    Votes: 27 10.6%
  • 2 to 4 heads.

    Votes: 145 57.1%
  • 5 heads or more.

    Votes: 65 25.6%
  • Full colony.

    Votes: 10 3.9%
  • Other.

    Votes: 7 2.8%
NicerReefs. Your Reef. But Nicer.
Back
Top