Navigation
Install the app
How to install the app on iOS
Follow along with the video below to see how to install our site as a web app on your home screen.
Note: This feature may not be available in some browsers.
More options
You are using an out of date browser. It may not display this or other websites correctly.
You should upgrade or use an alternative browser.
You should upgrade or use an alternative browser.
How to mount Hydra 32hd from the wall
- Thread starter Hamada
- Start date
- Tagged users None
So I would recommend screwing at least a 1x4 piece of wood into the studs on both sides of tour setup. From there I would suggest buying the biggest shelf bracket that you can and try to figure out a way to mount the light from there. The only other way would to make some legs for it and set it on the ends of your tank. Probably the best way.
Redirect Notice
images.app.goo.gl
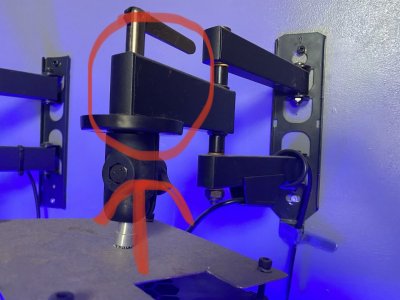
TV/ Monitor Wall Mount. Had 2 26hd on these type for years. Used corner braces from Lowes/Home Depot to mount light to bracket, then pull the TV connector off and buy a longer bolt that will pass thru the corner braces up thru the hole left from the TV connector bolt. Looking at the mounts available on Amazon you can find many options for how far off the wall it will extend. Using “butterfly” bolts to mount the bracket will work well for non-stud areas.

Pic shown with Radion XR15s and articulating mount from https://aquariumledmounts.com/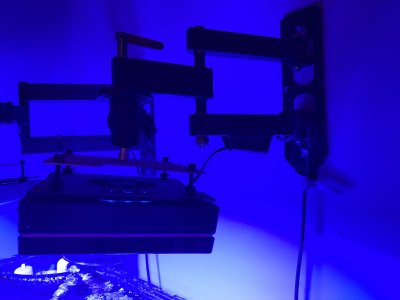
Pic shown with Radion XR15s and articulating mount from https://aquariumledmounts.com/

- Joined
- Mar 25, 2018
- Messages
- 2,457
- Reaction score
- 2,193
I used the AI hanging kits to mount mine from the ceiling, no studs needed.

- Joined
- Nov 17, 2019
- Messages
- 199
- Reaction score
- 211
TV/ Monitor Wall Mount. Had 2 26hd on these type for years. Used corner braces from Lowes/Home Depot to mount light to bracket, then pull the TV connector off and buy a longer bolt that will pass thru the corner braces up thru the hole left from the TV connector bolt. Looking at the mounts available on Amazon you can find many options for how far off the wall it will extend. Using “butterfly” bolts to mount the bracket will work well for non-stud areas.

Pic shown with Radion XR15s and articulating mount from https://aquariumledmounts.com/
- Joined
- Nov 17, 2019
- Messages
- 199
- Reaction score
- 211
When u say longer bolt to pass thru the corner brasses what are u referring too I have a mout like this one an I was going to get the other peace u suggest but when u take the tv bracket part oof it leaves the aa hole is th that were u put the longer bolt t to connect to the pivot head thing u reference too. I have hd 64
On the area where the VESA adapter was mounted is where you will pass the bolt thru from your fixture bracket to secure. If the attachment device on your fixture does not have a singular hole to use for this bolt to pass thru then DIY’ing one is fairly easy. I’ll look thru my older pics and show how a couple corner braces from any big box store’s hardware section can accomplish this easily.When u say longer bolt to pass thru the corner brasses what are u referring too I have a mout like this one an I was going to get the other peace u suggest but when u take the tv bracket part oof it leaves the aa hole is th that were u put the longer bolt t to connect to the pivot head thing u reference too. I have hd 64
@Aswswild found one pretty quickly! Note that if the included screws for the AI fixture are not long enough to pass thru the corner brace and thread into the fixture properly, you can find the specs on the screws from the manufacturer website or included documents and purchase some that a fractionally longer to make up for the bracket thickness. Being owned/ partners with Ecotech I imagine the new 32/64 fixtures probably use M5-.80 since buying and organizing one size screw is easier than ordering two sizes. I had to lengthen the attachment screws to add ventilation air space between my articulating plate mounts and fixtures, Lowes had a multitude of length options and head styles available in store.
*In the pic the silver part btwn the fixture and tv mount are the corner braces. You will also need appropriately sized nuts and bolts to secure the braces to each other. I would get additional washers to use for spacers to help aid in lining up the holes at the top crossing.
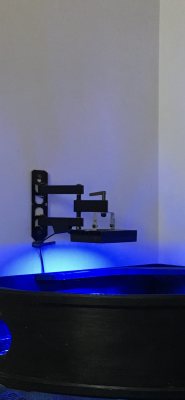
*In the pic the silver part btwn the fixture and tv mount are the corner braces. You will also need appropriately sized nuts and bolts to secure the braces to each other. I would get additional washers to use for spacers to help aid in lining up the holes at the top crossing.

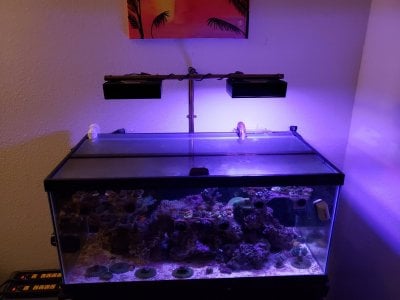
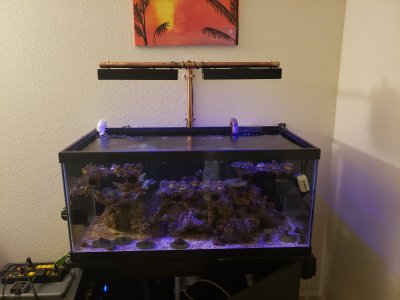
I built a simple mount with 3/8" copper and a more robust one out of 1/2" when i replaced my hydra 26s with 52s.
Screws to the wall with ez anchors and copper pipe straps. The most difficult part is drilling holes straight for the lights. And then having to cut the heads off screws to make threaded rods to be able to mount the light from the bottom. But i feel its the cleanest look of any mounts besides factory.
Ps the materials are less than $20 if you already have a basic soldering kit. You might even be able to get by epoxying the pieces together since their non pressurized.
I clear coated the whole thing so theres no chance of copper contamination.
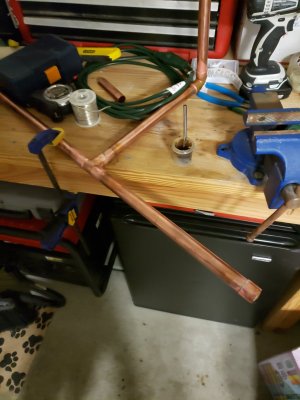


LOVE THE COPPER! Working in the HVAC industry I dont know why I didn't think of something similarI built a simple mount with 3/8" copper and a more robust one out of 1/2" when i replaced my hydra 26s with 52s.
Screws to the wall with ez anchors and copper pipe straps. The most difficult part is drilling holes straight for the lights. And then having to cut the heads off screws to make threaded rods to be able to mount the light from the bottom. But i feel its the cleanest look of any mounts besides factory.
Ps the materials are less than $20 if you already have a basic soldering kit. You might even be able to get by epoxying the pieces together since their non pressurized.
I clear coated the whole thing so theres no chance of copper contamination.
TY!LOVE THE COPPER! Working in the HVAC industry I dont know why I didn't think of something similar
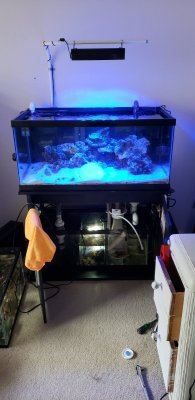
Im a building engineer by trade, my first diy mount around 7 years ago was bent EMT conduit. It worked great.
You can see it here before i refreshed this tank.
Before that i used a kessil gooseneck and hung my AI nano from it without issue.
- Joined
- Nov 17, 2019
- Messages
- 199
- Reaction score
- 211
Ok I got it now with ur pic thanks so much@Aswswild found one pretty quickly! Note that if the included screws for the AI fixture are not long enough to pass thru the corner brace and thread into the fixture properly, you can find the specs on the screws from the manufacturer website or included documents and purchase some that a fractionally longer to make up for the bracket thickness. Being owned/ partners with Ecotech I imagine the new 32/64 fixtures probably use M5-.80 since buying and organizing one size screw is easier than ordering two sizes. I had to lengthen the attachment screws to add ventilation air space between my articulating plate mounts and fixtures, Lowes had a multitude of length options and head styles available in store.
*In the pic the silver part btwn the fixture and tv mount are the corner braces. You will also need appropriately sized nuts and bolts to secure the braces to each other. I would get additional washers to use for spacers to help aid in lining up the holes at the top crossing.

- Joined
- Nov 17, 2019
- Messages
- 199
- Reaction score
- 211
Man that’s high from the water do u think it looks better from that high mine is like 5 in high off water
Man that’s high from the water do u think it looks better from that high mine is like 5 in high off water
Mine is placed based on lighting spread and PAR. I keep zoas at the top of my tank around the outside on racks and the light spread reaches them perfectly.
Honestly 5" off the water for any fixture is way too close. But if its what you specifically want....who am I. Lol.
Keep in mind its two hydra 52s on a 40 breeder tank lol. The wattage is dialed waaaaaaaaay down.
- Joined
- Nov 17, 2019
- Messages
- 199
- Reaction score
- 211
No o it’s what I kept my CBB at an just kept it like that when I did my par reading I am wondering if I will get better color if I move it higher up. An I made a homemade canopy to block the spill out lightMine is placed based on lighting spread and PAR. I keep zoas at the top of my tank around the outside on racks and the light spread reaches them perfectly.
Honestly 5" off the water for any fixture is way too close. But if its what you specifically want....who am I. Lol.
Keep in mind its two hydra 52s on a 40 breeder tank lol. The wattage is dialed waaaaaaaaay down.
Similar threads
- Replies
- 5
- Views
- 90
- Replies
- 4
- Views
- 255


