First time Sump Setup

dR3ws3r

Community Member
View Badges
Joined
Jun 26, 2023
Messages
37
Reaction score
37
Location
Virginia
Rating - 0%
0   0   0
Hi,

I have experience with freshwater, but this is my first adventure into reefing and saltwater, including my first time with a sump.

I have tried to search and watch tons of youtube videos until my eyes bleed, but I am a little uncertain about all the nuances of how to work with my sump.

So for reference I have the AquaForest AF OceanGuard 790 aquarium and sump. https://aquaforest.eu/ocean-guard/product/af-oceanguard-790/

I've finished the plumbing, and am trying to decide where to put everything. With everything being the ATO level sensors, the heaters, and the controller probes (as i'm using an APEX.)

So yesterday, I got the tank filled and turned on the return pump (Sicce SDC 7). I was watching the flow through all the sections, from inlet, through the socks, into the Skimmer section, through some "comb like" pieces, into a mini section, then into the return pump area.

So I guess there is some sort of balancing act that needs to occur here? Where I dial in a flow and tune the return valve so that I arrive at a constant level of water in the return chamber? I mean I watched the level carefully and even though the skimmer section was staying ok, the return pump section almost emptied. Is there some "trick" to balancing the flow? Should I be looking to maintain a constant level in the return pump area, and set the ATO level sensors to this level? Kind of think it might be obvious but I'm just not sure.


I can attach photos if that would help.

Thanks in advance,

Drew
 

VintageReefer

10K Club member
View Badges
Joined
Nov 16, 2023
Messages
10,181
Reaction score
16,462
Location
USA
Rating - 100%
2   0   0
The return section should be the only area of the sump where the level fluctuates. Either the pump is too strong and needs adjustment or the tank needs more water

I would start with adding more water to the display then wait a minute and watch the impact on the return water level. Repeat until return is proper water depth. Then ato sensor goes on the return water line. As water evaporates from the system the return section will be the first affected so you want the sensor here to detect changes asap
 

legionofdoon

Valuable Member
View Badges
Joined
Sep 29, 2017
Messages
1,169
Reaction score
870
Rating - 0%
0   0   0
Vintage is right. If you have an adjustable return pump, dial it back. If not you need to add more water. Your ato sensor or float needs to be in the return pump section. 20 years ago we didn't have the same resources like R2R or high speed Internet so the first time I set up my sump I had thought I needed to put a valve on the return pump (which worked BTW but required an extra step), rather than just adding more water. It was AC only so no dialing back the flow. Good luck and keep up asking questions.
 
OP
OP
D

dR3ws3r

Community Member
View Badges
Joined
Jun 26, 2023
Messages
37
Reaction score
37
Location
Virginia
Rating - 0%
0   0   0
I do have a return valve and a variable speed pump. I am "trying" to adjust the pump speed to approximate suggested flow. I was looking at the pump curve, approximating the head/height from sump to return, and trying to get about 1500 gph. I thought that I would be able to adjust the return valve until there was a match in flow in and out of the sump. The sump has "indications" on the acrylic in the skimmer section to indicate height, so I was trying to get that to be stable, but that wasn't really working for the return section as the level in the return section slowly moved up or down. Seems pretty sensitive to get the balance just right. Although I will say the return valve seems to be designed for this. It feels like it takes 100 turns to go from full open to full closed.
 

legionofdoon

Valuable Member
View Badges
Joined
Sep 29, 2017
Messages
1,169
Reaction score
870
Rating - 0%
0   0   0
Let the return section start to drop then add water until you get to the level you want, just make sure your overflow can handle the volume.
 

RocketEngineer

Well-Known Member
View Badges
Joined
Sep 3, 2019
Messages
999
Reaction score
1,091
Rating - 0%
0   0   0
Ok, basics:

Fill the display tank until water goes into the overflow and just barely flows to the sump, then stop filling the display. Now, fill the sump until it’s 1-2 inches (2-5cm) from the top of the sump. This is the maximum volume you should have in the system.

At this point, open the drain valve full open. Turn on the return pump and watch the system. It will be loud, but we can fix that shortly. Give it several minutes to settle. If you find the display is too high, throttle back the return pump. Once you are happy with that, then we can move on to drains.
 

RocketEngineer

Well-Known Member
View Badges
Joined
Sep 3, 2019
Messages
999
Reaction score
1,091
Rating - 0%
0   0   0
Looking at the documentation for the tank, you have a Herbie drain setup with one siphon and an emergency backup.

Now, with the system running, slowly adjust the gate valve until the level in the overflow box begins to rise. Ideally, you want the valve as open as possible while still keeping the water level in the overflow box below the emergency drain. This way any clog will make the water level rise but the dry emergency line won’t grow critters/gunk. Some folks run a trickle down the emergency line but to me that’s more noisy.

Once you get the system close to balanced, any changes to the gate valve will take longer and longer to show up. Go SLOWLY. Let the system run a while between adjustments to ensure you’ve got it set how you want. Smaller adjustments are better.
 
OP
OP
D

dR3ws3r

Community Member
View Badges
Joined
Jun 26, 2023
Messages
37
Reaction score
37
Location
Virginia
Rating - 0%
0   0   0
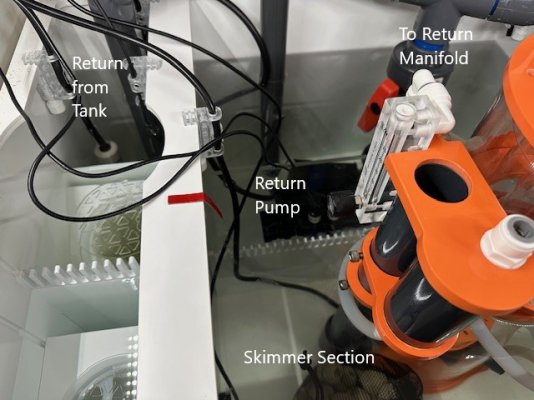
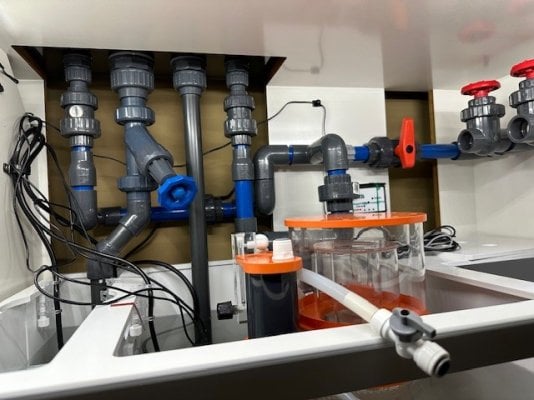
I can show more if you think it would help.
 

Attachments

  • Sump1.jpg
    Sump1.jpg
    80.6 KB · Views: 59
  • sump2.jpg
    sump2.jpg
    83.6 KB · Views: 68
OP
OP
D

dR3ws3r

Community Member
View Badges
Joined
Jun 26, 2023
Messages
37
Reaction score
37
Location
Virginia
Rating - 0%
0   0   0
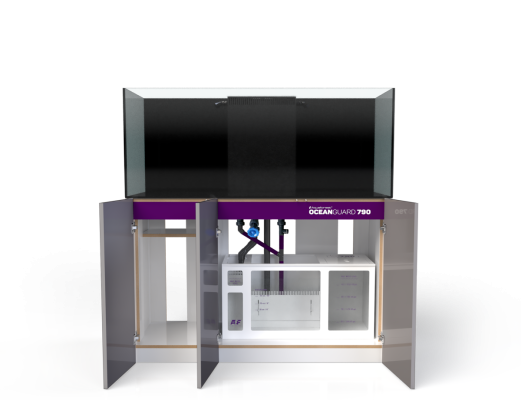
This is from the link in the original post
 

Attachments

  • OceanGuard-790-open.png
    OceanGuard-790-open.png
    583 KB · Views: 69

RocketEngineer

Well-Known Member
View Badges
Joined
Sep 3, 2019
Messages
999
Reaction score
1,091
Rating - 0%
0   0   0
Regarding sump flow, you really don't need 1500 gph even on a tank that size. That’s basically trying to drain and refill that tank every 5-6 minutes. You do want enough flow to ensure the sump and tank have basically the same parameters but 3-5x change over per hour can do that just fine for most of us.
 
OP
OP
D

dR3ws3r

Community Member
View Badges
Joined
Jun 26, 2023
Messages
37
Reaction score
37
Location
Virginia
Rating - 0%
0   0   0
Looking at the documentation for the tank, you have a Herbie drain setup with one siphon and an emergency backup.

Now, with the system running, slowly adjust the gate valve until the level in the overflow box begins to rise. Ideally, you want the valve as open as possible while still keeping the water level in the overflow box below the emergency drain. This way any clog will make the water level rise but the dry emergency line won’t grow critters/gunk. Some folks run a trickle down the emergency line but to me that’s more noisy.

Once you get the system close to balanced, any changes to the gate valve will take longer and longer to show up. Go SLOWLY. Let the system run a while between adjustments to ensure you’ve got it set how you want. Smaller adjustments are better.
Ok, I will give this a try tonight, Thanks!
 
OP
OP
D

dR3ws3r

Community Member
View Badges
Joined
Jun 26, 2023
Messages
37
Reaction score
37
Location
Virginia
Rating - 0%
0   0   0
Regarding sump flow, you really don't need 1500 gph even on a tank that size. That’s basically trying to drain and refill that tank every 5-6 minutes. You do want enough flow to ensure the sump and tank have basically the same parameters but 3-5x change over per hour can do that just fine for most of us.
is 3-5x for the display tank or sump and display tank combined?
 

RocketEngineer

Well-Known Member
View Badges
Joined
Sep 3, 2019
Messages
999
Reaction score
1,091
Rating - 0%
0   0   0
is 3-5x for the display tank or sump and display tank combined?
It’s an estimation but mostly I see it reference the display. Again, the goal is to keep the parameters consistent throughout the entire system. Sure, the equipment is going to be working to adjust parameters back into the desired range, but we want to make those changes gradually. Plus, we have multiple passes to get things where they need to be.
 

Glowurm

Active Member
View Badges
Joined
Mar 26, 2024
Messages
160
Reaction score
94
Location
Hampshire
Rating - 0%
0   0   0
Hi,

I have experience with freshwater, but this is my first adventure into reefing and saltwater, including my first time with a sump.

I have tried to search and watch tons of youtube videos until my eyes bleed, but I am a little uncertain about all the nuances of how to work with my sump.

So for reference I have the AquaForest AF OceanGuard 790 aquarium and sump. https://aquaforest.eu/ocean-guard/product/af-oceanguard-790/

I've finished the plumbing, and am trying to decide where to put everything. With everything being the ATO level sensors, the heaters, and the controller probes (as i'm using an APEX.)

So yesterday, I got the tank filled and turned on the return pump (Sicce SDC 7). I was watching the flow through all the sections, from inlet, through the socks, into the Skimmer section, through some "comb like" pieces, into a mini section, then into the return pump area.

So I guess there is some sort of balancing act that needs to occur here? Where I dial in a flow and tune the return valve so that I arrive at a constant level of water in the return chamber? I mean I watched the level carefully and even though the skimmer section was staying ok, the return pump section almost emptied. Is there some "trick" to balancing the flow? Should I be looking to maintain a constant level in the return pump area, and set the ATO level sensors to this level? Kind of think it might be obvious but I'm just not sure.


I can attach photos if that would help.

Thanks in advance,

Drew
Just gone through this process, first step for me was to determine the flow through the sump (so how many liters per hour), which means understanding the impact the plumbing is having on the pump pressure (not an exact science but mines around x4.5 total system volume).

Once the pump was tuned you need to tune in the drains (assuming you have a herbie system), so that its no engaging your emergency drain and making an awful sucking noise (i notice some engage the emergency drain, ive opted to run a cm beneath it)! To do this you need to mess around with your valves, adding reducing water to find that sweet spot, and minimum tank noise. Along with setting sump baffles heights (so for instance i want a deep refugium for algae growth in the future) and the skimmer which took me a while to bed in / determine water depth etc. I found this tricky, as the return section would run very low, and i found dialing in the drain took a while.

I've let the system run for a week (whilst i am cycling) and have manually managed water evaporation (pen mark on the sump) to determine how much i am losing (personal interest more than anything else).

Next step will be to set up the ATO (not sure which one i am going with yet though probably the Tunze).

PS - Anyone find themselves sitting and staring at the water cycling through, am i sad, or just devoid of any livestock to distract me lol
 
Last edited:
OP
OP
D

dR3ws3r

Community Member
View Badges
Joined
Jun 26, 2023
Messages
37
Reaction score
37
Location
Virginia
Rating - 0%
0   0   0
Just gone through this process, first step for me was to determine the flow through the sump (so how many liters per hour), which means understanding the impact the plumbing is having on the pump pressure (not an exact science but mines around x4.5 total system volume).

Once the pump was tuned you need to tune in the drains (assuming you have a herbie system), so that its no engaging your emergency drain and making an awful sucking noise (i notice some engage the emergency drain, ive opted to run a cm beneath it)! To do this you need to mess around with your valves, adding reducing water to find that sweet spot, and minimum tank noise. Along with setting sump baffles heights (so for instance i want a deep refugium for algae growth in the future) and the skimmer which took me a while to bed in / determine water depth etc. I found this tricky, as the return section would run very low, and i found dialing in the drain took a while.

I've let the system run for a week (whilst i am cycling) and have manually managed water evaporation (pen mark on the sump) to determine how much i am losing (personal interest more than anything else).

Next step will be to set up the ATO (not sure which one i am going with yet though probably the Tunze).

PS - Anyone find themselves sitting and staring at the water cycling through, am i sad, or just devoid of any livestock to distract me lol
Thanks for sharing that.
 

Bruttall

Well-Known Member
View Badges
Joined
Feb 19, 2023
Messages
953
Reaction score
1,612
Location
Council Bluffs
Rating - 0%
0   0   0
Sump basics, here is a picture of my 6ft 125g Sump during construction.
1. Pump Chamber, return pump, Inkbird Sensor for heat, ATO sensor.
2. Skimmer, Just the skimmer in this section.
3. Refugium, Yup, hang a grow light over that section :)
4. Inlet, Media Chamber, this is where I keep the heaters, and a small pump to feed my UV and all Bio Media, rock, seachem matrix, carbon etc.

1714485284006.png


This demonstrates the Basics of what I consider to be the most important part of my Reef System. This was in November of 2023 when I rebuilt my filtration and upgraded from an Eshopps AF300 Gen 4 sump to this custom built.

Here is a picture from today with the Fuge Light on.
20240430_085727[1].jpg
The smaller glass tank is my ATO Reservoir, I keep less than 5gal in the ATO because I only have a 5g bucket to catch the Skim-mate. Got smelly fish waste on my floor once or twice, so I adjusted!

I run a Fill Siphon Drain with an Emergency Overflow on my tank. It's old enough that my system pre-dates the Herbie Overflow tech but my tank runs dead quiet anyways, the only noise you hear is the Brine Shrimp Hatchery bubbling. about 3 times a week I add fresh hatched brine, I do not use any powder coral foods at all. I do dose a little AB+ about once a week but way less than suggested and I do a Flocculant Treatment (Coral Snow) every week for water clarity. I have NO MECHANICAL FILTRATION AT ALL. No socks, mats, floss. just don't need it and my water is crystal clear, all the time.

apr2824.jpg

Apologize for the glare, in this picture my S22 camera screen is scratched and I am in the process of looking for a Camera but you can see how clear my water is. 20240430_085727[1].jpg
 
OP
OP
D

dR3ws3r

Community Member
View Badges
Joined
Jun 26, 2023
Messages
37
Reaction score
37
Location
Virginia
Rating - 0%
0   0   0
I have made my first stab at getting the return pump running and getting my sump level between 6-8” as recommended for my skimmer. My sump has dual filter socks and hopefully you can see in the picture, the second sock is not totally submerged. I’m nowhere near the max level in that section either. I had to close my return valve a good amount to balance my pump flow and the waterfall in my sock area is a little noisy. (Not really sure what to expect in regard to noise)

So my real question is, should the second sock be submerged? I feel like it would help with the noise. I can turn the pump up and open the valve and try to find a new balance with a higher flow. Anyone have thoughts on this?

IMG_4034.jpeg
 

Reinboordt

New Member
View Badges
Joined
May 25, 2024
Messages
4
Reaction score
0
Location
Calgary
Rating - 0%
0   0   0
Are you dialling back the drain flow at all? Or full blast syphon?
If you are not fully open you could open it more to increase flow.

I am also in the process of planning my sump, currently freshwater.

It sounds like your sump set up itself is good though

Good luck
 
Back
Top