Hello everyone!
I want to share my journey through my first reef tank and hopefully pick up tons of knowledge along the way! I have named this tank "The Mistress" because I'm sure it feels that way to my wife! I have dove head first into reefing after having 4 freshwater tanks for about 2 years now. I am extremely technical and the more involved something is the harder I dive in. I have barely finished cycling this IM 20 gallon and it is already the most fun thing I have ever done in the aquarium hobby! I hope you enjoy this build as much as I am and i look forward to all of your advice and discussions!
Equipment:
Starting Point - Rock Work
I started out with 40lbs of dry marco rock, coralcrete epoxy, super glue, and insta set. I took measurements of my tank and created a replica of the dimensions using pvc pipe. After around 8 hours and a whole lot of dust, stuck fingers and crazy looks from my wife and kids, I had finished the structures I wanted! I then used liquid super glue, and all of my marco rock dust to coat as much of the epoxy as I could to hide the joints. I proceeded to soak the rock work in RO/DI 2-3 times over the next few days to ensure any leftover chemicals/dust were leeched away. At the end I had used ~30lbs of Marco Rock, 2 tubes of CoralCrete, 5 gel Gorilla Glues ( green cap ), 2 liquid tite liquid super glues, and 1 bottle of insta set. After all was said and done I was left with the structures below. In hindsight I most likely made the rock work a little to large and its probably going to make maintenance difficult but I absolutely love it!
Front:

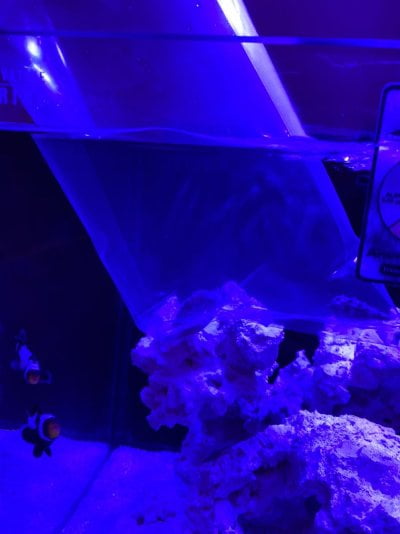
Left Side:

Right Side:

Top View:

Equipment Setup - Base
This AIO has 2 overflows with 200 micron filter socks and I placed 1/2L of Seachem Matrix to each media chamber. I installed the 2 return pumps facing their respective sides. I installed the Hygger 100w heater in the return chamber and placed the controller temp probe into the bottom of the left filter sock chamber to ensure the heater would not turn off until the water overflowing was at temp. I currently do not have a wave maker so I have angled my return jets upward to create surface agitation and hopefully help keep oxygen and pH up.
Equipment Setup - ATO
I really like to design and create things myself if possible and that is what I decided to do for my ATO. This is a first draft of this ATO so it is not pretty but it functions extremely well. After I get this tank running like a top I will revise it to look better, so be gentle on me! What you see below is a 120v control board inside the steel box that has two 24VDC outputs, with one being adjustable from 8VDC-24VDC. I have the adjustable output hot side running to two floats ran in series with one being slightly higher than the other, mounted on 2 random pieces of plastic that I melted and formed to snugly hold onto the back of the sump and drilled and threaded for the 2 random floats that i had in my parts drawer. Because these floats are wired in series, if the lower float fails the second float will stop the ATO from overflowing the tank. For the ATO reservoir I used a 4.5 gallon watertight storage container with a rotating pex pickup. For the ATO pump I used a 24VDC Diaphragm pump and also placed check valves before and after the pump to prevent back pressure and siphoning. ( Don't mind the heater display, 82 is actually 79 at the probe )


Tank Cycling
I wanted to be extremely careful about the cycle and ensure that the tank could handle the addition of 2 clownfish at the same time and probably some inverts very soon so I started the cycle with Dr. Tims and Fritz Zyme Fishless Fuel. I started the tank cycling 1.5 ppm of ammonia and continued dosing when at zero while being careful not to exceed 5ppm nitrite. I continued this balancing act until the tank could cycle 1.5ppm of ammonia all the way to nitrates in a single day ( yes that is a lot of nitrates lol ) I then performed 2 medium water changes from the surface of the water to get the nitrates below 5ppm. My wife really wanted 2 clownfish in the tank so I had our awesome LFS ( The Fish Tank, Daytona Beach ) who took care of a pair for us while we were setting up our tank. They are black snowflakes and they have an awesome blue hue on the whites of their bodies that looks amazing under light! They are attached at the hip and its hilarious to watch when they get separated and rush back to each other!

Thats all for now! For those of you who read through all of that I applaud your determination lol. Thank you for taking the time to check out my little tank and for giving me such a great environment to learn and share all of the good and bad that comes with reefing! I hope everyone has a great night!
I want to share my journey through my first reef tank and hopefully pick up tons of knowledge along the way! I have named this tank "The Mistress" because I'm sure it feels that way to my wife! I have dove head first into reefing after having 4 freshwater tanks for about 2 years now. I am extremely technical and the more involved something is the harder I dive in. I have barely finished cycling this IM 20 gallon and it is already the most fun thing I have ever done in the aquarium hobby! I hope you enjoy this build as much as I am and i look forward to all of your advice and discussions!
Equipment:
- Innovative Marine Nuvo Fusion 20
- Stock Dual Nuvo return pumps
- Hygger 100W Titanium heater rod with controller
- Completely custom ATO
- Air, Water & Ice 75GPD RO/DI
- 30lbs Dry Marco Rock
- ~15lbs Carib-Sea Arag-Alive Special Grade Reef Sand
- Red Sea Coral Pro Salt mixed at 35PPT using RO/DI
- 1L Seachem Matrix media ( 1/2L per side )
- 2 Black Snowflake Clownfish
- 5 Fingers ( Sometimes 10 )
Starting Point - Rock Work
I started out with 40lbs of dry marco rock, coralcrete epoxy, super glue, and insta set. I took measurements of my tank and created a replica of the dimensions using pvc pipe. After around 8 hours and a whole lot of dust, stuck fingers and crazy looks from my wife and kids, I had finished the structures I wanted! I then used liquid super glue, and all of my marco rock dust to coat as much of the epoxy as I could to hide the joints. I proceeded to soak the rock work in RO/DI 2-3 times over the next few days to ensure any leftover chemicals/dust were leeched away. At the end I had used ~30lbs of Marco Rock, 2 tubes of CoralCrete, 5 gel Gorilla Glues ( green cap ), 2 liquid tite liquid super glues, and 1 bottle of insta set. After all was said and done I was left with the structures below. In hindsight I most likely made the rock work a little to large and its probably going to make maintenance difficult but I absolutely love it!
Front:
Left Side:
Right Side:
Top View:
Equipment Setup - Base
This AIO has 2 overflows with 200 micron filter socks and I placed 1/2L of Seachem Matrix to each media chamber. I installed the 2 return pumps facing their respective sides. I installed the Hygger 100w heater in the return chamber and placed the controller temp probe into the bottom of the left filter sock chamber to ensure the heater would not turn off until the water overflowing was at temp. I currently do not have a wave maker so I have angled my return jets upward to create surface agitation and hopefully help keep oxygen and pH up.
Equipment Setup - ATO
I really like to design and create things myself if possible and that is what I decided to do for my ATO. This is a first draft of this ATO so it is not pretty but it functions extremely well. After I get this tank running like a top I will revise it to look better, so be gentle on me! What you see below is a 120v control board inside the steel box that has two 24VDC outputs, with one being adjustable from 8VDC-24VDC. I have the adjustable output hot side running to two floats ran in series with one being slightly higher than the other, mounted on 2 random pieces of plastic that I melted and formed to snugly hold onto the back of the sump and drilled and threaded for the 2 random floats that i had in my parts drawer. Because these floats are wired in series, if the lower float fails the second float will stop the ATO from overflowing the tank. For the ATO reservoir I used a 4.5 gallon watertight storage container with a rotating pex pickup. For the ATO pump I used a 24VDC Diaphragm pump and also placed check valves before and after the pump to prevent back pressure and siphoning. ( Don't mind the heater display, 82 is actually 79 at the probe )
Tank Cycling
I wanted to be extremely careful about the cycle and ensure that the tank could handle the addition of 2 clownfish at the same time and probably some inverts very soon so I started the cycle with Dr. Tims and Fritz Zyme Fishless Fuel. I started the tank cycling 1.5 ppm of ammonia and continued dosing when at zero while being careful not to exceed 5ppm nitrite. I continued this balancing act until the tank could cycle 1.5ppm of ammonia all the way to nitrates in a single day ( yes that is a lot of nitrates lol ) I then performed 2 medium water changes from the surface of the water to get the nitrates below 5ppm. My wife really wanted 2 clownfish in the tank so I had our awesome LFS ( The Fish Tank, Daytona Beach ) who took care of a pair for us while we were setting up our tank. They are black snowflakes and they have an awesome blue hue on the whites of their bodies that looks amazing under light! They are attached at the hip and its hilarious to watch when they get separated and rush back to each other!
Thats all for now! For those of you who read through all of that I applaud your determination lol. Thank you for taking the time to check out my little tank and for giving me such a great environment to learn and share all of the good and bad that comes with reefing! I hope everyone has a great night!

")