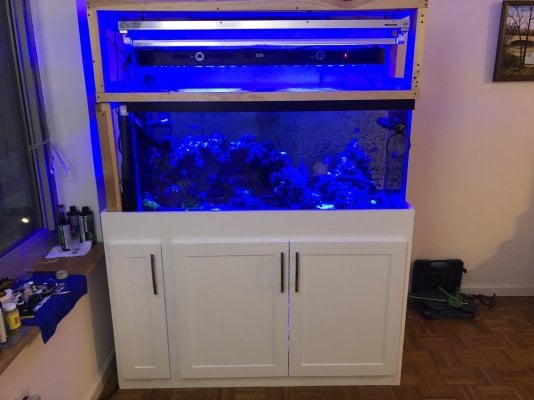
EithelSirion's 75 Gallon DIY SPS & Gorgonian Reef

EithelSirion

Active Member
View Badges
Joined
Feb 10, 2023
Messages
112
Reaction score
44
Location
Jersey City
Rating - 0%
0   0   0
I've been a long time lurker and finally decided it was time to have a thread to document my tank... over 3 years after I started it. This thread will be covering the progression of the tank over the last 3 years of trial and (many) errors.

The tank began with an idea right around the time of COVID quarantine in early 2020. I had a 40 gallon tank in my apartment in NJ and was back visiting my family in the midwest when everything shut down. I quarantined in the midwest and having 3 months without my tank to look at had me dreaming of something bigger. Moving back to NJ I had significant footprint constraints, so I chose a 4' wide tank with a small amount of additional space for plumbing. I decided to try DIY and build a stand and plumbing for a 75 gallon system. My goal was to be able to successfully keep SPS and to focus on filtration via natural methods.

IMG_9009.jpg

BC Pearly Cadaver
 
OP
OP
EithelSirion

EithelSirion

Active Member
View Badges
Joined
Feb 10, 2023
Messages
112
Reaction score
44
Location
Jersey City
Rating - 0%
0   0   0
First I decided I wanted the maximum space for a sump. Many people have small sumps relative to their tank, and this really limits the space for filtration and increases the functional bio load. A 75 gallon tank with a 20G sump has a lot less potential for biomass in the aquarium itself than one with twice as much sump space. I decided that a 40 gallon stock underneath was the best dimensions as a 55G was just too narrow front to back. The stand for the basic structure was built in the manner that King of DIY builds his stands on YouTube. I have no experience with any woodworking prior to this project.
IMG_6217.jpg


I built the supplementary shell on the left to house the plumbing. The tank was designed to be a peninsula to maximize viewing space, although you will see later that it has not been used in that manner for viewing.
 
OP
OP
EithelSirion

EithelSirion

Active Member
View Badges
Joined
Feb 10, 2023
Messages
112
Reaction score
44
Location
Jersey City
Rating - 0%
0   0   0
Next I painted the bottom of the display tank to allow for bare bottom without that glassy shine that I hate about barebottom displays. I used a white flexseal paint on the outside of the glass panes on the bottom of the aquarium. I also installed a Eshopps Prodigy low profile overflow.
IMG_6247 2.jpg
 

StripeCore

New Member
View Badges
Joined
Oct 7, 2023
Messages
22
Reaction score
23
Location
Florida
Rating - 0%
0   0   0
First I decided I wanted the maximum space for a sump. Many people have small sumps relative to their tank, and this really limits the space for filtration and increases the functional bio load. A 75 gallon tank with a 20G sump has a lot less potential for biomass in the aquarium itself than one with twice as much sump space. I decided that a 40 gallon stock underneath was the best dimensions as a 55G was just too narrow front to back. The stand for the basic structure was built in the manner that King of DIY builds his stands on YouTube. I have no experience with any woodworking prior to this project.
IMG_6217.jpg


I built the supplementary shell on the left to house the plumbing. The tank was designed to be a peninsula to maximize viewing space, although you will see later that it has not been used in that manner for viewing.
Great
 
OP
OP
EithelSirion

EithelSirion

Active Member
View Badges
Joined
Feb 10, 2023
Messages
112
Reaction score
44
Location
Jersey City
Rating - 0%
0   0   0
The canopy was designed to reduce light flow and fit the maximum height while still being able to take apart every section and transport the stand and aquariums in my small car, a Subaru Crosstrek. In retrospect, I haven't had to move the tank more than once and I would have appreciated more height on the canopy to elevate the lights further. The side cover for the plumbing is a third unit of the stand which locks in place with the other sections to help support the canopy not just on the tank rim.
61343497228__F198395D-EC39-445C-9031-003447C38AED 2.JPG

Cross braces were added to the top for support. In this image you can also see the paint drying on the bottom of the display tank.
61348820078__81EDAE26-924F-46DE-B171-37243FBD1BD0.JPG
 
OP
OP
EithelSirion

EithelSirion

Active Member
View Badges
Joined
Feb 10, 2023
Messages
112
Reaction score
44
Location
Jersey City
Rating - 0%
0   0   0
Here you can see the floor board for the sump and the side profile of the peninsula. If I were to do it again I would go for a 90 gallon and a corresponding width stock underneath and increase the width by 6". It makes a minimal difference in the footprint but would make a world of difference for use of the sump and better aquascaping options in the display.
61360495605__DE6EDB7A-437F-4489-B676-F5A6BAAC8AAE 2.JPG

61369486527__594B003B-85D0-4075-98E9-A456AB70ABCF 2.JPG

Foam was added to support the aquariums. I ended up not using the foam for the sump when I eventually set it up.
 
OP
OP
EithelSirion

EithelSirion

Active Member
View Badges
Joined
Feb 10, 2023
Messages
112
Reaction score
44
Location
Jersey City
Rating - 0%
0   0   0
Here is the plumbing set up. I attached the pipes with metal arms to the underside of the stand for support. The main pipe drains to the middle chamber of the sump with the skimmer, the Durso pipe drains to the refugium for a lower flow refugium, and the emergency drains to the return chamber, above the level of the water.
61369462291__ACD4C390-7670-4B06-9B62-59C3092916C5 2.JPG

IMG_6267 2.jpg


IMG_6276 3.jpg

The sump was designed with a majority of space for the refugium, then a section with a skimmer, then the return chamber. In the middle of those is a separate narrow 2G chamber for top off.
61358629884__249CCEEA-B1BD-4A1A-A85B-79ACA7341C6A 2.JPG

Above you can see the separation of the main section for the refugium from the other 3 sections.
 
OP
OP
EithelSirion

EithelSirion

Active Member
View Badges
Joined
Feb 10, 2023
Messages
112
Reaction score
44
Location
Jersey City
Rating - 0%
0   0   0
For water flow, I use two IceCap 4K Gyres and an MP40QD. The first gyre is located opposite to the overflow on the far end of the peninsula and with the cord running within the canopy. The second gyre is located on the bottom of the tank and directed towards the surface from the same end as the overflow. The MP40 is located on the opposite end of the tank from the overflow along the back lower corner. This flow pattern reduces dead spots everywhere except the front R corner, the corner without the MP40 on the peninsula end of the tank. This area can be easily suctioned out during a water change.
 
OP
OP
EithelSirion

EithelSirion

Active Member
View Badges
Joined
Feb 10, 2023
Messages
112
Reaction score
44
Location
Jersey City
Rating - 0%
0   0   0
For aquascape, I decided to go for a dry scape to get the best possible shape of structure and to limit any negative hitchhikers.

This was not a strategy I would go with again, as the tank took longer to mature because of this and in any future build I will build a custom skeleton of dry rock but attach ocean live rock or mature aquarium live rock to the light-facing surfaces to decrease the proliferation and colonization of undesirable photosynthetic organisms on dry rock devoid of life.

The structure was constructed with various dry rock types and was attached via drilled holes with fiberglass posts, epoxy, and a small amount of superglue in the joints between pieces.

Front view:
61661335965__52B8FBA2-5BDE-423C-957D-1CB062EA3CD2.jpg

61661338560__B20E75B8-8AC4-4A36-9CAA-C97F92E56E24.JPG

End-on:
IMG_6690.jpg

Back of the structure:
IMG_6689.jpg

In the above image you can also see the orange fiberglass rods I cut and drilled into the structure to increase the support and stability.
 
OP
OP
EithelSirion

EithelSirion

Active Member
View Badges
Joined
Feb 10, 2023
Messages
112
Reaction score
44
Location
Jersey City
Rating - 0%
0   0   0
I then added the main structure to the tank and epoxied the barnacle structures into place for fish hiding spots (particularly for a blenny).
61670526198__08BF9C10-CB1B-48E7-BC8A-51C974339BB2 2.JPG

61670527094__C3065D8C-BFE2-422E-B17E-D2E7DA7EB380 2.JPG

61670520981__8D4DFA54-089E-4448-9BEC-6A98438CFA1B.JPG

61670529032__05704485-1063-4235-8771-F1A24D980FCC.JPG

61670555819__1BEB3B49-4667-496E-AD05-BE32ADB1B134 2.JPG

You can see here that the tank, while designed to be possibly used as a peninsula, is being utilized against the wall with two visible sides. While not ideal, it is the way the aquarium best fit into our new apartment.
 
OP
OP
EithelSirion

EithelSirion

Active Member
View Badges
Joined
Feb 10, 2023
Messages
112
Reaction score
44
Location
Jersey City
Rating - 0%
0   0   0
I then added the fish, rocks, and sand from my existing 40G aquarium to the system (after testing for water-readiness of course). All the rocks and sand from the old aquarium went into the refugium. This maybe was not the best move as it did not allow for much biodiversity in the display and while the water is all mixing, I believe that having the display be totally fresh dry rocks was not an advisable move for tank maturity.
IMG_6790.jpg

You can see above the ATO reservoir in the front in between the refugium and the return chambers.
 
OP
OP
EithelSirion

EithelSirion

Active Member
View Badges
Joined
Feb 10, 2023
Messages
112
Reaction score
44
Location
Jersey City
Rating - 0%
0   0   0
For lighting, I went with a hybrid T5/LED combination. To try to save money, I went with an SB Reef 48" Black Box LED and single 48" T5 Retrofitting with a C+ T5 bulb. I later added two more 48" T5 retrofitting to the section of the canopy behind the LED system.

The SB Reef light broke initially and I was able to talk to a rep on the phone and repair it myself. The LED ran for two and a half years before failing in a more permanent fashion. I have since replaced both the 2 T5 and the LED with a ReefBreeders Photon V2 48" which I believe that I should've done originally. This light has much more pleasant spectrum and more controllability than simple A and B channels off/on on a timer and was actually comparable in cost to the SB Reef LED system plus the dual T5 fixture plus 30 months of T5 bulb usage. I still utilize the front single T5 bulb retrofit with the ReefBreeders LED fixture.
IMG_6917.jpg

The refugium is lit by a Maxspect R420R fixture which I replaced all the electrical components, LEDs and lenses in late 2019.
IMG_6920.jpg

I also moved over 7 anthias, a banggai cardinalfish, bicolor blenny, orchid dottyback, two percula clownfish, and gorgonians from my previous system into the display. I added a yellow tang within a month for algae control.
 
OP
OP
EithelSirion

EithelSirion

Active Member
View Badges
Joined
Feb 10, 2023
Messages
112
Reaction score
44
Location
Jersey City
Rating - 0%
0   0   0
Next I designed the cover for the stand and had a local shop mill and plane the panels and paint them with waterproof paint.
I assembled the cabinetry and then attached it to the stand frame. The panels come apart the same way the stand does in 3 sections so they can be permanently affixed to the frames. The top of the canopy had wall vent covers attached to prevent light spill but still allow for air exchange with the canopy.
IMG_7999.jpg

IMG_8001.jpg
 
OP
OP
EithelSirion

EithelSirion

Active Member
View Badges
Joined
Feb 10, 2023
Messages
112
Reaction score
44
Location
Jersey City
Rating - 0%
0   0   0
62985743974__A33D0DA6-636B-40A4-B6FD-B79F8DDD85FF.jpg

The small door for plumbing access has to fit within the opening of the frame.


IMG_8008.jpg

62985739881__A59520A0-52A4-4C88-BCE6-4F23C2CA6F52.jpg

The large doors fit inside the frame on the left side but the right side had to be placed within the outer 2x4 in order to have symmetrical doors as seen in the design. I used a chisel and hammer to remove the section of wood necessary to attach the hinges within the frame. Since the stand is designed to hold 3x the functional weight, the small removal of wood I did not deem a concern for the structural integrity of the overall stand. The inside of the 2x4 and the top of the stand were also coated with FlexSeal white paint to ensure there was never any water damage within the confines of the stand.
62985741838__97C71B6E-6F89-4F63-8A2C-ED200BA66ED8.jpg
 
OP
OP
EithelSirion

EithelSirion

Active Member
View Badges
Joined
Feb 10, 2023
Messages
112
Reaction score
44
Location
Jersey City
Rating - 0%
0   0   0
The lower portion attached. I utilized silicone sealing on the panel to the frame for initial adherent and then used brads and finishing nails to provide additional stability.

62985736154__790FDD9A-ED6D-42A6-912E-23E3FC3B904B.jpg
 
Back
Top